All of a sudden, I can not get an even, clean burn.
I was sent a fixed focus 20 watt module to replace mine which was losing power. I changed it out a few weeks ago. It was simple, just unplugging the old one, putting the new one on. But nothing worked right at the begining.
My friend and I cleaned the machine top to bottom, balanced all belts, screws etc. It worked ok for a couple of weeks, but now I can’t get it to burn anything consistent.
First picture shows what it was doing last night, which would imply loose belts. So today, we took the whole thing apart again, balanced and cleaned everything, and the results are awful.
I also:
Put my old diode head back on in case the new one was faulty.
Rolled back to an earlier lightburn in case the last update messed things up
Removed lightburn and reinstalled it.
Refocused the laser manually.
All of my belts seem to move smoothly when I hold the machine at 45 degree angles to test everything.
It doesn’t seem to be a hardware issue, because everything appears to be working well?
Rolling back lightburn didn’t change how the laser was firing, so the software seems to be ok?
Changing my diode also didn’t help, so it can’t be the laser module itself.
What am I missing? I have christmas orders to finish up, and I’ve been working on this since 8 am It’s 10 hours later now…I need some help…
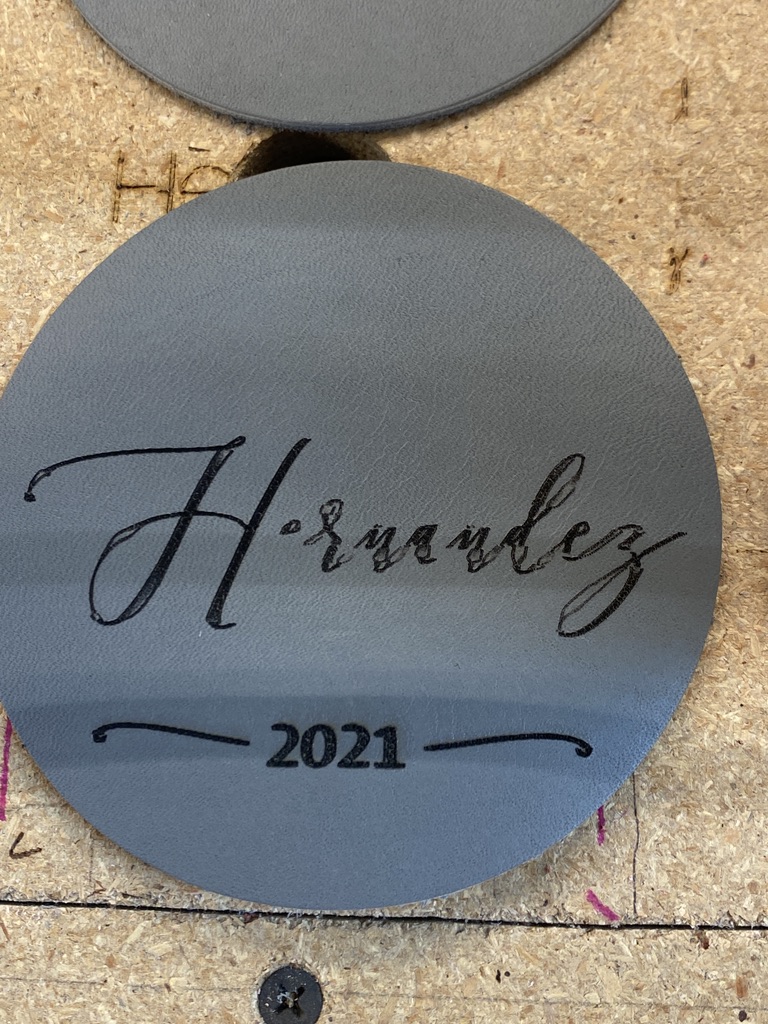
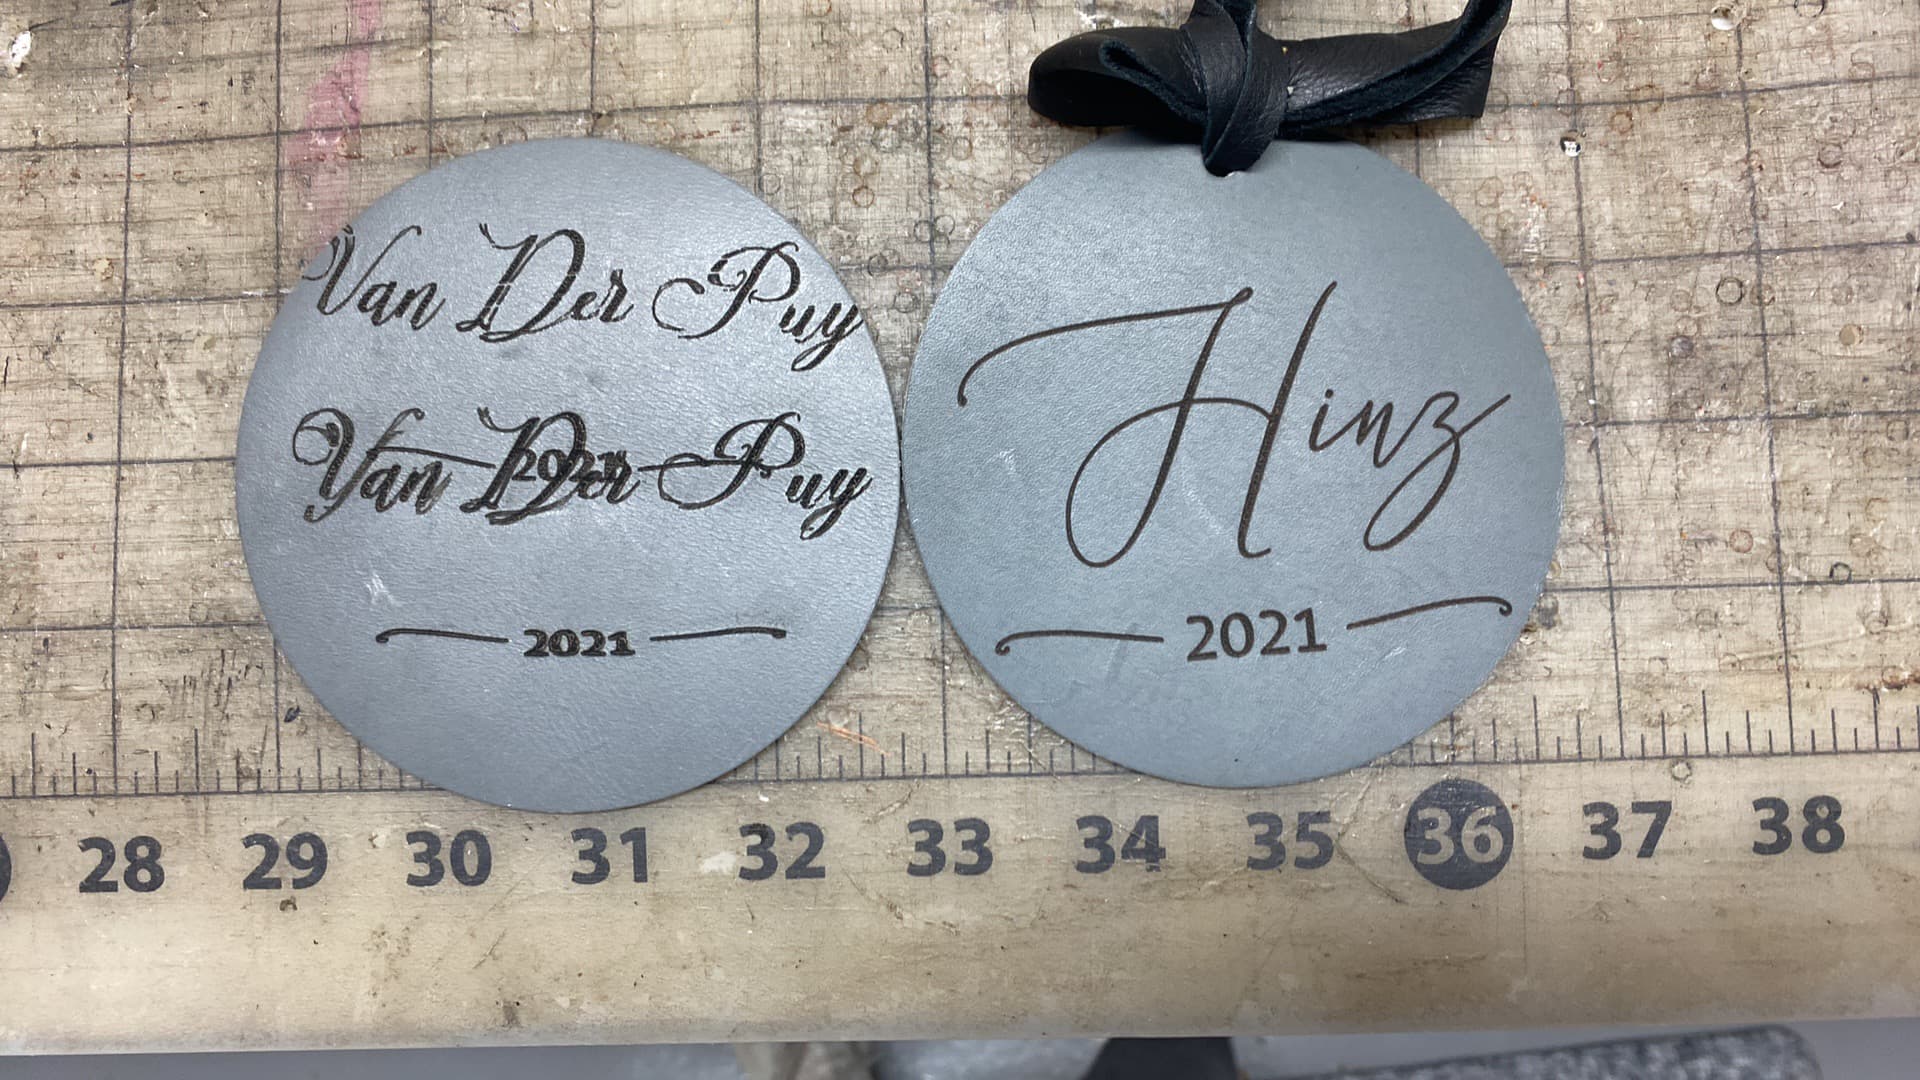
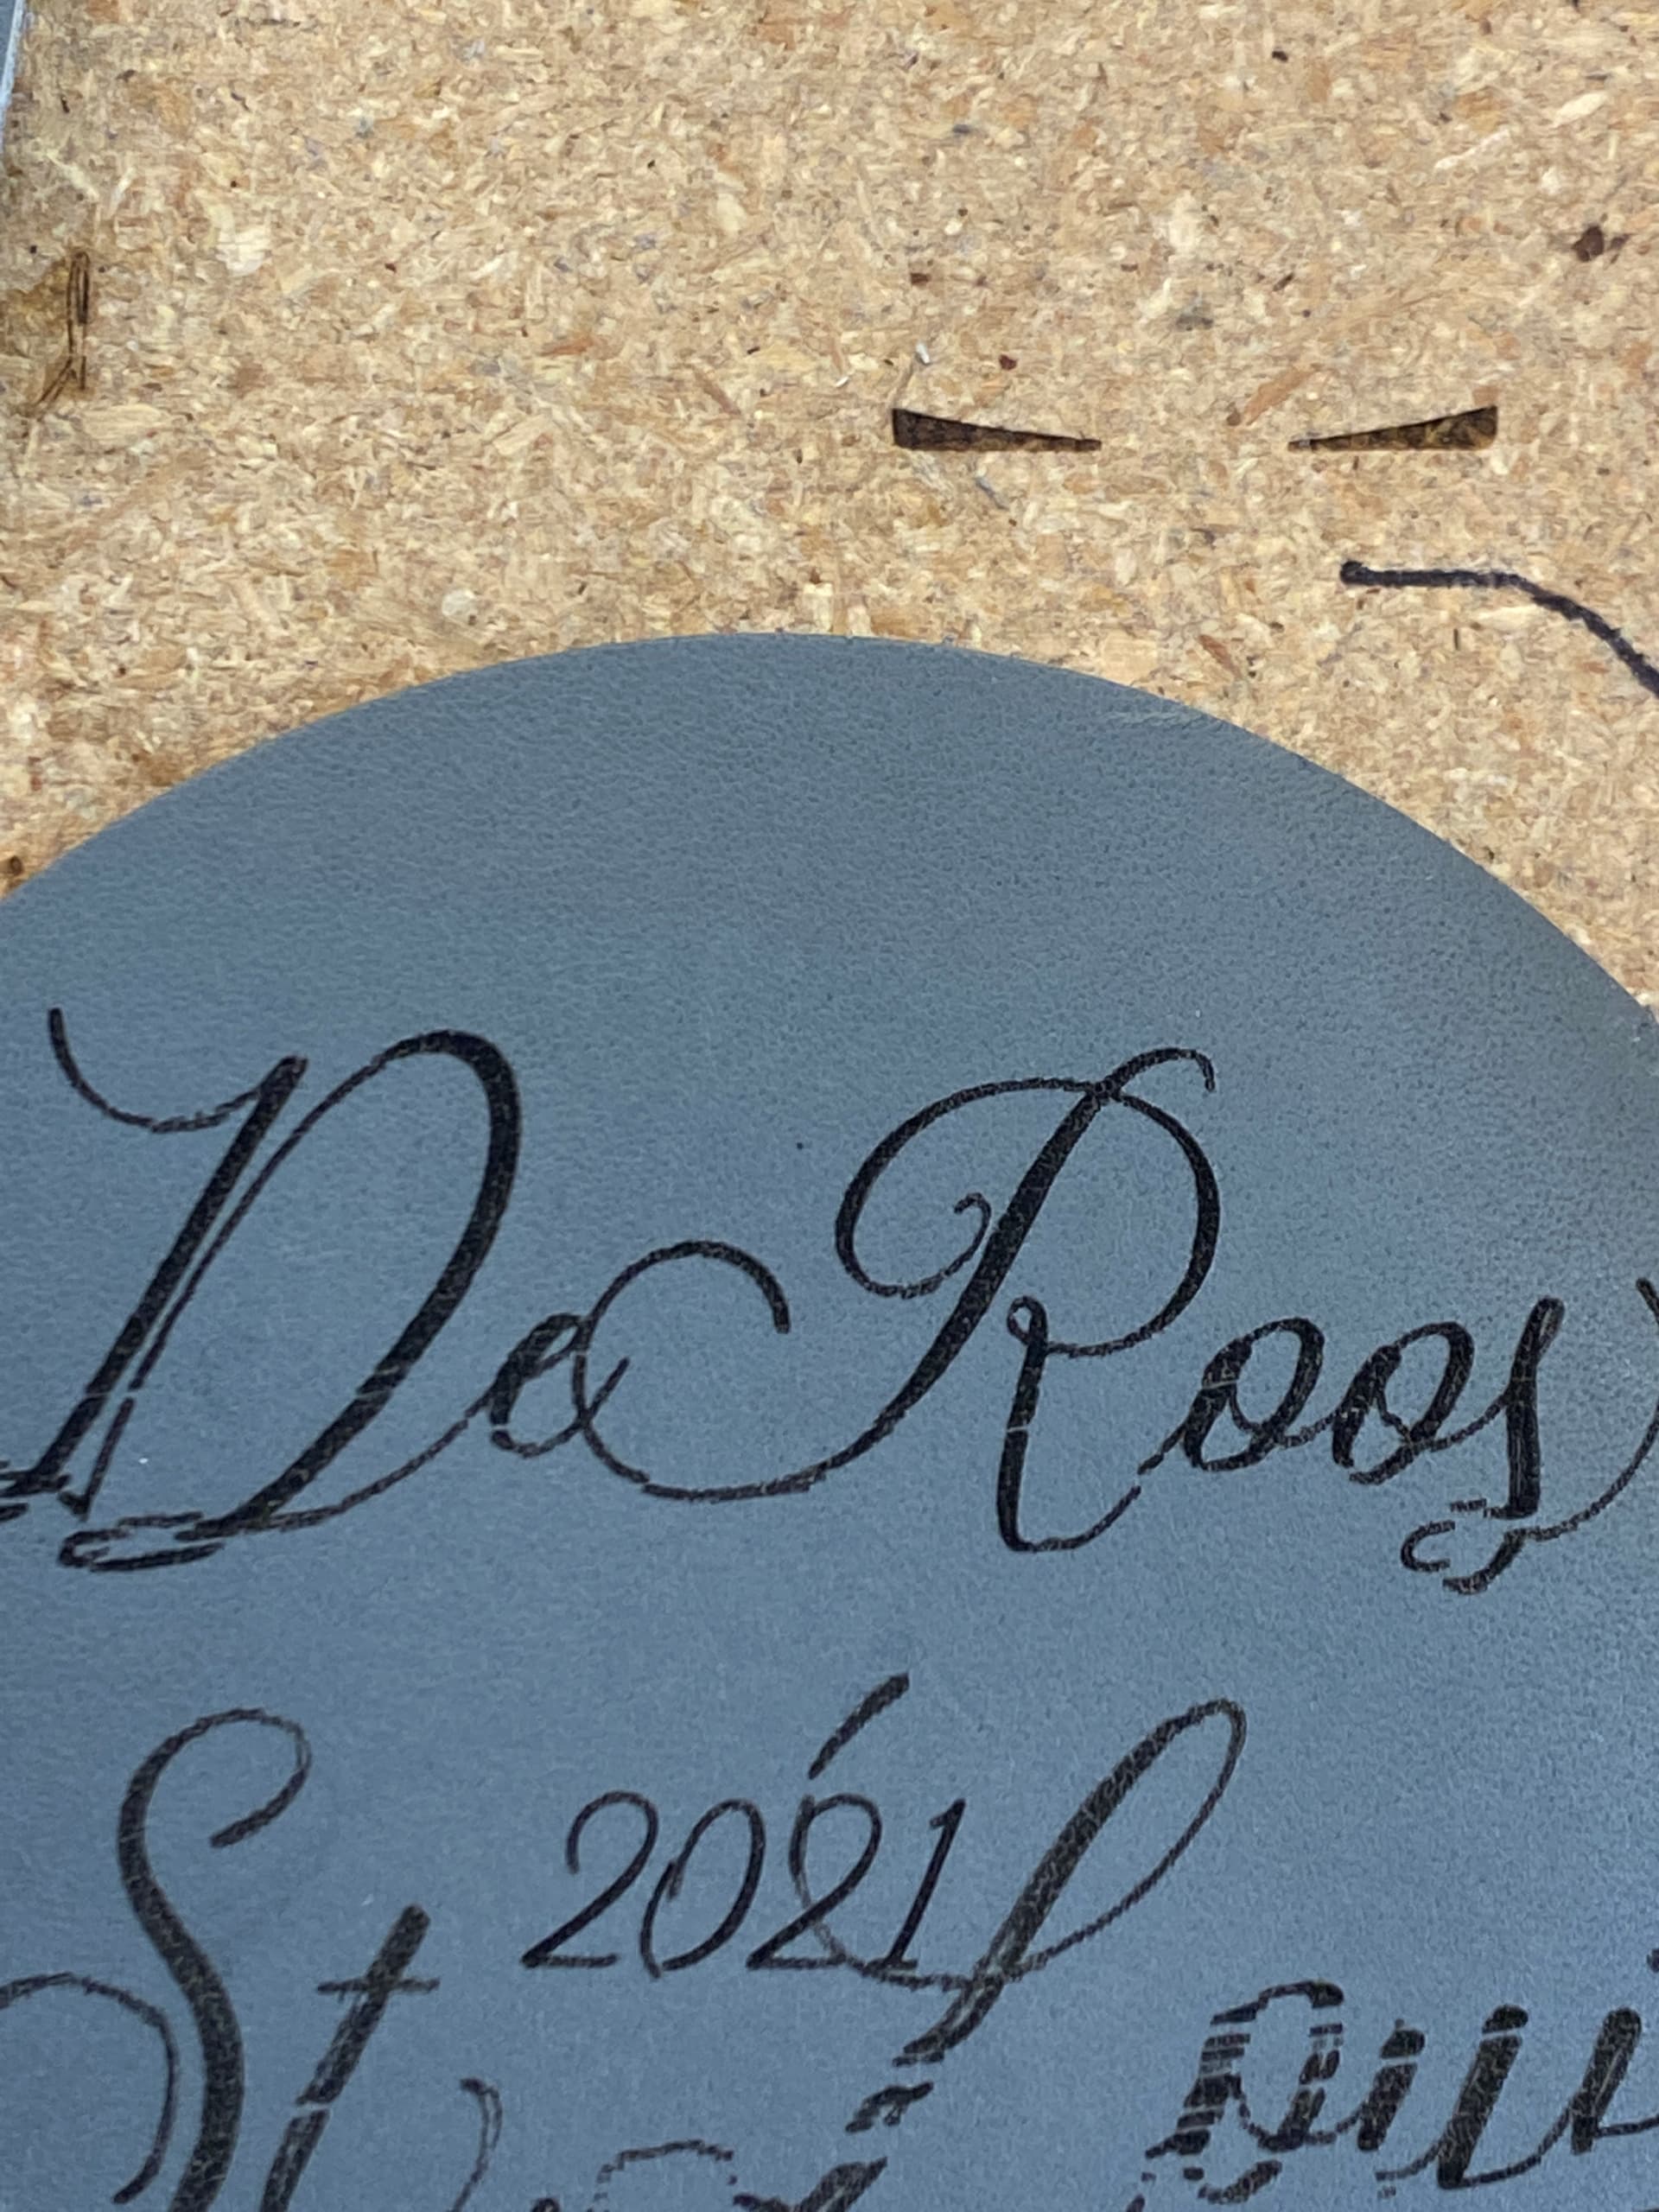
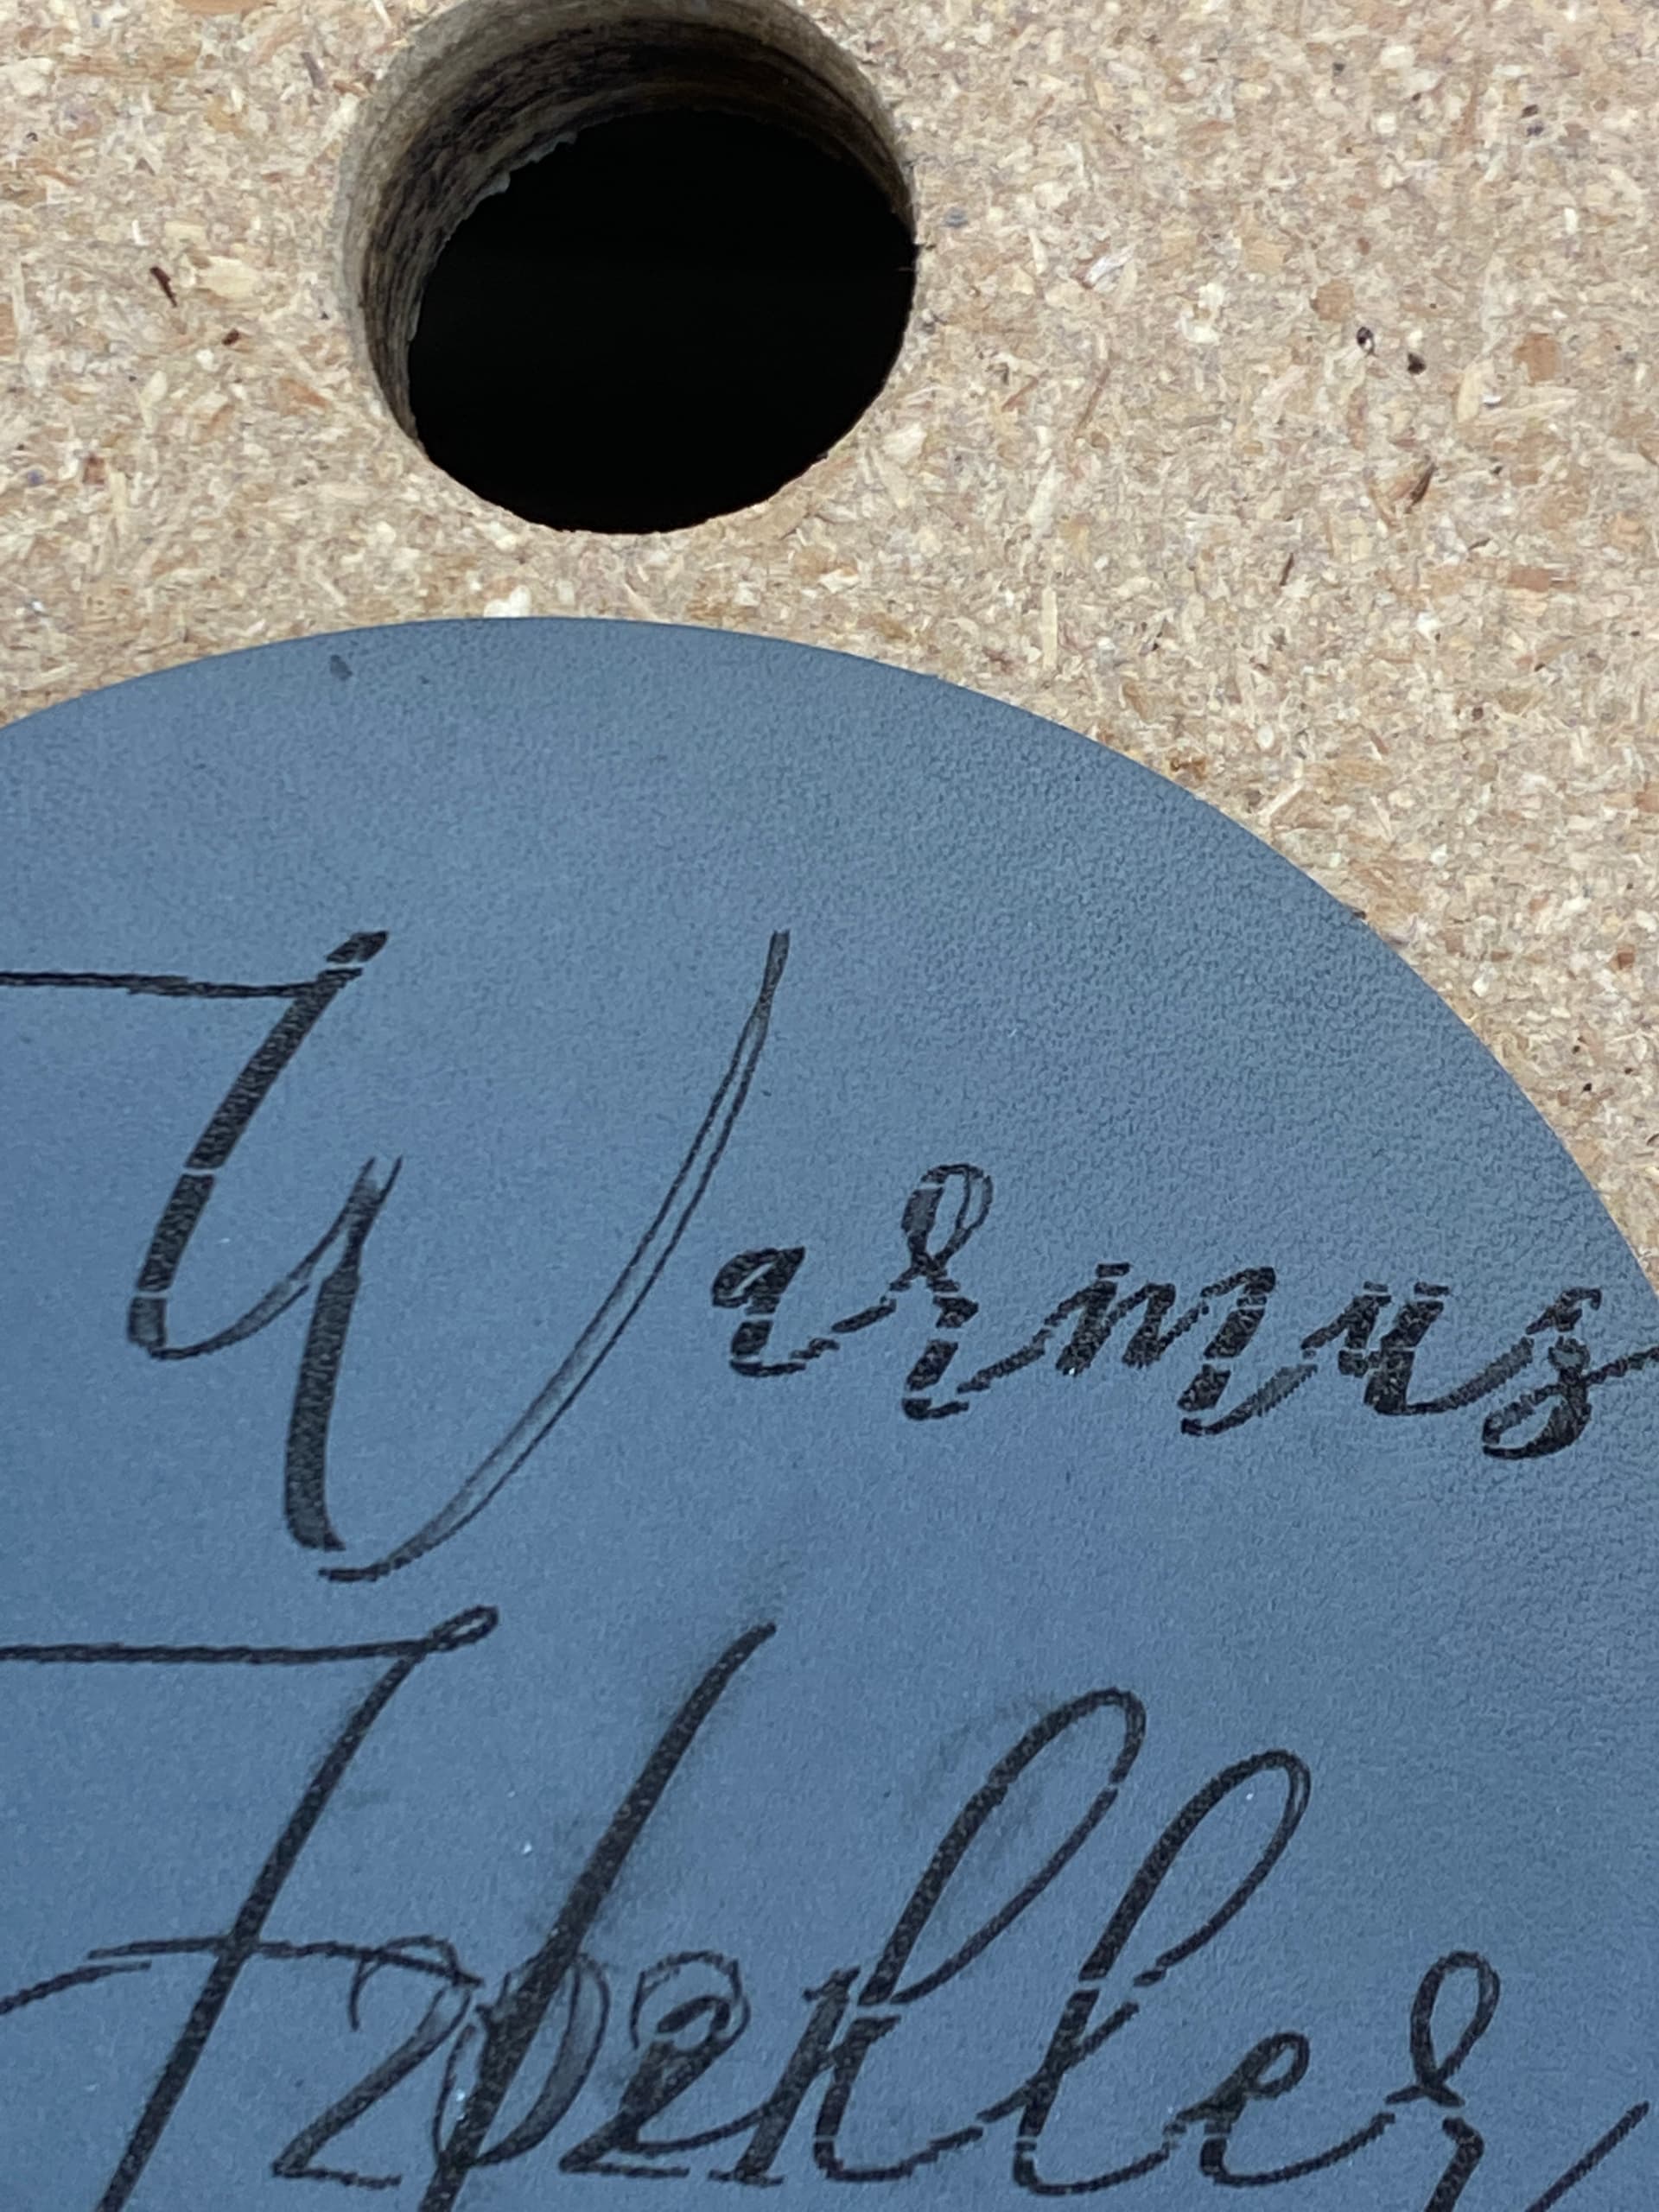
This last picture shows one I’ve been testing on today on the left, one I did before this all happened on the right. So I know it’s not my material or settings or files.
The last picture, are the left and right the same design with the same font? I’m looking particularly at 2021. Are you dealing with things get scrunched or is it just the misalignment and skipping that you’re dealing with?
Can you attach the .lbrn file here? Will offer a reference.
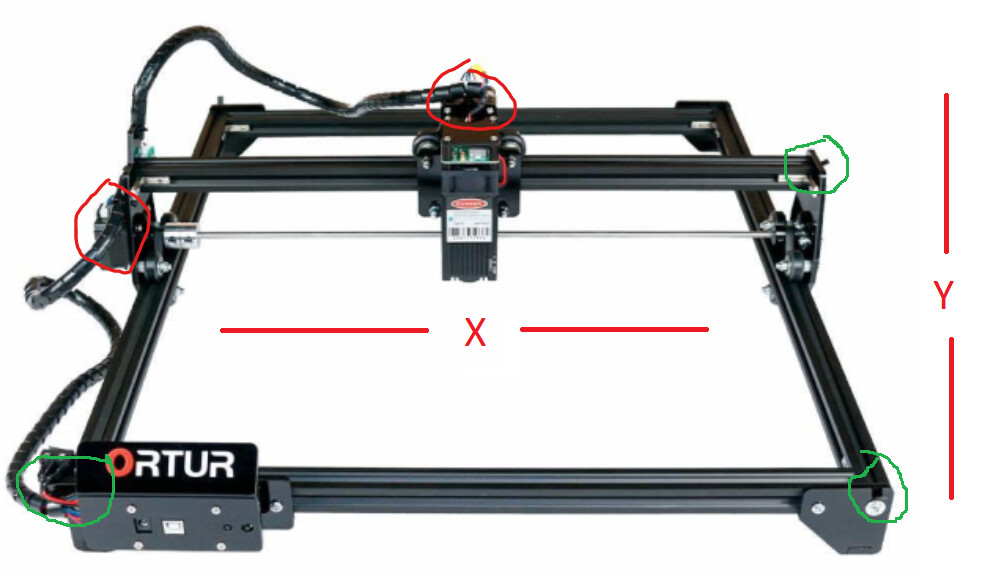
At first glance this looks like something mechanical to me. The skipped horizontal lines is most likely a belt tension issue on your Y-axis.
I know you’ve been at this all day but I suggest you recheck:
belt tension - make sure you have no slack in the belt. They should be taught without really stretching.
check if the laser head has excessive movement front to back. As in can you rock the head of the laser forward and back perpendicular to the wheels? If so, there are eccentric bolts near the wheels you can use to reduce the gap between the wheels and the rails.
Check for slip of the pinions on the stepper motors. If you can feel them moving on the stepper shaft, tighten the grub screws holding it in place.
Check these things and send the .lbrn file and report back.
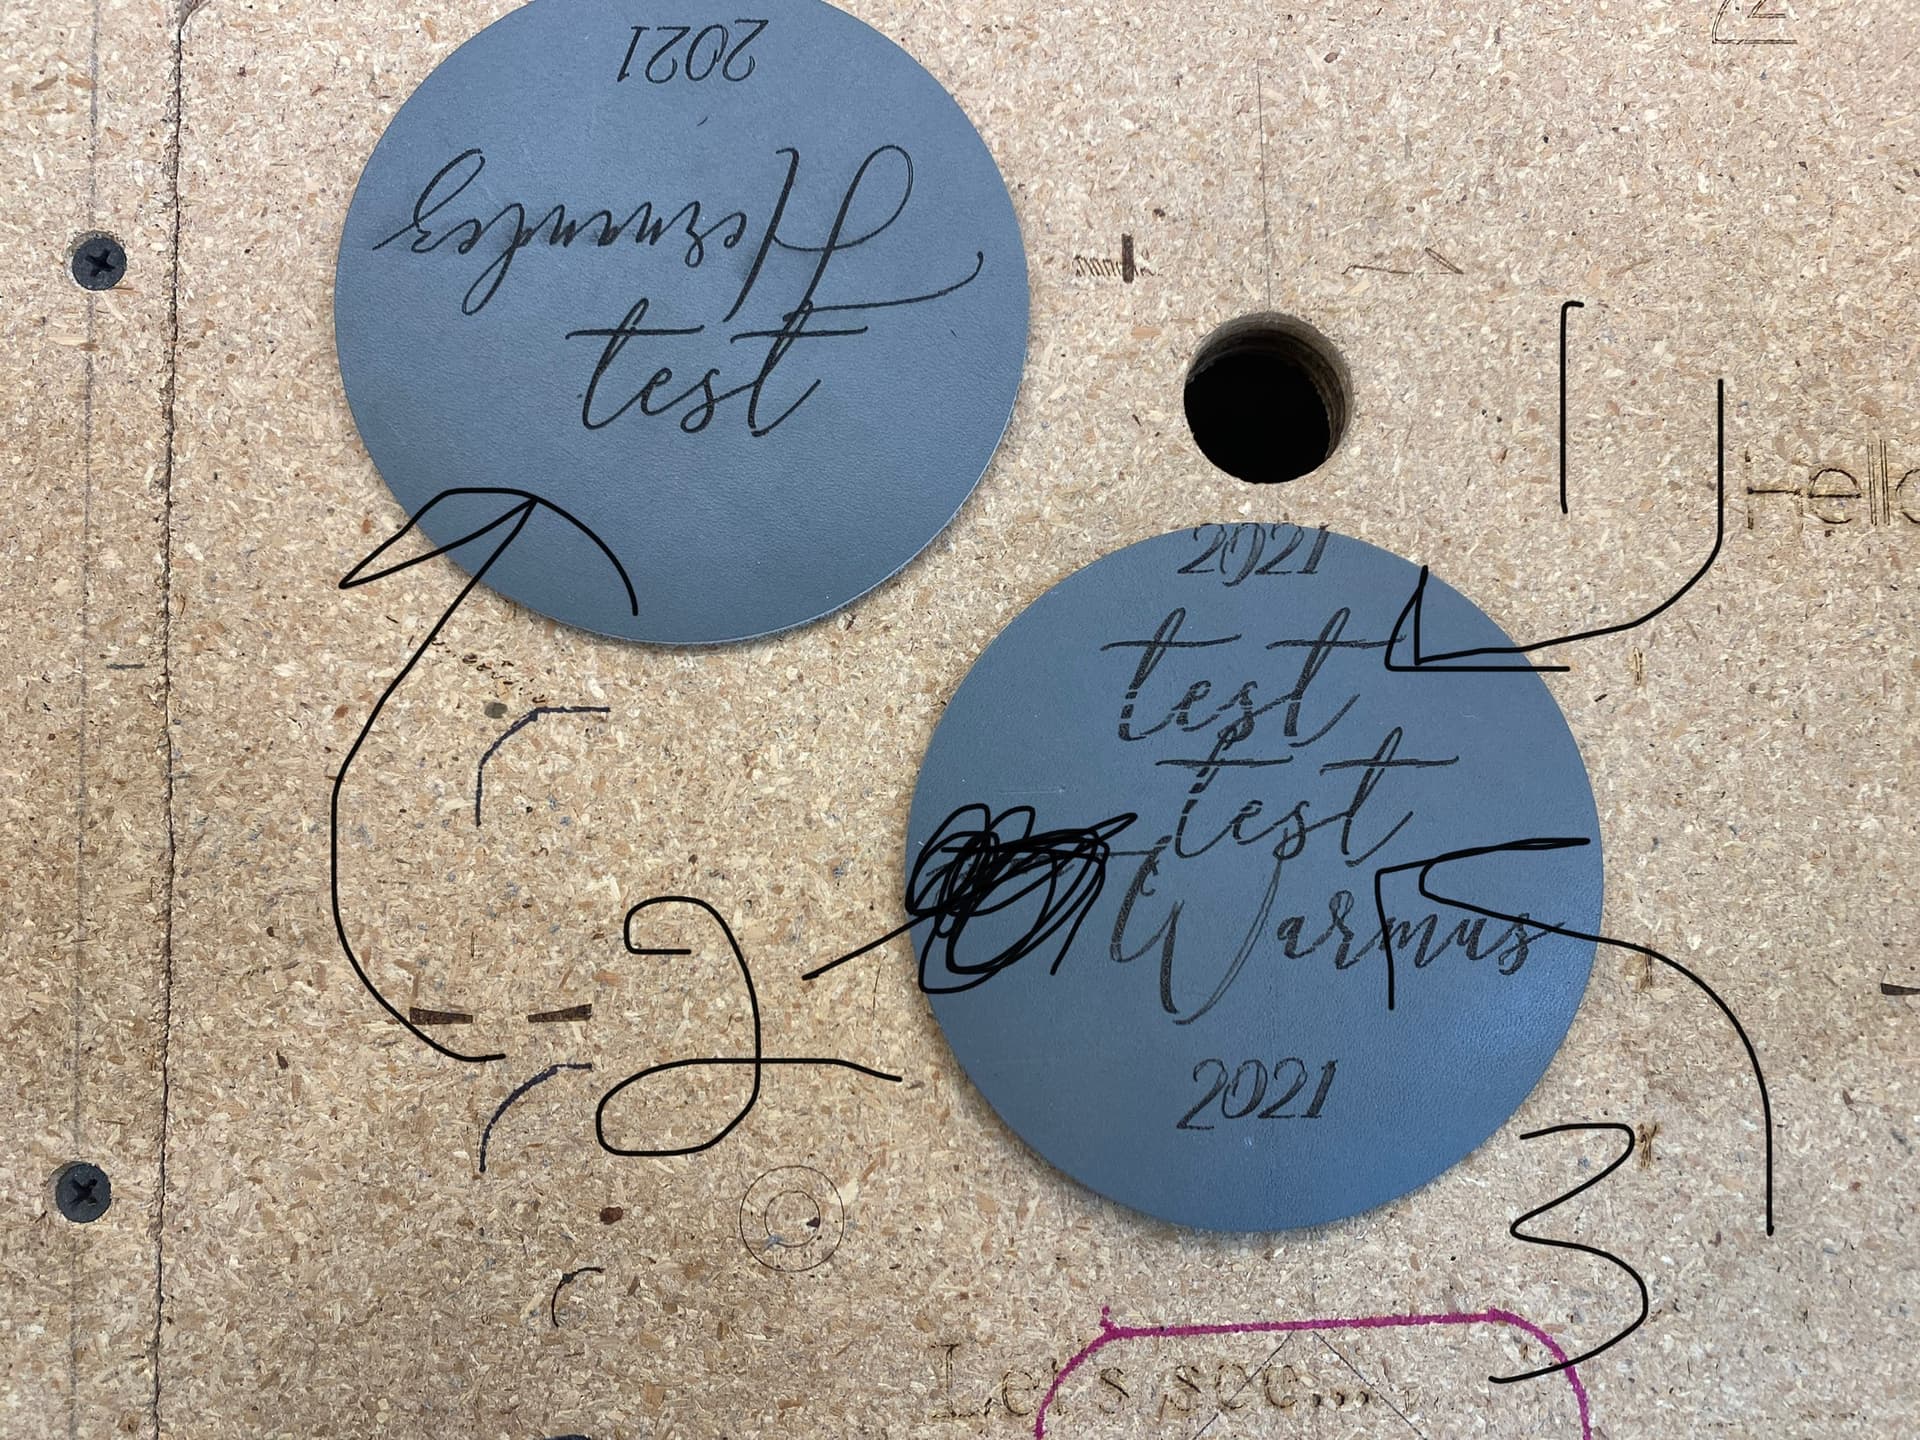
I just rebalanced my right to left axis (is that the x or y?) The one with the module on it. I ran three images from the file I’ll attach here. The first was perfect (hernandez) the second was a little sloppier (DeRoos) the third looks awful (warmus)
Since I burned those three tests, I retightened the belts on the side of the machine on both sides. I’m going to burn another test now.
Also, can you dumb down a term for me Pinions…what are pinions and where are the stepper motors? It’s been a super long day,lol!
Green circles indicate all the belt tension points you should adjust. Once you do, make sure the laser can move freely and without binding along the whole bed. Don’t move the head too quickly as you can actually feed electricity back into the controller from the steppers acting as a generator.
Red circles are the location of the stepper motors. They are the motors that drive the motion of the laser head. The one behind the laser module moves the laser along the X-axis. The one on the left moves the head along the Y-axis.
Directly mounted to the working end of the stepper motor you will find the pinion (looks like a sewing machine bobbin but with geared teeth instead of thread). Check both of these.
Also, where in the bed are you placing the work material for your tests? Are they well secured?
Just had a chance to review your .lbrn file. Had you always been engraving at 2050 mm/min?
Also, the shapes are set to fill individually. Has that always been the case?
The reason why I ask is that with these letter shapes you’re likely to get a lot of very rapid back and forth movement, especially at these speeds. This will exasperate any sort of mechanical issue that you have with the machine. Technically things should work at these values but the mechanics need to be well sorted.
I actually usually do it at about 1800 speed, so I’ll adjust that. I think as I was testing earlier today I turned it up to see if that helped as things seemed to be burning out of focus, so I thought speeding it up would help with that.
As for placements, I don’t have them in the same places. I’ve been moving them around the bed.
The drawing helps a lot. Let me check those things. I did just tighten the two green x axis belts on the last test. I had done the y axis belt when I loosened the eccentric nuts (I noticed those were very tight earlier this evening.)
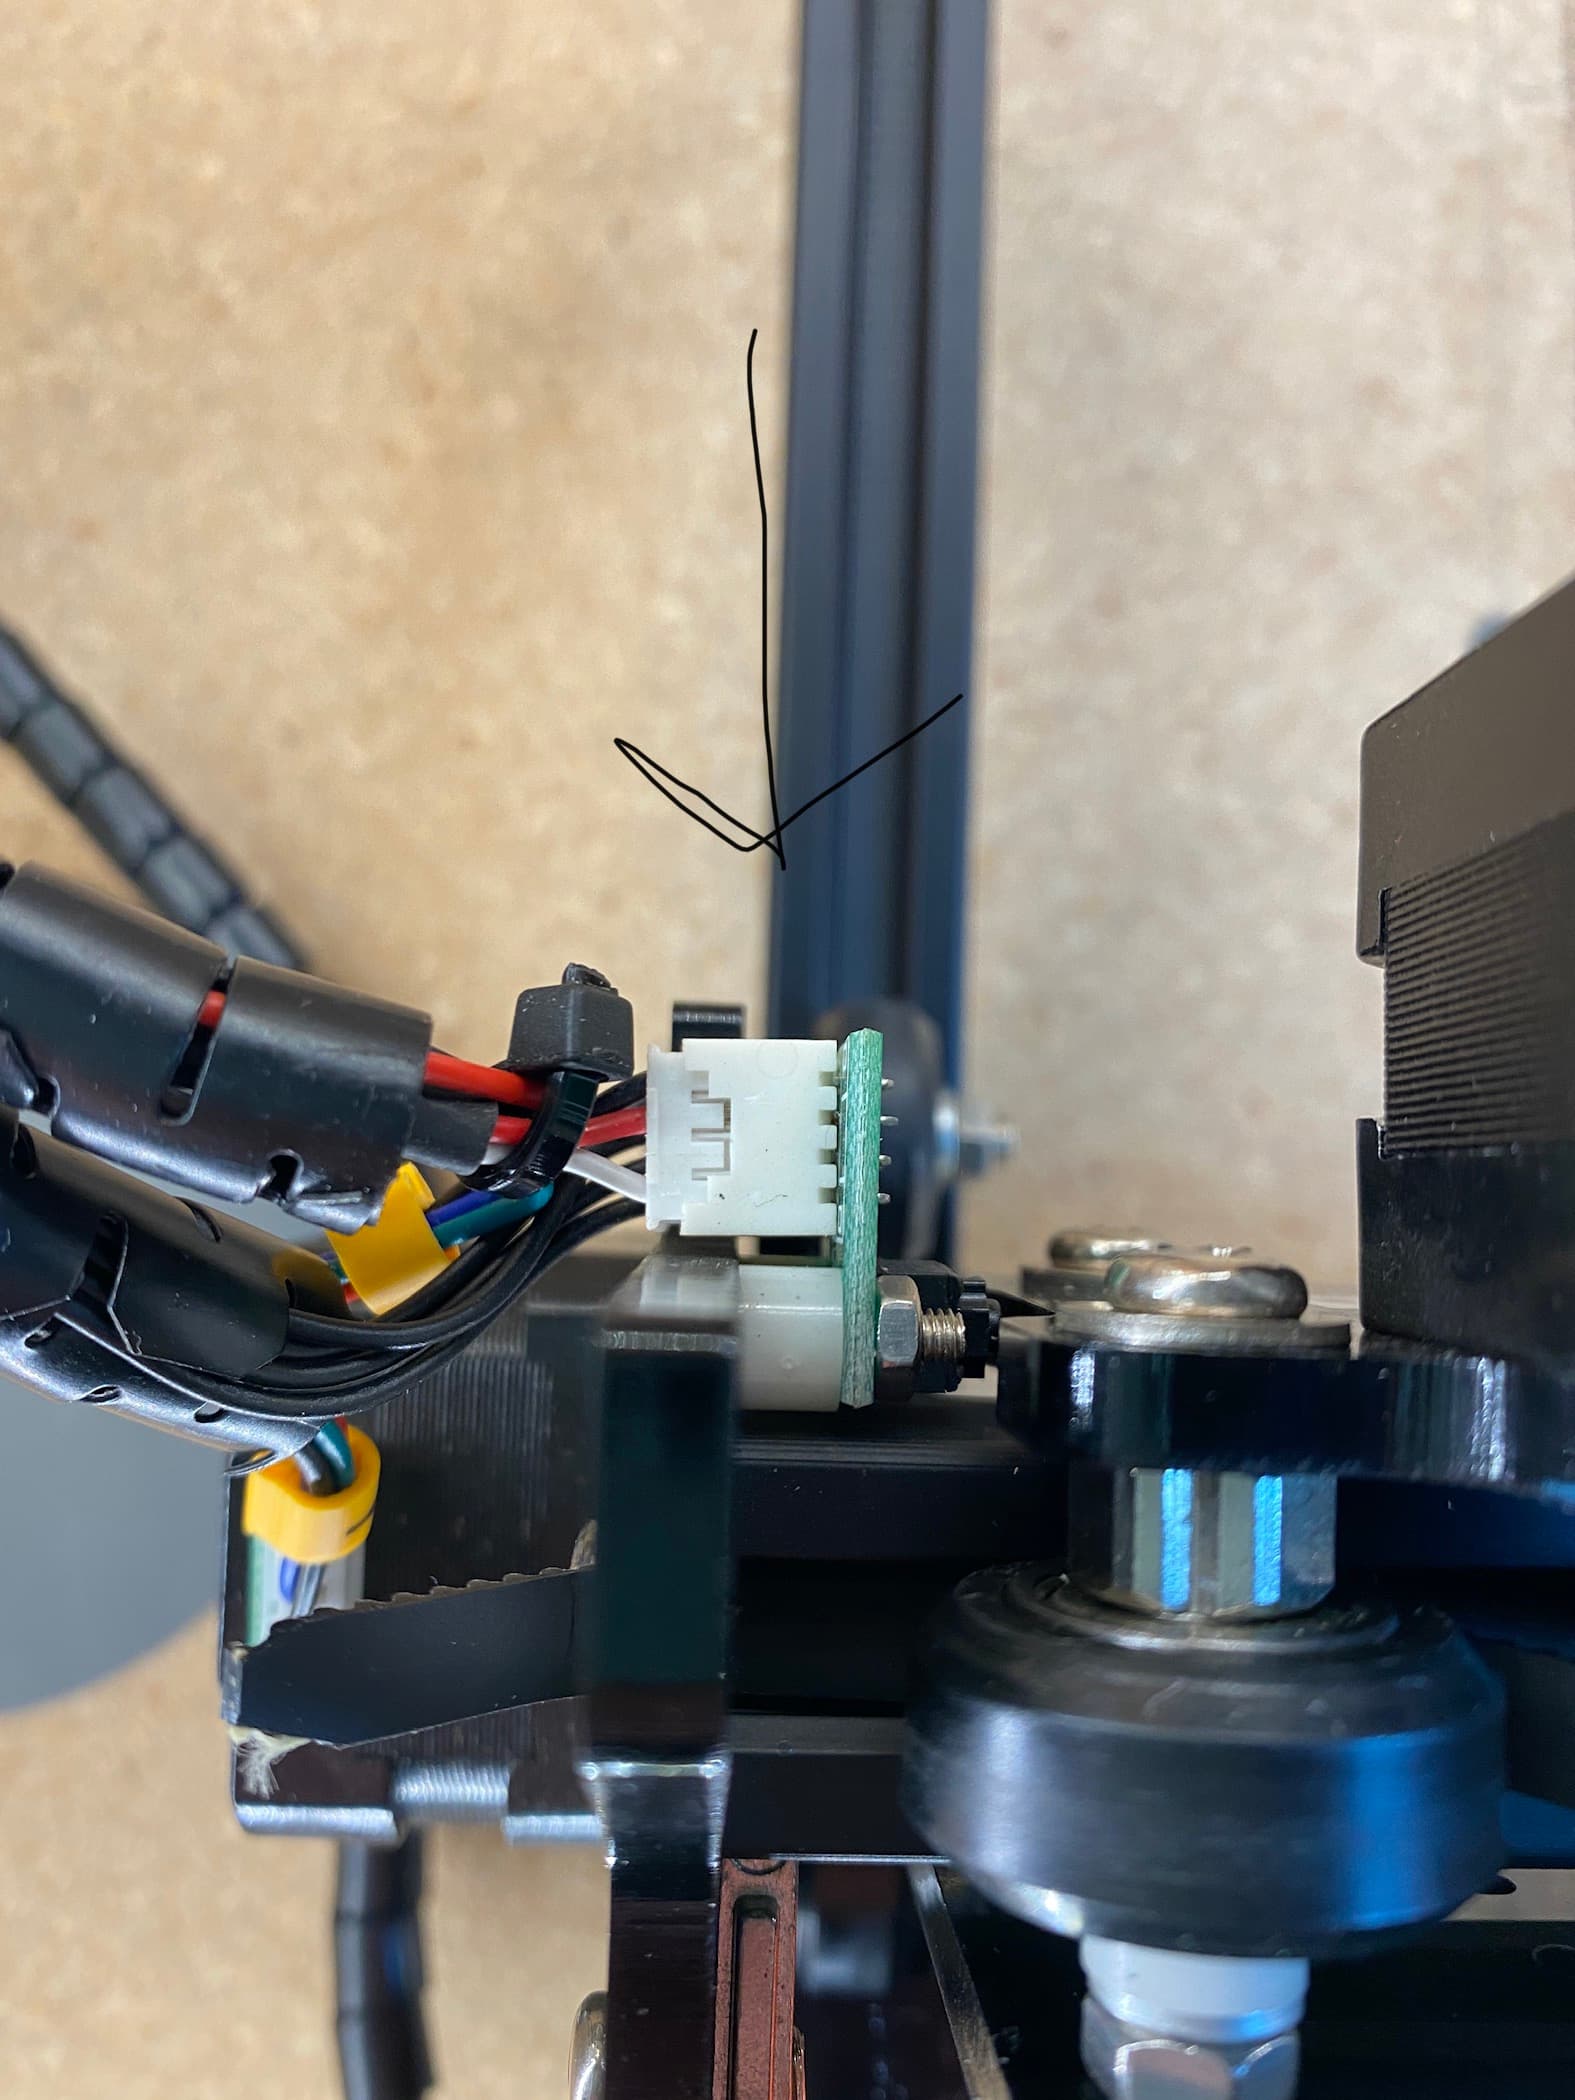
THis might be a long shot…but as I checked the stepper motors, this little plug wasn’t super tight. Is it possible that would cause inconsistencies!!! Could it be that simple? I’m not getting my hopes up, but I’m running a test now
Is that the plug for the Y-axis stepper? If it wasn’t firmly seated this could definitely cause missed steps which would end up looking like horizontal gaps, vertical shrinkage, or general misalignment.
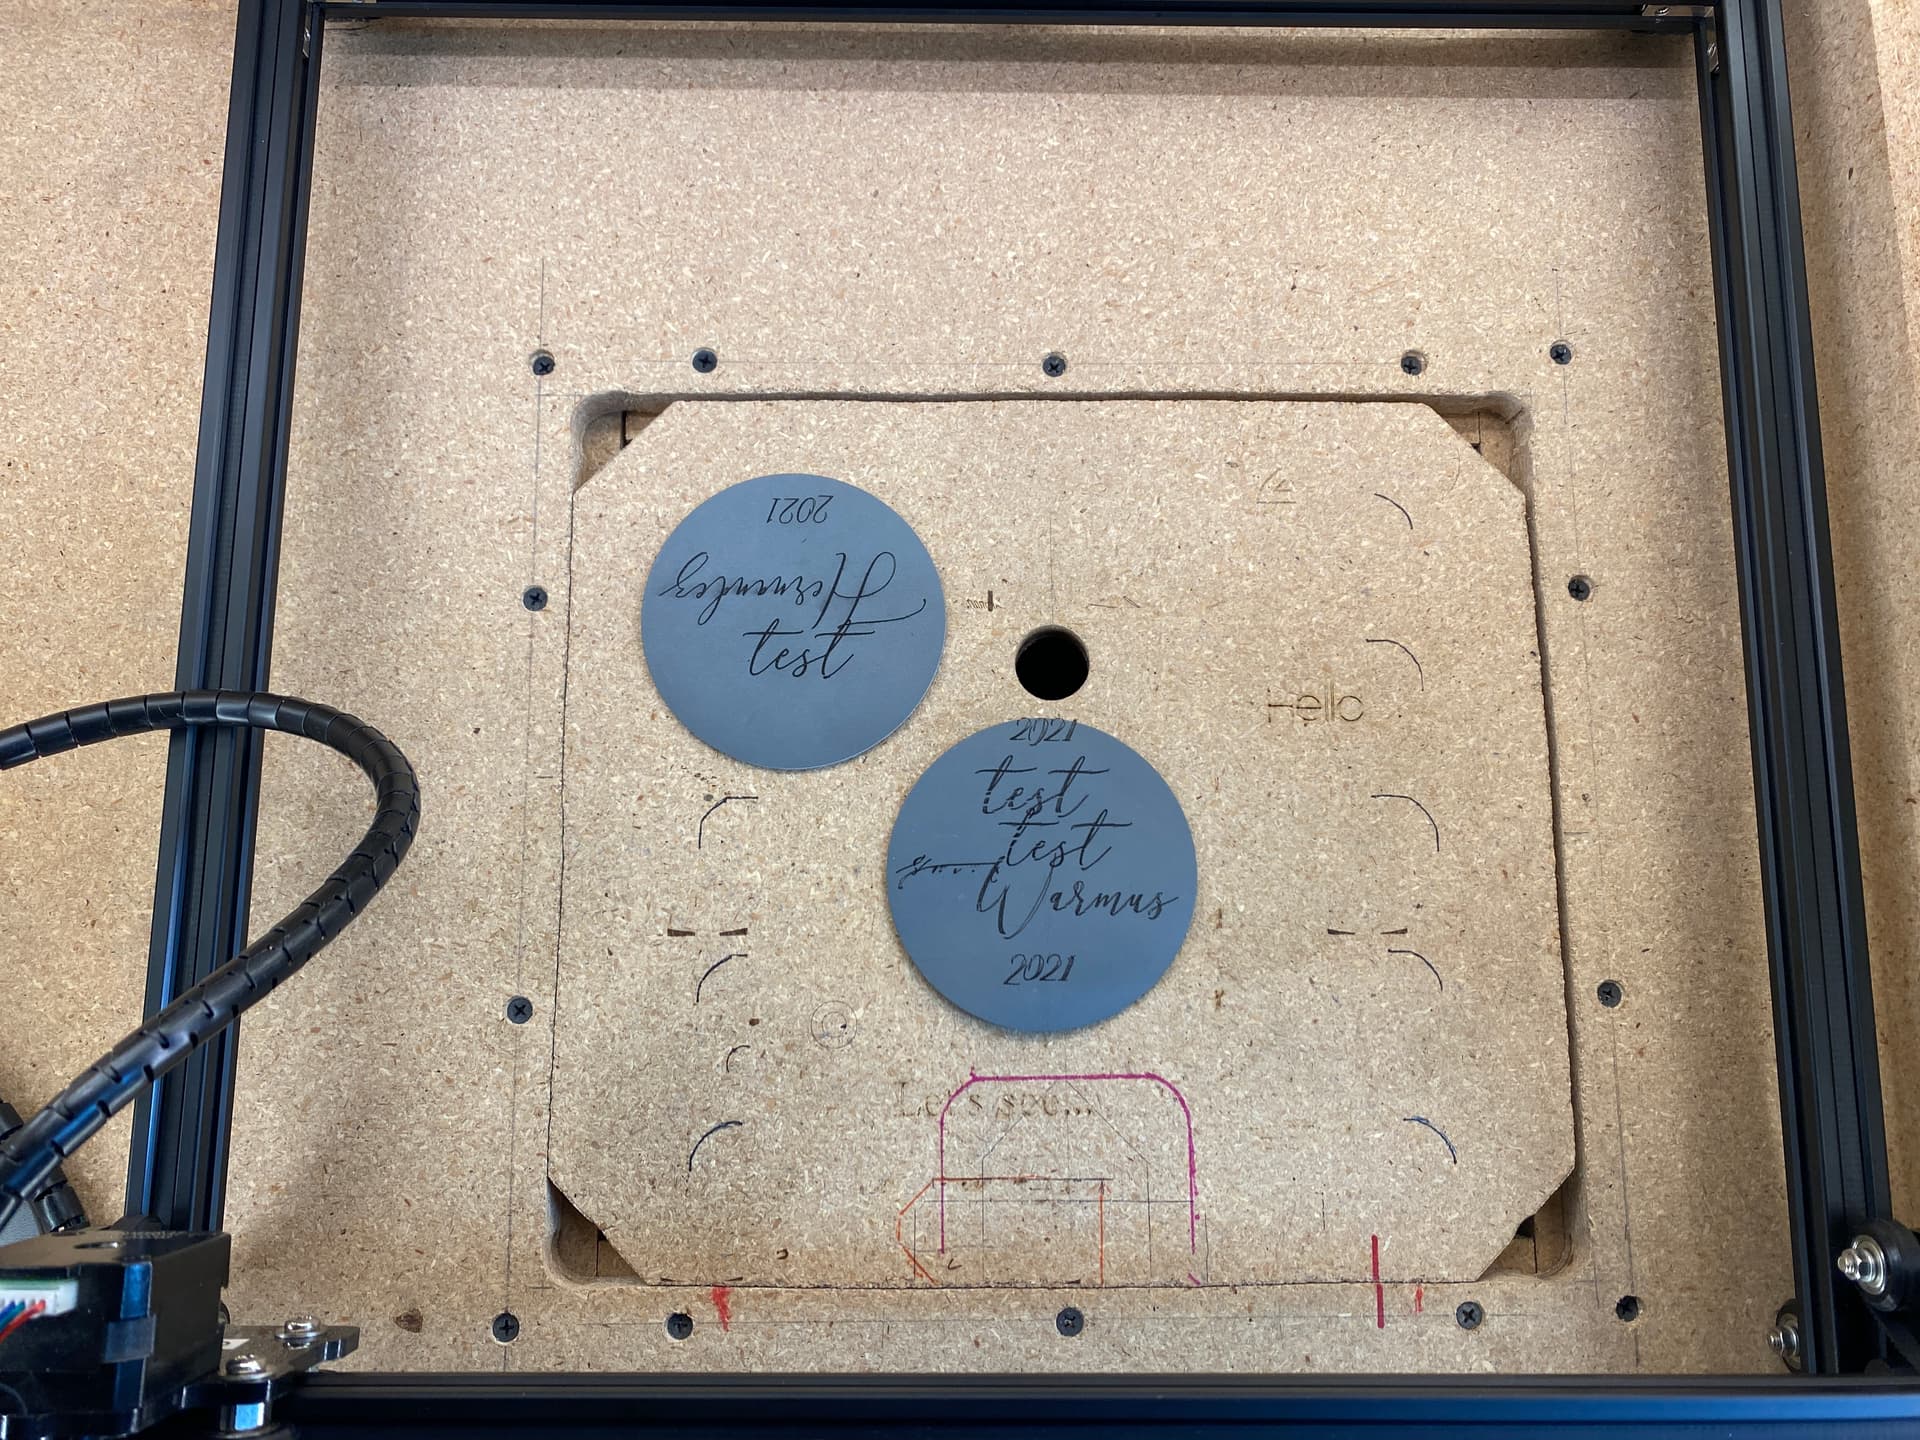
Nope. Too good to be true! So I ran test 1 at the same settings. Then tests 2 and three where I reduced speed to 1800, and changed from fill individually to fill all shapes at once. The test labeled two looks great. 1 and three look awful. 2 and three were both done with the same settings. If you zoom in, you’ll see the inconsistencies on the tests at the middle of the bed. Seems like I have best luck in the upper left area of my laser bed.
I still have to think there’s something mechanical. Particularly anything that would affect stability along the Y-axis.
Can you confirm each of these checks:
X-Axis belt check
Y-Axis belt check
X-Axis stepper motor pinion
Y-Axis stepper motor pinion
laser module wheel tension - I know you adjusted but please revisit. I’m wondering if you made this too loose which may cause a lot of forward and back tilting. This could cause the horizontal gaps
free non-binding movement of laser head along the entire bed
Please also check the belts (especially on Y-axis) to see if there are any missing, mangled, or broken teeth that could be causing a skip or snag
Please inspect the full length of both X and Y rails to make sure there’s no debris in the slots that may be interfering with motion.
I just tightened the belt on the left y axis and it seemed looser on the pinion (bobbin thing) than the other side was. I’m running tests again. I’m going through a lot of leather today,lol!
Oh no! You can test this on cardboard or other waste material. I don’t think the material is going to impact the testing.
Also, you may not be able to remove all slack from just one side of the pinion. You may need to go to the opposite side where the other end is anchored to fully remove slack.
Try uploading the picture again. MIght just be a glitch.
Can you go through the checklist I sent earlier and confirm each item? Please try to take a photo of each belt.
Also, are you able to actually observe the laser while it’s running? Can you physically see what’s happening at those times you see the horizontal artifacts? For example, the whole module travles too far, or the laser doesn’t fire when it should, or you can see the laser module tilt?
Only thing I can think of why it’s on certain parts of the bed is that the belts only have issues at certain spots. Possibly due to tension differences at those spots.
If going through the checklist proves futile are you able to take a video of it burning? Taken mostly from the side and fairly close but able to see the laser module and the material being burned? Preferably you’d have the camera mounted on a tripod or something to keep it very still so that the only motion is from the laser. You’ll need to post somewhere in the cloud and then past the link here.
I appreciate all of your help! I ended up just ordering a new one. 13 hours I spent troubleshooting . I’m going to come back to this with fresh eyes after the holidays because I would love to have two working orturs, that would be even better! But if I can’t get this one to work, at least I’ll have one to work with. Thank you, I’ll try these steps in a few days!
Well you certainly had a go at it. Hopefully the new ones goes together without issue. You could use that one as reference to figure out what’s different.
 It’s 10 hours later now…I need some help…
 Pinions…what are pinions and where are the stepper motors? It’s been a super long day,lol!
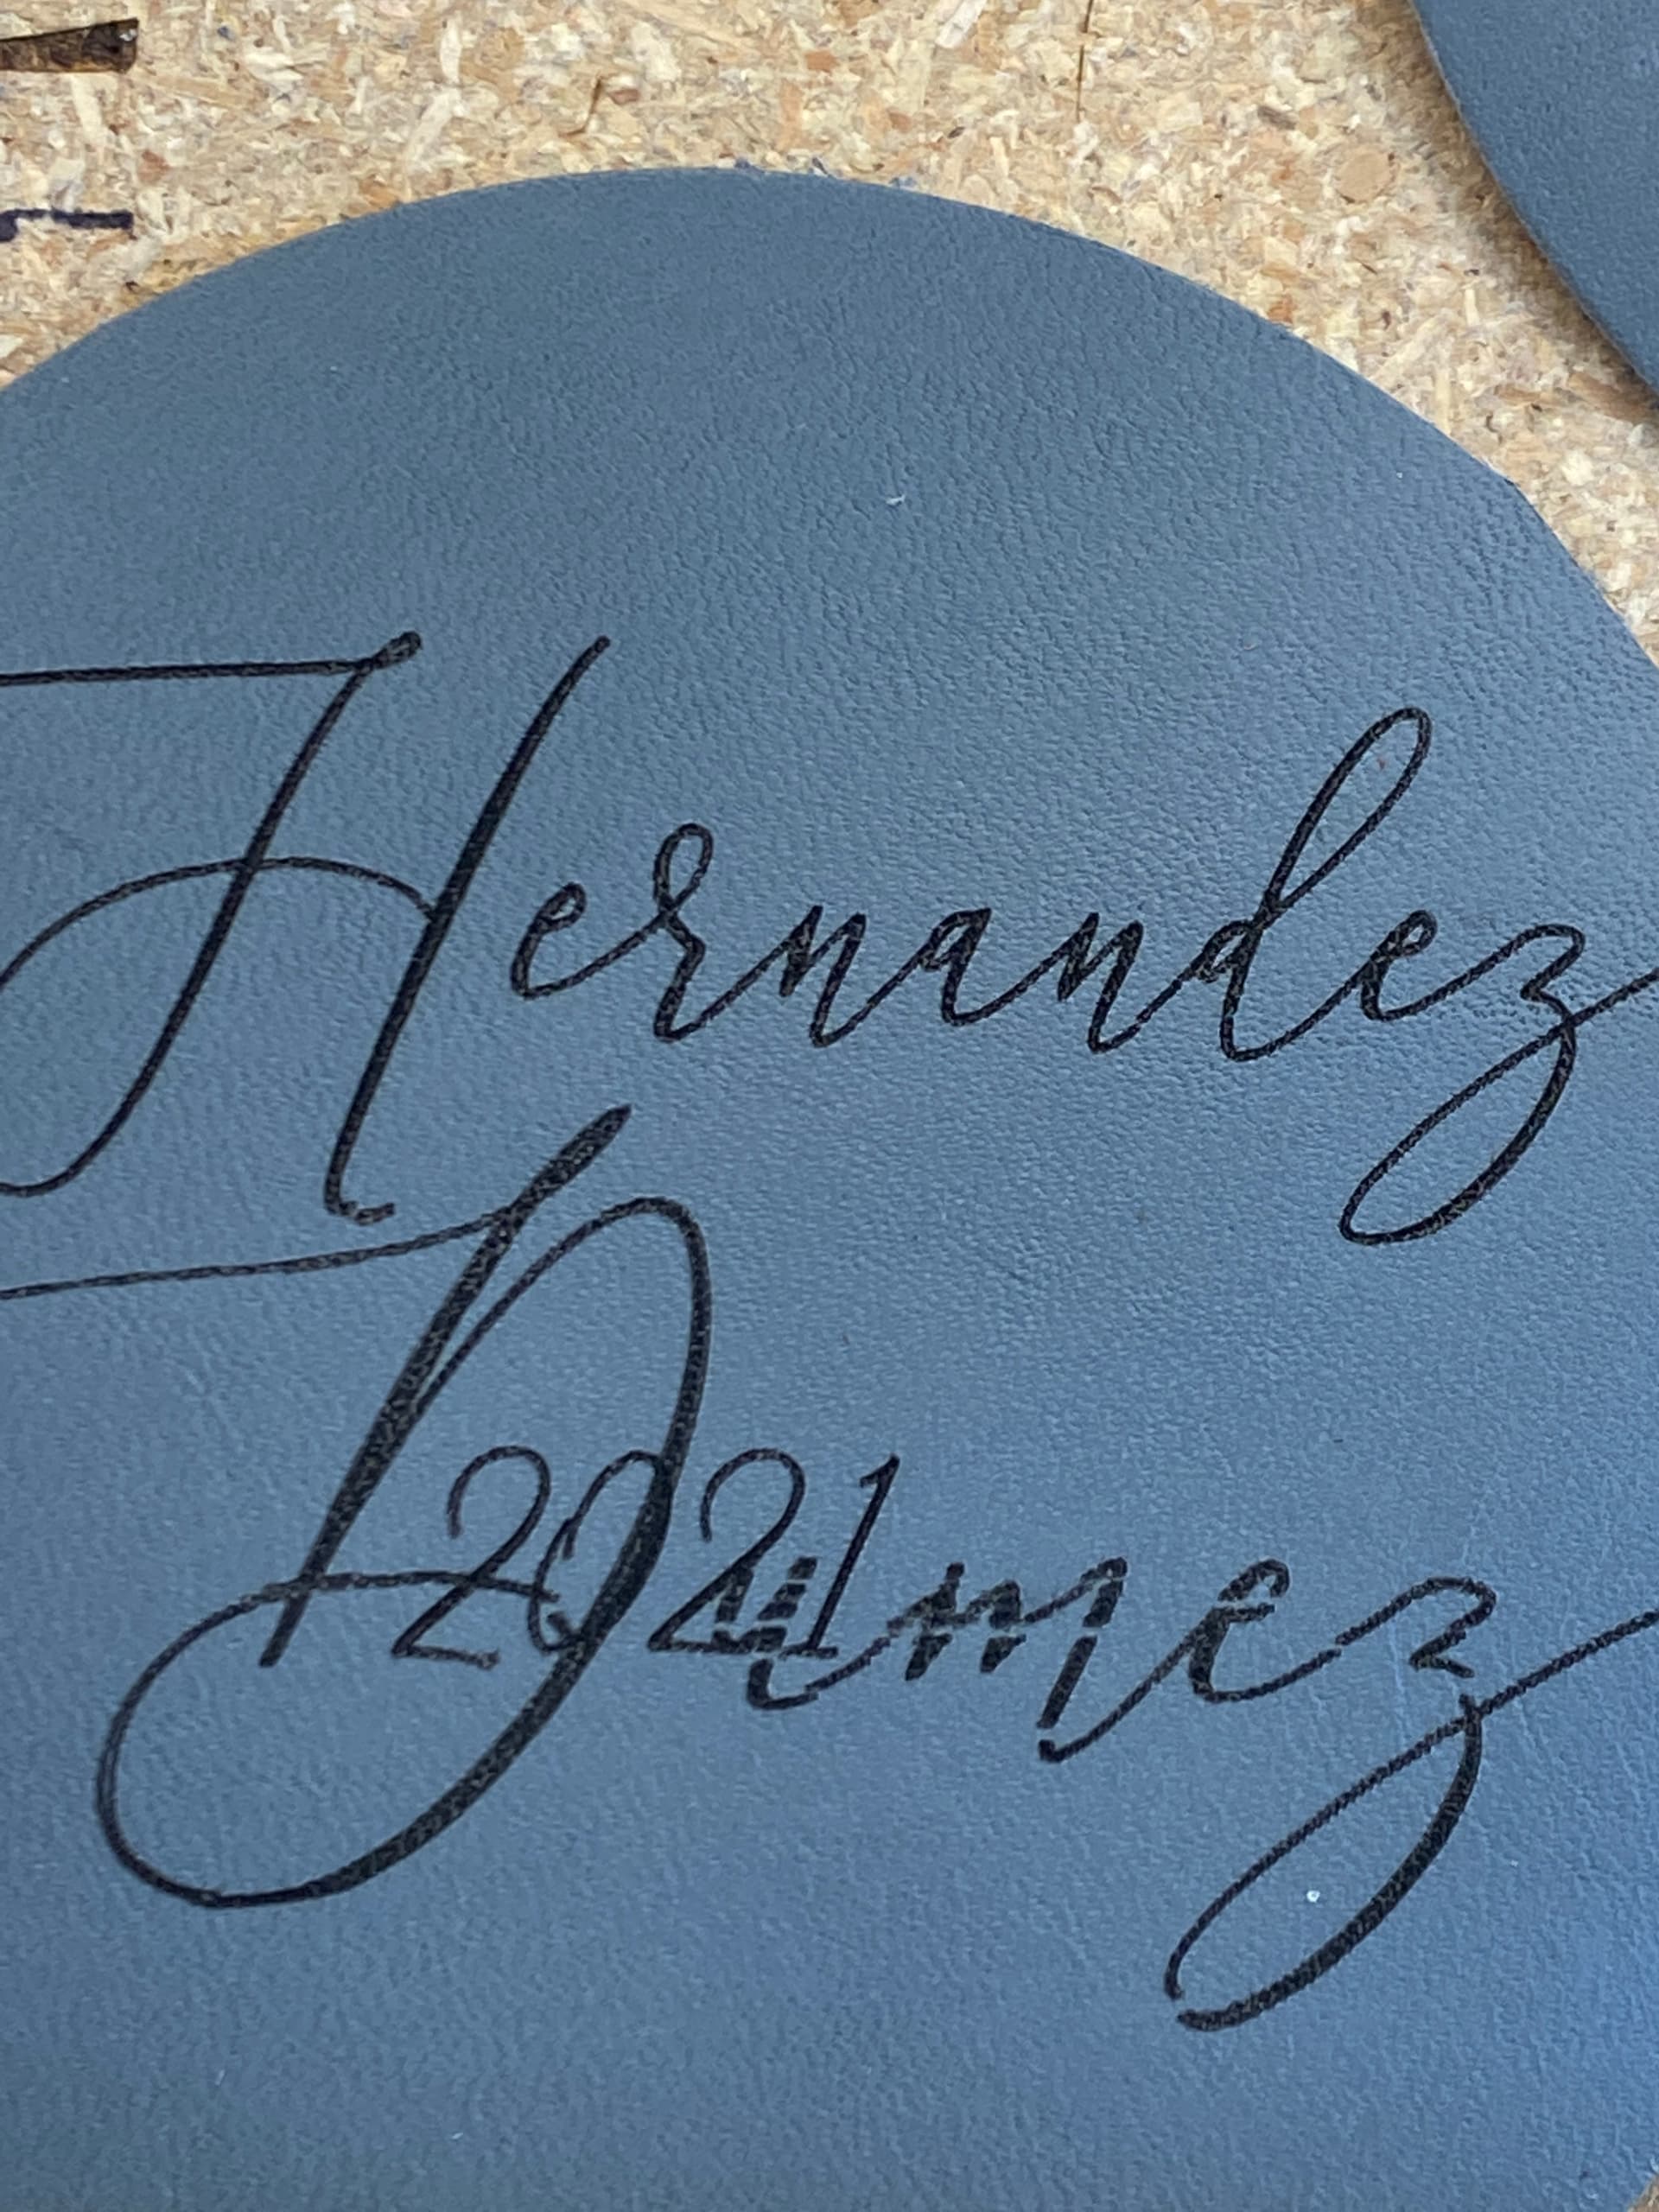

 . I’m going to come back to this with fresh eyes after the holidays because I would love to have two working orturs, that would be even better! But if I can’t get this one to work, at least I’ll have one to work with. Thank you, I’ll try these steps in a few days!