firstly, i must say that the rotary axis setup in LightBurn is 1st class, really easy
I sent a file to my cutter with rotary enabled, it worked perfectly, then i shut down and left it a few days, did some non-rotary work and went back to the rotary.
This time the job came out compressed in the Y/rotary axis.
Is the “Use rotary” option stored on the Ruida controller or do i have to connect the laptop every time i want rotary work??
Mine looses its Step per Rotation parameter, so I must enter it every time I enable the rotary.
Also still figuring out how to set it up correctly as the image flips vertically when I laser it. In the previous version I used to select the start origin at the bottom left, and this solved the issue, but in this new version it doesn’t work this way, so by now I must flip manually the image for the laser to engrave it correctly.
The rotary settings are stored in the Ruida itself. If the last job you did was a rotary job and you want to re-run it, you can just run it again without the computer connected. If you want to run a rotary job with different settings, like the object diameter or circle pulse, you’d need to re-send those.
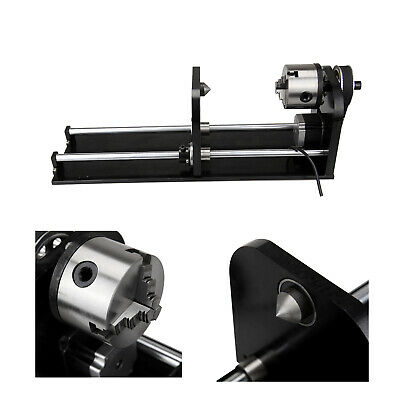
Sorry, I mean the rotary wires aren’t long enough to turn it the way Oz says (180dg), as the motor ends on the left of the bed and my electronics are on the right side of my machine. I must cut them and add 40-50 cm of wires to be able to plug the connector on the RUIDA controller. My rotary is a JAW type like this:
And with the wires it has now I’m only able to put the motor on the right of the bed, the closest point to the RUIDA controller.
It sounds like you are running the wire from the rotary all the way to the stepper controller. Are you sure there isn’t a round connector located inside the cutting area of the laser? Most lasers have one there and then there is an unused connection sitting near the stepper driver that you swap out.
Can these be turned back on with the controller or is it easier just to connect the machine again and send the file direct with “use rotary” turned on?
You can’t turn on the rotary flag from anything but software as far as I know. If you have a roller rotary, it’s enough to just toggle the enable. If you have a chuck you also need to set the diameter, as that is stored too. (With a roller, the diameter is constant).
If you have the file stored on the controller you can re-enable rotary mode, then just re-run from the panel, but it’s probably easier to just resend the file.