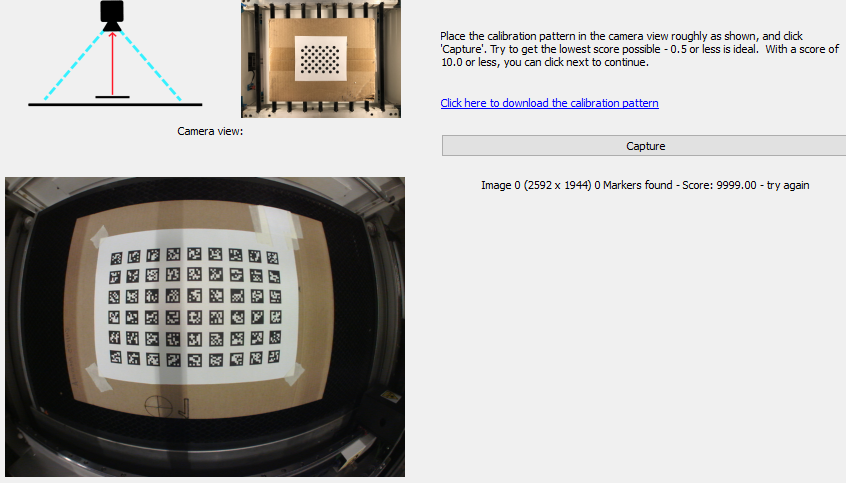
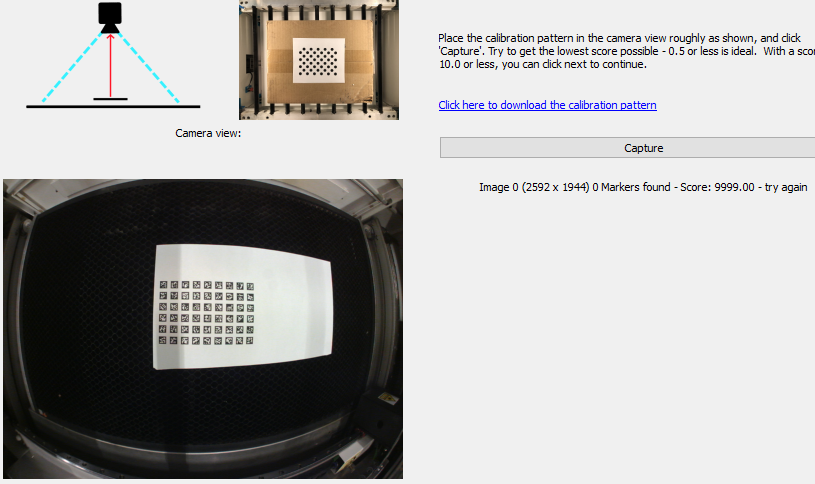
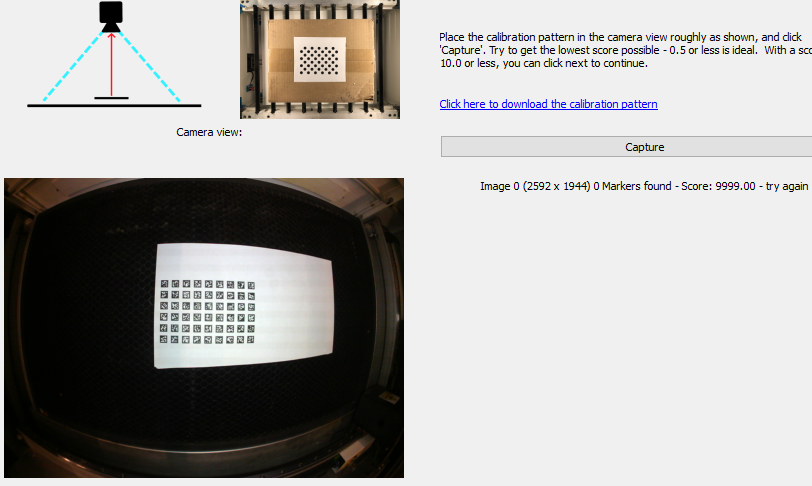
Recap: Can’t calibrate with April Tags. Tried A4 A5 and A6 prints with different distances, angles, orientations and room lightings. Inside and outside of laser case. Always “0 Markers found”.
Windows 10 PC, LightBurn v1.7.04 and Gweike Cloude Pro laser with bundled 5 megapixel fisheye camera fixed in center inside lid. 510x300 mm laserable area.
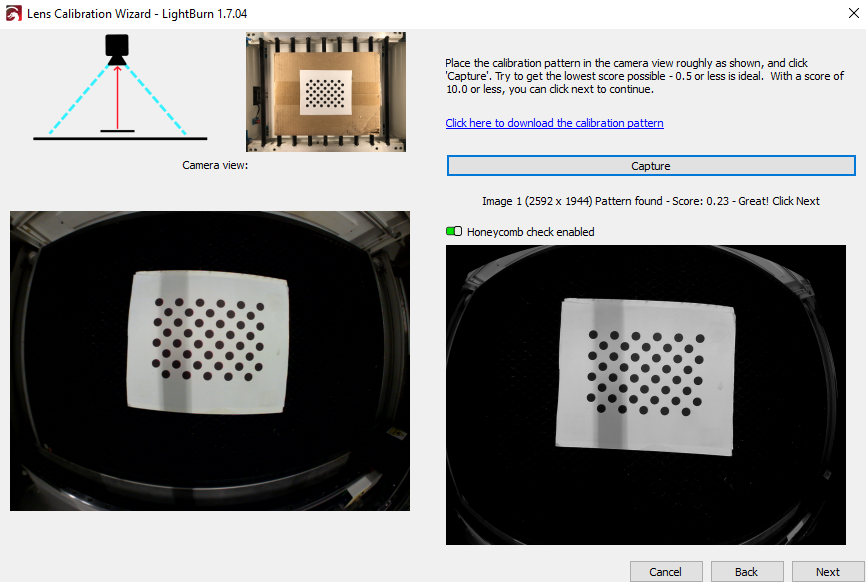
Calibrating with old circles image works although fiddly. Takes 15 minutes to get <= 0.35 on all calibration steps. Alignment then completes without issue. But end result is not super great. In bed center actual lasered position differs 1mm from camera position. But in outer corners up to 8mm.
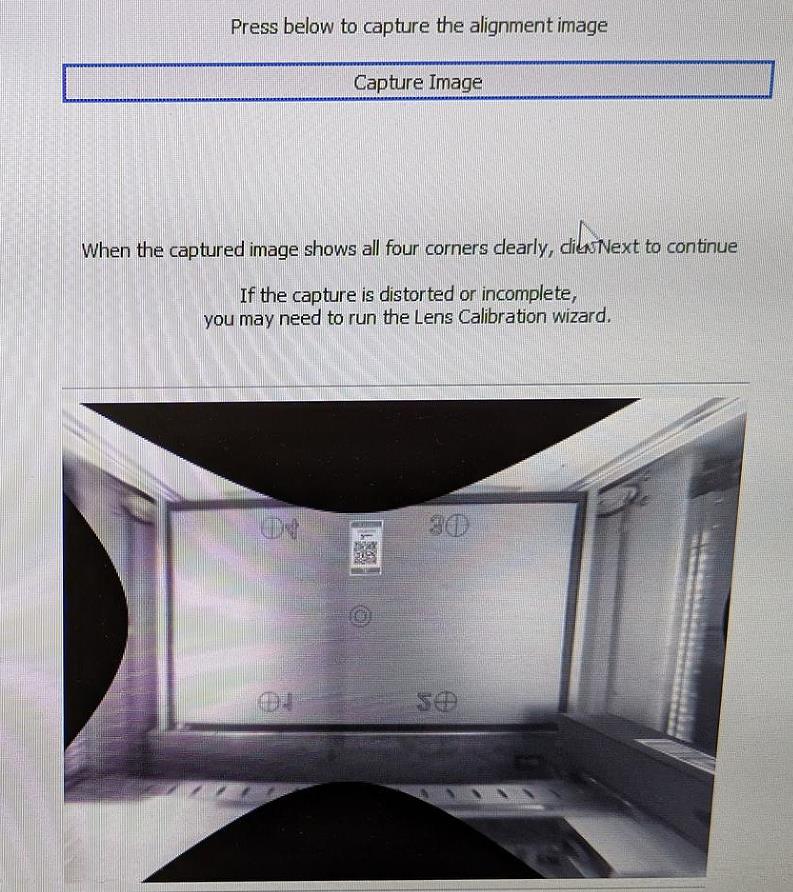
Screenphoto of image shown after alignation laser step and calibration with old circles image. Notice how a chunk between 3 and 4 is blacked out, despite <= 0.35 calibration step results.
(BTW why not show a similar image and suggestions at calibration wizard end?)
v1.7.04 changelog has bugfix for extreme perspective overhead cameras, but didn’t fix my issue.
I wish calibration/alignment doc had more real world examples of how little deviation (in mm) can realistically be had in center and outer areas after careful calibration/alignment. I get that camera quality, fisheye degree and laserable area varies between lasers. But some examples could still help adjust expectations.
I’ll go bigger: I wish for a video where the LightBurn team completes the calibration wizard with april tags and fisheye cam and no parts of the video cut out. Ideally with split view between LightBurn window and sideview shot of hands placing/holding the april tags.
The image captures look like they might be out of focus. Hard to say from the screenshots. If they look blurry to you examine the camera to see if there’s a way to focus the lens.
Instead of trying to do the calibration with the lid closed I’d suggest pasting the calibration pattern to something rigid and handholding it. This will allow you to try many more positions to dial-in the calibration
If after camera alignment the alignment is still off then try this:
3a. Create a grid of squares across the entire workspace, then burn onto material. Do not move the material or modify your design.
3b. Capture an overlay
3c. Use the Camera Shift and Scale adjustments until the overlay matches your grid on workspace as closely as possible.
3d. Save the Camera Adjustments by right-clicking Camera window and selecting Save.
This looks like to me it’s due to that portion of the bed not being captured in the overlay.
I’ve tried both inside and outside the case. Alas, always “0 markers found”.
I think the issue is in calibration, not alignation.
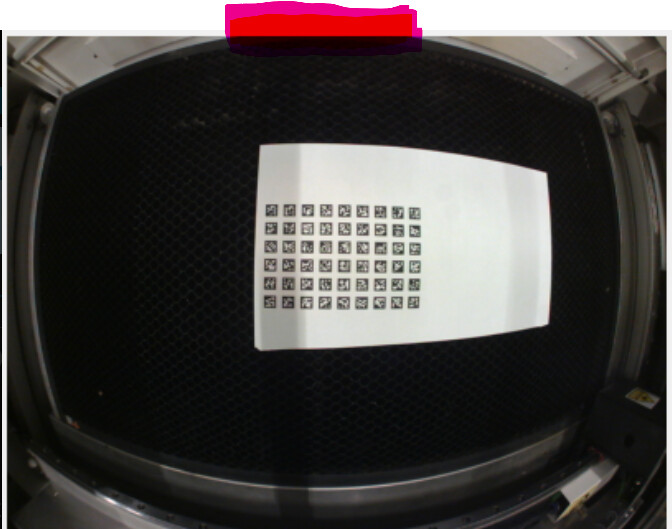
Yes the input source does seem to exclude a portion of the honeycomb (or its edge really), but it seems like a bigger portion is missing after calibration, even with <= 0.35 results.
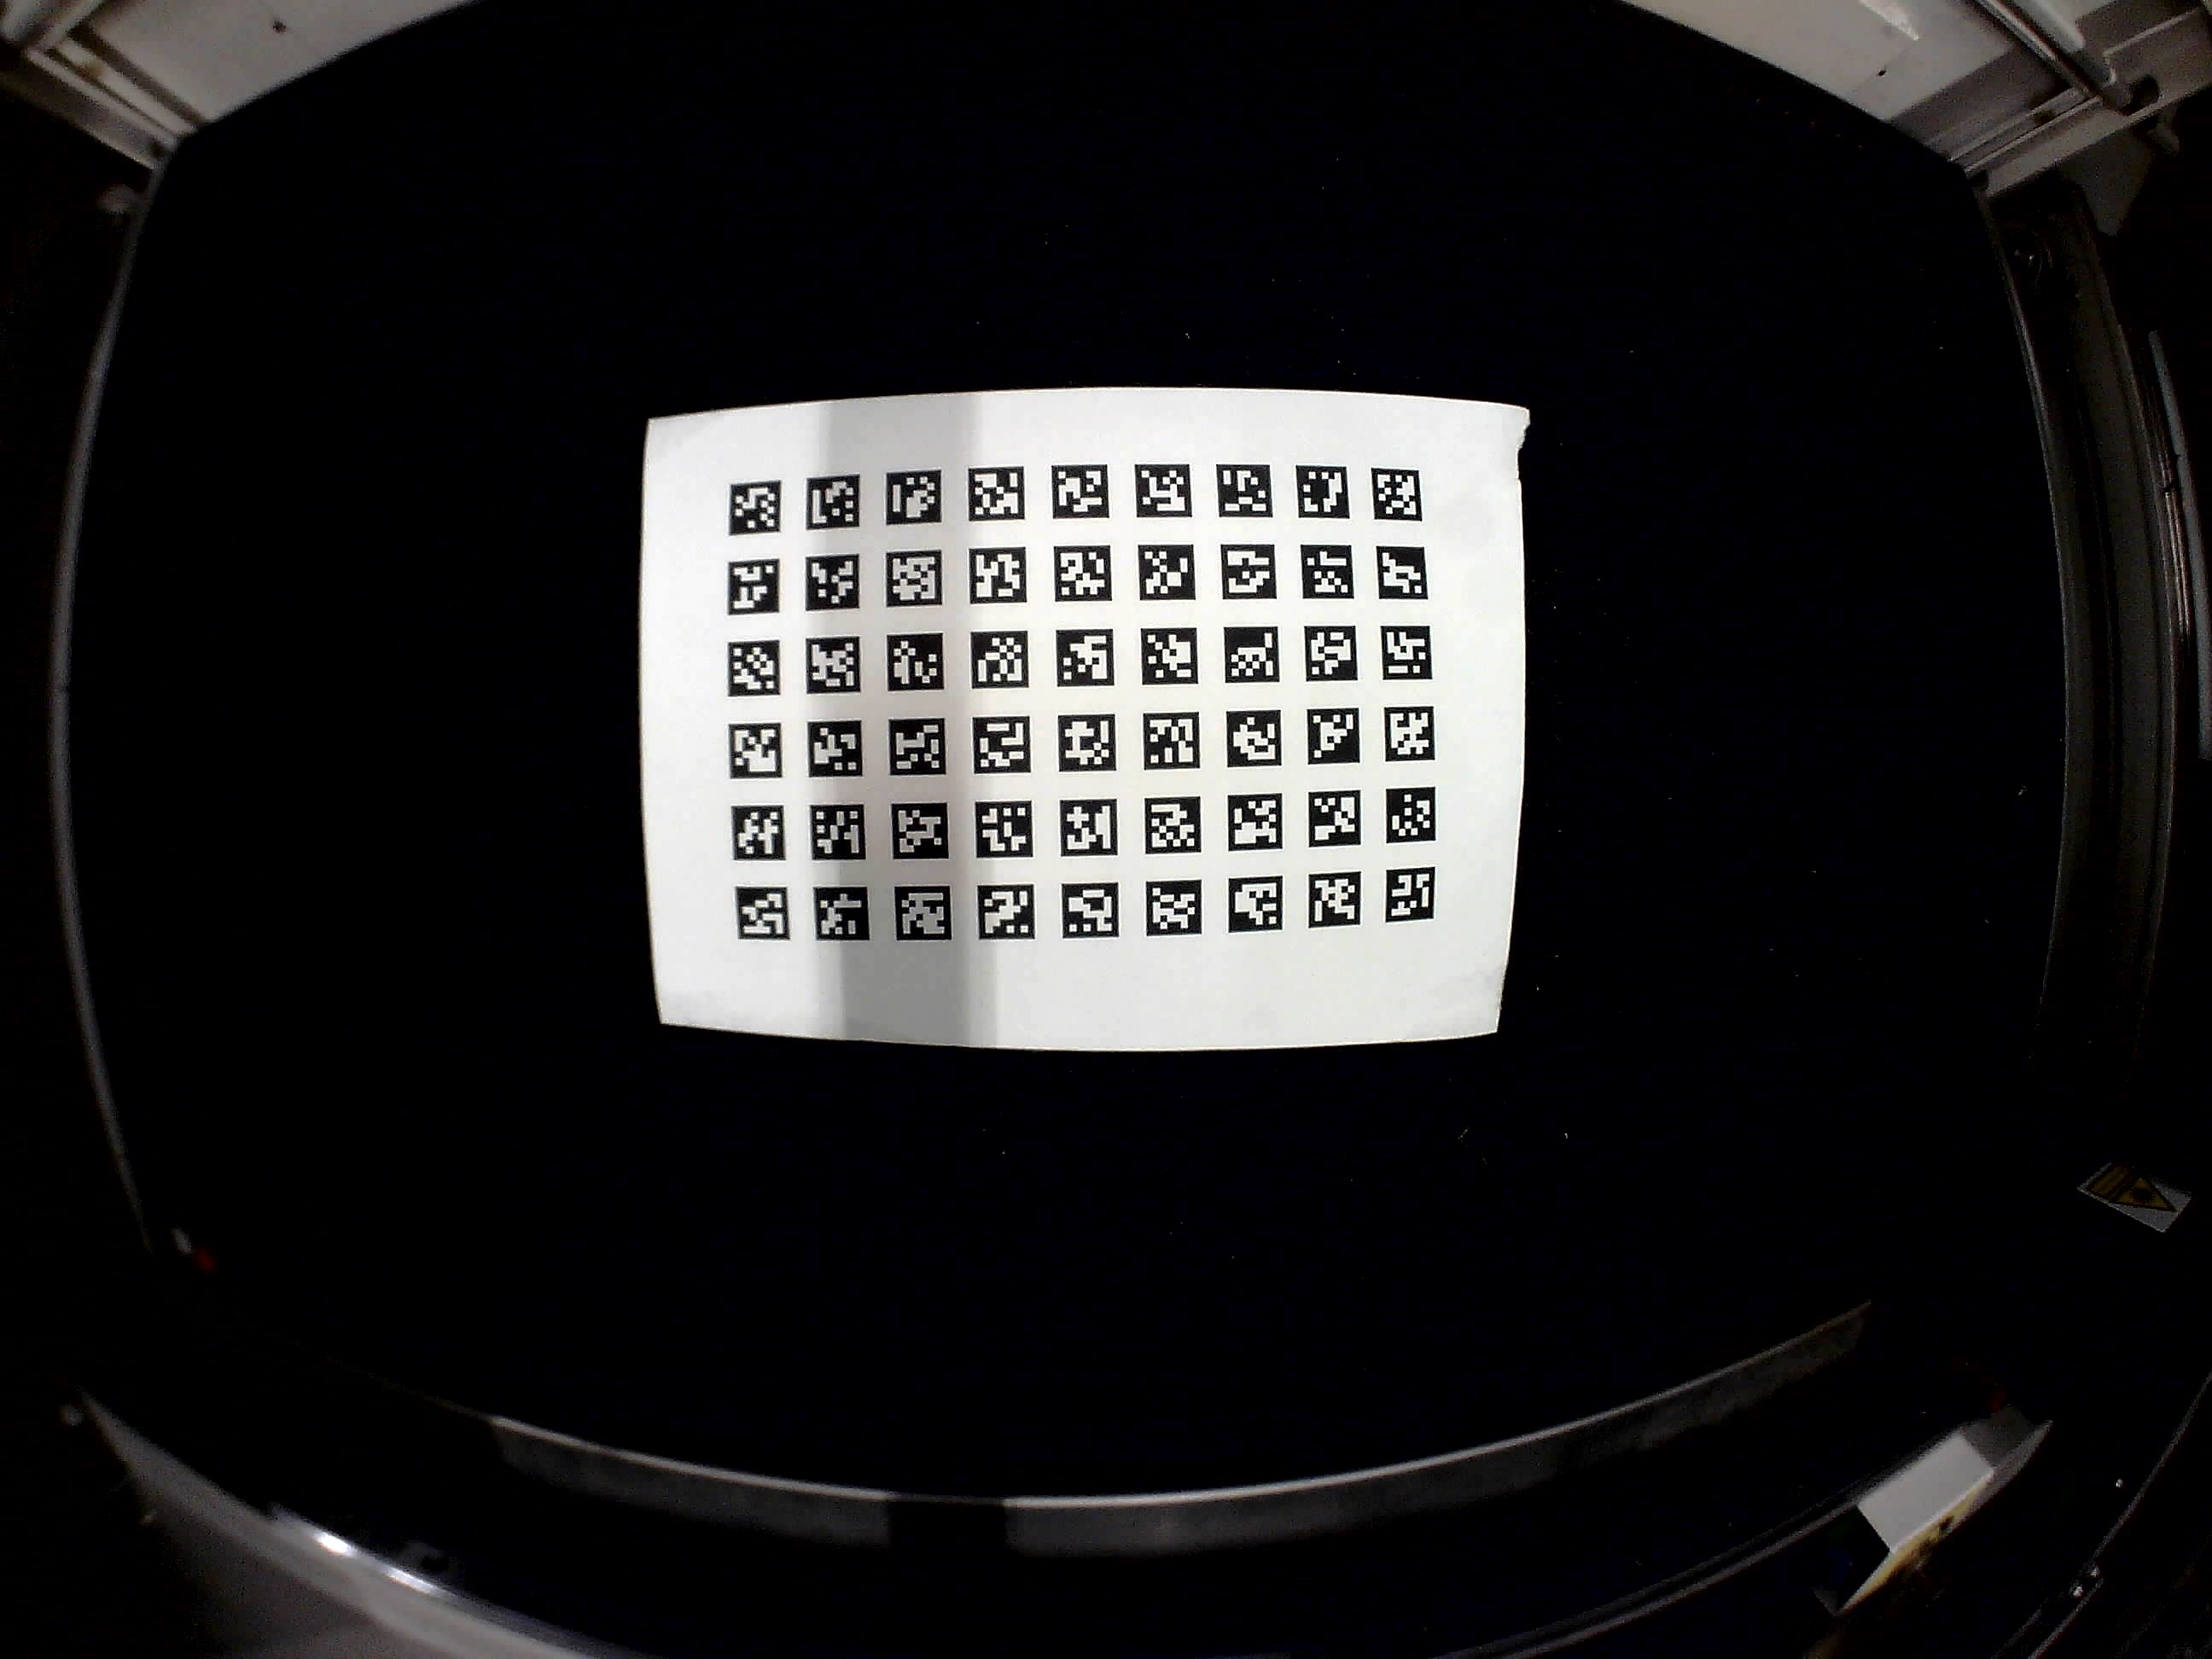
out of focus: I think LightBurn’s scaling in the calibration wizards window makes the image appear more blurry than the original source is. I’ve tried adjusting focus on the camera several times throughout my tests. No difference for april tags. Note also that I, with the same camera focus, can get <= 0.35 scores with the old image circles, even in not so great lighting tests:
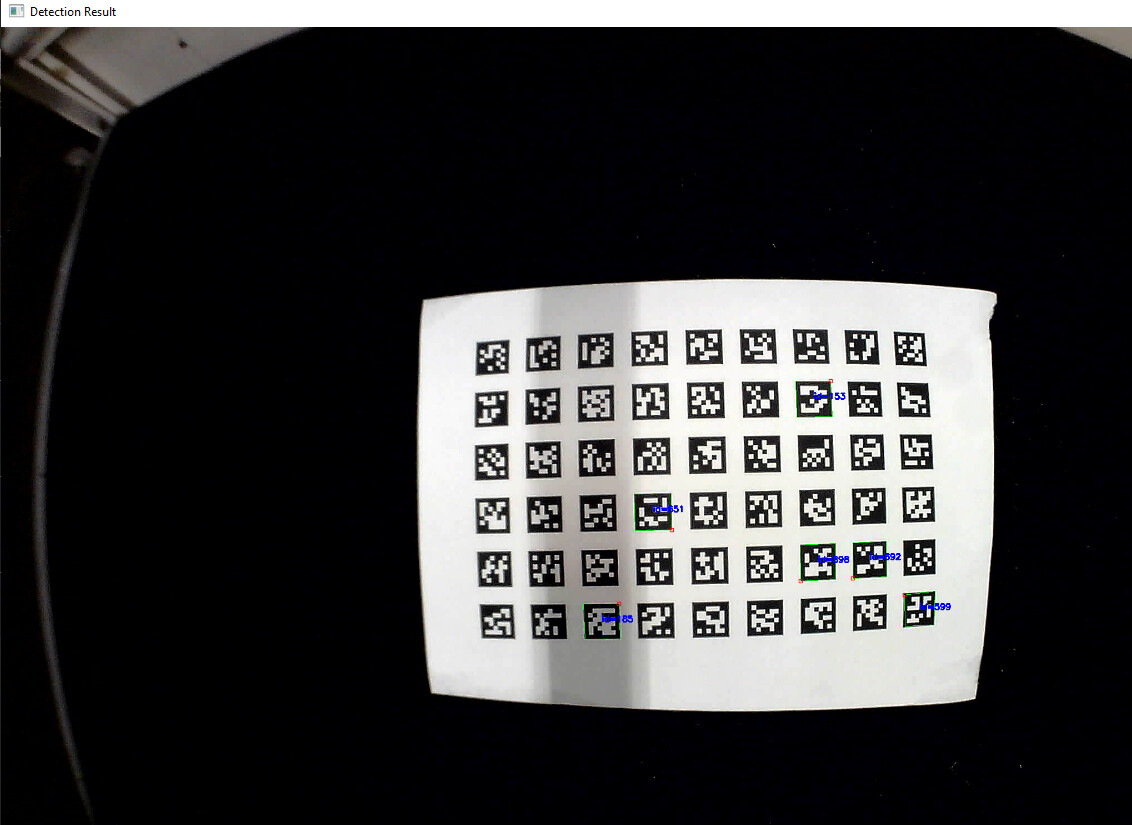
I used an AI to quickly whip up a python OpenCV script that successfully detects 6 tags in that image (using cv2.aruco.getPredefinedDictionary(3) specifically). Which makes me think LightBurn is at least a part of the issue here.
Let me vent a little. To me the calibration wizard is quite bad and a timesink. Big contrast to the very user friendly and effective controls and tools in LightBurn in general. The wizard could be improved in many ways small and large
When we in old circles mode press “capture” with a keyboard the input focus moves to the “honeycomb check” toggle control. Which means I can’t just with one hand keep pressing “space” or “enter” to repeat capture while I adjust the circles with the other hand.
Why have the user make captures one by one at all? LightBurn could instead on “capture” press instruct the user to slowly move and angle the circles/tags and automatically capture and process multiple images per second until a really good capture is detected or the user presses a “stop” button.
The instruction says “Try to get the lowest score” but then specifies that “0.5 or less is ideal”. But my experience with <= 0.35 captures for circles is far from ideal. And if I intentionally go through the wizard with some higher values, like a 2 or 3 at some steps then the result is terrible, even though LightBurn at the step says “Not too bad!” (don’t recall exact phrase). What’s even the point of letting the user click next with scores as high as 10? Has anyone really gotten useful results with such high scores?
as mentioned in my first post, after calibration wizard there should be some extra step that guides the user to if the result is probably useful or not. Without having to spend time on the alignation lasering and clicking steps.
I hadn’t previously tried the april tags so tried it today after reading your post. I had no particular problem getting the tags to be detected so it’s not something inherent in the version of LightBurn so likely something either in your equipment or in the environment. I know you’re still struggling through the extreme fisheye but I’m surprised to hear that attempting the lens calibration outside the machine makes no difference at all.
Ideally you’d be in bright diffuse light… think a bright but overcast day with no harsh shadows.
Looking at your captures, though, the conditions don’t seem too bad. To me the position and relative sizes would be more the issue which should be remediated by hand-holding and fine-tuning the position.
Even in that case, using the shift and scale adjustments may be able to marginally improve overall accuracy.
The image is captured prior to correction. So if that portion of the image is missing it will show as a void post correction.
Yes. This seems fine.
This gives me hope that the capture can be done. If you can try with the image at varying distances to the camera that may improve things.
By the way, I wasn’t in ideal conditions when I did the april tags test and my end results were worse than what I already had with previously done circle pattern. I could not get scores consistently below .3. I typically aim for .1.
I believe at one point there was talk of attempting a live correction system. I trust that there’s a lot of effort being put into this and even the existing recent changes represents a ton of effort. Improvements are surely to come but this is all non-trivial. Keep in mind that an entirely new custom camera system was also being developed for Mac during this time and that small changes to the system end up affecting some users due to the vast amount of variation in hardware and systems.
If you have specific additional suggestions it’s worth documenting in the Feature Request portal.
Not sure if I have any more suggestions for you but try importing this calibration file. It was done on an Omtech Polar. If they are sufficiently close this may work. Make sure to take a backup of your existing calibration so you can go back to it if necessary. I recall this one being off by a couple of millimeters in alignment but the lens calibration may be okay.
Can you tell me how to import this calibration file?
I got a Polar for Christmas and am struggling a lot to get the camera calibration to work. It’s just not detecting anything. I’ve tried different sizes, rotations, closed and open configurations with circles and April tags… nothing seems to work.
Right-click in body of Camera Control window->Import Camera Settings. Then select the file.
The only thing I can suggest is to review the entirety of this thread and to follow the same recommendations. Specifically, I’d suggest attempting the lens calibration with the pattern outside of the laser and with ideal lighting. You want a bright, diffuse, and even lighting scenario. Due to the extreme fisheye of that lens small changes can make dramatic differences.
FYI:
the calibration-file was useless for me, the result was completely distorted.
I got it to work by heavily messing with the windows camera settings (brightness & contrast) while taking the pictures.
(The settings that finally worked where way to bright for my “gut feeling” and had to be adjusted for every paper position)
It was a major pain und took me half a day, messing with different orientations, pattern-sizes, additional lights.
The detection results have been so very random (no detection at all to a score below 5 - without noticeable changes in settings or light direction) that I’m pretty sure the code behind the calibration is buggy.
Question
is your work area a honeycomb
if it is then may I suggest that you cover the entire bed surface area with
a solid white cover then try the calibration again
I ha a simular issue it was picking up the holes in the honeycomb bed and confused the program
I have tried varying distances, without any improvement with the april tags unfortunately. That I (or rather an AI) could rather quickly get OpenCV to detect 6 tags under the same conditions where LightBurn detects none gives me hope, but more along the lines of that future LightBurn version might improve the calibration steps, rather than hope that I’ll be able to improve the results with this camera and the current version of LightBurn.
Thanks also for sharing your experiences from testing the april tags. I had assumed, not sure why, that using april tags would generally bring improved accuracy for most, but that now seems incorrect.
That’s promising. I hope we’ll here more from the LightBurn team about that.
Thanks for the calibration file. Alas it worsened results on the laser here. I guess even though the machines are similar small differences in the cameras, their angle and so on makes the settings nontransferable.
Unfortunately I have to admit that I can’t get the “new” april targs to work either. Nothing is recognized, no matter what (light) conditions I’ve used.
The “old” round targs still work fine for me, just readjusted my original LB camera today.
(Linux Ubuntu with the latest patch version of LB)
Question, is an A4 with april targs at all big enough to be recognized?
I’m trying to recall what I did but I believe I printed 1:1 size with the LightBurn version of the file which I’m fairly certain would fit on A4 without problem.
I’m now very curious why different people are getting different results. I was actually in fairly poor lighting when I tried it and got frustratingly low scores which I attributed to the lighting.
The lighting conditions or the lack of the ability to adjust the camera in LightBurn have always been my biggest problem.
When it is dark in my workshop, i.e. I have turned off the lights, (during the day) I get the best results from my camera. I have tried with temporary solutions to adjust the lighting of my camera under Linux and Mac OS, but it is far too cumbersome to make and use homemade scripts just to be able to use a camera with something other than Windows. Unfortunately, it is just not good enough and I understand that some users get frustrated faster than I do
It should also be said that when the conditions are optimal, the camera works perfectly with LB, and it has saved me a lot of material and time.