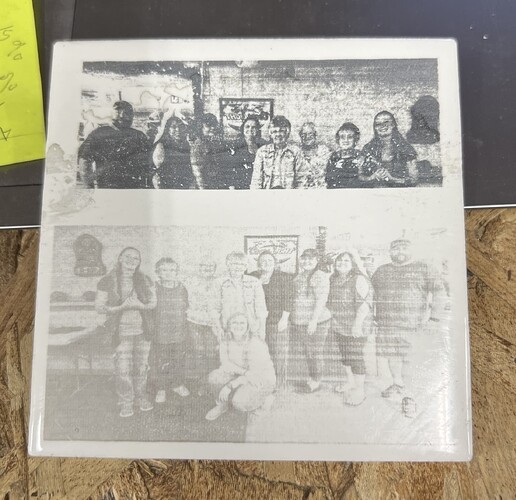
What could cause these lines using the NWT method. Both pictures are crap, still trying to dial in the best speed and power, can’t figure out what is causing all these lines. DPI to high? Not high enough? I am using an Orthur 10 watt on a OLM3 with windows 11 and the latest version of LB.
I use .08 lpi on most everything.
I find on the tiles I need to go to .075 to get rid of those lines.
Thanks Mike. I will look at my settings in the morning and hopefully get rid of those lines!!
Those lines can have two causes.
- incorrect LPI/DPI settings. This setting is hardware dependent. You need to select it according to your laser spot size. The laser spot size defines how many lines you can do in one inch with perfect spacing
- your mechanics are not set up perfectly. If the y axis in your case does not run smoothly, you get those artifacts. Try to use a scan angle of 45°. If it gets better, it’s most likely the y-axis that’s causing the problem.
Thank you, Melvin. I will try your suggestion and go through guide and see what develops.
If you haven’t seen this video, I’d suggest you watch it… It’s by Laser Everything and explains interval concisely. It’s done on a fiber, but the procedure works for any laser with any material…
Good luck - have fun
![]()
Very nice! Thank you, Jack.
Melivn, I did the 45* angle and it came out with no lines!! However, I did notice after the job was started the % of angle changed to 90*. ??? I am doing another burn now and the same thing happened.
update: Looks like the reason the angle was going to 90* is that was using the path-thru option
when using imag-r
I doubt it… The scan angle needs to be controlled.
It determines the major axes that will be moving the most… most machines have a fast Y axes than an X axes, simply because of mass. On a fiber you can do as you wish…
It can be detrimental to swap axes with a rotary.
If you enable pass through, you can still change the scan angle.
![]()
By using the pass through option it will change my 45* angle to a 90* angle. Which isn’t all bad because I no longer get the lines running through the burn. Just don’t understand why it does that. If I do not use the pass through option the angle stays at 45* and also with no lines.
I just tested with LB 1.4.04. Surprisingly, this is not correct. Choosing pass-through changes the scan angle to either 0° or 90°, depending on which is closer. It’s not possible to select another scan angle with pass-through (you can enter a different value, but it is reset and preview shows only 0 or 90). Bug or feature? ![]()
Yep. whatever is closes to the angle…
Beats me what happens… I assume it has to do with the way the file is handles… but ![]()
Thanks for the check…
![]()
No problem, just thought it was weird. But like I said the lines are gone and very happy about that!! ![]()
![]()
![]()
![]()
Hi Try using image adjust on lightburn by varying the dpi and dither. Watch the right screen and select the best image combination. This may not be your problem but i find it helps to define your the best dpi for your dither.
Thanks for your reply. By setting the scan angel to 45* I got rid of the lines. And, I will use the adjust image as you suggested.
This topic was automatically closed 30 days after the last reply. New replies are no longer allowed.

