I want to engrave a picture, but when i do, it seems to lightly engrave the white parts for some formats, for example, jpg. Like it is lightly engraving while travelling. Is there a way to make it so that white pixels are ignored and not engraved? I already have the min power to 0%.
Or is there something I might be doing wrong?
Make sure that the white is actually 100% pure white, otherwise it will be engraved. If you have paint software like PhotoShop or even something free like Paint dot net, you can make anything you don’t want engraved transparent, and LightBurn will explicitly ignore those areas of the image.
Maybe png would be a better raster format, as you can turn anything white, transparent?
Thank you. Using transparent works. (EDIT: Upon further testing, transparent does not work. It still lightly burns while travelling over transparent section) However, I would like to use JPGs sometimes, which have pure 100% white between objects. It looks like it only engraves where it is travelling. For example, I have a white-filled box with no border. Within the box are two objects next to each other with white in between the objects. It will engrave the two objects, and lightly engrave the white space between them, as it travels back and forth between the objects. It will not engrave the white on the outside of the objects, between the object and edge of the box. (Box has no border), as it does not travel to the edge of the box, because there is nothing to engrave there. I would be happy to upload a picture if my description is confusing.
In another program I have, there is an option to turn off “Burn White”. Is there a similar function in Lightburn?
A little more info about your laser would help - There’s a section in your profile called “Machines” that we ask you to fill in so we can just look when you post. Depending on what kind of machine and controller setup you have, you might have a configuration issue that’s causing this.
If you have a GCode machine, LightBurn uses G1 S0 to move across the non-burning parts of the image. If your minimum PWM value is set just above the firing threshold of the laser, instead of just below it, this could cause what you’re seeing. We don’t presently have a way to disable this, as using G1 moves instead causes inconsistent speed during the engraving that can introduce wobble.
Thank you. I will fill in the profile. I have a FabCreator FabKit.
I just did a test where I made four squares in a row, set them to Fill + Line. I then changed the Power Scale to be 10, 0, 5, 0.

The line the arrow points to was made during the Fill phase. The lines within the red boxes were made during the Line phase.
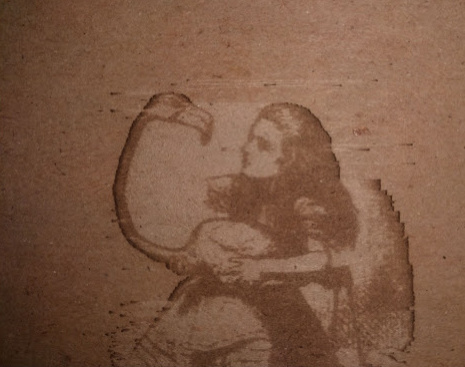
Here is a picture of a jpg, where it is easy to see that the cardboard was made white by the traveling beam between the engraving. Also note that on the right edges, you can see it is dark at the edge of the picture where it reverses direction, similar to square 4.
Yes, that’s why then - they set their minimum PWM value a bit too high. This number is in the config file on the SD card of the laser, called laser_module_minimum_power. The comment in the settings file notes that it should be just enough to keep the laser active, but not burn anything. With a 40w tube that should be very low - probably around 0.01 to 0.02 (1 to 2 percent).
You should also enable overscan in the cut settings for your engraving layer, as it will prevent the excess burn on either end, and you can set ‘Use G0 moves for overscan’ in Edit > Device Settings.
Thank you! I will try that. I appreciate your hep!
This topic was automatically closed 30 days after the last reply. New replies are no longer allowed.