I am trying to engrave travel mugs. The image is the organization’s logo with their statement written around it in a circle. I made 40 earlier without problems. Then I tried to make more yesterday. The first two look great, the circle on the third looks a little flat on the right side (a little oval-ly) and the fourth is totally squished and an awkward oval. I didn’t change any settings. Can anyone help me understand what might be happening?
I’d like to know more about your setup.
Are you using a rotary device to engrave the travel mugs? Is it a chuck or roller type?
I’m considering that something may have come loose on the rotary mechanism as settings don’t often drift between single objects.
We have a two-wheel roller rotary device. I re-created the design today and made four more. Again, the 4th one came out totally squished and unusable.
What does your setup look like…? How is the cup/mug held to the device?.
How are they distorted.? A photo would be nice… you know worth 1K in words…
I have a PiBurn rotary.
Since you’ve had success with other cups/mugs, I’m wondering, are there setup changes to the Ruida other than enabling the rotary.?
Have you slowed down any of the acceleration or other speeds in the controller.?
How fast and is it a vector or scan.?
If you don’t mind posting the .lbrn2 file, we’ll look at it…
![]()
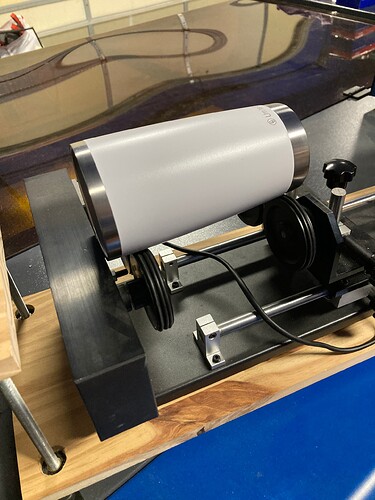
I’m running a project on the flatbed right now, so I don’t have the rotary connected. Here’s a picture of how the mug rests on it, though. Its front lip catches the frame of the rotary just enough to keep it in place.
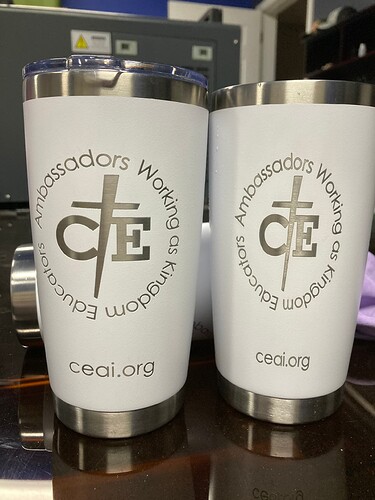
I’ll attach a picture of two mugs. The one on the right is one of the squished ones. The one from today was even more narrow.
Here’s the Lightburn file. Before attaching it here, I deleted some of the elements I had turned off. (I had some extra text circles hidden with different phrases I was using. I don’t think those should have affected the result…) In my final attempt today, I changed the text circle dimensions to be just a little wider than it is tall like you see here. I had read somewhere that it’s best to change the width to about 90% of the height to account for the rotation of the cup. I was trying to trick the machine into keeping the circle less of an oval - it obviously didn’t work ![]()
AWAKE tumblers.lbrn2 (63.5 KB)
It looks like it’s slipping on the rotary.
Have you slowed down the Y axes, both acceleration and start speed.?
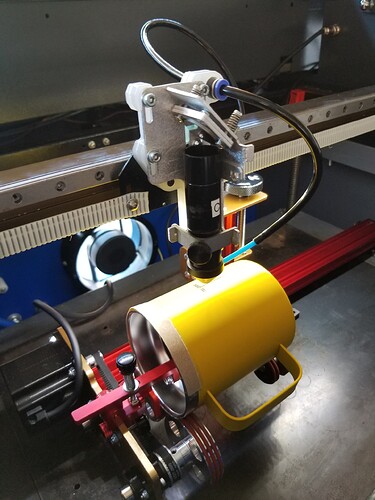
This is mine
It has a ‘hold down’ and a roller at the end of the object…
Where does your machine home? The graphic was mirrored like yours homes in the rear/right…
![]()
I guess it makes sense that the mug is slipping. We haven’t figured out a way to secure things on our rotary (yet). Multiple previous projects have turned out well, so I haven’t really considered that before. I see now that the “wall” that the open end of the cup rests against can be extended up. I’ll try that… but it still won’t ensure that the cup turns correctly.
Our laser does home in the rear right. Would that affect anything?
I looked through the forum for help with understanding the start speed you mentioned. When I have the rotary attached and on, it should show up in the Edit → machine settings menu, right? I’m switching back to the rotary to check that now…
There are techniques to help hold it down.
Put a ‘weight’ inside the cup, adhere something to the areas that engage the wheels to increase traction. I tried sand paper strips. I didn’t have great success with any in particular. The may work for you…
Most of these have drawbacks, the weight works well for some, but the problem is the mass of the cup and traction, so it’s kind of counter useful.
The acceleration for the Y axes and the start speed should help. Mine are in the single digits. You will see it moving slower…
You need to ensure there is no kind of oil or anything that would let it slip. I wipe my coated mugs off with alcohol before I engrave.
If you haven’t already, go to the “Edit → Machine settings” and use the ‘save’ options to write the current configuration to a file. When you modify it for your rotary, save it as a different file and you can just ‘load’ and ‘write’ it to the controller.
Shouldn’t have any effect. I just noticed the artwork was mirrored and I was assuming rear/right for the origin on your system. Since mine is in a different cornet, back/left, it is mirrored across the Y axes.
Good luck
![]()
If I had problems with slippage, sometimes I would place a strip or two of masking tape to the cup. It seemed to help
I’ve seen on this forum where they put a weighted ball inside the cup to help slippage.
I get the scrunched up one when my steps per rotation are out of whack. Some would argue I shouldn’t need to adjust but I do.
I also have a stainless steel test cup that I put painters tape on and burn at 10%. It etches the tape so i can see the outcome.
I used to have that problem with my CO2 laser all the time. I always put a piece of tape on the item and mark a 10X10 box on the tape and measure it to make sure the steps were correct.
Mentioned that, it’s kind of counter from the fact the issue is the rotating the mass of the mug. More weight causes the mass to increase and hopefully the traction, but it’s still not easy.
You can see in the picture of the PiBurn that there is a ‘spring loaded’ bar/wheel that will press down on the inside of the mug.
What I’ve found is that it’s usually too aggressive of a setting for acceleration or start speed…
Good luck
![]()
This topic was automatically closed 30 days after the last reply. New replies are no longer allowed.


