Hello all !
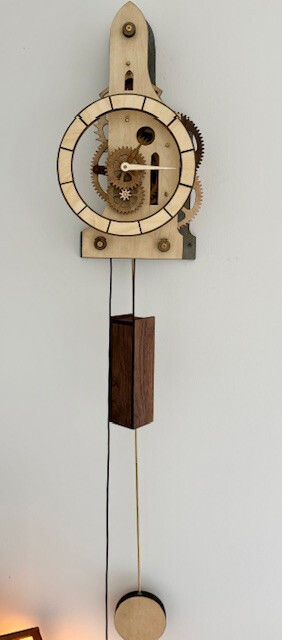
Our latest project, a wooden pendulum clock. Very fun project
and keeps reasonably good time for a dozen wooden gears !
Hello all !
Our latest project, a wooden pendulum clock. Very fun project
and keeps reasonably good time for a dozen wooden gears !
Hi Glenn
Any ideas why the clock doesn’t keep perfect time.
Nice work by the way.
Thanks Pete !
I’m still dialing it in, it’s primarily the pendulum length which is adjustable via a threaded rod inside of the brass pendulum shaft. Getting the counter weight just right so it exerts enough downward force to keep the clock running without over stressing the mechanism, and I just redid the capstan to eliminate a little slippage in the counter weight cord.
There are quite a few variables that factor in to the overall accuracy. Over a 6 hour period it’s only off about two or three minutes, for twelve wooden gears meshing together with a 5.6 lb counter weight I’m pretty happy with the results. I can hear a very slight difference in the pitch of the ticks as the timing gear rotates which makes me think I may have a slight alignment/gear meshing or binding issue to track down as well. I periodically make small adjustments on the pendulum length but I don’t think I can hope for much better especially when temperature and humidity start to fluctuate.
It’s somewhat mesmerizing to watch the gears rotating, I tried to post a short video but that’s not permitted on the site, but then again not a lot of things on this site are in motion !
Laser cutting wooden gears is really difficult. Actually it’s very easy to cut a gear using a laser. It’s just about impossible to get one to function properly in a clock. I gave up trying to get a mainspring type wood gear clock to work using a laser.
So great job if the clock simply keeps ticking for a decent amount of time.
You could upload a GIF or put a link to a video on YouTube or other hosting sites. I’ve also seen people use google drive on other forums so that should work here as well. Really cool project!
That time keeping is a good result considering the materials and changes in temperature and humidity etc with so many factors in play. I hope you can keep us updated with any further insights. I grew up listening to at least two or three mechanisms working in any given room in the house due to my father’s love of mending time pieces and I learned early to listen between the ticks!
Thanks for the information Gato, great idea I attached it below !
I’m thinking about making a few changes mainly to the counterweight system. I think this is an area that could be strengthened as the counterweight bears on the palls that lock the load to the main gear. I cringe a little when winding even with the load off as the thin wood that locks the capstan to the gear in forward motion could be a point of failure. I’m also going to try to add a suspended pulley system to extend run life. Currently it runs for about 10 hours then needs to be rewound, I’m going to try to reduce the counter weight size with lead shot filling the canister instead of the steel bb’s in there now. The counter weight is 9.5 inches and it drops at 5” per hour, (the clock overall is 20” top to bottom) so if I add the pulleys and can reduce the size of the counter weight I’m hoping to get a 24 hour runtime. If your interested I’ll post a revision when I get that all done. And yes Peter, I really love the sound in the house, definitely a distinct tick and a solid wood tone tock !
I think this is brilliant!!
I would love to have a go at this project, would you be prepared to share your Lightburn files?
Regards
Ed
Ed it is brilliant !
I’m not being cheeky, LOL, I wish I could take credit for the design, the clock was created by Dr. Stephen Ressler.
If you subscribe to his lecture series through the Great Courses website,
https://shop.thegreatcourses.com/do-it-yourself-engineering
you can watch the video showing design and build which is extremely interesting as are all of his lectures on the great courses website. It really is a fantastic source of information. You can subscribe to the Great Courses lectures on an Amazon subscription for $7.99/month. If you are a documentary addict like I am you will love this series, it covers everything from engineering, self defense, history, art, self help, physics, astronomy pretty much any topic of interest, literally hundreds.
But you won’t get the plans and source book that way, you need to subscribe through the Great Courses site for the clock video, or possibly the whole DIY engineering series to get the source book, instructions and plans all of which you will need to complete the clock. The subscription for the 24 lecture series is $39.99. The series has many DIY builds, pumps, gear sets, rc blimp, bridge, plane, catapult, etc.
I wouldn’t feel right forwarding the plans as they had to be purchased, and If I only shared my Lightburn cut files from there you would only have 1/3 of the information needed to complete the project.I learned a lot about the mechanics of the clock through building it, it was well worth it and a cool project to display in the house.
Through watching the lecture series, getting the Sketch-up files, plans and instructions I’ve gained a lot of knowledge (and a ton of respect for Dr. Ressler - google him), I may take a crack at designing one myself. Sketch-up has a feature that will help you design the gears then allow you to export them to cut.
If you decide to go ahead with the build I can give you some tips that I learned along the way that will probably be helpful.
Hi Glenn,
Thanks for coming back to me… Unfortunately I am not in a position to subscribe to the courses, but no matter… I was under the impression that you designed it yourself, so I fully understand and agree that paid designs should not be shared!
I will give it a go at some stage to build a unit of own, it will just take a bit of time with Freecad to get all the bits sketched up…
Thanks Again…
Ed
Most Excellent!
I built a wooden pendulum clock about 20 years ago using a scroll saw. I never did get it right, even after many months of tweaking. I have to dig up the paper plans and have another go at it using a laser this time.
Thanks for the inspiration.
To calculate the weight, it’s best to use sand, as it allows for greater precision. Then, simply place whatever you want on the pendulum with the same weight.
I thought a pendulum weight was adjusted for position, not weight.
I think Big Ben (a famous clock in London) is adjusted by adding or taking away from a pile of old pennies on top of the pendulum weight. I guess the idea is that putting extra weight on top of the weight moves the centre of mass of the pendulum up a bit so makes the effective length of the pendulum shorter and vice versa
Makes sense, but I wonder how we can make that work using sand.
I think what Jose was referring to was the counterweight. As Mike pointed out the period or swing time of the pendulum is what regulates the clock. Lengthening the pendulum slows the clock while shortening it speeds it up. If you disconnect the pendulum the force of the counterweight will run the clock, you put just enough counterweight on to keep the clock running smoothly without the pendulum, then reconnect the pendulum and dial in the length to keep correct time. The pendulum regulates the fall of the counterweight via the anchor that moves up and down, seen at the very top of the clock in the gif. If there is too much counterweight it binds the clock and it won’t run, it’s a delicate balance.
The pendulum has to have a certain amount of mass to keep momentum, but I don’t add weight to it. Mine is a 6” x 1” hardwood disc, inside the brass rod is a threaded rod that extends into the disc and can be screwed in or out to adjust the overall length to slow or speed up the clock.
Setting the counter weight is critical, and I just switched to lead shot over steel bb’s. Since the size of the counterweight gets ungainly if it’s to big I want to keep it compact. Lead is 7:1 times heavier than sand. As Jose pointed out I slowly add weight to the counterweight dribbling the pellets in to get a good run weight then take the counter weight off, weigh it, then build my final counter weight enclosure filled with lead matching the test weight.
I’m in the process of adding pulley’s to lengthen the run time, and with the pulleys the pull weight gets reduced by a factor determined by the number of pulleys and configuration. With friction in the pulley it takes some fiddling to get the counter weight just right so it’s really helpful to be able to slowly add weight to the counterweight.
I can share a pic when I get the pulley system added, I added one decorative one that looks cool, kinda steampunkish, but I’m playing around with a four pulley setup shooting for a 24 hour run time.