Hello everyone, I’m having a bit of a problem with LightBurn and I’m hoping I can get a tip from someone. I am sorry, I’m new to this. Please forgive my ignorance. I’m trying hard to learn all of this.
Really my question has more to do with workflow. What I’m doing is cutting out guitar picks using a small CNC machine.
To engrave onto the pics using my 40 W laser, I routed out slightly oversized pockets into MDF with (so that I can print 10 at a time with the laser)… and again, these picks sit in the pockets that are the same shape, and this way the laser knows the exact place they should be in.
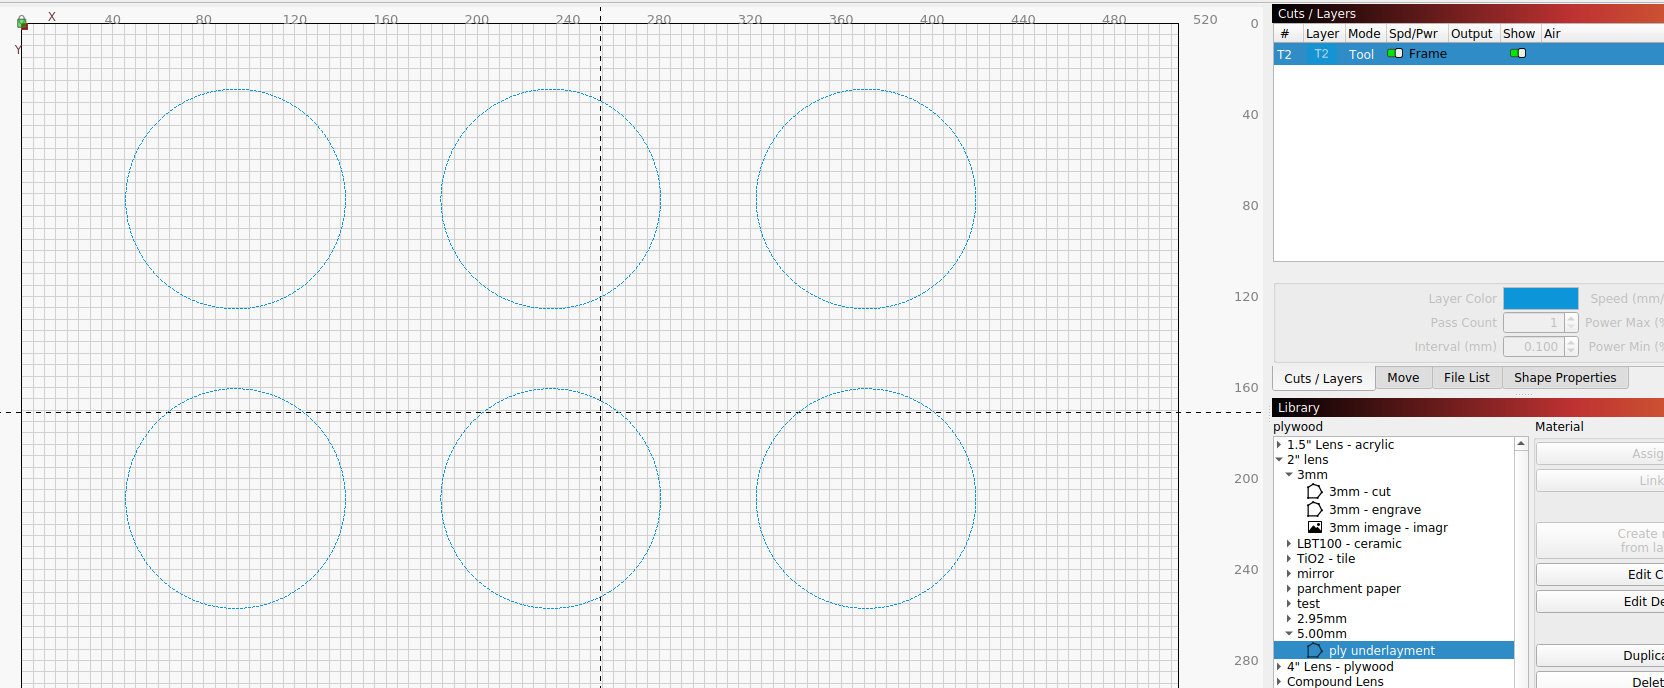
So I’ve got an .svg file with 10 picks arranged on a grid, and I included one 25 mm diameter circle pocket along with this. What I have been doing is just printing out 25 mm circles with a faint crosshair on it… I slip the paper into the circle pocket I made, and I try to fire a single dot that hits the crosshairs exact. Then things print right…
But I’m really having trouble getting the crosshairs to be “dead center” in the circle I made. The SVG file has 10 shapes (maybe 9 picks and one circle)… so I can’t just tell it to find the center, and it doesn’t snap to any logical gridlines.
Adjust the “Distance” in Move window to something smaller to allow finer adjustment. You can also hold “Ctrl” key on the keyboard as you press the jog buttons to get even smaller adjustments.
I think part of the problem is the template is made on one machine and it’s being used in another. I’ve dealt with this and you need something to align the item to a position known to both machines.
If you can cut with the CO2, figure out how to place it so you can take it out and put it back in with as much precision as you can…
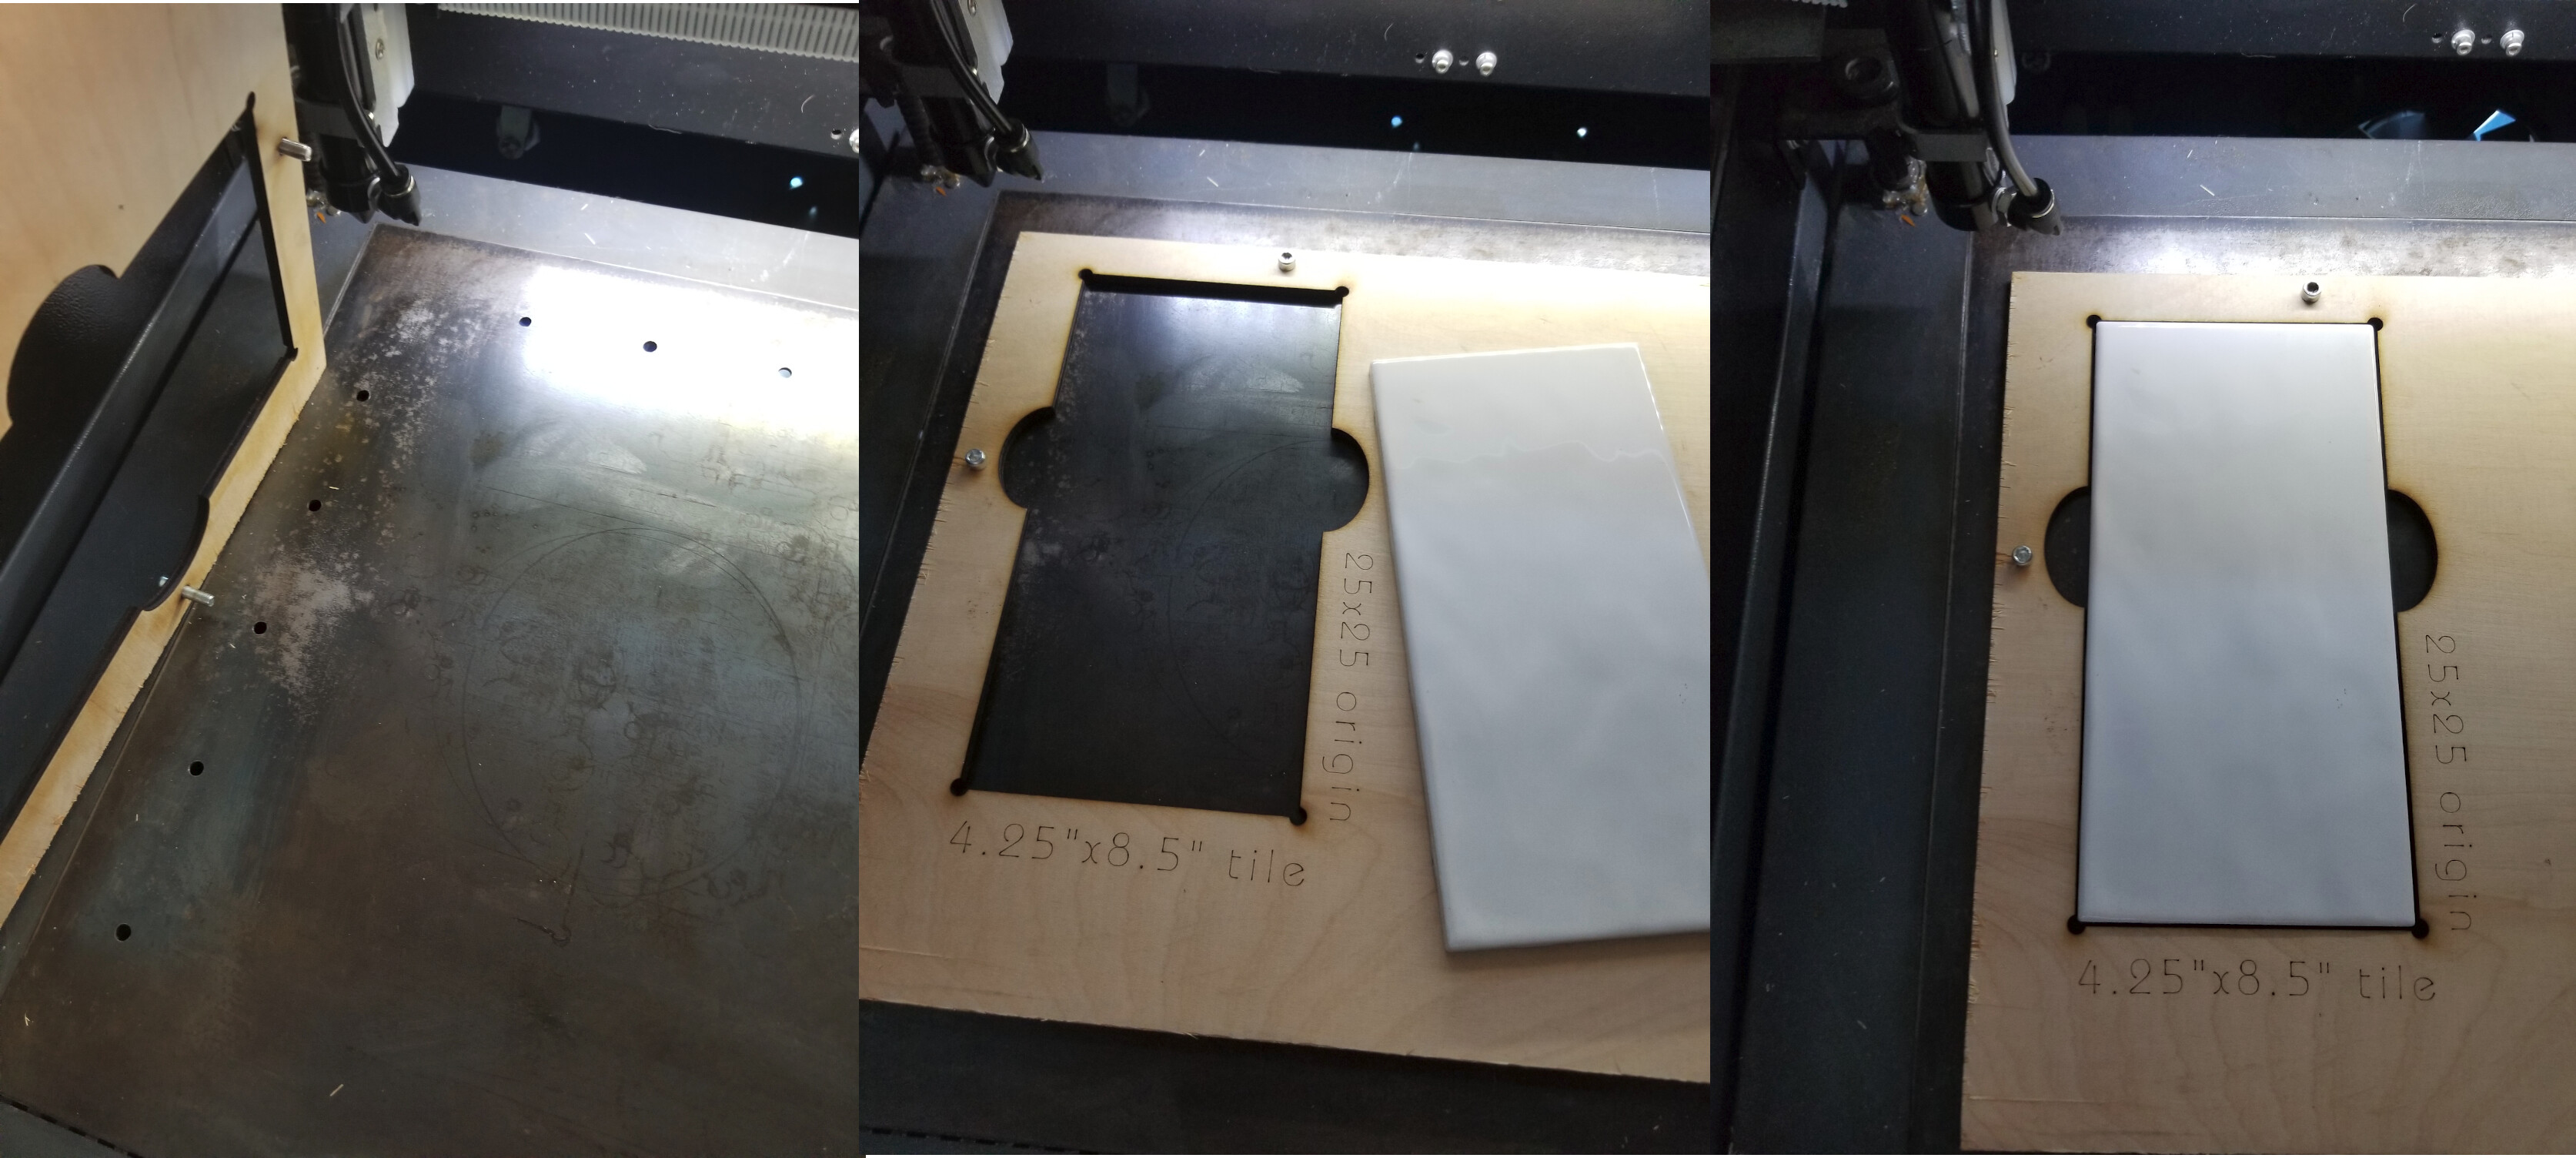
I have drilled holes in my table that accept screws.
I cut the screw hole pattern out.
Put in the screws, replace it on the table and cut out the template using absolute coordinates.
This ensures you can put it in and go… Keep the template as a master…
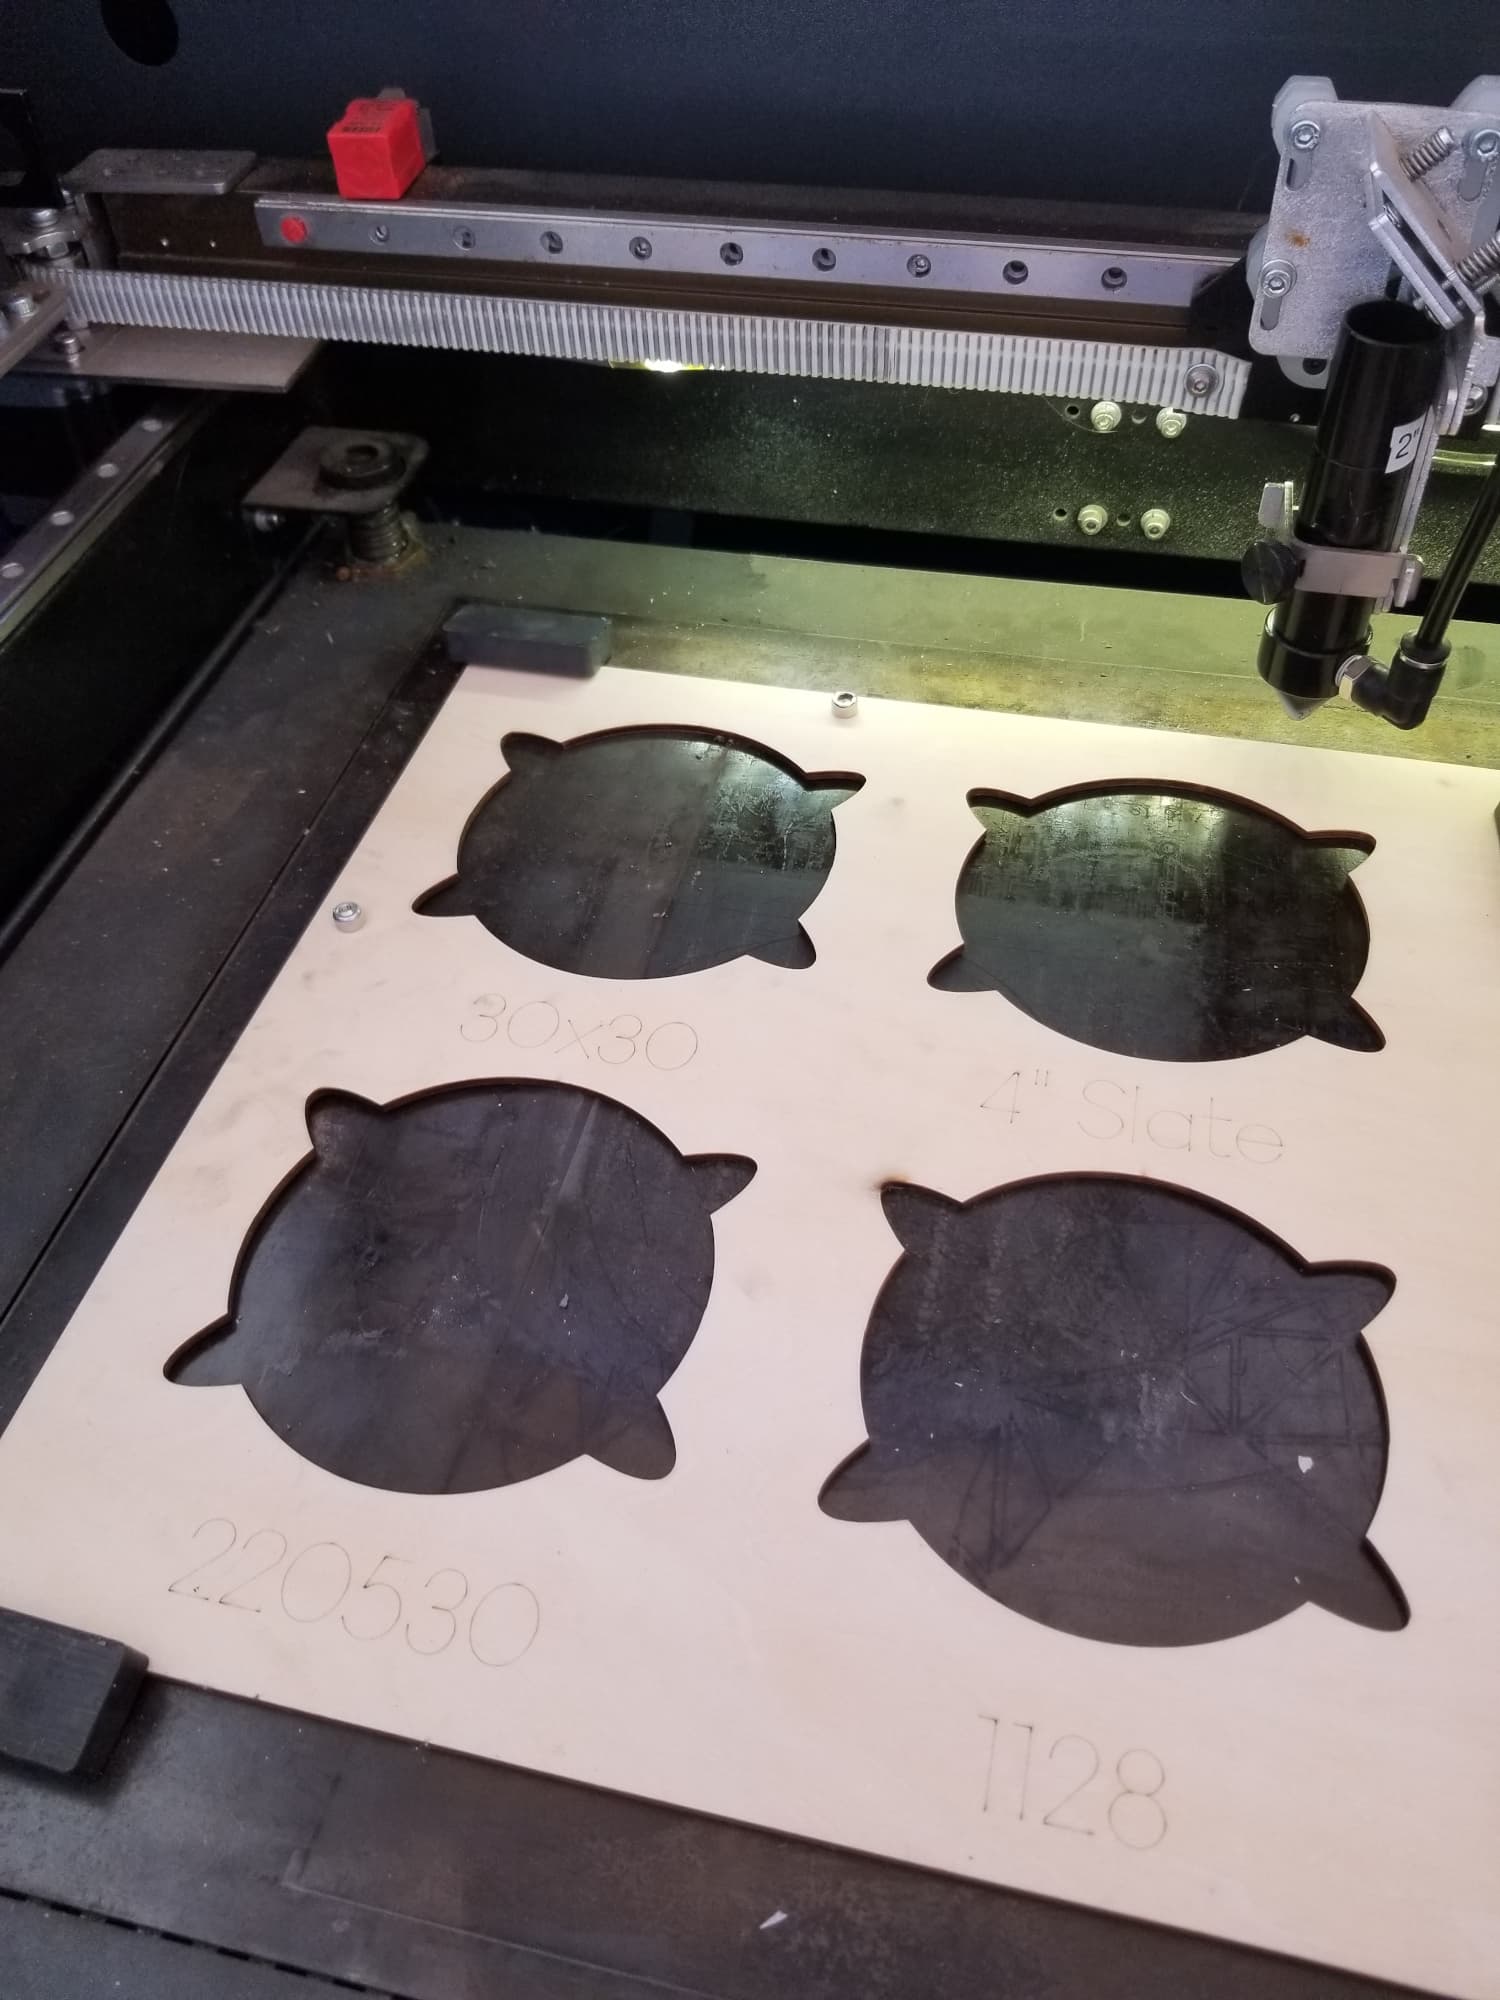
Here is one for six slate coasters… Alignment screw holes… You only need two if they are snug, but I have a choice of which of the group I want to cut out… The inner blue is where your artwork will be…
oh wow, this is really helpful! Thank you very much.
Reading through this I do have one question, at least initially:
How did you locate the holes to drill into the bed of your laser? and did you just use a hand drill? Or would I need to remove the bed somehow and use a drill press? I just don’t know how I’d get the distances to be as precise as the distance of the holes that are cut into the MDF i’m using.
I actually, sprayed the plate with LBT100, which is supposed to bind to metal… it didn’t really work as expected… Probably not enough patience.
I could easily see where the laser marked them… Went to the drill press and drilled them out…
Probably could have used a black marker pen or something similar…
This is really trick… If you have a camera, Lightburn will show your lasers work area as a background. You can place the art wherever it’s laying on your screen…
–
The camera shows you where on your machine the work piece is positioned… So with the camera, you don’t need to drill any holes… However, you need a camera…
If you go to help → camera selection help it will help you out with suggestions for a camera.
awesome! I will post some photos here in a day or two.
I got 3mm birch plywood… when the laser cuts through it, do i need anything under it (to protect the bed?)… I’ve done quite a bit with this laser, but somehow I’ve never cut all the way through a material
A nonmetallic bed / platform / whatever is pretty much a consumable, but @jkwilborn’s suggestion of putting some air under the material improves the result by keeping fumes away from the underside of whatever you’re cutting.
Spikes work better than knife edges, if you can add tabs to your design to hold the cut pieces in place:
I have this machine and I don’t think it allows for z axis movement…
Since I probably can’t adjust the laser head up and down in relation to the material will it be a problem for me if I put the work up on spikes like this? I seem to recall that there needed to be a certain distance between the material and the laser head… Maybe I’m mistaken…
There’s certainly focusing travel to handle sheets of different thicknesses, which would then set the maximum height for the spikes or bars or whatever.
The general idea is to direct air from the front of the enclosure across the sheet, with enough space below for the air flow to clear the fumes. Your K40-style machine extracts air to the rear, my 60 W OMTech exhausts toward the bottom, so those cardboard “cover plates” you see on the honeycomb direct the air toward the rear.
It’s a nice action picture of your laser. The small bright point at the exit of the nozzle, does the laser beam hit the nozzle or is it just an optical illusion?
Are you able to communicate with the laser but can’t configure it or you cannot connect to the laser at all?
Can you use Ethernet? This generally alieviates messing with drivers… I run a Ubuntu machine so, although similar, not really easily transferable…
If you’re using usb, did you run ‘lsusb’ to see if you can see the device is connected.
You can also use ‘sudo dmesg | tail’ to get just the last bit of the system messages. If it’s not seeing it, unplug it then a few seconds later plug it back it… It should show up on the dmesg output.
Jack,
Thanks! I’m all in favor of the path of least resistance. What would I need to set things up via ethernet? I’m new to that. I’d love to get this solved asap. Thank you very much.
The most simple way is to just set it’s ip to something unused on your lan and plug it into the network…
You can plug it in directly, but the communications have to be setup as the Ruida has a static IP.
The other option is to use something like the Lightburn Bridge which has a code layer to help with the UDP communications with the Ruida… This software was developed by Lightburn specifically for the Ruida.
If you have an old router with wireless capabilities and you can configure it as a wifi bridge that will also work…
If you have a Raspberry PI laying around, you can download the image, load it on an SD card and it’s virtually plug and play.
And follow these instructions… if you have any issues speak up… it’s pretty painless…
My Linksys router shows all devices connected to it. I can bind a MAC address with an IP address. When there is a re-boot the router will assign the same IP to the bridges MAC address.
Bind may be referenced by a different term, such as reserved or something similar… You would have to do this with a direct connect to the laser anyway, because the Ruida is a static IP device.
This way it’s always resolved to the same address, no changes to the device…