Hello all! Just upgraded my FS Pro 48x36 to the Ruida RDC6445S. Originally I could not get the laser to home in the back right where the switches are. I read some other posts and changed some things in the Vendor Settings inside of Lightburn and it is now homing correctly. I do have the device set to the back right. All of that is good. Now, when it is at home (0,0) the control pad beeps when I try to jog to the left. If I try to jog right on the control pad, it will overtravel the home limit and try’s to keep going. The opposite happens when I try to jog in Lightburn. Jogging left runs the head to the right and jogging right will run it back to the left until it hits the home switch again. I cannot get X to travel to the left.
Turn the Invert Keypad Direction switch Off and see if that improves the situation. Both LightBurn and the machine control panel determine the direction using that value, so both should work correctly. Note that homing must work properly before tweaking that switch.
Some oddities in the settings:
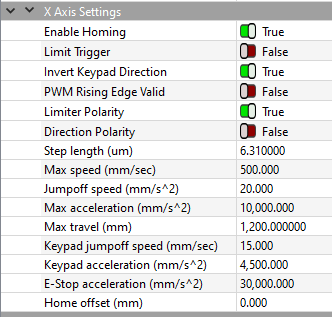
Most Home switches are active-low (“NPN”) and require Limiter Polarity to be Off. If you know the switches are active-high (“PNP”), it’s all good.
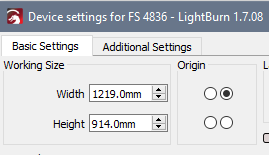
The LightBurn Width should match X Axis Settings → Max Travel (ditto for Height + Y Axis). If you know something we don’t, it’s all good, but tell us so we don’t assume something is wrong.
The Max acceleration value seems unusually high. If it works correctly, it’s all good, but keep that in mind should the motors make gronking noises when they can’t accelerate hard enough. Ditto for the Y axis.
Thank you very much for the response. I will check these as soon as I get home. I’m pretty sure that turning the Invert Keypad Direction makes the head move in the opposite direction of the button. when the home switch is not made, the contact is closed, when I click the switch to simulate the head being in position the connection opens up. I only set the X and Y travel a little lower just to be safe until I get the rest sorted. I’ll raise that up once I know home position is good. I for sure need to adjust the Max acceleration down. would a tenth of that be more normal? This is just where it was when I fired everything up.
If it homes correctly, then the Direction Polarity is correct. With that set, then Invert Keypad Direction is the only knob left to change the jogging direction. Perhaps it jogged backwards while you were settling the homing direction.
The X is 10000 and Y is 3000 for my machine, but I’ve done some tweaking. On the other paw, if the settings continue to work as-is, there’s no reason to change them.
The controller settings must match the actual physical travel, regardless of any nominal claims, but those are typically hard metric values like 700 mm.
Because LightBurn thinks the X axis on your machine is 19 mm larger than the controller does, motion near the far left edge of the platform will not end well.
Test 1: Turn Invert Keypad Direction off. Result: pressing the right keypad button and the right software button, make the laser head move to the left. X axis homing now moves extremely slow and eventually the motor hums, but it stops moving. If I get it close enough in X that it can reach the switch and home, X and Y both display zero on the keypad, I cannot move the head to the left by pressing the right button. If I press the left button the head will move to the right and the X number goes up on the keypad as if it is traveling in a positive direction.
Test 2: Adjust X and Y travel to be what it should 1219mm x 914mm. Result: No noticeable change.
Test 3: Change X axis Limiter Polarity to False. Result: The head tries to home in the back left position. Changed back to True.
Test 4: Change the X axis Direction Polarity to True. (note the Y axis Direction Polarity is set to True) Result: Left keypad and software button now move the head left. Same goes for the right button. The machine now homes in Y first and then tries to home X in the left corner. Moving the head left indicates a positive direction on the keypad screen and moving right is a negative direction.
Test 5: Change the X axis Limiter Polarity to False again. Result: The machine successfully homes in the back right and then rebounds in Y about 49.8mm.
Woo Hoo! Looking great so far. On to the next step of the process. I’ll let you know for sure if I need any help. Thanks a ton!
I’d say I’m good at this point. It made it through the calibration and the size looks great now. Material test ran really well. Is there a max I can run the speed at? everything moves MUCH faster now than it did with the OEM controller and software. Thanks again for all the help.
The two Max Speed settings limit the top speed along the axes, so you can go nuts.
However, the actual maximum speed is limited by both the ability of the motors to run at that speed and to provide enough torque to accelerate at the Max Acceleration settings. The default values probably don’t match your actual hardware.
There are also speed & acceleration limits in the Cut Parameters and Engraving Parameters sections, although how they apply to any particular design remains a mystery (to me, anyhow).
I’d try running the classic testcase at various speeds & accelerations to see what happens:
Scale it to fit the platform and run it as fast as it will go in Line mode with optimizations turned off and power set to mark a sheet of cardboard. When the motors fail to keep up, the machine will complain vociferously; it won’t cause any damage, but it’s a hint to back off.