I didn’t quite notice the distortion happening until I tried to etch a tumbler. This may be a classic error, hoping someone can point me to the right fix.
This was using the RA 2 pro roller with the rotations per mm set to 32.02 rollers were at 17mm
I dialed that in by making a rectangle the same circumference of a cylinder and the ends were right on each other…
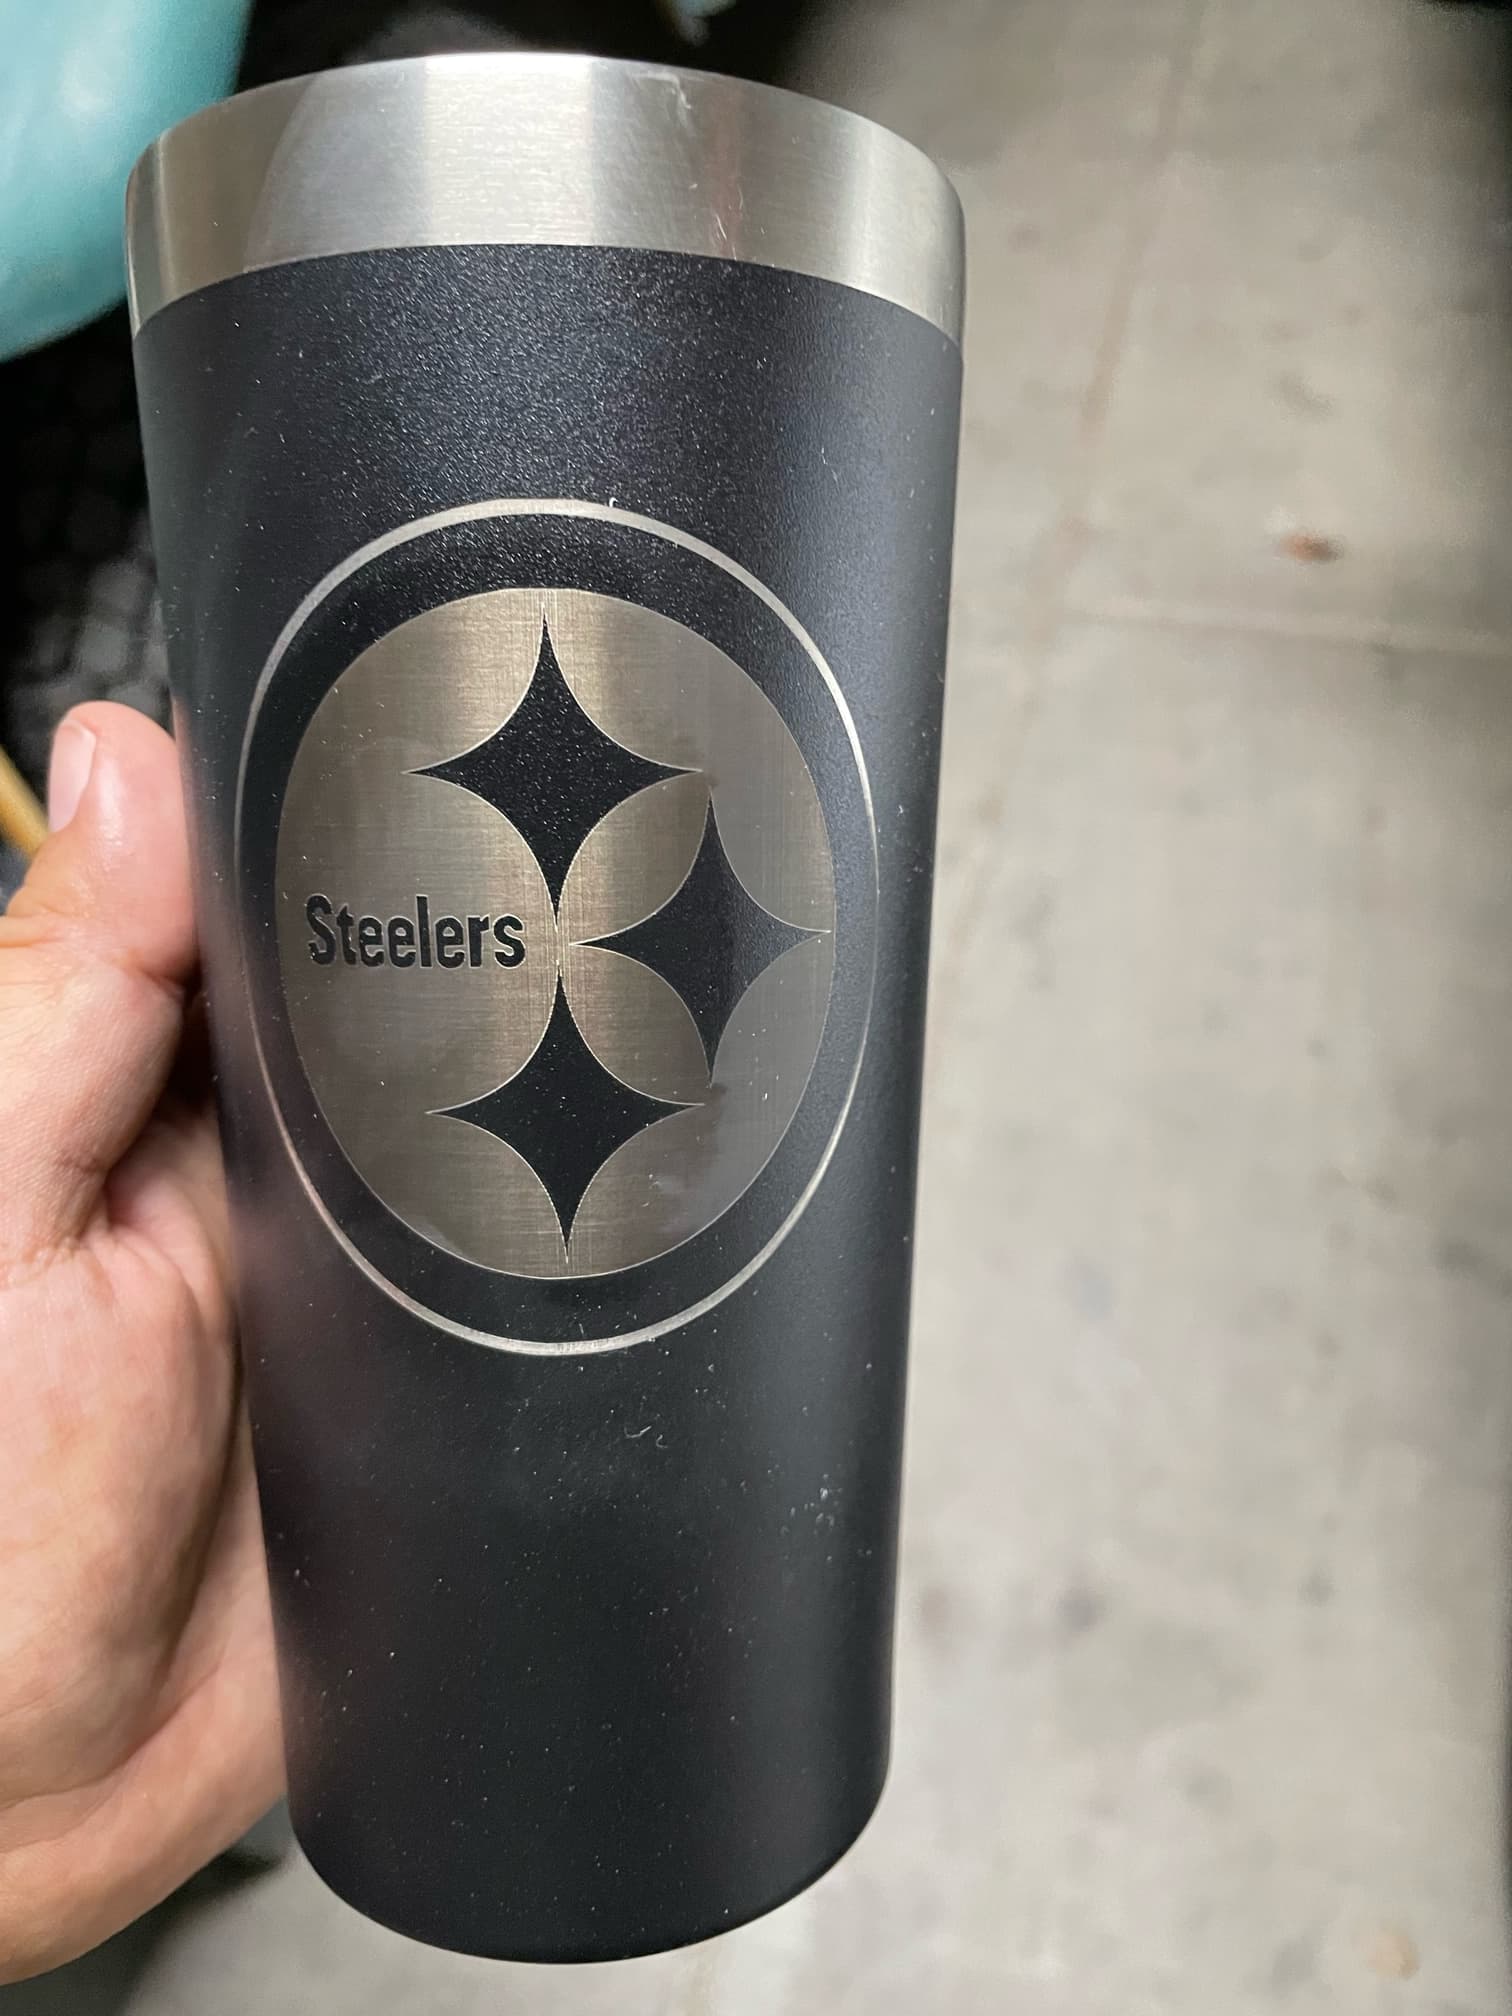
I tried my hand at etching a logo on a tumbler. The circumference I set to the wider point of the tumbler because that was the part that was rotating on the rollers. Then I used the little brace with wheels that comes with it, to support the smaller bottom of the tumbler. I raised the end until it was level with the top. And ran my project, still dialing the setting I used 300mm and 90% power
THE PROBLEM
This was basically a circle logo… but it came out elongated egg shaped any suggestions?
using an xTool D1 with RA2 pro rollers, Have LightBurn 1.1.04, built Thu 2022-04-28 @ 09:52, Using a Win 10 machine. I built and a Win 10 Surface pro to connect to the laser. I am a new user.
Even though you had it level, you are basically engraving on to a cone shape. A perfect circle will always elongate when printed onto a cone shape. I’m sure there is a formula to figure out how much you would need to skew the height to have it appear a perfect circle. I’m not educated enough to what it is, but there is always trial and error. I usually remember best by making mistakes anyways. That being said, I also learn well from good instructions too. Hopefully one of the the highly intelligent folks on this forum knows the formula or knows of an app that can process it for you. I have a couple projects that will be going on similar tumblers. If I get to them, and figure it out before someone shares the knowledge, I’ll report back with what I learned from my mistakes
Theoretically the height shouldn’t be elongated because this is the axis it revolves around - it should be the same vertical dimensions as the artwork. The cone shape complicates it as well.
However, the width will look squished in (for want of a better word), because that’s the part that’s wrapped around the object - moving away from you, and curving in around the cylinder. But this may not be what’s going on in this instance.
I don’t have a rotary tool, but I have done this in the past manually - creating decals for tapered mugs, bottles etc. From memory I used a software program called Vector Studio to distort the artwork. I would think that LB has an adjustment to take the natural distortion into account?
[EDIT] After doing some research, it doesn’t look like LB has tools that allow you to warp/distort objects, that is an entire vector logo. If I have the time, and anyone is interested, I’ll post some tips on how you go about editing artwork (ex LB) for these sort of situations.
Yes it was…
Just slightly bigger by .5mm could be just me not measuring correctly but it was basically set for 3 inches and the size top to bottom of the logo is 3 inches.
Also the width of the logo is 2.5 inches making it a difference of .5 inches. according to a difference calculator that’s an 18% difference. would it make sense if I squished the logo by 18%?
Ok, so you measured the width of the logo by wrapping a piece of paper (or similar) around it, then measuring it? If so, and it is 2.5 inches around in width, then you would have to look at the “mm per rotation” adjustment under the rotary tool setup.
Even so, if that “Steelers” text looks like a smiley face when viewed straight on, meaning curved up at the ends, then you would need to distort the logo accordingly to make it look straight (horizontal).
I actually just put calipers across the logo to measure but your way sounds better. Just did it. Its actually 2.75 inches a difference of 8.7% - and I went back and remeasured the top to bottom still 3 inches. MM per rotation adjustment… is this just a trial and error sorta thing? plug in a new number and see what happens?
No, I wouldn’t say it’s all trial and error, but I did read up, and one of the Developers mentioned to do a test to make sure that when you are imaging around the circumference, the measurement is what it should be according to your artwork. Keep adjusting until it is correct. But this was more about a cylinder than a cone. Cones are a special case.
Weather it looks correct, is a different issue. Take a simple square, 2 inches by 2 inches. Image it on your tumbler, measure top to bottom - 2 inches, all good. Measure around the width - 2 inches, all good. But now have a look at it from the front, at the sides - does it look correct?
I wish I had a rotary tool just to be sure. Maybe I’m just going mad. This only applies to cone shape objects, not straight cylinders, but 2 inches around the top of a cone is not the same as 2 inches around the bottom of a cone. It won’t look right.
Anyway, probably not worth bothering about for some logo’s.
It’s hard to explain.
[EDIT]
There’s two methods of distorting the logo:
“Let’s keep things in Perspective”
“I want to be Isometric”
Anyway, 4am in the morning here. Time to call it a night and think about it more tomorrow.
I found this video which seems to help… there was some discussion of getting the right sizing and taper with cone shape images this really helped I still need to practice but I think Im on the right track now. https://www.youtube.com/watch?v=SV3Zfqnhyag
One thing that I mentioned earlier is a “smiley face” effect with straight horizontal lines - this is incorrect when engraving directly onto a tapered object. It took me a while to get my mind around this.
Cut out a square piece of paper and stick it to the side of your tapered tumbler and you will see what I mean.
What this means is that if you decided to produce the same logo on LaserMax or similar, then stick to the side of the same tapered object, it would look wrong - you’ll get the ‘smiley face’ effect.
What’s interesting in the video is that he suggests printing it out on a laser printer first, cutting it out and wrapping it around the object. This ONLY works for cylinders, not tapered objects. But it does give you a good idea in any case.
Anyway, enough of my ramblings. I wish I had a rotary tool. I think I’d better get back to doing whatever it is I’m meant to be doing.
Nice work. Curious to know what power your D1 is? I have 10W with air assist.
What software you are using? Laserbox/LightBurn? Oops. I see it is Lightburn
And what line interval you are using. I have tried multiple speeds at 100% power, from 75 mm/s to 35, 20, 10, 5, 2, 1. Always ends up looking dark, rather than shiny.
This might be a good addition to Lightburn. In the rotary set-up menu have a taper setting where you give the circumference of the tumbler at the top of the job and at the bottom of the job and have the software do the math to warp the image so it appears as it looks on the screen (or at lease closer to it).
Hey Tim, I find I always have to buff out the laser’ed stuff on tumblers with heavy powder coating. But they usually shine right up. The ones with thinner powder coating have less of an issue. I think the darkness is just ash cooked onto the stainless. Try a stiff brush, something just shy of being able to scratch the powder coating and scrub it under soap and water.
Sorry for the late response…
I use a 10w xTool Di, Lightburn
for that first test I ran 4200 mms at 100% power.
line interval was .01 (iirc)
Someone hinted on a forum to defocus the laser by 2mm to get a better tumbler etch.
So that’s what I did: I placed my focus lever at the top of the tumbler on the rotary tool, then found a SD card, It measures just a tad over 2mm in thickness… I added the top of the tumbler and reset my laser. I also used Brasso to buff the final image into a nice shine. Hope that helps.
If the height of the logo is correct, should be configuration on the rotary (Steps or circumference of the object).
Even the shape of the tumbler is ‘conic’, should not have that much distortion.
Make sure the steps are the correct, if not, use the tumbler with a couple of layers of masking tape and mark the circumference only as a line (at low power to barely mark the tape)
I’ll double check it. I did do this with another cylinder and dialed in my steps at 32.2 mm (now here is my dumb question for the day)
Do steps change based on the cylinders I’m marking? meaning if 32.2 was rock solid on the previous one… I had assumed it was set for all… but now I have to check that each and every time?