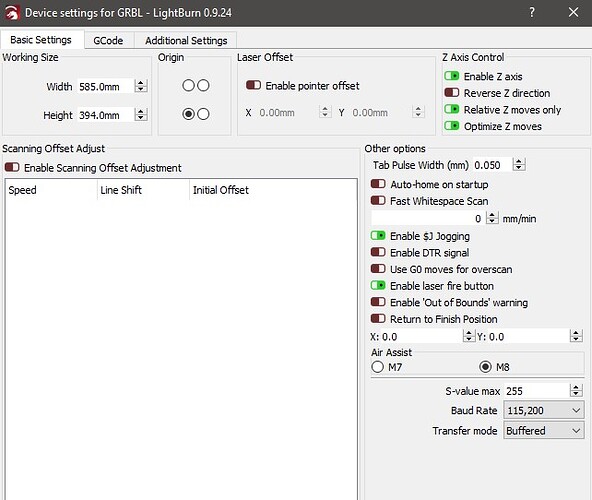
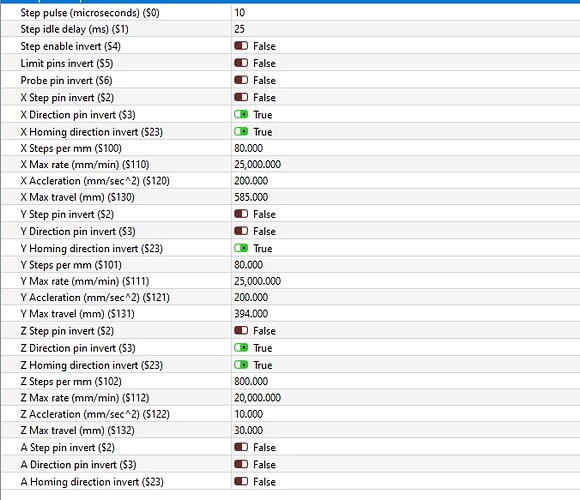
I can only show you how mine is setup, it may not be the right way but it does work.
My x-axis moves up to the limit, that sets it at zero.
I have the following settings
I also have this uncommented in my grbl firmware
#define HOMING_CYCLE_0 (1<<Z_AXIS)                // REQUIRED: First move Z to clear workspace.
#define HOMING_CYCLE_1 ((1<<X_AXIS)|(1<<Y_AXIS))  // OPTIONAL: Then move X,Y at the same time.
// #define HOMING_CYCLE_2                         // OPTIONAL: Uncomment and add axes mask to enable

// NOTE: The following are two examples to setup homing for 2-axis machines.
// #define HOMING_CYCLE_0 ((1<<X_AXIS)|(1<<Y_AXIS))  // NOT COMPATIBLE WITH COREXY: Homes both X-Y in one cycle.

// #define HOMING_CYCLE_0 (1<<X_AXIS)  // COREXY COMPATIBLE: First home X
// #define HOMING_CYCLE_1 (1<<Y_AXIS)  // COREXY COMPATIBLE: Then home Y

// Number of homing cycles performed after when the machine initially jogs to limit switches.
// This help in preventing overshoot and should improve repeatability. This value should be one or
// greater.
#define N_HOMING_LOCATE_CYCLE 2 // Integer (1-128)

// Enables single axis homing commands. $HX, $HY, and $HZ for X, Y, and Z-axis homing. The full       homing
// cycle is still invoked by the $H command. This is disabled by default. It's here only to address
// users that need to switch between a two-axis and three-axis machine. This is actually very rare.
// If you have a two-axis machine, DON'T USE THIS. Instead, just alter the homing cycle for two-axes
#define HOMING_SINGLE_AXIS_COMMANDS // Default disabled. Uncomment to enable.

// After homing, Grbl will set by default the entire machine space into negative space, as is typical
// for professional CNC machines, regardless of where the limit switches are located. Uncomment this
// define to force Grbl to always set the machine origin at the homed location despite switch orientation.
#define HOMING_FORCE_SET_ORIGIN // Uncomment to enable.
When i use the up arrow in the move tab my laser head moves down towards my material, what i do is jog it down with it fired at 1 percent at a slow rate until it looks pretty focused, when that is done I use the get location button to make a note of its location. Very important to return it to zero position or re-home it after doing this. As an example if the “get location” says its focused at 34mm i would put that in the offset section as a negative number (-34.0) if i wanted a step that would also be a negative number.
That said,
What i usually do after my rough manual test is a “tools-focus test” with a range a little above and a mm or two below (make sure you don’t go too low and crash it) with 30 steps. So in the above example i my go 33.5 or even 33 to say 35 to 38 ( i have 62mm of travel on the axis your may be different) just make sure your second number isn’t so low the laser hits your material. The biggest thing to remember is that the laser focus test uses POSITIVE numbers not negative ones, otherwise you will crash it into your limit switch at the top, which i can say won’t halt the movement when it hits it will keep trying to go up in that case. If you turn of “optimize z moves = off” the laser will go down to burn a line, then up to zero and then down again until its completed. With “optimize z moves on” it will go down once at the beginning and complete the whole test, then go back to zero.
I may tweak my offset based on the best looking line in the focus test once its done.
You might notice I cannot stress enough to be aware that its at zero or homed before you start to burn a file if you start anything when its not at zero it will consider where it was when you started as zero and move from there and if you put a negative number in the focus test it will crash towards the limit switch and beyond.
#define HOMING_SINGLE_AXIS_COMMANDS in the firmware compile to my board allows me to issue a $HZ command in the console to perform a homing cycle only on the Z axis which i find very useful but you would have to have the ability to compile and flash your own grbl firmware into your controller.
Some of these settings may not be applicable to your hardware but maybe they can shed some light on how to get the most out of the z-axis.

