Z-axis on Ruida 644XG not responding (Software only)

Hello everyone,

As a first-time poster on this forum, I’m reaching out in the hope of finding some guidance and solutions to an issue I’m experiencing with my 50W Chinese laser cutter, which I purchased a few years ago from eBay. I value any help or advice you can offer.

Background:
I’ve been using the original software that came with the laser cutter for years without major issues until recently. After replacing the PSU and laser tube, the machine functioned well, but then I encountered a problem where it started cutting circles in an oval-ish shape. In an attempt to resolve this, I reset the settings based on some advice, which unfortunately led to further complications.

Switch to LightBurn:
To rectify the settings issue, I tried LightBurn (on advice) on a free trial and it successfully resolved the problem. I’ve been using LightBurn ever since and have been very impressed with it.

Current Issue - Z-Axis Movement:
Lately, I’ve been facing challenges with cutting through materials like 3mm Acrylic, 3mm MDF, and 1.6mm dual-tone plastic, even with multiple passes, often resulting in extensive clean-up after each cut. I thought using the Z-axis step feature per pass in LightBurn would ensure complete cuts through the material. However, I’m unable to get the Z-axis to move via LightBurn. It moves fine using the hardware buttons on the machine, but there’s no response when I try through LightBurn - no motor sound, no movement in the Z-axis pins, nothing.

  • I have enabled Z-axis control in the device settings.
  • I’ve experimented with various machine settings to activate it.
  • Attempts to re-home and refocus not led to positive results.
  • The controller (Ruida 644XG) displays changes in the Z-axis figure, but there’s no physical movement.

I also explored the possibility that the U-Axis might be connected instead, as per a similar issue I read about, but using the rotate buttons didn’t yield any movement either. Additionally, the “Diagnosis+” on the controller indicates that the limit is not engaged.

The machine’s configuration is listed as rdlc-v8.00.49. If there’s any additional information required to diagnose this issue, I’m more than willing to provide it. Resolving this problem is crucial for me, as I believe it will significantly improve my cutting results.

Thank you in advance for your time and assistance.
If a 50 W laser cannot cut through 3 mm acrylic in one pass, something is badly wrong. Messing with the Z-axis cannot improve the situation: you must determine the actual problem and fix it.

Some areas to examine:

  • Is the lens properly focused on the material?
  • What cut speeds & powers are you using?
  • Have you verified the mirror and lens alignment?
  • Is the tube lasing in TEM00 mode?

@ednisley on top of it, no surprise. I’d just like to add the way I advise…

  1. properly working tube
  2. clean and aligned optics
  3. correct focus

If you have these three, it will work.

I’d start with TEM mode.

Good luck

:smile_cat:

I want to express my gratitude for taking the time to respond to my query. Your insights are greatly appreciated, and I’m going to try out the suggestions you’ve provided now.

I’ve been experimenting with multiple passes at reduced power settings to avoid prematurely burning out the PSU again. Currently, I’m working at a speed of 20mm/s with 40% power. I’ve noticed that lower speeds or higher power settings tend to produce a small flame that follows the laser, resulting in the blackening of the material.

Interestingly, even a test run at 10mm/s with 90% power didn’t successfully cut through the material, which was quite unexpected.

I will definitely explore the settings you’ve mentioned. However, I’m still keen on resolving the Z-axis control issue with LightBurn too :slight_smile:


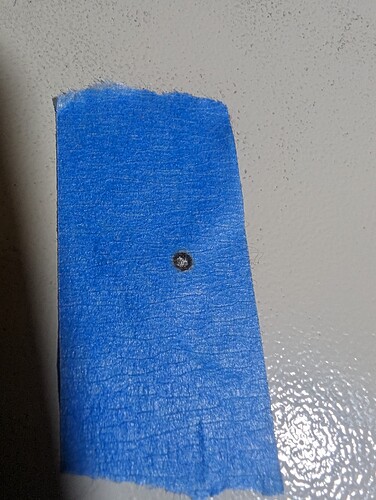
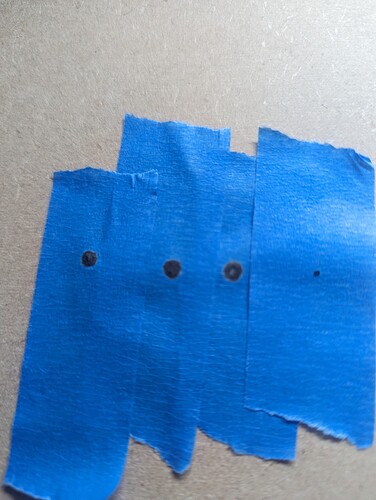
I’ll be honest and say I don’t really know what I am looking for here. This is in order of:

Direct from the laser
Past mirror 1
Past mirror 2
On the bed

Lens checked, mirrors cleaned. Just gone through alignment last week.

Can you do another at m1 that is much lighter. If you burn it, we can’t tell how the power is distributed. Dark center getting lighter as it moves outward.

It looks like it’s moving out of TEM00 state…

:smile_cat:

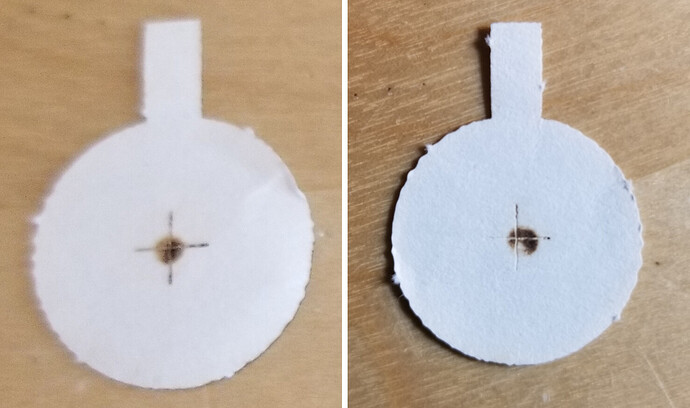
This is at 20%. I’d also be interested to learn what I am looking for here.

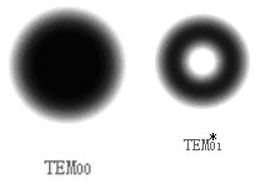
Post 2 has a link to how the power is distributed over the beam. When mine failed, it looked like this. Left is actually two pulses as this is the m2 mirror… The right one came from m1. Notice it isn’t centered and the dot itself doesn’t show the beams Gaussian power distribution.

A very light mark is all that’s needed. You want to see the gray gradient.

Lower your power and shorten the pulse duration…

This is a TEM00 and TEM01 resonance. These are really too dark but I think can get the idea?

tem-pair

:smile_cat:

Thank you for this help. I’ll draw something up to do on the cricut that I’ll cut out in greycard, hopefully get the definitive results. :slight_smile:

If it is in TEM01 mode, how do I fix it?

I would still like work out the original z-axis issue. having it programmatically set for focus for different size materials would be a benifit…It is sitting perfect just now after doing this testing. But that’s for 3mm material, just about to try and manually reset it for 1.6mm material, and worried i wont get it back perfect again :smiley:

You buy another laser tube … :man_shrugging:

The thing I had trouble realizing is that laser tubes are consumables that not only wear out due to ordinary use, but go bad on the shelf.

Generally tubes don’t fail spectacularly, but subtle changes in the internal chemistry or structure wreck them: the tube may look fine, but it don’t work.

Thanks for the response. I’ll look to replace it, but it is cutting something.

Is there any help I can get with the initial z-axis issue?

These seem mutually contradictory:

  • “It moves fine using the hardware buttons on the machine”
  • “Attempts to re-home and refocus not led to positive results.”
  • “The controller (Ruida 644XG) displays changes in the Z-axis figure, but there’s no physical movement.”

Which leads me to think:

  • The “hardware buttons” are not on the controller console
  • The machine has a DC motor driving the Z axis, not a stepper
  • There is no Z axis stepper driver
  • The controller’s Z axis outputs aren’t connected to anything

Take a look inside and report what you see.

This topic was automatically closed 30 days after the last reply. New replies are no longer allowed.