Hi,
I’m setting up my laser and after struggling to get my mirrors aligned I finally have it cutting and engraving. Yay! So I decided to proceed with upgrading the air assist and had purchased the California Air compressor and everything else.
Setting it up was pretty straightforward except for attaching the solenoid.
I had purchased this solenoid:
as it’s what someone recommended on something I read somewhere.
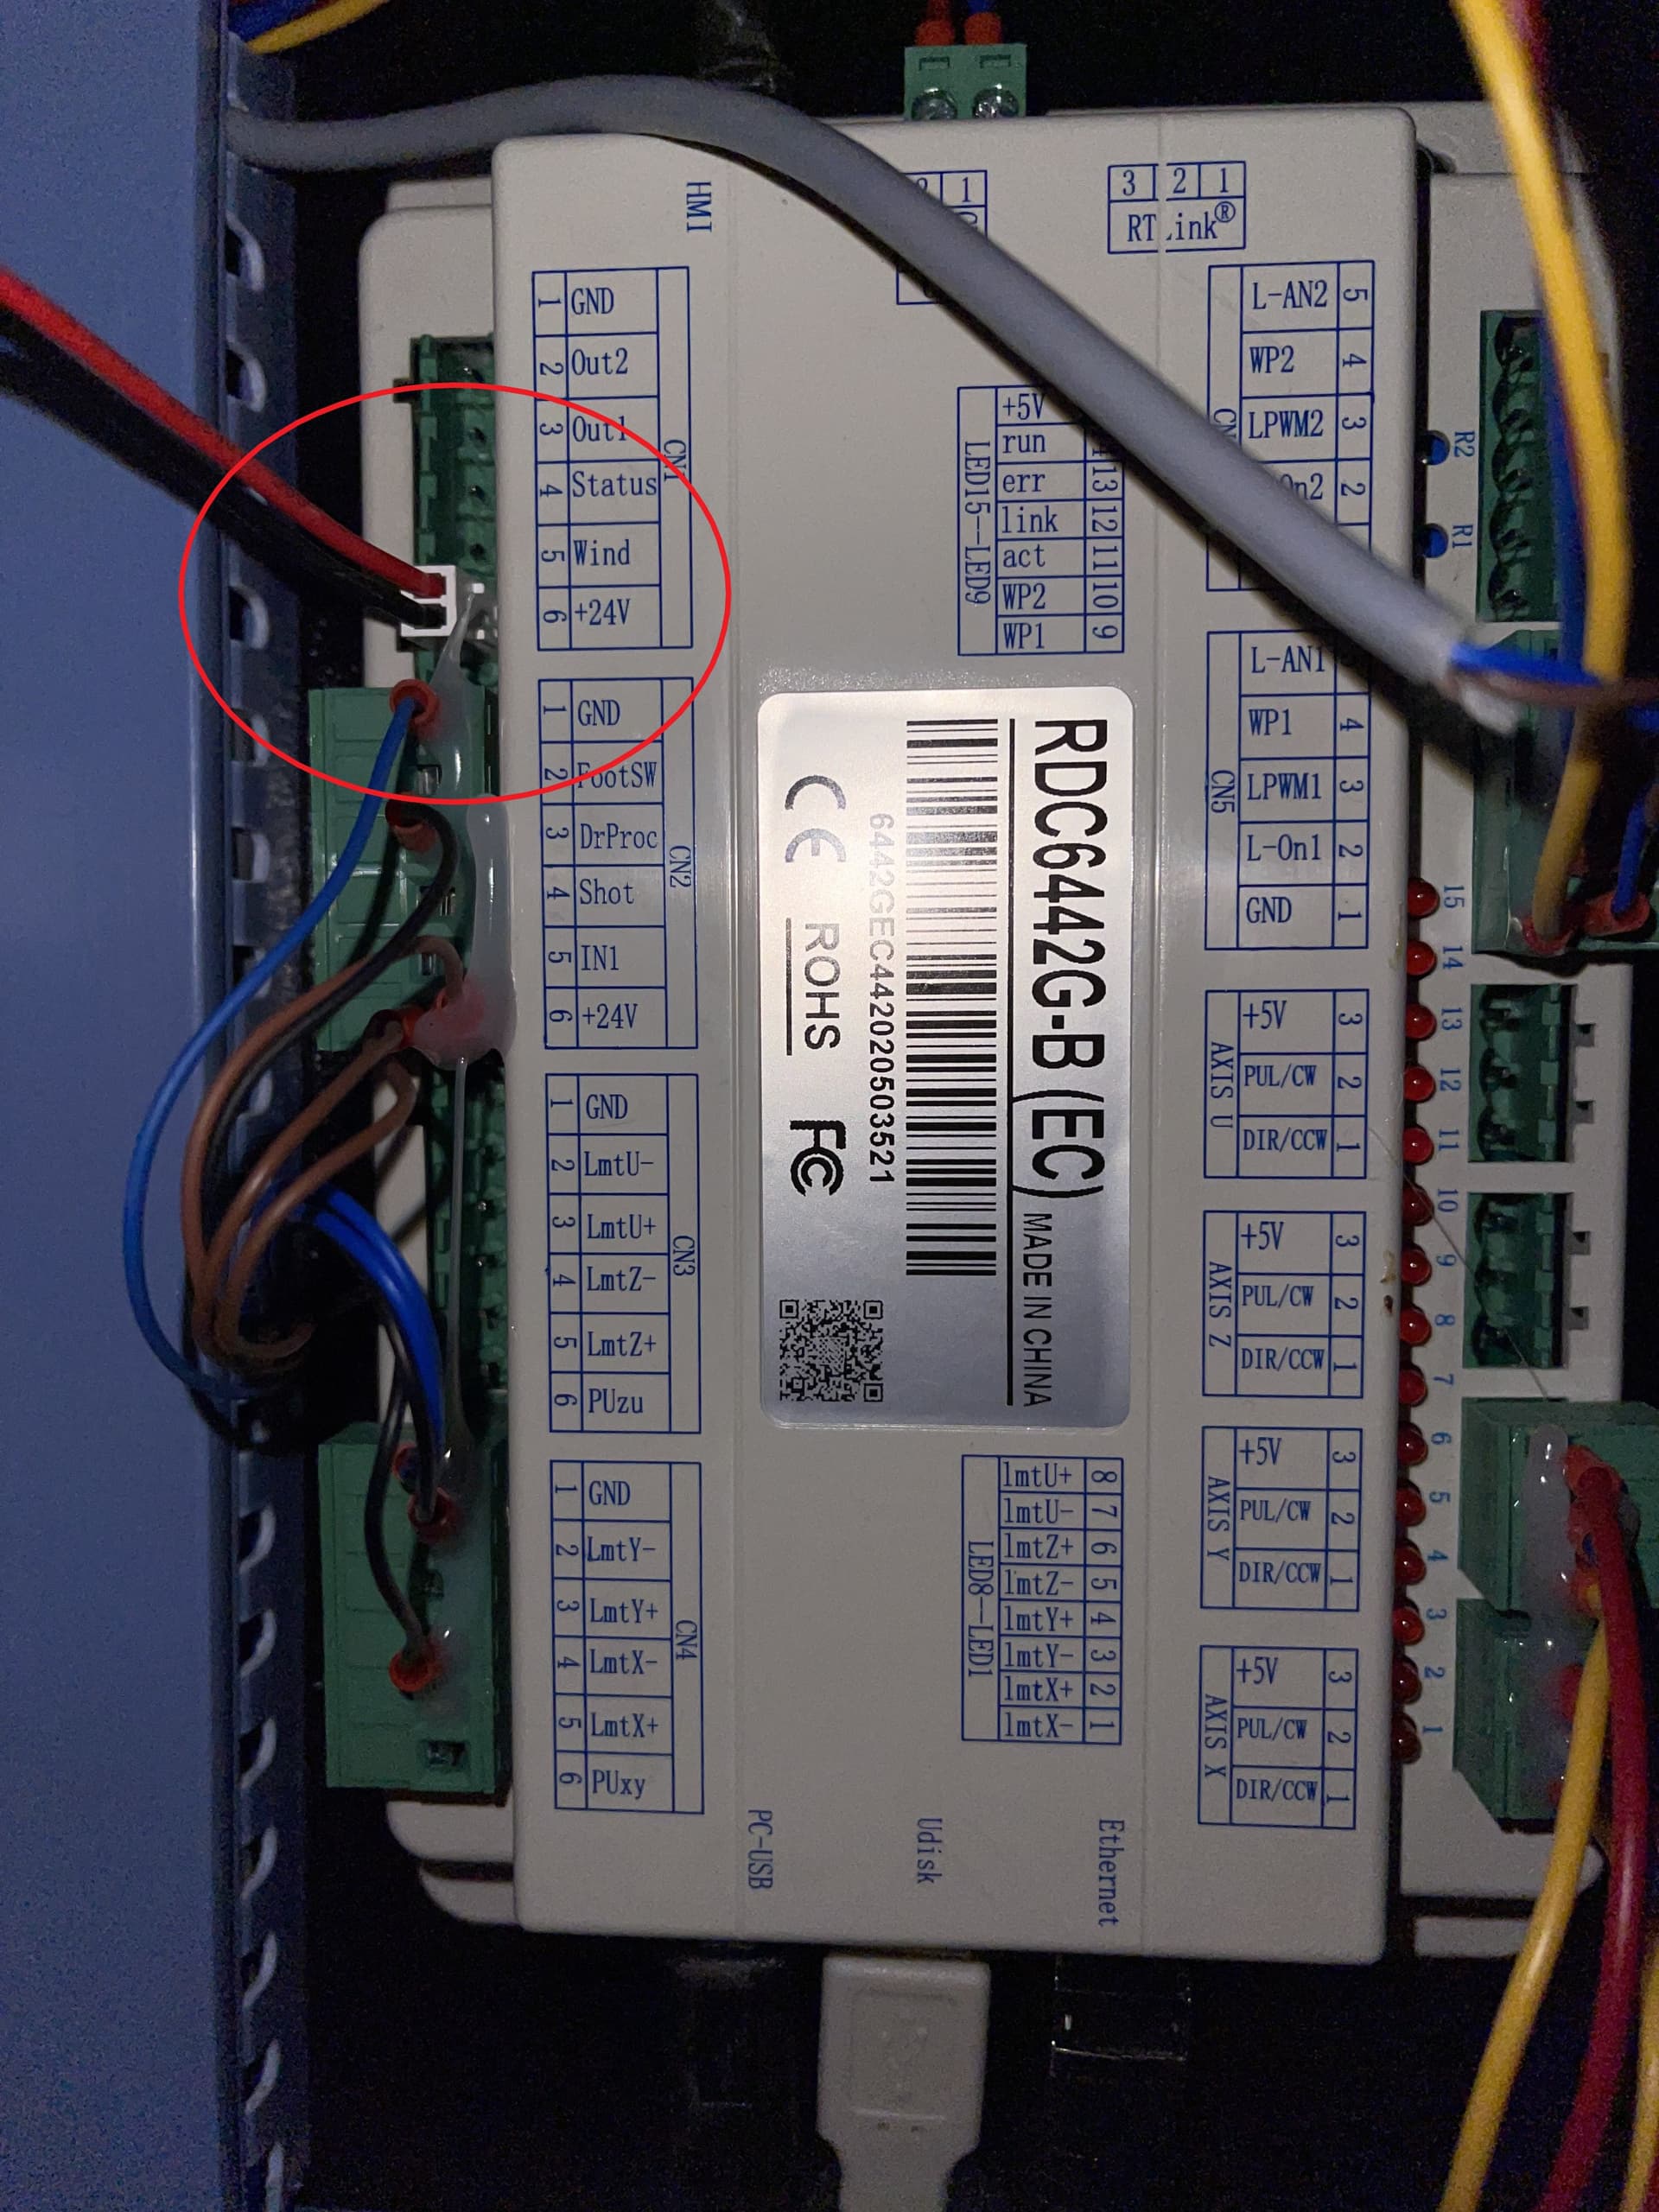
This one comes already wired with the white connector on the end – I had my spouse get in there and connect it for me. This is how the wiring looks:
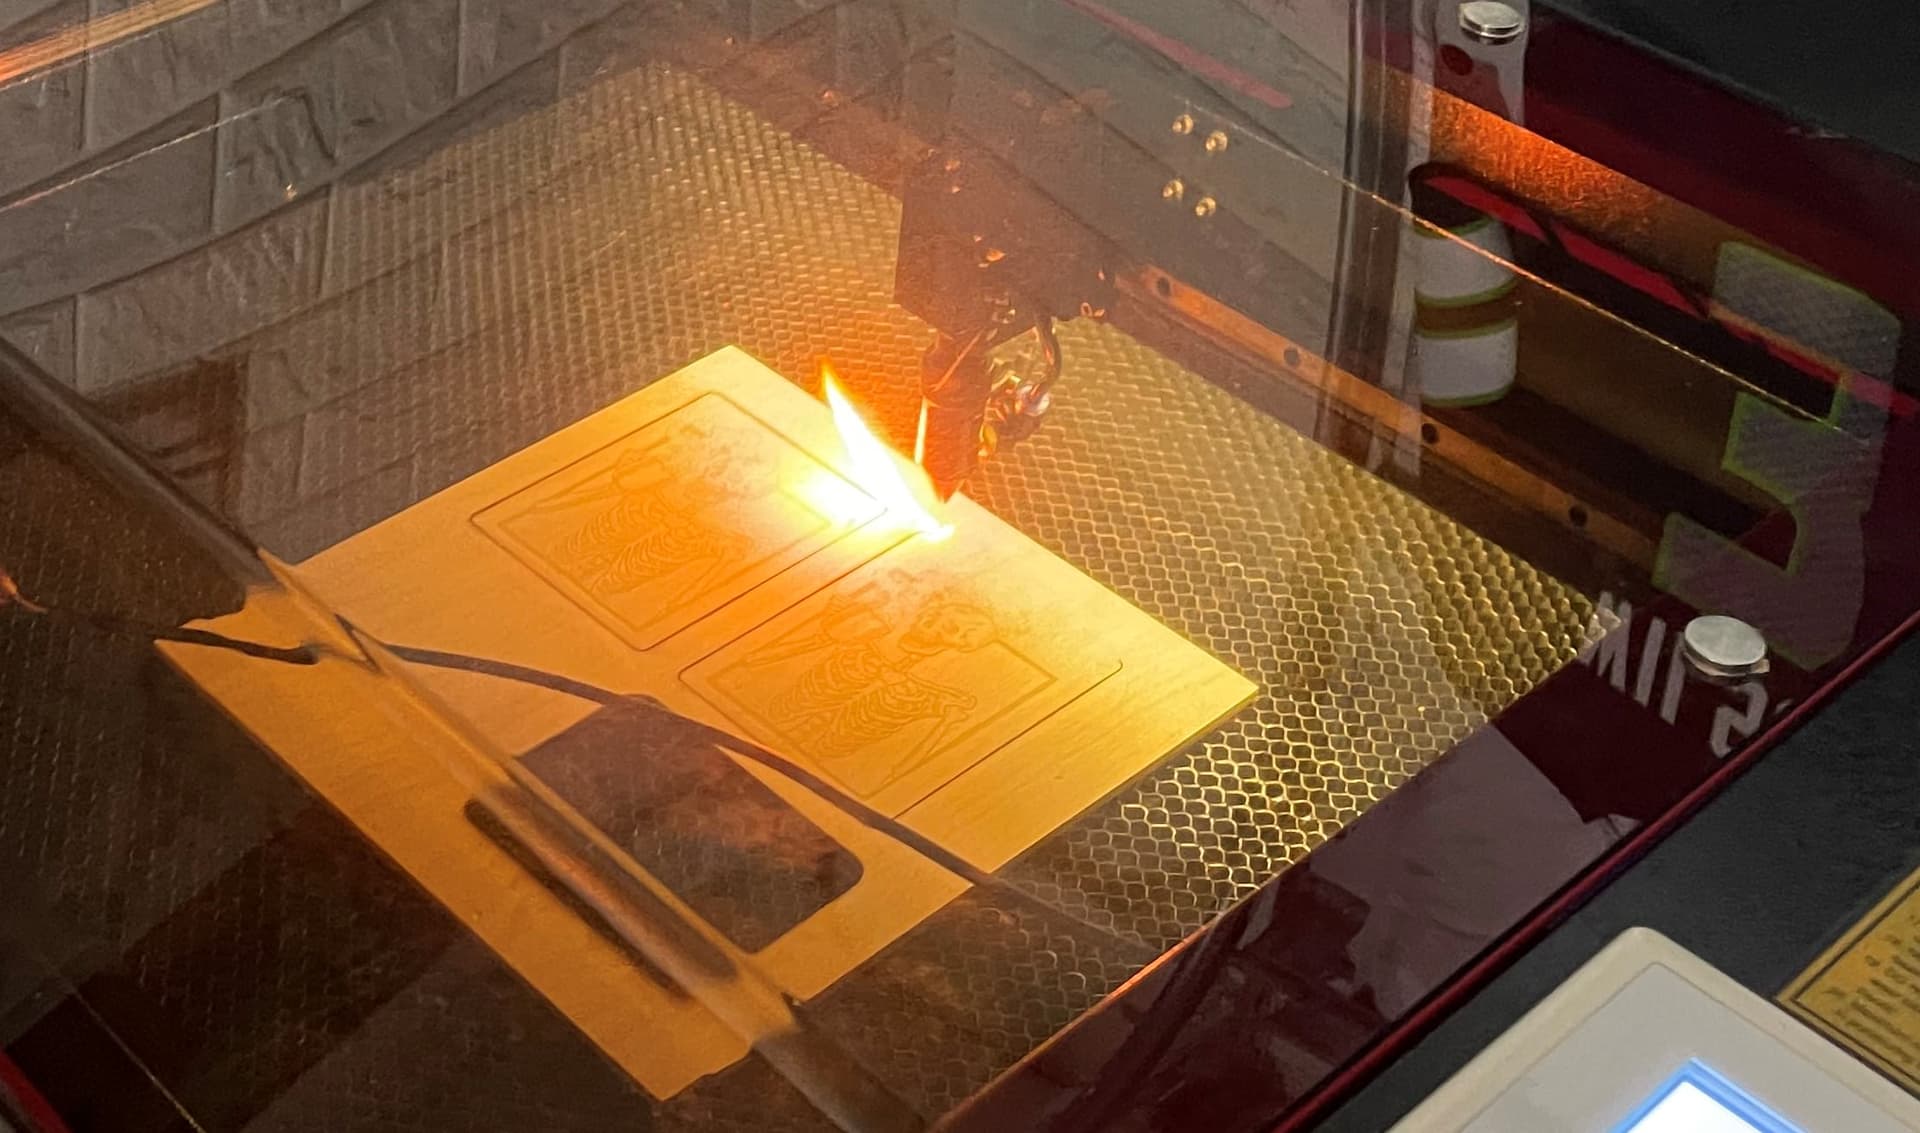
In the photo, I’m running a test with layers with and without the air assist turned on and both are just the same – I don’t see any difference or evidence of the air assist.
I have the psi set at 30 here and, yes, I enabled air assist on the machine in the Lightburn machine settings.
I’m pretty sure I have everything else set up correctly as far as the air assist. Is there a problem with how I have the solenoid wired or is there any other reason I’m getting flames every time I try to cut something?
As the air assist is activated when the laser is running while using Lightburn is there any way to turn on the air assist when the laser is NOT running to see if it’s operational? My husband was telling me to “get into my machine,” but I’m not going to get into my machine when it’s got an invisible burn ray active, lol. Where am I going wrong with the air assist?
Thanks.
I can try reversing the polarity later – my husband is working from home today and my laser is in his workspace so I can’t try it until tonight or tomorrow morning.
It’s only connected at the wind and 24V as shown in the picture (other than the air hoses, of course:).
I’m generally not afraid of DIY but I’m more than a bit lost when it comes to electrical work.
Is that amount of flame normal when you’re cutting through wood? The material here is 1/4" baltic birch. I hadn’t cut it yet with the built-in air-assist so I can’t compare to what it was doing with the aquarium-type air compressor. It’s not actually catching fire, but it has that nice flame going that follows the laser head around as it does its work.
Thanks
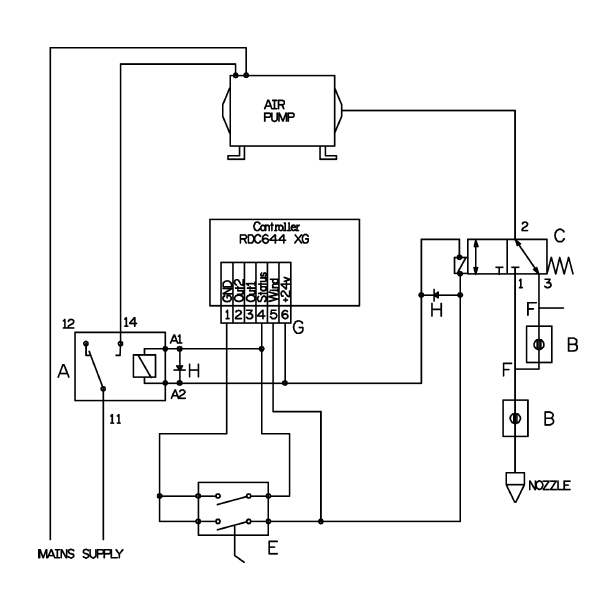
Indeed, the polarity in not correct. The solenoid should have 24V to it all the time and wind grounds it.
To add an override switch you simply need to install a changeover switch so that when it is activated the solenoid has an alternative path to ground.
Edit:
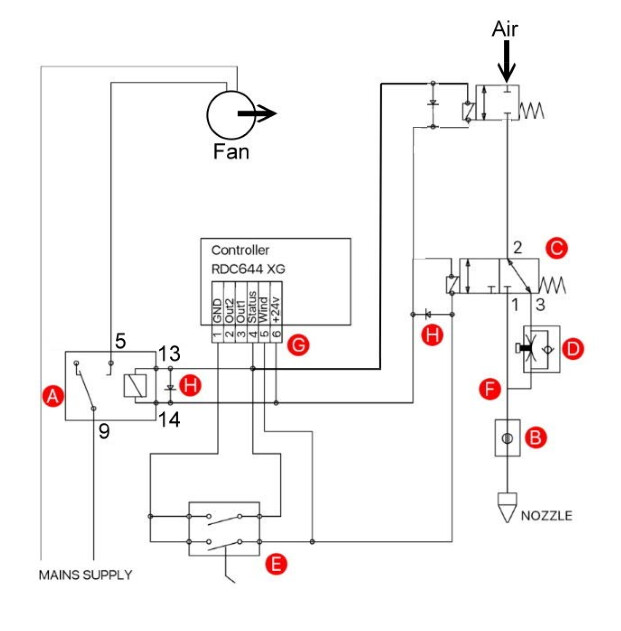
You could purchase the Ultimate Air Assist from Cloudray (Aliexpress store) for about $30 which, as a reference is wired like this:
Or given that your husband is quite handy and given you already have one solenoid, you could have is open that and the relay switch your extractor fan on/off like this:
OK, thank you. I can try revering the polarity tonight or tomorrow when my spouse isn’t working out there. I am not sure how to install a changeover switch, however.
Thanks. I had seen the kit on Amazon, but didn’t purchase it as (I thought) I had the items I needed. The videos I watched and the things I read did not include the finder relay. I’ll look into it.
It’s wired backwards most likely. If air was working, the pressure on your compressor would be dropping fast, you would hear it coming out the nozzle too.
30psi is a lot, that compressor will run constantly. I think I am using 15.
I only have a 60w and won’t use 60% power to cut 1/4 sometimes. What kind of wood are you cutting?
If there is a diode in there it does matter. I have yet to get one that has a diode in it, unless it’s potted in the solenoid itself.
Remember that the Ruida ‘sinks’ current, so the line going to ‘Wind’ will be pulled to ground, so that should be the ground connection. The device you wish to control (solenoid) is attached to power, when the Ruida enables that output it completes the connection to ground.
If you have the air assist, doesn’t it involve ‘status’ for the first solenoid to switch the air?
I assume you have ‘air assist’ on the layer enabled?
‘Wind’ won’t go low if not.
Do yourself a favor and order
You only need the female…
I haven’t had good luck with those valves. I’ve also heard that Cloudray was sending some they knew or at least were advised that they didn’t operate properly. I use a pair of these from Amazon.
Check the operation by enable the parts and see if they are actually switching the air as expected.
Yeah, as I think I said in the first post I did enable the air assist in the controller settings – that is, via Lightburn’s machine settings when i was connected to the machine.
When you installed this, did you try it on a dry run?
Did you or your other half understand this part?
You can always…
Take the air hose off the head, or turn the laser mains power off, so it can’t fire, run the job and feel it with your finger. Don’t want to do this at 500 mm/s, but…
That’s correct Jack. It was me actually. It’s the flow control valve on the bypass. The one they supply is full flow in one direction and metered in the other. The one supplied Has a ‘B’ marked on the adjuster. It should be the one with an ‘A’ marked on it. It means that the metering element is always on full flow. I had some emails back and forth with Cloudray and even though I sent them the AirTac (Brand) data sheets they either didn’t get it or didn’t want to know. You can see the ‘B’ in this picture from their kit
They just said they can’t change it. It’s a simple fix just to swap that one out with one that meters both ways.
It could be that they have changed the part now but not mentioned it anywhere.
Edit: Something on the solenoids, the easy way to tell if it had the diode built in is to look on the connector plug terminals. The one with the diode have a + and - marked on them.