Air assist solenoid questions/Flame when cutting/How to test air assist

I measured with a multimeter all the voltages at pins 1-6. Pins 4-6 have a 24 V voltage throughout the work. Pins 5-6 have a voltage of 24 V only when the laser cuts or engraves (when switching between drawings the voltage disappears, implicitly the solenoid valve will close the air. Also when engraving at the end of each line there is no voltage).
In conclusion, we chose the first option despite the fact that all the schematic published in the virtual space indicate that the solenoid valve should be supplied at pins 5-6.
I mention that my scheme is modified compared to the published one because the compressor is supplied to the external socket of the CNC machine. I have two such sockets on the back panel.
I come back with findings.
In this scheme, the “Air Assist” function is no longer functional, but the solenoid valve will open at the beginning of the cutting/engraving work and will close at the end.

Thanks. Interesting option, must be studied.

Indeed this is the case. The circuit is supplied from the 24V supply all the way through to those pins. When those pins become active they are grounded. % and 6 are opposite.

I can say that I solved the problem as I presented a little above, but Jack Wilborn proposal is also interesting. Thank you all.

Relative to what?

Plus I think your diagram is hosed…

If you have air pressure and the machine is not in ‘run’ mode, sitting idle, you will have low pressure air. When the machine goes into run mode you’ll get high pressure air.

The ‘Air Assist’ in the settings layer will have no effect.

You want the solenoid going to ‘Wind’ not ‘Status’.

In the original Air Assist the ‘Status’ was used to enable the air compressor.

:smiley_cat:

1 Like

The compressor starts simultaneously with the machine. So I have pressure, but the problem is that I can no longer use the ‘Air Assist’ function. But what good is it to disable this ‘Air Assist’ function?

Missed the point.

You have it wired incorrectly to do what you want.

The ‘Air Assist’ on the layer controls ‘Wind’.

:smiley_cat:

I want to hear reasons why some layers are cut/engraved with ‘Air Assist’ disabled. When and why?

Three reasons from me:

  • With the UAA if you trigger it from Status and not Wind then the bypass part will not function and you will have no positive pressure in the nozzle to protect your lens.
  • When cutting or engraving acrylic where best results are obtained with air assist off (also lens protection).
  • When photo engraving, particularly with a short focal point lens, so the air assist isn’t able to blow back debris and discolour intricate detail but on the next layer will automatically switch on when cutting out the result. (also lens protection).

Besides, if I understand correctly, if your air compressor is switched on automatically from elsewhere, what is the purpose of the UAA?

Bypass works all the time because it is a direct channel between the compressor and the laser nozzle. Problems occur when cutting acrylic and probably wood engraving, in these cases low pressure is needed and I can no longer disable ‘Air Assist’. But I can’t work with connecting the solenoid valve to the ‘Wind’ pin either because the opening of the solenoid valve is intermittent and this will lead to its destruction quickly. I searched in the controller menu, in the LightBurn software and in RDWorks, I don’t have that ‘Air Blow’ function anywhere, as I read on other topics.
The only option is to design an electronic scheme that will have a delay of 5 seconds when closing the solenoid valve and thus obtain its opening throughout the work period. In this case I can connect the solenoid valve to terminal 5 ‘Wind’. It is not difficult, I am already working on this scheme.

You will have to find out why you can’t change the ‘blow type’ semaphore.

If you cannot change that, air assist, as designed will never work without the solenoid issue.

It’s simply that it needs the hardware and software to work together and you don’t have either set up properly.

I broke out the spouses Windows box and I don’t have the ‘blow type’ option either. If you follow the the links, one of them has a firmware upgrade. Don’t know if that’s an issue. I have a 6442 but can’t find any higher version than I have. 8.00.67

Might try a previous version of RDWorks. Matt has one that goes back to .48, the video was done on .47

I don’t know if the access to that semaphore is blocked by the client or the device firmware. I would think it was accessible, that it would be available via Lightburn.

:smiley_cat:

Yes I think it might be worth investing in - I did want to reduce the complexity of the install though - less chance of user error!

I suppose it will not hurt if it is in there. Good to know I can install it “downstream” of the preinstalled wires of the solenoid.

I managed to make an electronic scheme that will open the solenoid valve throughout the cutting/engraving process. This installation will allow me to connect the solenoid valve to terminal 5 WIND and to have the ‘Air Assist’ function operable. This electronic scheme will open the solenoid valve quickly when the cutting/engraving process begins and will close 5 seconds late after the process. The delay time can be modified according to everyone’s preference. For me and for other people who have problems with opening the valve intermittently, it will be the best solution. I hope you understood why I choose this method, I also tried RDWorks and it doesn’t open continuously and I don’t do firmware for Ruida, I’m afraid and I don’t even know if it will solve the problem. If you want me to upload the electronic scheme, please tell me, it is at the project level and it behaved excellently on the virtual simulation.

Sure, upload the schematic.

The basic air assist, schematic way up there, works fine.

I guess I don’t understand your issue.

What/why are you changing it’s basic operation?

Lots of people have valid reasons for things, I assume you do to and this is and ‘educational’ forum.

:smiley_cat:

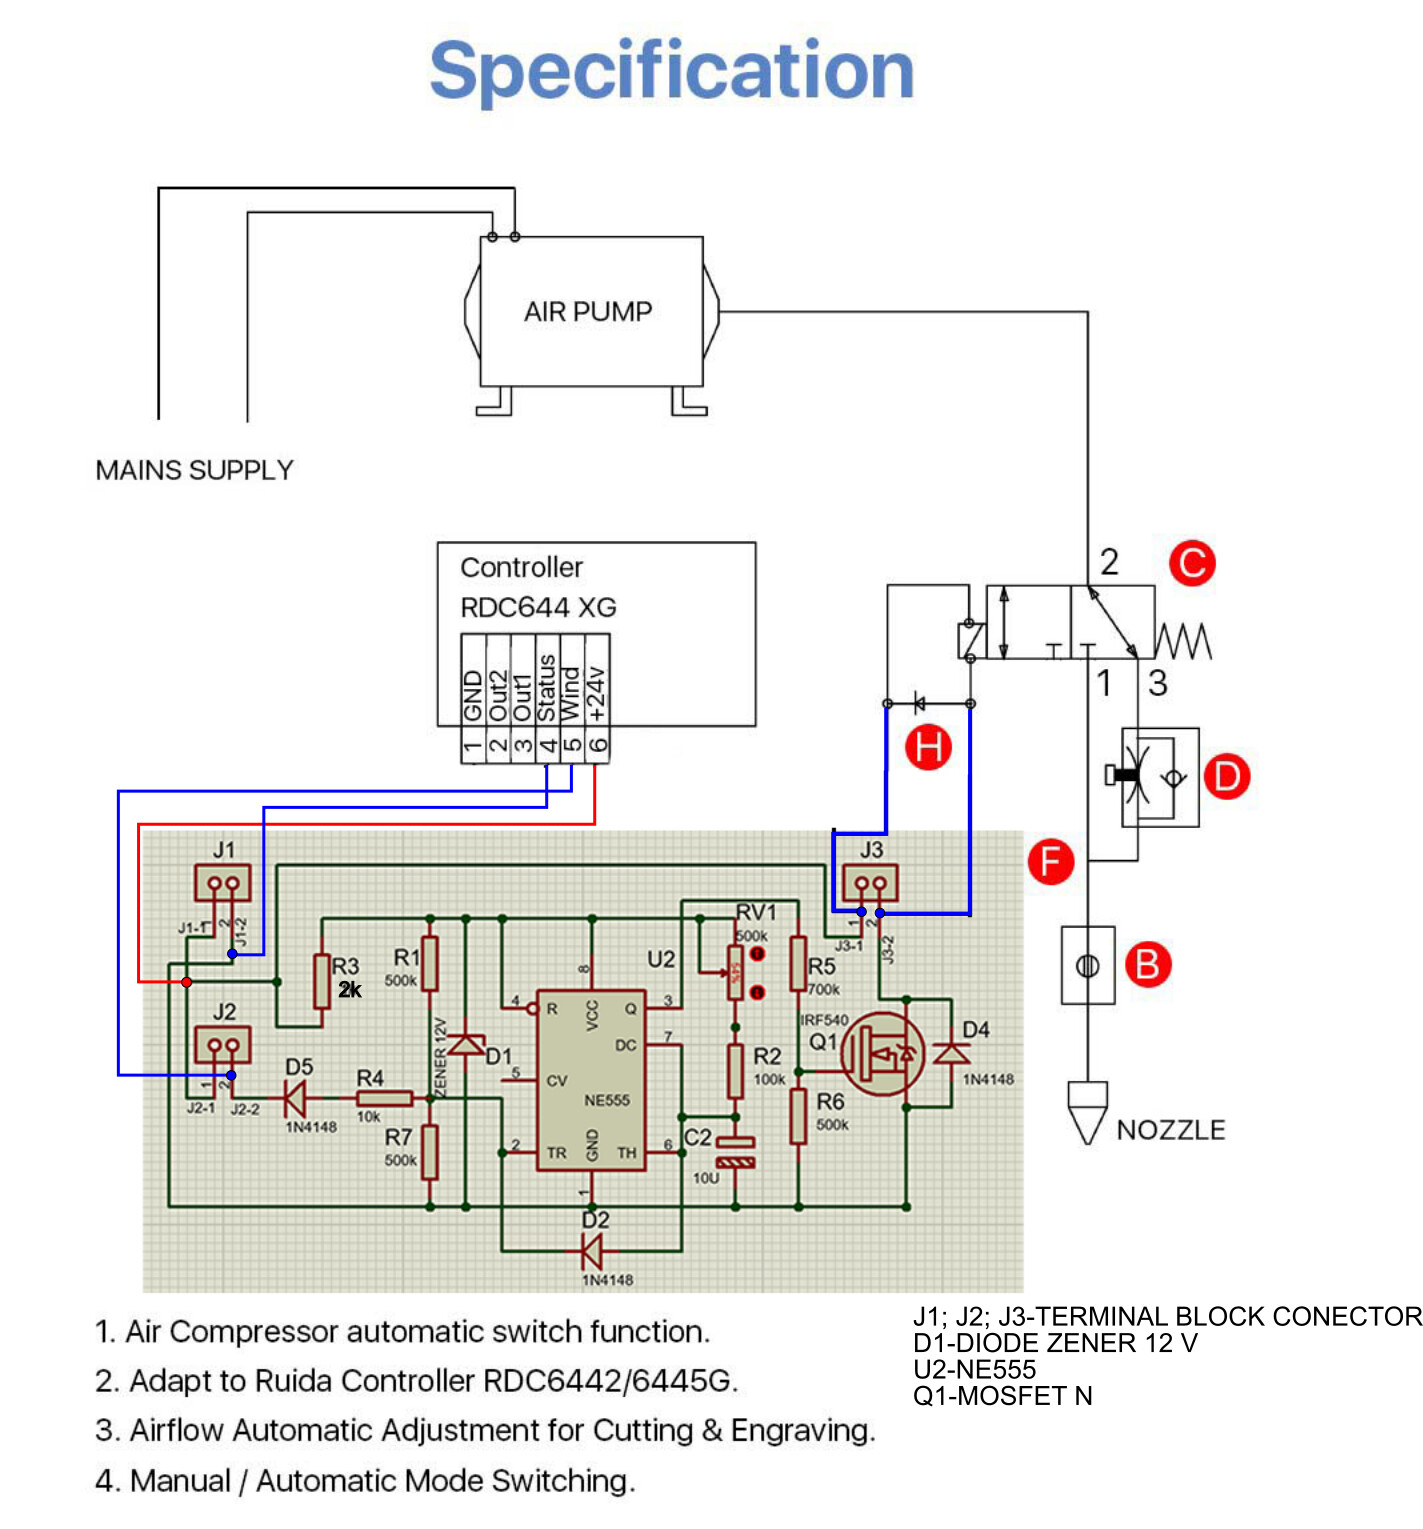
This electronic scheme solves the problem mentioned above and discussed on another topic Air assist solenoid fires rapidly on RDC6445G - #39 by Stroonzo

There are 2 modes for Auto Air Assist Solenoid Valve:
1 Blowing while LASER ON - this solenoid will click on and off each time the laser fires.
2 Blowing while PROCESSING - this will click solenoid on and off for each mode set in the layers if Blowing Yes or No. The solenoid valve opens throughout the working process. This is the preferred mode.
For me, only method 1 works and it’s a big problem. Because of this I made this electronic scheme, it has a delay of 5 sec (or longer because it is adjustable) when closing the solenoid valve. I did a virtual simulation and it behaves perfectly, I will implement it in the next few days and I will come back with information.

Looks great, let us know how it works out.

There are others that may wish to duplicate your ‘fix’.

Any additional information is good…

:smiley_cat:

I noticed that there are many people with this problem. I’m going to do tests on the breadboard and come back with results.

I did tests and everything is perfect. We installed two LEDs to understand the usefulness of this electronic installation. The green LED indicates the voltage at the PIN 5 WIND terminal and the red LED indicates the voltage that supplies the solenoid valve. With this electronic assembly you have the operational ‘Air Assist’ function and the solenoid valve will be open continuously throughout the cutting/engraving work. I’m going to make a PCB and put it in a box made of transparent acrylic.

IMG_20211104_003056_9|375x500
Processing: VID_20211104_002830.mp4…

This topic was automatically closed 30 days after the last reply. New replies are no longer allowed.