I am new to using a camera with Lightburn. I have the Genmitsu L8 40W. I can get the camera working OK and can see the bed. I place a printout of some labels on the bed. I have a selected vector of a rectangle, which I have placed over a label to be cutout using the camera to position the rectangle. How do I now instruct the laser to cut out the label?

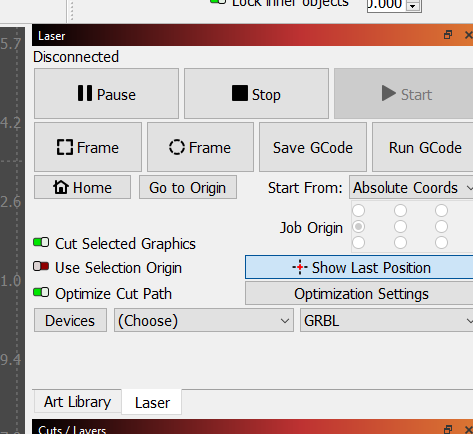
When your laser is connected (mine is not in this photo) … press the button with the triangle “START”
Wear your eye protection 100% of the time the laser is working, put it on BEFORE you press START.
I used Frame to see where it would cut but it doesn’t Frame in the correct place. Would Start behave differently in this case? Does it matter where the laser is when I press Start. Don’t need eye protection because the case is eye protection.
Soooo, you have camera alignment problem? The computer screen does not agree with the actual laser?
You need to run the laser alignment wizard.
Aha! Thanks I will give that a try
The camera does not “talk” to the program. The camera just projects the image as a background to the workspace. There are small adjustment tabs on the camera window to make small corrections to the projection to align the lightburn workspace with the image.
Best option is to use the setup wizard program then fine tune by the adjust tabs.
I went to calibrate the camera lens before doing the alignment. I got down to 0.83 and clicked next but nothing happens. What am I doing wrong?
Keep pressing next. I had trouble with my setup for a long time because I did not know I had to keep pressing try again and next and try again. It takes a whole buncha photos.
The program will take photos of the calibration page in the dead center middle, all four corners and all four center edges.
Found a lens calibration file from Genmitsu and imported that. Burned the calibration picture and did the calibration. The laser still frames with the same offset as before. I even did the calibration twice. I wondered if there was an offset from home zero but no.
On your waste board, burn a square.
On camera control panel press overlay update
On camera control panel you can move X and Y and you can stretch or shrink X and Y to for the camera image onto was was burned. After fine tune, the click save settings.
Ok I will give that a try. Thanks
I think that I finally got it! Had to move -50 in X - would not go more than that. I tested by burning over the square I made and it cut pretty much on line. Then I tested with the labels and it cut well enough for me to use them. Thanks so much for your help and patience in steering me through this.
This topic was automatically closed 30 days after the last reply. New replies are no longer allowed.