Anyone found a valid G-code to trigger the autofocus on the new 10W laser ?
2 Likes
Is this for a Snapmaker? What is the model number?
Or is this a fun homebrew project?
I really want to look into this.
Model is A350T , laser is the new 10W . It employs a triangulair measurement system with a red dot to measure the depth…! In Luban it is automatically used before starting a print/cut if A(utomatic) is selected. Have analysed the G-code file but cannot find HOW this gets triggered.
I hate to say it but i think the needle you’re looking for is in this haystack:
If you select A(utomatic) is it in software on the LightBurn side or is is in software on the A350T or is it a button on the controller that pulls a microcontroller pin high/low/toggle?
G-code is somewhat fixed but you can put stuff in a starting macro or bake stuff into a controller. I was warned earlier this week about different versions of Marlin and what I could be up against.
any luck with this?
Unfortunately not…have plans to install monitor-software to trace the USB traffic from Luban and see if i can detect the command(s) that way… Just have not had the time yet ![]() Will keep you informed if i find something. kind regards
Will keep you informed if i find something. kind regards
1 Like
Goede Morgen Gerard.
Heb je ondertussen al gevonden hoe je dat moet doen heb ook de 10 watt laser .
niks gaat zoals het moet mijn beelden worden invertiert gelasert alhoewel dit niet aangegeven is. weet jij toevallig daar een oplossing voor.
Jean-Luc
Good morning Gerard.
Have you already found out how to do that? Also have the 10 watt laser.
nothing goes as it should my images are inverted lasered, although this is not indicated. Do you happen to know a solution for that?
Jean-Luc
not spotted the gcode yet, but when using luban connected over wifi it’s done over the API, run wireshark and you can see. I believe the touchscreen does the same, not sure what happens if you connect over usb-only.
IP:8080/api/request_Laser_Material_Thickness?token=YOUR_AUTH_TOKEN_USED_BY_LUBAN_IN_STATUS_REQUESTS&x=237.48514468547785&y=183.171&feedRate=1500
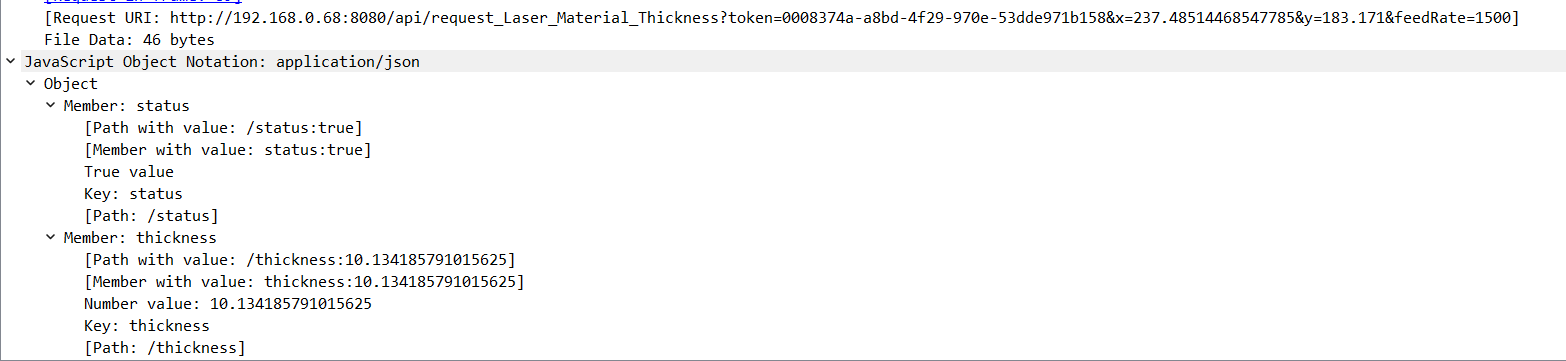
Then it sends gcode commands via the api (/api/v1/execute_code):
- a G53
- G0 Z40.1341 F1500 (40.134 is my Bed height plus detected material depth).
- G54
- G53
- Then a few more positionings then calls api for “prepare print” which queues the job on the snapmaker followed by start_print
You can just call the url in your web browser and it will work, assuming the machine has already been homed since switching it on.
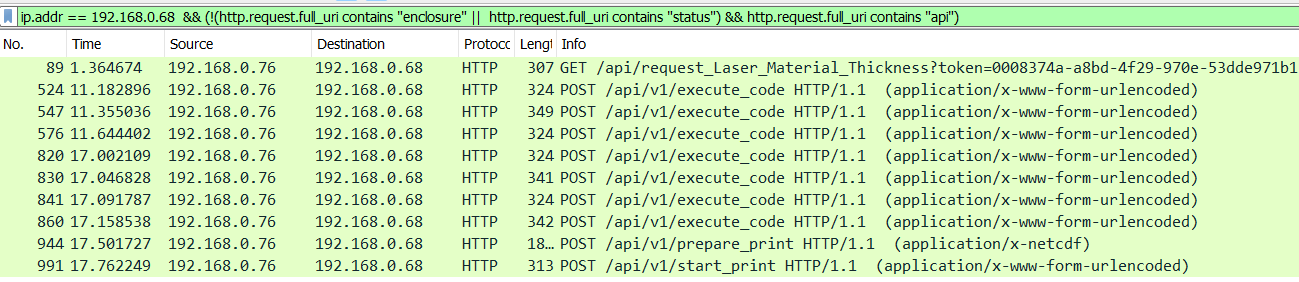
This is my wireshark filter (cuts out the status and enclosure messages), just update the IP 192.168.0.68 to your snapmakers IP address
ip.addr == 192.168.0.68 && (!(http.request.full_uri contains "enclosure" || http.request.full_uri contains "status") && http.request.full_uri contains "api")
I just checked the USB-serial mode with wireshark, unfortunately Luban disabled automatic material depth caluclation/mode if you use USB mode. It asks the user for the depth, and then after setting the workspace (base bed focal height set) it moves to Z14 if the user manually set 14mm as the material depth.
The only option for auto-thickness calculation is to use the web-api or touchscreen to start a job in auto mode (complete calculation and note measurement then cancel job).
I cant edit the previous post, but the token is not required:
http://192.168.0.68:8080/api/request_Laser_Material_Thickness?x=237.48514468547785&y=183.171&feedRate=1500
It’s worth noting you can measure different places, but the measure rd dot is very offset, see this compared to the “middle” of the bed.

2 Likes
Think we have to hope SM will implement a net G-code in a new firmware version ![]() … thanx for your efforts.
… thanx for your efforts.