Basic help importing drawing and cutting edge

I am stuck with a simple workflow that I can’t seem to get working using Inkscape that i wonder if Lightburn can handle natively. If easy enough I will be happy to purchase

Basically I would like to have the kids draw something - I would like to import it in, convert all the inside lines to a vector (engrave) and have it automatically detect the outside edge to cut it out.
There is a decent youtube video on the trace (using an owl) but it stops short of the step that I can’t figure out which is how to configure it to cut the outside edge.

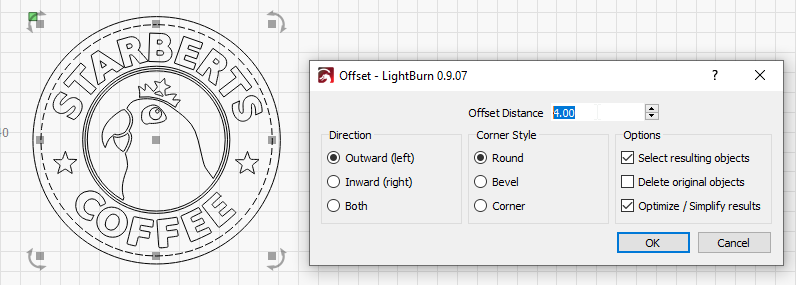
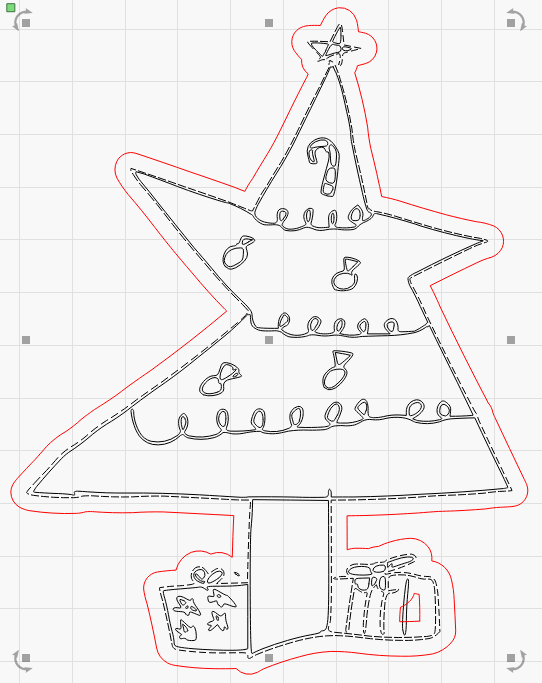
Is there a tutorial available for this - or is this something that can be easily done? ! have uploaded an example. It seems like it should be a 2 minute task to import this - have it cut the outside edge and engrave the inside lines to make an ornament - but fighting with inkscape for over an hour - can lightburn do this with an easy workflow?

IMG_20191127_144058116|432x499

Your image didn’t upload, but I can show you how to do what you asked. Is the source artwork an image that’s being traced, or already vector artwork?

If it’s vectors, the simplest approach would be to to un-group it, select the outer line, duplicate it, and then click the ‘red’ palette entry on the palette bar, to put the duplicate on the red layer. Set the red layer to cut.

For example, given this artwork (and the preview next to it):
image

Select the outer line that you want to cut:
image

Click Edit > Duplicate (or press Ctrl+D):
image
It’s hard to tell, but the marquee is no longer marching, because there’s a duplicate under the one that is selected.

Now I click the red palette entry:
image
So the original is now on the red layer, and the duplicate is still on the black layer, as part of the engraving.

You can also use the offset tool, instead of duplicating the outer line. Starting with a simpler version of the logo, without the surrounding outer circle:

image

Select the outermost line and click the Offset tool:
image

Set the offset however you like, and then click ok:

Select the resulting offset, and make that a different layer, like red, and set it to cut.
image

It probably sounds like a lot of steps as I’ve written it, but it only takes a few clicks, and it’s very simple.

The offset version works really nicely for weird shapes, including names and text, if you want to make something that has a bit of a border around it:

image

This seems similar to the process I try to use with Inkscape, the issue is the image is a jpg to start (The example was a phone pic of a Christmas tree one of the kids drew that I wanted to make into an ornament). I can get it to a vector but the trace function doesn’t make a clean outside line - so it winds inside the object as well. Maybe light burn does it better, let me try the image upload again so you can see what I mean. This kind of thing is my primary use case

You want what’s called a center-line trace for that, and I don’t have such a thing yet. Image trace assumes a filled area, and it’s outlining the area. Your “areas” are the lines. It’ll work, and you could actually use the same techniques I showed here with this art.

Copied & pasted into LightBurn, then traced:
image

The issue here is that if the lines don’t cross, like the tip of the tree here, there is no “outer” line at all:
image

1 Like

By dropping a few small circles where the art needed to connect, and using the Weld feature, I was able to get a clean outer line, and offset it:

Given the source, that might be a little above the skill level. You could easily engrave the hand drawn bit and then cut it out with a circle, oval, square, or other shape.

I did it a bit differently. All in LightBurn. I traced original image - resulting is grouped, then applied a large offset (offset 1) to the outside of group until no offset is seen to the inside shapes. Select resulting offset 1 and apply another offset, but this time to the inside until it is the size you see below. I then deleted offset 1.

Everything set to ‘Line’ as seen in ‘Preview’.

Ok -thanks for all your help, the person doing this process would be me and not the kids. It seems this process is pretty similar to the what I was already going through that I thought could be easier. It seems like it would be easier for a computer to identify the edge even if not joined… could it not scan each row from outside in and drop a path point where it first detects a black pixel… and then just connect each of these to generate the outer path?

Is there a lightburn version that has the actual laser functions (or export functions) disabled so you can experiment with these sorts of options? I had tried the demo in the past just to see if it worked with the light objects controller and it will no longer start up.

Post your trial ID and I can extend it for you.

You’re thinking of ‘outline’ differently than a computer, because it’s ambiguous. The first shape is pretty easy - it only has a “real” outer line. The other two are less simple - do you want the upper, single outline, or the lower, split one? How do you choose?

image

There isn’t, but the trial can easily be extended.

72b97e47-4557-42c9-8fef-6d688a6f17ba if you wouldn’t mind extending. I didn’t really use the original trial beyond some basic testing to see if it worked with the controller.

Oh wow - that was last year. I’ve reset it.

Ok - actually that wasn’t bad - here is what I did, if you wouldn’t mind can you confirm this is the most efficient process

  • Imported the graphic
  • Used trace - picked a threshold that got most of the outer border
  • Made a copy of the resulting vector
  • Using the copy, found the gaps and drew little circles to join the gaps
  • Welded it all
  • Selected the whole object - offset by 5
  • Ungrouped the object
  • Deleted everything but the outer line
  • Changed the color of that line
  • Dragged it over the original vector output from trace
    Result is a vector that can be set to engrave with an offset cut vector

You can also just nuke the original and use the vector version for the engrave, but either way works and would have a similar number of steps.

Sorry by original I meant the original vector trace (that I made a copy of to fix and offset)

Ahh, gotcha - I just used the small fixed one for the engraving - if you make the little weld-helper circles small, they’re not noticeable, but that’s down to a preference at this point.

Reviewing the post, Rick’s method might actually be a little faster - using the offset feature twice to generate an outline, and it’ll have the effect of smoothing it a little too.

1 Like

Sorry Rick - I must have missed your response, I just tried your method, it seems to work and is easier. I didn’t follow at first but for me - offsetting out 20 created the border I wanted, then ungrouping and offsetting back in about the same amount ended up with the outer edge. Works great with no need to fill in the holes. Having the tool able to do this with a single click would be awesome, but this is good enough. I’m surprised this isn’t a common request, I get lots of art from coloring pages and when traced they almost always have this gap issue and fighting with it in Inkscape has been a real pain, if this works consistently its a much easier process and can all be done within the tool

Greatly appreciated!

1 Like

No worries and you are welcome. More than one way to skin a tree.

The large offset followed by reduction seems to consistently work with the type of graphics I am interested in (which might not be well represented by your examples), for example here is a random coloring page graphic - offset + 150 and then -130. Even though the dress isn’t a complete outline at all it ends up with a decently contoured outer cut line. I tried a handful of images and it just seems a trial and error of selecting the values - which seems to somewhat freeze the app by the way - it seems to try to redraw the screen while you are still adjusting the offsets.Capture