I’ve read inserting a Red dot beam combiner between the CO2 tube and first mirror that it may reduce the CO2 output power!
Have not found anything definite on this so I thought I’d ask for any first hand experience the folks have had…
I am looking at the Cloudray model right now seems easy enough to install…
Providing I have the room to drop it in ( will ck tomorrow).
SO… Any down sides, would really like to hear first hand experiences…
Yes I want to add a beam combiner to mine but don’t have the room without moving the tube and adding the extension box, I have been looking to see if I can find a combo mirror 1 with combiner, so far no luck.
This is what I installed on my Omtech C02. I put it between mirror 1 and 2. It did require a fair amount of modification to make it fit. I didn’t want to mess with moving the tube to put the mirror 1 replacement unit in. Although I did have to replace the tube shortly after and it wasn’t that big of a deal. If I had to do it over knowing what I know I would have used the mirror 1 replacement instead.
I have a 130w yongli tube in my system, when I get to the office I will ck and see if there is room for a red dot combiner.
There is not too much info hanging around, imperical data the show if these units reduce the output at different stages of output power.
CO2 tubes are generally used under the 50%-70% power ratings, as recommended, for most jobs to conserve the life of the tube.
But it would be nice to know if across the wattage output range if these have a non-effect or if there is a drop, is it linear across the wattage range ?
Tim… did your tube just wear out ? or have an issue ?
Curious how long (hours) you used it and what the typical power usage ratings were?
My laser is only a couple months old so dont know really what kind of longevity I will get as I plan on cutting mostly acrylic, I suspect after testing, my typical wattage should be 20-50% on average, maybe 3-6hrs / day for a typical work week. Kinda looking at a couple years of usage, but the tubes are not that expensive $800ish to replace, kinda like tires on your car… expected…
I bought my machine used. It wasn’t cutting properly when the seller demonstrated it and he told me up front that it might need a tube. I did a fair amount of work, replacing the mirrors and aligning them and got it cutting again, but it never seemed right. It had approx. 250 hours on it at this time. I installed the beam combiner and didn’t really notice any difference as far as power output, but I was still pretty new to the laser business and the tube wasn’t functioning properly. After seeing similar machine settings and comparing mine, I realized mine wasn’t working right. I did some testing and discovered that it was out of TEM00 mode. After replacing and aligning the new tube, I’m very happy with the performance.
The beam combiner I installed has some issues. First, I had to modify the mount considerably to get it installed where I wanted it. Second, the red dot is not 100% in alignment with the beam. Trying to introduce a 4th mirror into the middle of the beam has proven difficult. The best I have been able to get it is about 1/2 the diameter of the beam off. I know where it is in comparison to the actual beam and have adjusted my mind to it. Nothing I do is that precise that half a beam width will make a difference, except doing a print and cut, there I get it close with the red dot and pulse the laser fo final positioning.
I hadn’t even considered placing it anywhere but between Tube and M1, now I will have to have a look in the morning and see if I can make it fit somewhere between M1 & M2 (at its closest point to M1)
I’ve tried some of these, but I’ve found the red alignment led to be of questionable value. The machine itself is much more accurate. Add to this, there is no possible way to exactly align the led emitter beam with the IR beam from the tube. If the axes of the emitter beam isn’t aligned with the tubes beam, it will mark in different places. Meaning the accuracy could/should be questioned.
Most of us adjust m1 to work with m2, so if you put it between m1 and m2, it’s alignment will change if you modify m1 to do an alignment. The best place to put it is before m1.
Anytime you put something in a beams path, you will loose power. Just like you loose power when you bounce it off a mirror, run through a beam expander or any other lens, including the focus lens in the head.
It’s usually a minor amount of power, generally less than 1% if I remember correctly. Been a long time since I looked at this, but my memory is pretty short lived…
Thanks Jack…
I did read something about a small loss…but could not recall since I’ve been thru
so many laser vid’s etc…
I may re-think this… Really like the idea of getting the red dot hanging off the nozzle
and every time you change the lens…well…
I do know there are 3 adj. screws for the yongli Red Dot attachment, as usual
the instructions are not good, but heck three screws…turn them and see how they
work, how hard can it be…
I did ck my tube…wow I had enough room to unscrew the tube heatsink
and just drop this unit on without removing the tube at all…
Ah heck…I’ll order one and see how it goes…
More to come I guess… I keep making work for myself with this laser…
(see the smile)
Well I say Heat Sink…
it was not even hand tight, two fingers lightly unscrewed it…
thinking about it now I am surprised it did not fall off during shipment…
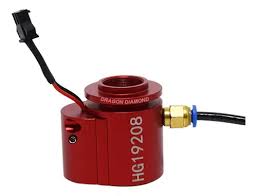
but the RED DOT unit looks pretty hefty and has an AIR cooling that
I will need to run a hose from the small internal air pump off a splitter…
this runs all the time… should be fine… I suspect…
Yes, I’ve wondered what these are for. It cost money, so it must have some use. Years ago somebody told me it was to remove the heat at the end of the tube… I’ve grabbed mine after a high power cut job and it didn’t feel even warm to me. So I’m not sure what they do.
I assume the led gets hot, the heat comes from something - last thing you need in a laser, is something getting hot. I’d steer clear of anything that required plumbing to cool something. I sure wouldn’t want a compressor running the whole time I had power on the machine. I’ve seen a bunch of these, but never one that required air cooling. Is it the one in the photo? Do you have a link to it?
I know when I buy something, that if I need to use it at full power I can… The difference between an led or metal tube co2, is both of these are digital devices. They are either on or off. So a 50% pwm for these is on 100% for 50% of the period (time).
A dc excited co2 is an analog device, so it can run at various power (current) levels and stays on as long as the laser enable pin is active. Since they are analog, they do best in the 30 to 80% area. However, if you have a 130W machine, that’s rated for 130W it should run at that without and issue for short periods. If I paid for a 130W tube and run 70% maximum power I’m only getting use of a 90W tube, even though I paid for a 130W. I run mine at 100% when I need to cut thick items, but it’s rare and relatively a short amount of time. My lps is also limited at the tubes maximum power value. I have mine setup for power percentages, not tube current.
What I’m saying is that all these warnings about tube life don’t seem to really apply in real life. I know some who have K40 types, and run them as a digital device, turning them on/off at 100% power. One of these guys claims 7 plus years on his tube and I have no reason to doubt him. Sometimes they fail. Larger tube, such as yours usually have a 10k hour expected life
On mine, it worked great, a three day weekend and it was out of TEM00 mode. If I need an alignment, it’s smart to check your tube resonance before any alignment. You’re already there anyway.
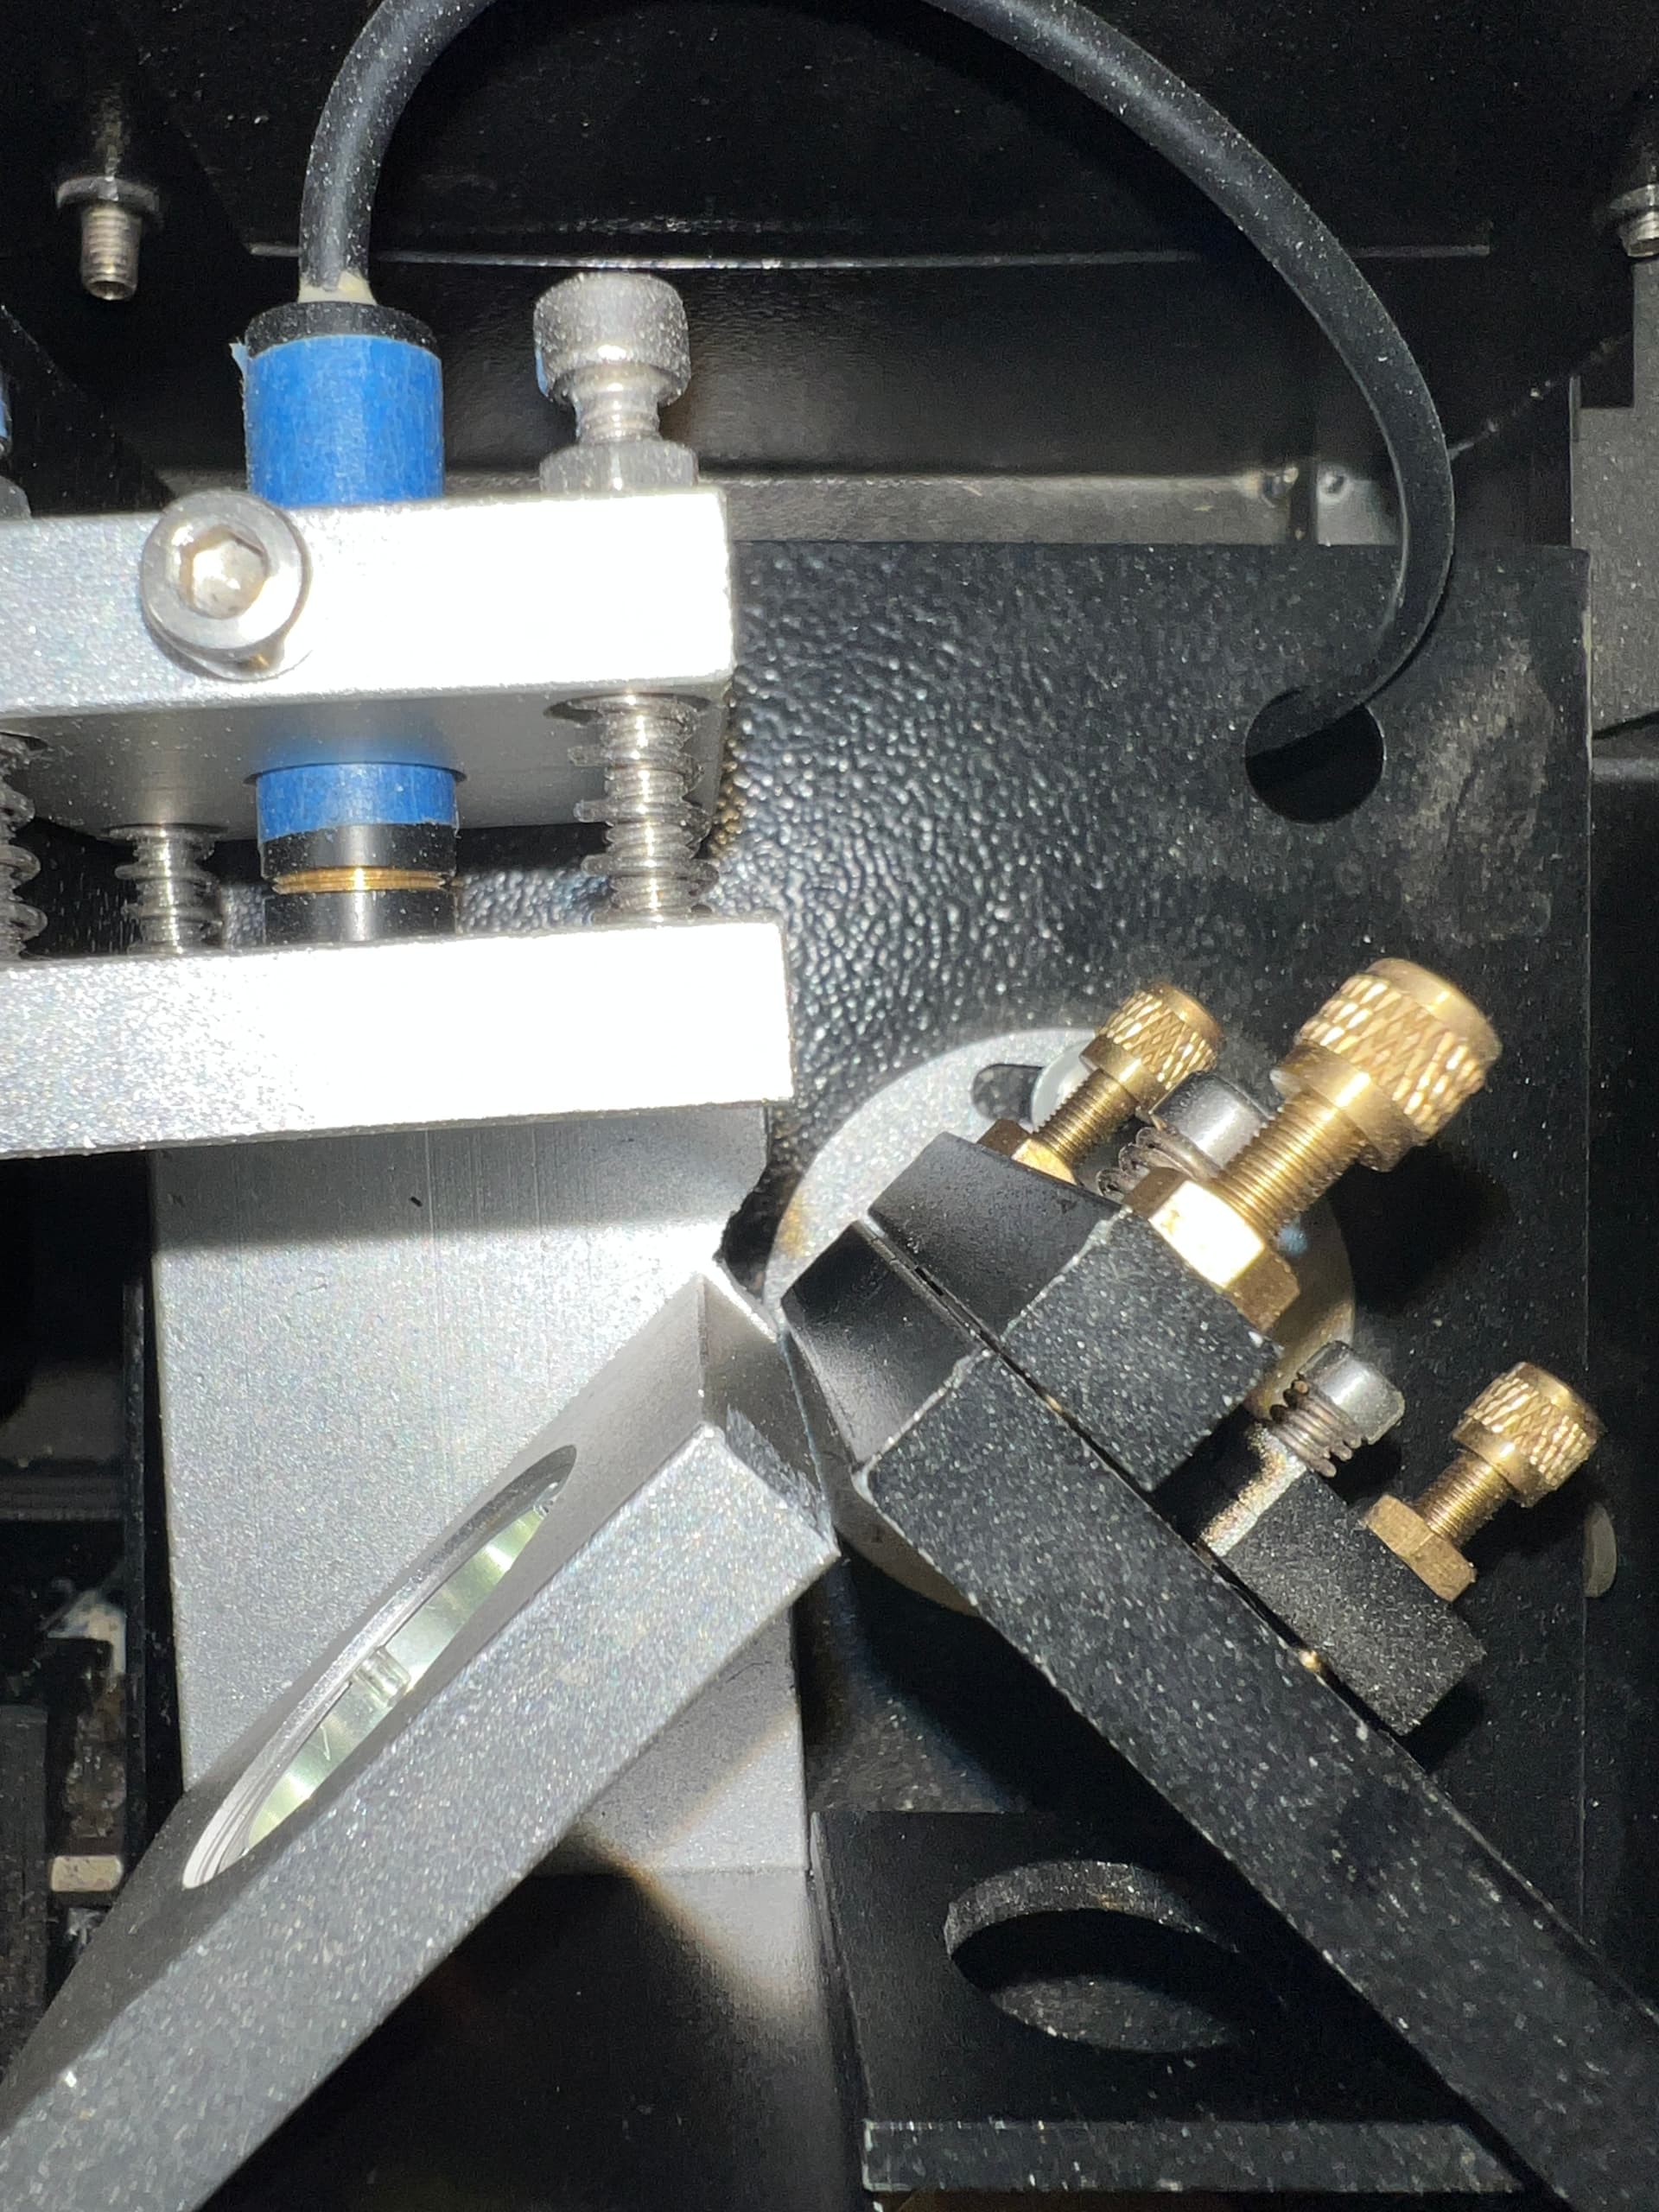
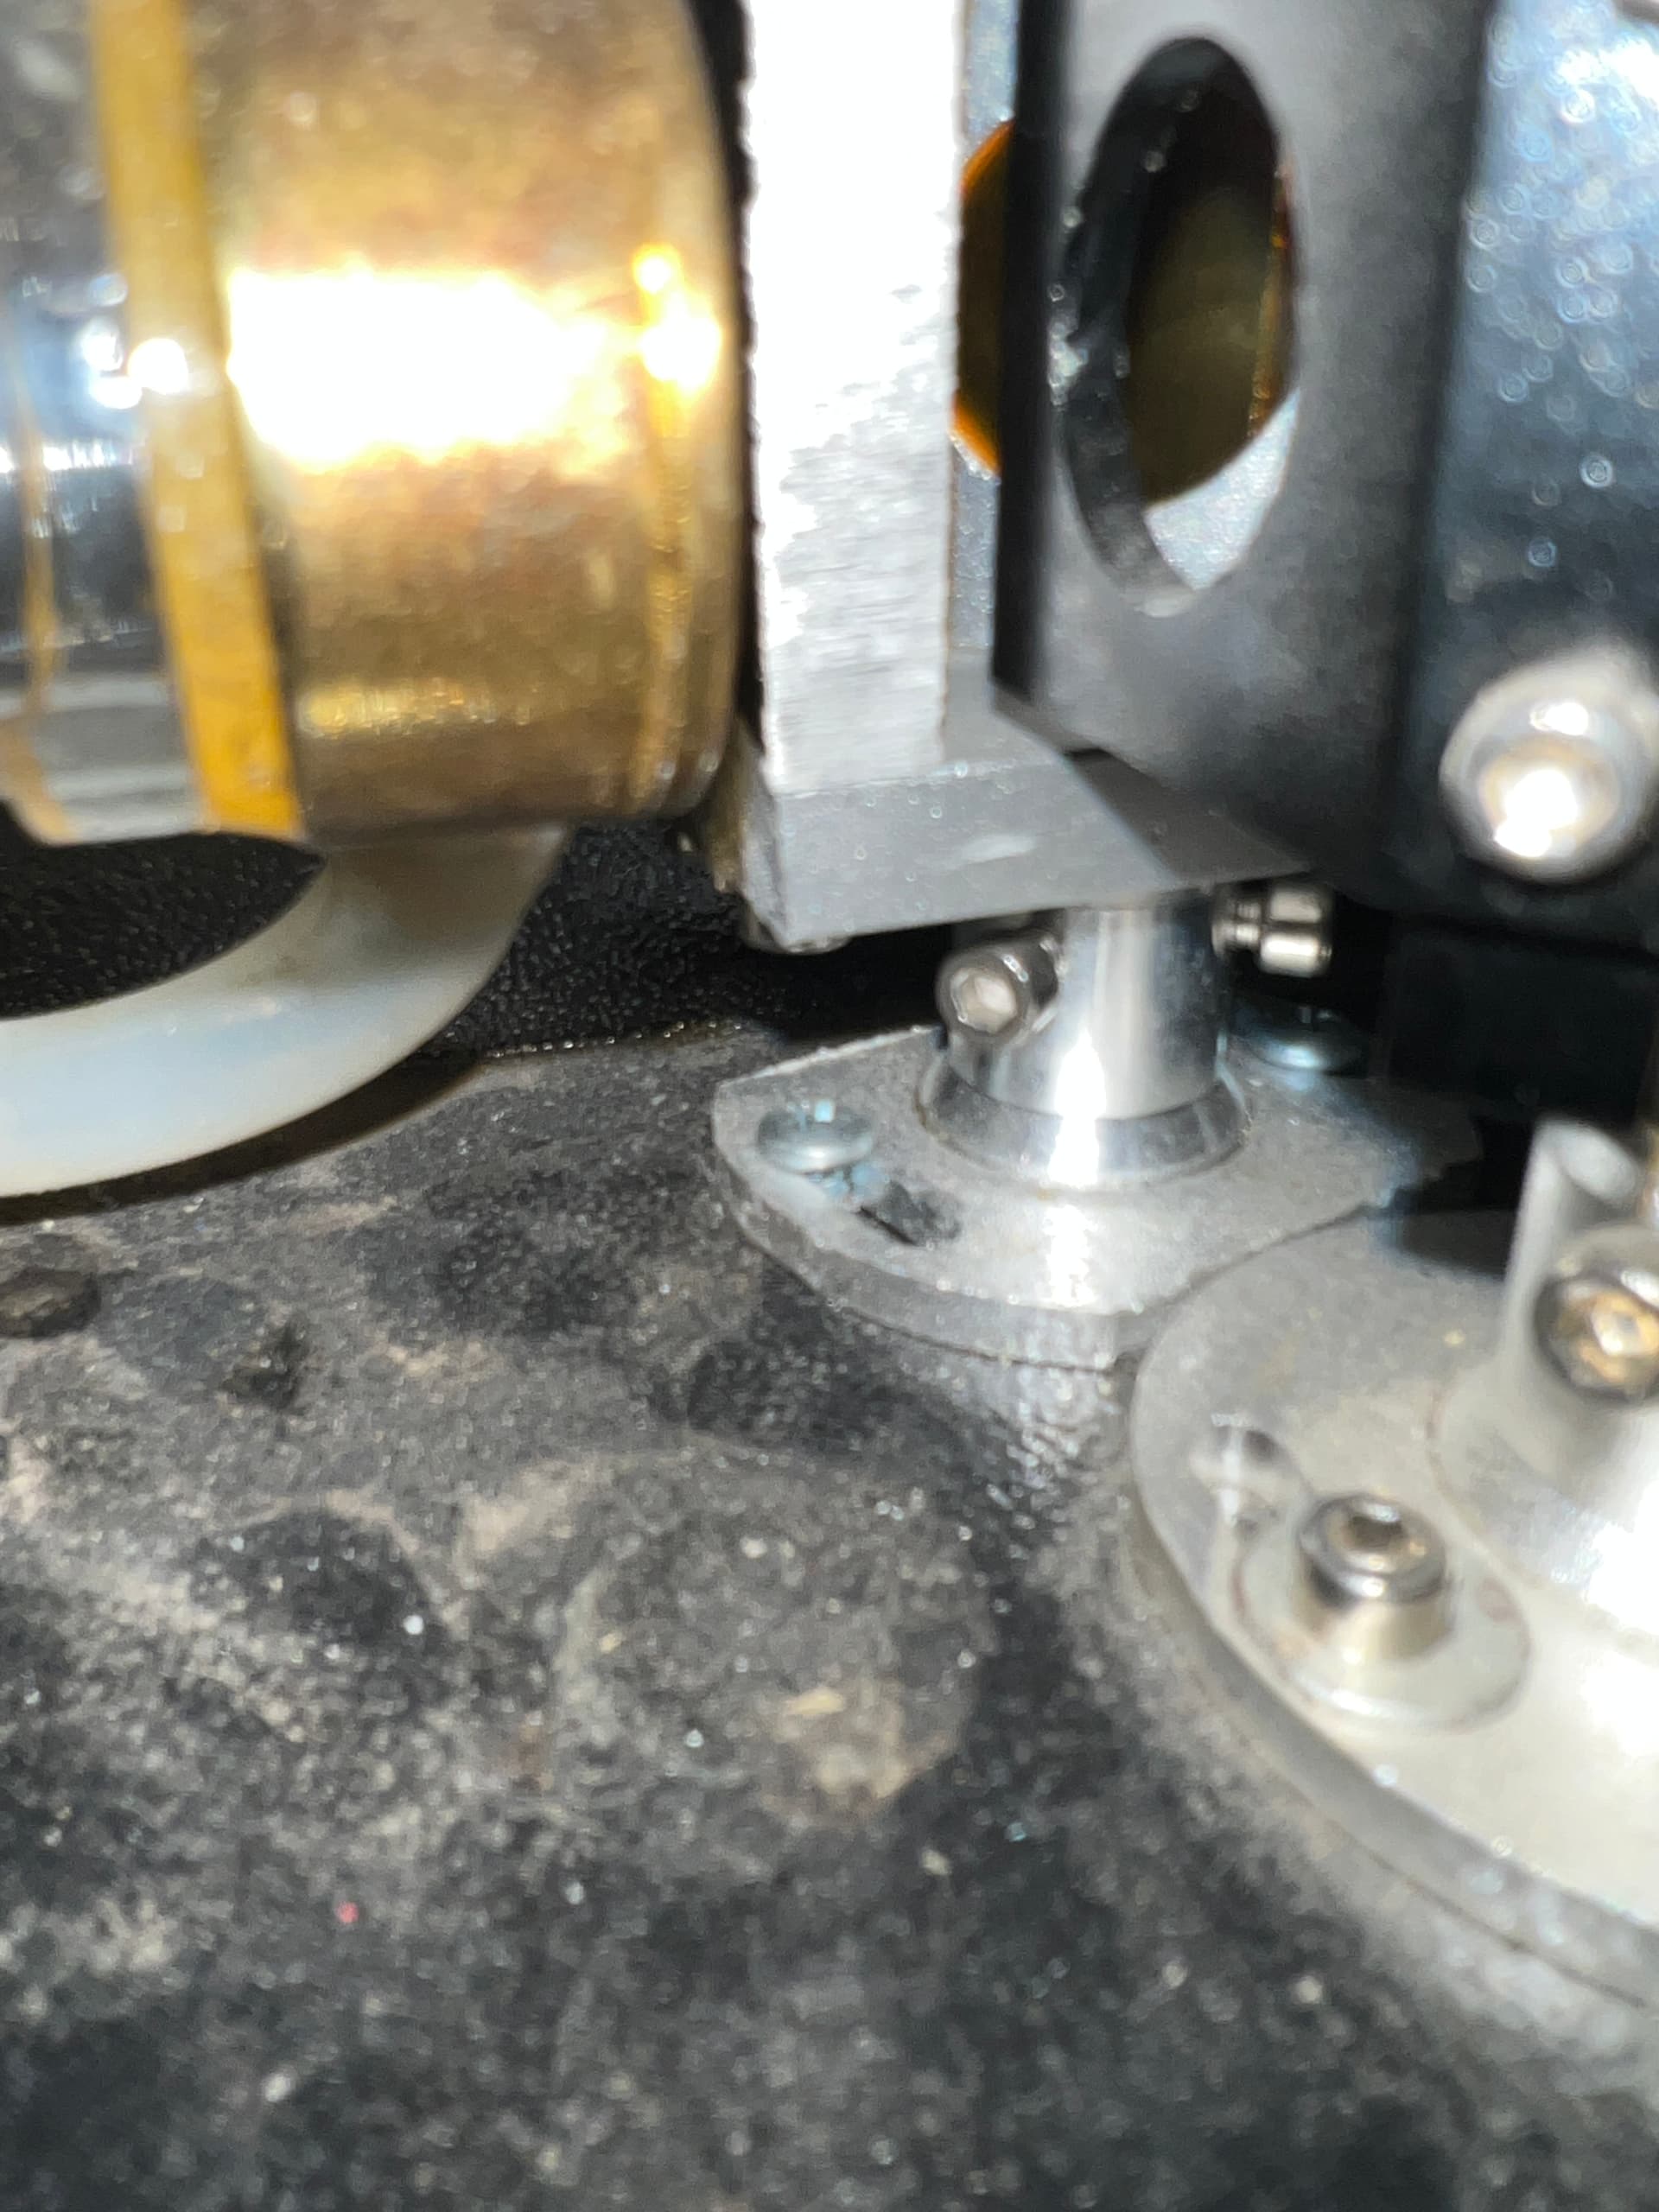
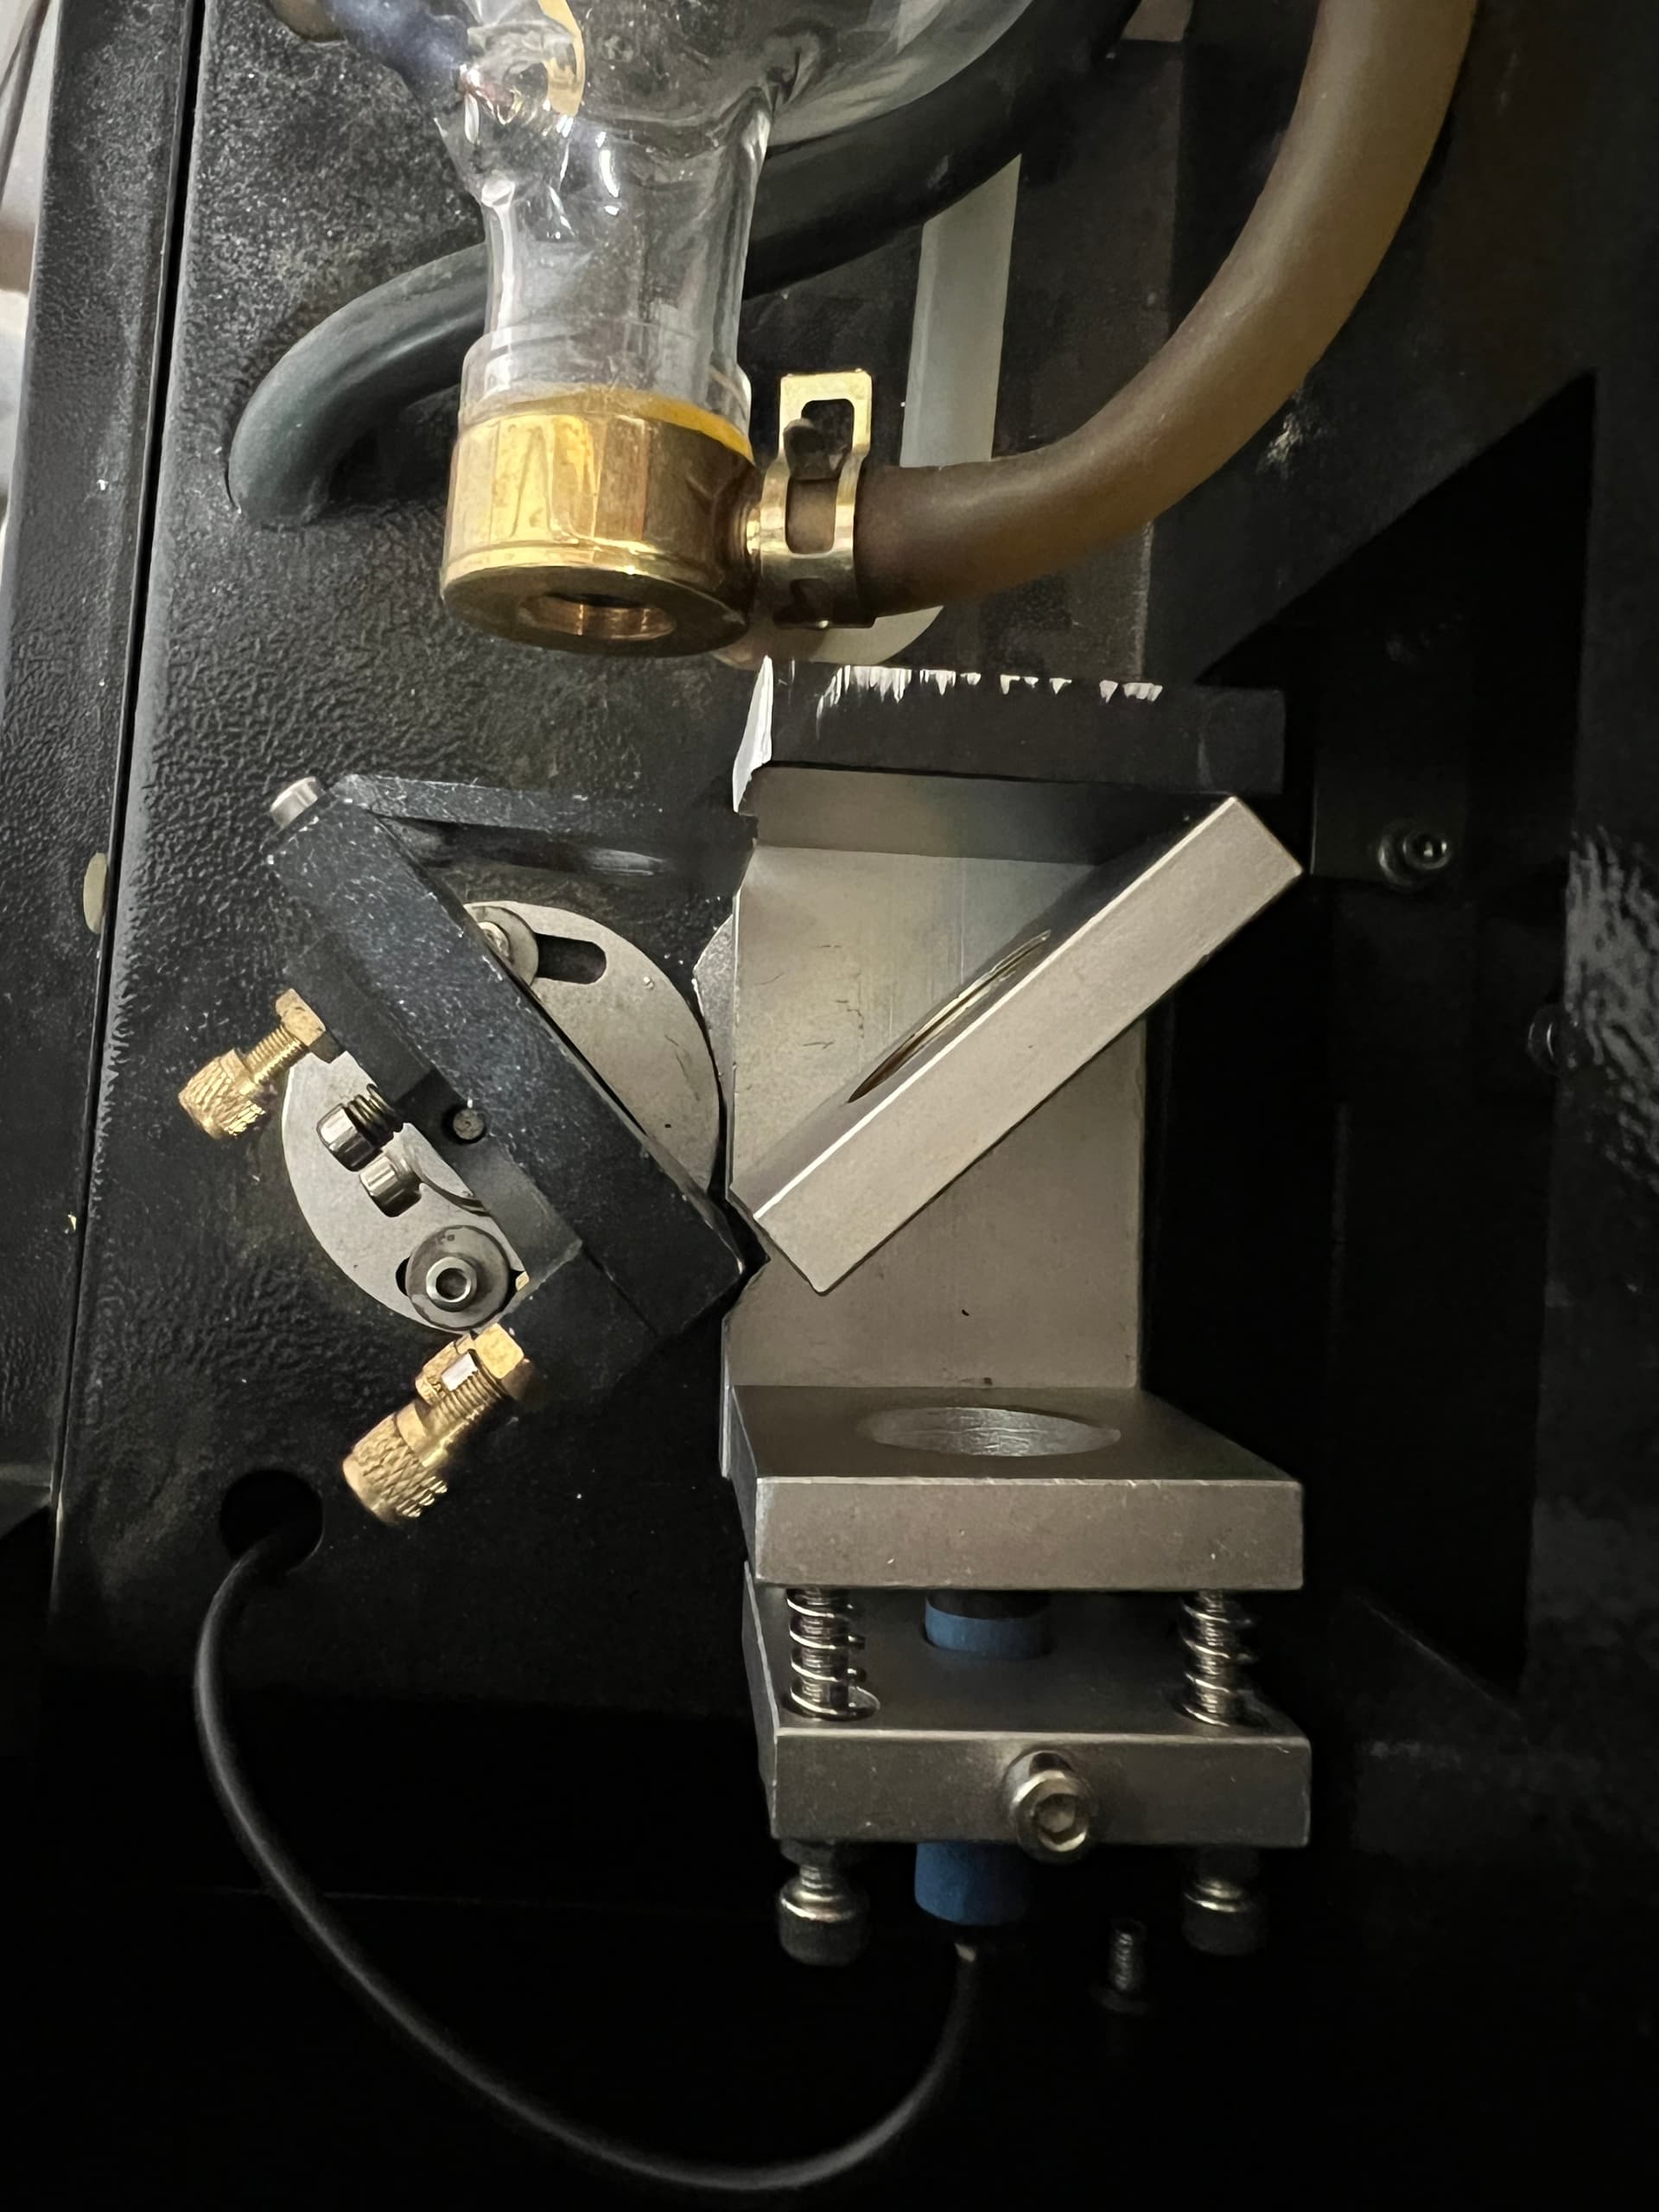
Here is how mine sits in the machine. I totally agree with @jkwilborn that before mirror 1 is the better location and if I was to do it again that is where mine would be. I didn’t want to use the mirror 1 replacement setup as it requires moving the mounting location for mirror 1 and I was afraid I wouldn’t be able to get it where it needed to be.
I think the type that mounts to the end of the tube is probably the best option. If I would have known that I was going to replace the tube a few months after I installed this I would have just purchased the tube with it built in.
The post mount that came with this kit was too tall and I had to use a different post mount. I had to cut off the edges where it sits on the deck so that it would fit between mirror 1 and the flange. I also had to modify the mirror mount slightly as you can see by the bare metal on the black shield nd the V notch in the bare aluminum.
It’s quite difficult to keep things clean around here. I also do woodworking and the sanding dust is relentless. I spent the entire day yesterday cleaning after a project, well the first round of cleaning anyhow.
Unfortunately I may have mixed up the words in that acronym. I sometimes keep it stupid, simple.
My 130w is rated at 8000-12000hrs
my cutting stuff rarely calls for more than 50%…
But having the larger bed 36 x 55 is one of the reasons I got this unit…
some of my acrylic parts at 34wide x 28H
I am hoping I wear the tube out soon, I want to drop 150w into the unit, it has the room for an upgrade only 5ma more from the PS machine I think my 130w PS is the same as used in the 150W need to be sure…
Although the specs don’t mention it, I vaguely recall seeing a 100 W maximum power limit when I looked around a year ago. IIRC, either the mirror or waste beam dump lacked sufficient mojo.
That would be particularly true for the smaller units fitting onto the end of the tube, where its internal beam dump probably can’t handle more than a modest part of a watt.
Seeing as how it claims it can handle the power, I withdraw my vague recollections …
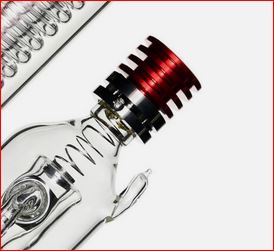
The beam dump absorbs the energy reflected from the combiner mirror due to its not-quite-zero reflectivity at 10.6 µm. In the overhead view of the Mirror 1 unit, it’s the black anodized block adjacent to the tube output.
In the clip-on units, I have no idea what it looks like, but it’s definitely smaller and presumably gets hotter for a given main beam power.
