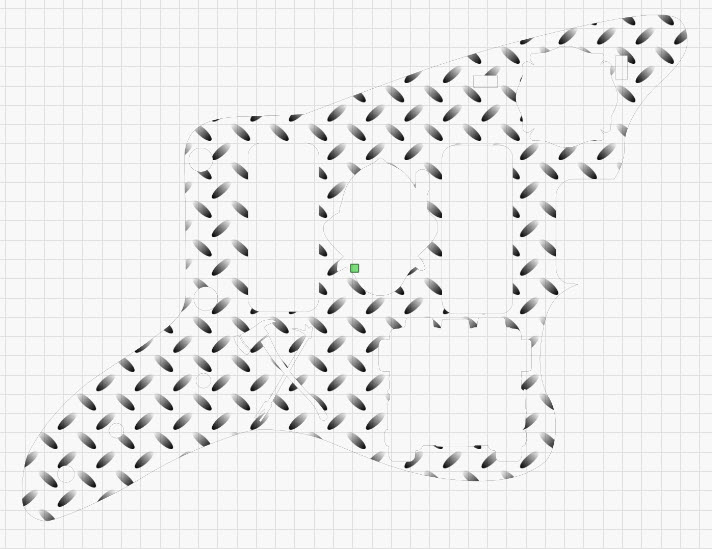
A friend is making a guitar as a present for a firefighter. I am designing and making the pickguard. At this point I am simply trying to figure how it will burn and what the end result will look like, vs anything to do with speeds, power and material. Specifically, will the base graphic burn as shown with the faux metal appearance. In preview the ellipses show as solid and not shaded or is that for simple appearance in preview. My understanding is that Lightburn works using hidden line removal. In other words anything hidden by an object at a higher level will result in the area under that object not being burned at the lower level. Otherwise things would be burned one on top of another. Is this correct? If so does the order of the objects in the burn list matter or does Lightburn work it out from the layering? The artwork was designed in Inkscape and imported into Lightburn. In Inkscape it is in layers but it did not import in layers when I thought that it might. I have included the Lightburn file
guitarpickguard4.lbrn2 (470.4 KB)
.
I’m watching this thread because I am under a different impression.
If something is in a layer in Lightburn and the output of that layer is “On” then it gets sent… regardless of whether it’s behind something on a subsequent layer… it gets burned twice.
If you don’t want that diamond plate to show behind those badges and other artwork… you need to cut out around them. Otherwise it will burn the entire diamond plate artwork and then also burn the badges over that. Lightburn won’t do that automatically for you.
If I’m wrong here, someone please correct me.
Jim
Jim, this is the exact conversation that I am trying to generate. I fear that you may be correct, which is not what I want. I can do the extra work in Inkscape to remove the space covered by the objects on higher layers, if that is needed.
Yes, overlapping layers will engrave/cut/burn on top of one another.
However, in this case it is relatively easy to fix this by “Masking” the background image using the shapes on top of it.
You’ll need to start by Tracing the images in the foreground. Since they’re relatively simple black and white images, it will be easy to get a good trace from them.
You can choose to delete the images altogether and just work with the vectors produced from them set to a Fill mode, or you can keep the original images, and delete everything you get from the trace except for the outline (I recommend either working with vectors set to Fill, or setting all of the foreground images to “Threshold” mode).
If you choose to work with all of the vectors, you’ll need to duplicate the outline. In either case, the outlines will need to be set to a Tool layer.
After you’ve done that for all the foreground images, create a Rectangle around the entire background image, and set it to the same Tool layer as the outlines.
Hold the Shift key while clicking the Tool layer in the Cuts/Layers window to select all shapes on that layer, and then Group them.
Then select both the background image and all the shapes on the Tool layer, and right-click, then select Apply Mask to Image. The area covered by the foreground images will be removed, preventing layers from burning on top of one another.
I strongly recommend trying the above out for yourself, but I’m uploading a version of the file where I’ve completed the above process here:
guitarpickguard42.lbrn2 (492.3 KB)
And would this be true of anything put behind that mask… even at a later time? Just making sure I fully understand. That would be an advantage to using a mask… otherwise it seems it might just be easier to Trace, outline, offset, and boolean it away. (At least to me anyway).
Not being terribly familiar with Inkscape… it’s not that difficult to do in Lightburn either. Just sayin’.
Jim
If you added new images over the background image, you would need to re-do the masking process to include the outlines of the new images.
In some cases tracing, outlining, and using the boolean tools as you suggest would be a better method. The reason masking is a better option in this particular case is that the background image has shading to it, so it needs to remain on an Image layer to capture that shading in the engraving.
I realized that… right after I hit “Reply”
It’s an image… and due to that, the mask might be better.
Understood. Thanx for the education.
Jim
I only use Inkscape because of familiarity. I am still learning how to do the same things in Lightburn. I am familiar with the concept of masking. I will try it for myself but thanks so much for the file from which I can learn. Thanks to all for input. Now that the burning layout side of things has been taken care of, the next challenge is to burn the image onto stainless steel. SS is the preferred material but I have very limited experience with it. I have only “played” around to see what I can do.
Only if it is in both layers. Each layer is a separate tool path.
Hidden line removal should refer to a single layer. I have not played with this feature (do not even know where it is), so I know nothing else about it. If you are referring to duplicate line removal, that is to eliminate burning the same path twice.
That was my point. If data is on two layers the data gets sent for each layer.
One doesn’t override the other… both burns will happen.
Yes duplicate line removal is what I was referring to. It can be done but is very complex where many levels are involved. I am familiar with it wrt producing 2D drawings from any angle using 3D models of chemical plants. I can easily understand if Lightburn did not go that far and expects users to apply masking as was demonstrated earlier. Essentially, it amounts to automatic masking.
Are you engraving on an existing pickguard, or also wanting to cut it out? What guitar is the pickguard from?
It is a new pickguard which will need to be cut out. Will have to ask about the guitar model. I am not familiar with guitars.
I didn’t see a cut line in your file. Only a raster edge that shows where the cut lines should be.
Actually, LightBurn ignore SVG groups aka. Inkscape layers. Or rather, it uses them to groups the shapes in a similar way.
If you want to transpose Inkscape layers into LB, you just set the color of all the shapes in the layer.
In other words, LB converts colors of shapes to its layers: same color goes into same layer.
I am aware of how LB takes care of layers. Don’t know where I got the idea that layers in Inkscape might work. It clearly does not.
After much playing I got it to work. I had to completely redo the whole thing having been given wrong dimensions. So, had no choice but make it work. Thanks for the excellent help.
I did a test burn on MDF. Everything was Ok except the background image did not burn as shown in the Lightburn file. The shading did not appear. I have attached the burn and the background image. Is there something that I have to do to correct this?

What dithering method did you use for the background?