Ok, I need some help. I’m on a Reno 45 Pro. After I find my ideal speed and power for a job it engraves just fine over long runs. But when it comes to short runs like a point or even letters that have short runs like a p or an l or the dot on the I it burns way deeper. This example is 200 mm/s at 10% power and it keeps burning through when doing points. What can I do differently. It does it on anything that will burn. This is painted canvas, but it does it on all wood as well. Any suggestions would be greatly appreciated. I should add that the controller is a TopWisdom TL-A1 which is a DSP so I don’t have access to all settings like a GRBL. Thanks.


I may be wrong anthony but 10% is still quite a lot of power at 200mm/m. I see there are many similar points in the painting…was there anything particular about those points that made the laser delay there a bit longer or something about the material or paint.
Maybe on a test strip, find the burn point at which speed/power and adjust.
When it happens on wood, can you see a bigger/deeper burn size per small letter as opposed to bigger fonts. If you do a series of dashes is the line wider than if dengraving a longer line.
One thing to check is those areas have not been duplicated and results in that area burning more than once.
1 Like
I assume this is the machine.
As a quick check, try this with the lions:
- Put them on a
Filllayer - Set the
Line Intervalto 0.2 mm - Select
Fill all shapes at once
Does that change the result?
Upload the offending lbrn2 files so we can take a close look at the settings.
If that layer is set for Offset Fill, try it in ordinary Fill mode with settings as above.
1 Like
How big are this physically? Can’t tell from the photos.
If you’re running this as a vector, your speeds might be slower when doing some of the graphics.
This video is just under a minute, I did the same vector image, at least looks very similar. This is my co2 set for 200mm/s, it’s pretty clear it rarely makes that speed.
To add to the insult, I’m running with an acceleration value of >40,000mm/s^2 and it’s still not making speed.
You may need to lower minimum power to clean up where it slows down, if you’re doing this as a vector
![]()
1 Like
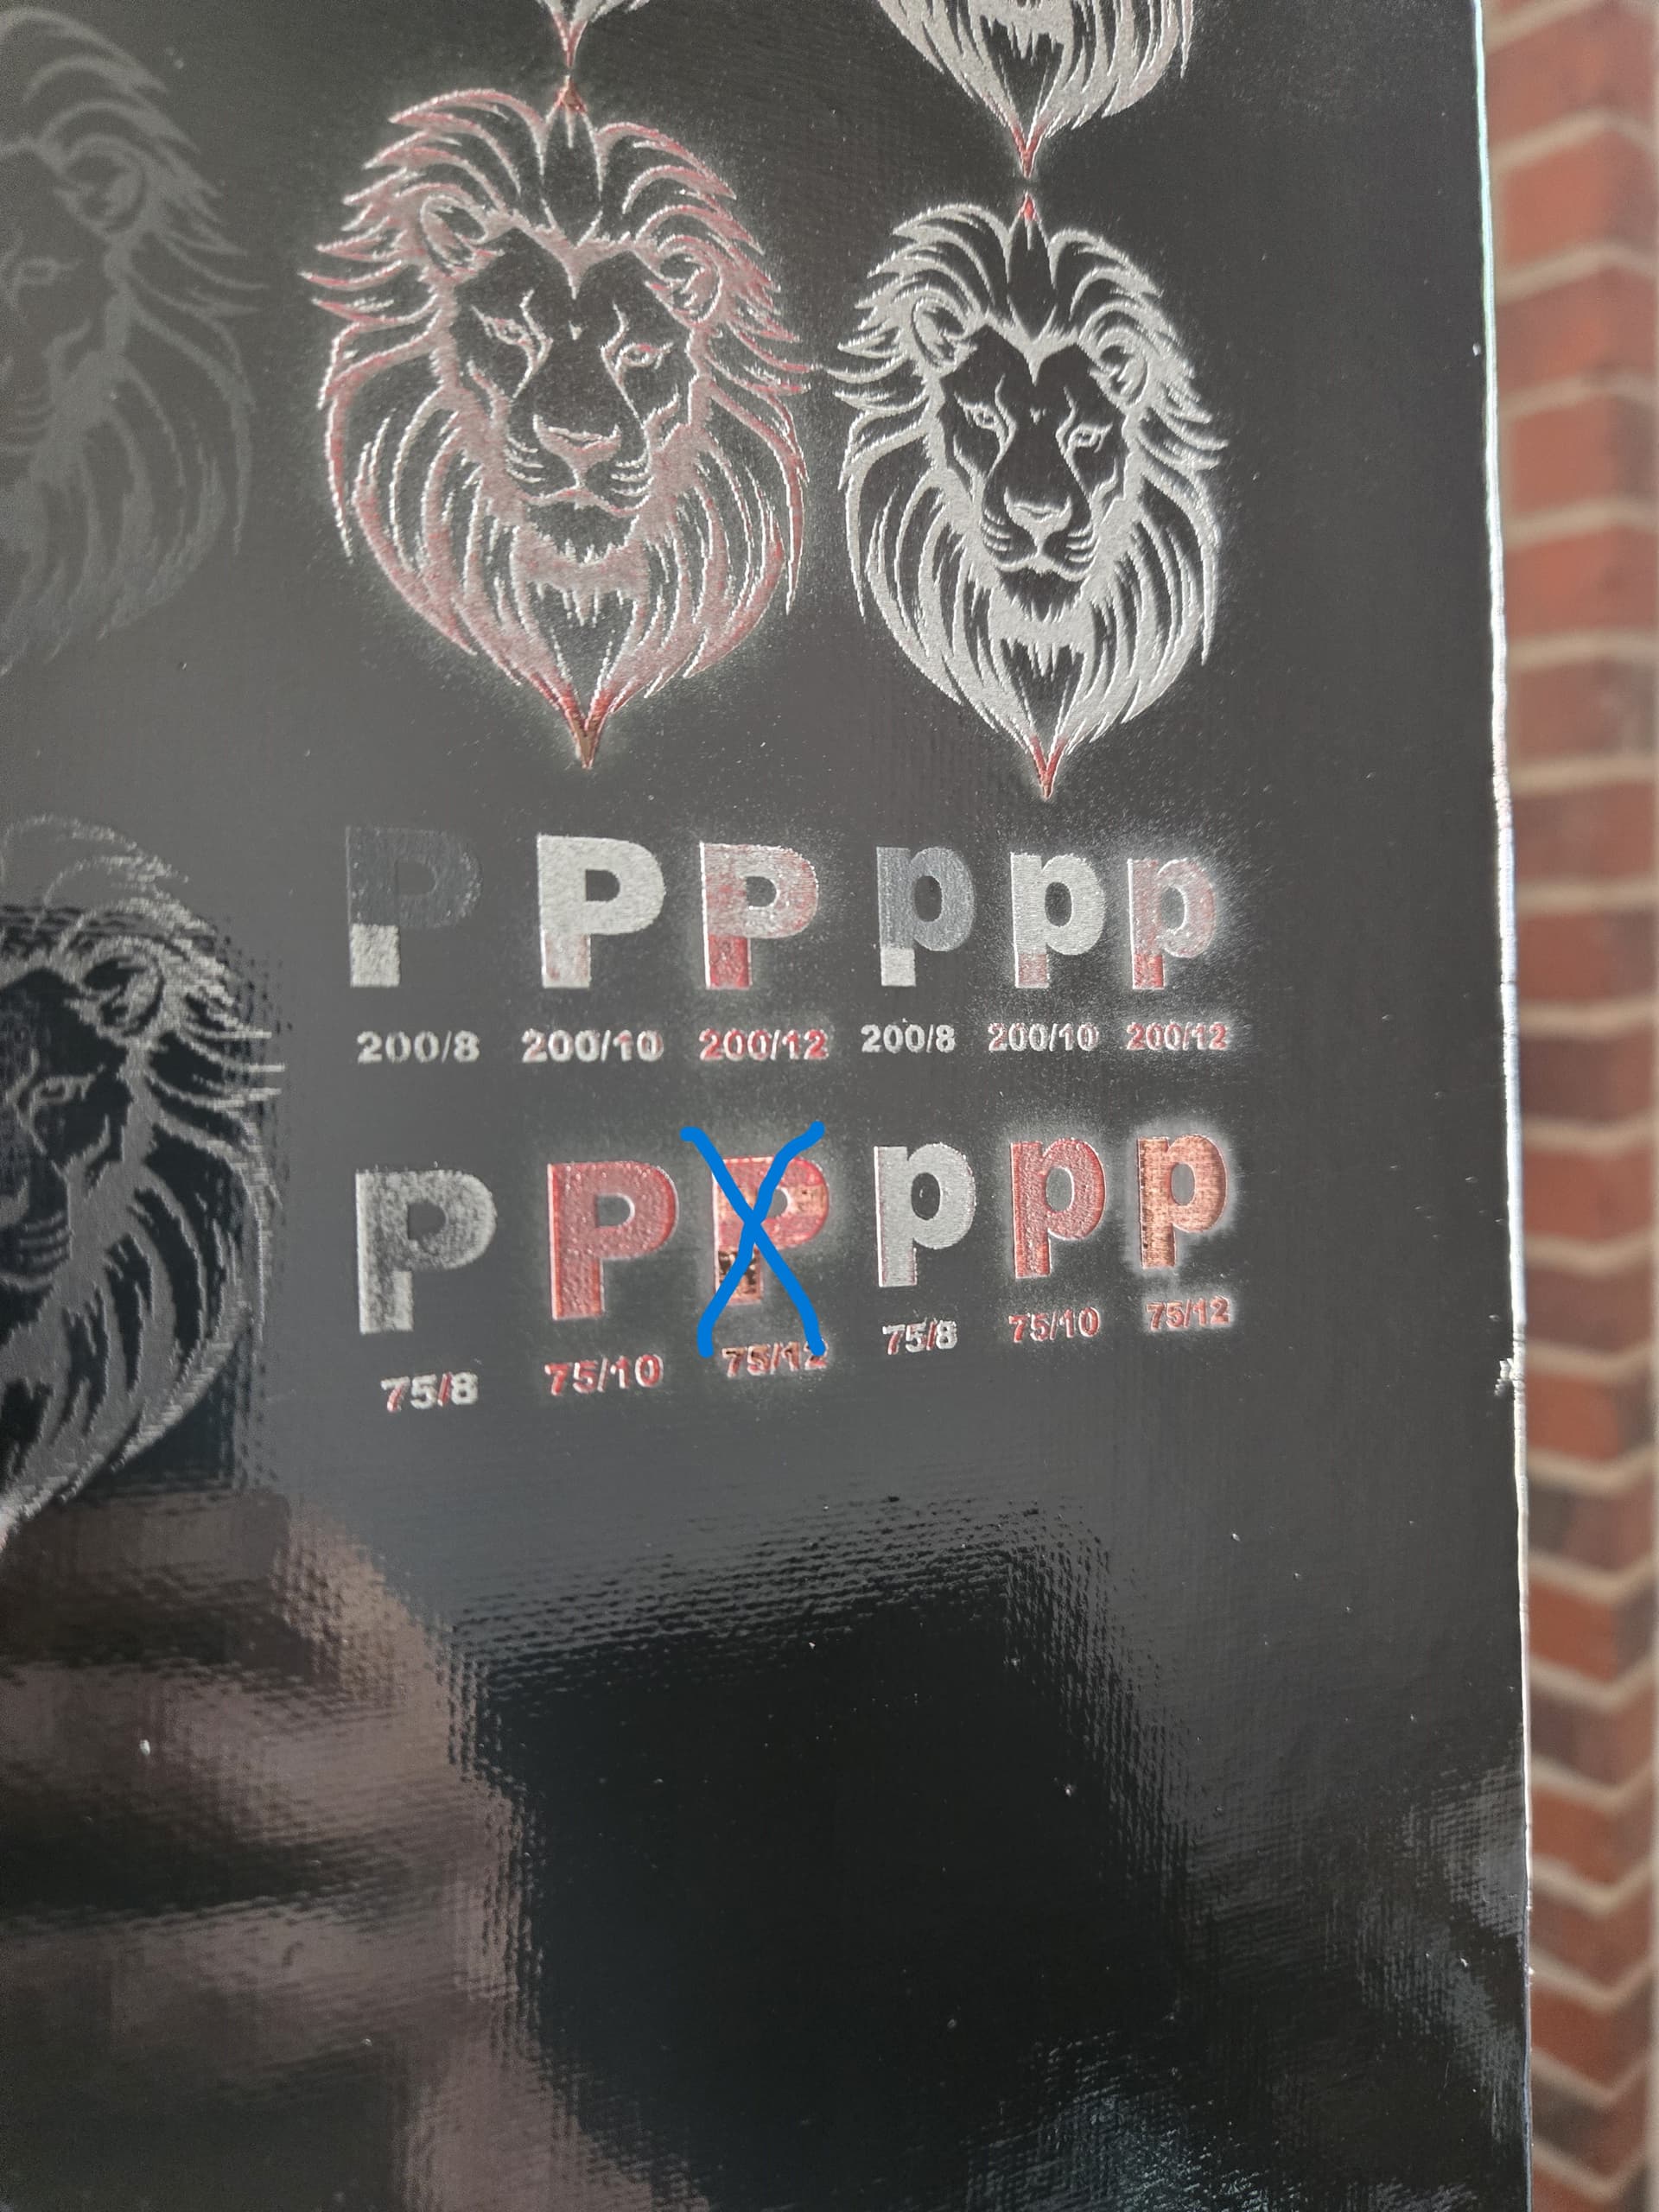
1st of all, thank you all for your comments and advice. I tried them all and this is what I got:
- Pete-I tried lowering the power and all I got was a lighter burn. My laser stops firing at 8 so I couldn’t go much lower anyway. However, the issue persisted. The parts that were shorter still came out darker than the rest. On wood, yes the burn is deeper on short runs. I keep saying short runs because i do’t know where the cutoff is. I will do some tests to determine.
- Wyked-there is no duplicating and no overlap on intervals either. I adjusted and the only thing that happened was the quality of what was engraving correctly deteriorated.
- ednisley-Yes, that is the machine. I did as you suggested all that did was lessen the darkness of the burn, however, the points did the exact same thing. I will upload the lightburn file.
- jkwilborn-this is actually an image, not a vector. I did lower the min. power to as low as it would go which was 8 and still no change.
These pictures illustrate the problem I’ve had from day 1. As you can see, the legs of the Ps are shorter runs and therefore they burn hotter and deeper than the rest of the character. As you can see in the last lowercase “p” ALL of the edges seem to burn deeper, which brings me back to Pete’s point that something is causing the laser to delay. I don’t think it’s delaying, although I don’t pretend to be able to tell by looking at it, but I don’t think the overscanning or the laser shutoff is working. That is supposedly handled by the DSP controller
but it doesn’t seem to be working.

Lion test.lbrn2 (496.2 KB)
I tried lowering the power and all I got was a lighter burn. My laser stops firing at 8 so I couldn’t go much lower anyway. However, the issue persisted. The parts that were shorter still came out darker than the rest. On wood, yes the burn is deeper on short runs. I keep saying short runs because i do’t know where the cutoff is. I will do some tests to determine.
There is no duplicating and no overlap on intervals either. I adjusted and the only thing that happened was the quality of what was engraving correctly deteriorated.
Yes, that is the machine. I did as you suggested all that did was lessen the darkness of the burn, however, the points did the exact same thing. I will upload the lightburn file.
this is actually an image, not a vector. I did lower the min. power to as low as it would go which was 8 and still no change.
Hi Anthony
You can try turning off Bi directional scanning. This will reduce the acumalating heat while the laser is off, as it returns to make the next line.
Also, as the laser is narowing down to finish the (or starting from) the tip of the lions mane the left/right runs of the laser happen in a very norrow space and this will create a lot of heat in a very small area.
This does not happen on/at all similar points so this may be where other material reasons come into play.
Are each and all the layers (white/grey, Red, Black) of paint totally covering the canvas or are there mixed areas with the black being the only color which has total coverage.
Thats a good photo of the speed/power test but it seems there are conflicting results for similar/approximate or quite different values…but I only say that after an initial look.
There is a definate patterns of burn quality in the letter’s with a clean burn down the left side and speckles around the centre…it looks in my unqualified opinion to be related to ‘overscanning’ and acceleration.
It seems you are very close in some letters to the required values for a solid clean layer removal and further incramental small changes will get you there..or similar small changes to the paint application.
There was a post a few weeks ago where it was useful to reduce the video playback speed of the laser moving, perhaps you could try that if you want to see the movement of the laser at a decernable speed.
If it’s an image scan, it will use overscan, allowing it to accelerate to speed before it reaches where it needs to lase the image. There is no use for minimum power here, as it’s not applicable.
Are you using bi-directional scan? Might try it disabled and see if the issue exists..
Hoping the results will give us more of an idea of what’s happening.
![]()
Yes, there are 2 layers of paint for each color and they all cover the complete canvas. I thought about turning off bidirectional but then 2 things came to mind. 1. EVERYBODY can’t be having this problem and using just one-way scanning and 2. wouldn’t that slow down each project and throw the “speed” ratings right out the window?
Were you able to try the file and get different results?
I think, he and I were attempting to use this as a diagnostic tool to help us figure out what’s going on with your machine. And yes it will double the job time. My machine show about 52 seconds, so <2 minutes with bi-directional off.. of course that’s my machine.
I’ve looked at your project, nothing sticks out with your settings.
Why do you have such a large tool layer? Are there other things you plan to put in there or ?
Looked at it only. I have a bunch of junk on my machines table for checking response time and need to do a tube swap out and realignment check.
I will test it if we don’t come up with some thing first.
![]()
I will have a closer look at those speed/power values in a while because I’ve just returned from the rainy hill’s of County Kerry and need to get some things sorted…but just to say, I find it strange that 75/8 has white and black…but no hint of red, while 75/10 seems almost dialled in for red.
Will need to mull it over a bit!
Anthony
Were those letter P’s all burned together or individually…If burned individually, this may show the reason for the Kinda guosting down the left side and on the curve of right side..Possibly Overscan/acceleration.
Try 75/9 for Red. (may not speckle burn through to white) and then further fine adjust speed to really dial it in.
Set each color letter to a layer and space them out…White letter - Red letter - White - Red - White - Red, and run it burn together so each line gets to cool down before laser returns for next burn line and if overscan/acceleration is an issue it will show at either end but not in the middle letter.
Try 200/11 to totally remove Black and Red…and/or slow speed for that layer, just a bit!
The Box’s being only in the leg of the P, I cannot say anything about, but maybee the changes listed above may affect that situation also.
It’s always possible the tube isn’t really working correctly at such low power settings. I don’t know, just speculating.
When a tube is using low current they can have the TEM mode that is different from a bit higher current use where the tube is completely lasing properly. This effects the optics as far as focal point, spot and depth of field.
If you’re scanning or using these with fill, minimum power isn’t used or needed.
![]()
1 Like
I did a quick sarch to familiarise and I see what you mean. So ‘00’ will not occur at low power but more probably toward ‘33’ and might cause speckle or ghosting because of repeated burn in, and not in specific areas due to divergence…am I in the ballpark.
Just took a look at the outer edges, and they are defined but not optimally sharp, but perhaps paint burns that way?
So would that suggest higher power and speed as the answer, or other frequency band.