Chuck Rotary Steps Don't Change Rotation

I’ve been through several similar posts that didn’t have a conclusion, or advice that I haven’t already tried, so I’m creating a new one to see if I can get some help figuring this out.

First some details:

  • Gweike Cloud Pro II 55w + Xtools RA2 Rotary in Chuck Configuration
  • Ruida RDLC-V15.50.18
  • LightBurn v1.6.01
  • Stepper Motor (on the RA2): Golden Motor 42HD2036-14

I did read the rotary instructions for LightBurn and for the Xtool RA2. Xtool says to use “128 mm Steps Per Rotation” but that doesn’t show up with a Ruida controller and I knew I was doing something a little hybrid here anyways.

I did see the DSP notes for LightBurn, and have I been painstakingly writing settings, powering off, restarting, and testing. I have also disabled Y axis homing because that was getting annoying.

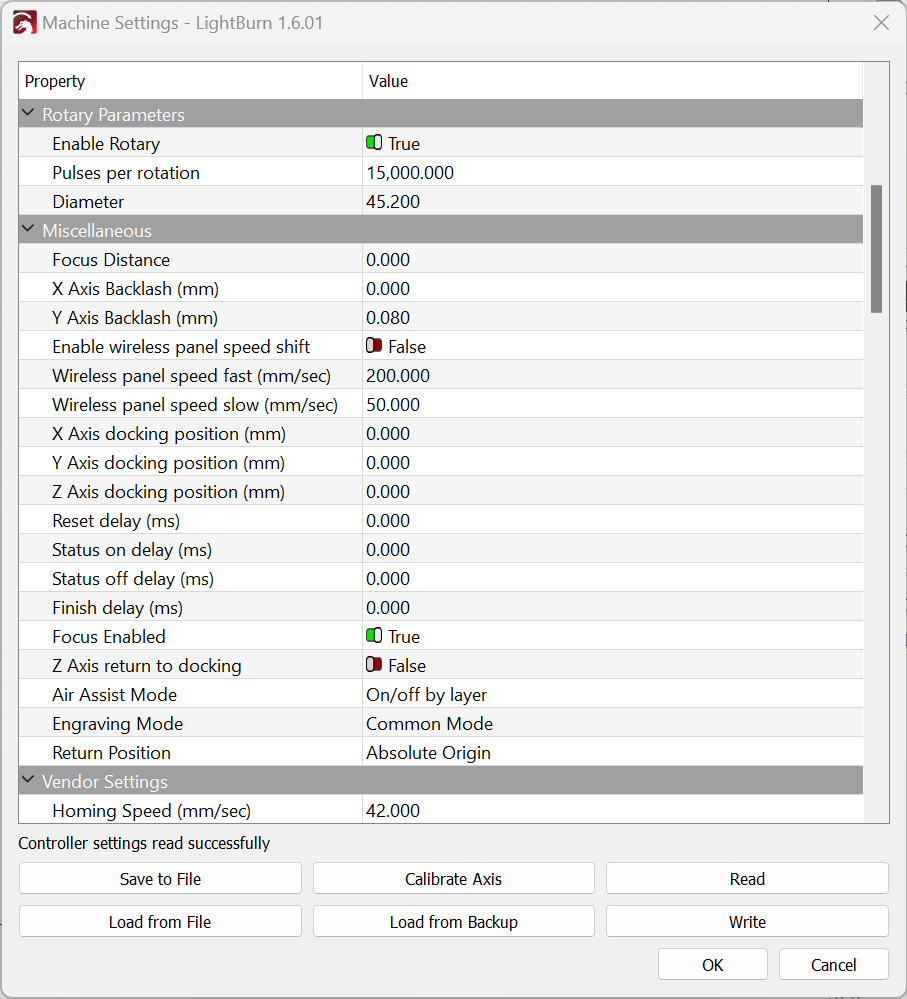
Eventually, by measuring the outter gear size (45mm) and marking a point, I could see it performing one full rotation. However, it was a “little off” (like maybe 1mm off of a full rotation), but then when I tried to test other “steps per rotation” (and power cycling after writing), I noticed that nothing mattered. I can set it to 200, 360, 400, 500, 1000, 10000, and it would still do the one rotation.

The only thing that changes the rotation is the Object Diameter, but that defeats the purpose if LightBurn needs to know that to determine the speed, scale the output, etc.

I have seen other posts with this symptom, but all of them I could find either ended unresolved, or ended up being something like they were not power cycling after writing settings, etc.

What am I missing here? Is there something unique about the fact that the RA2 is a combo roller and chuck? It uses the same motor but in one configuration it’s a roller, but in the configuration I am using it, the rollers come off, and I installed the gear/pulley with chuck attachment. See their YouTube install video for a demonstration of that.

Here are some screenshots at 15,000 but it does one full rotation at 45.2mm no matter what the steps are, and rotates past 1 full rotation with anything larger than that.
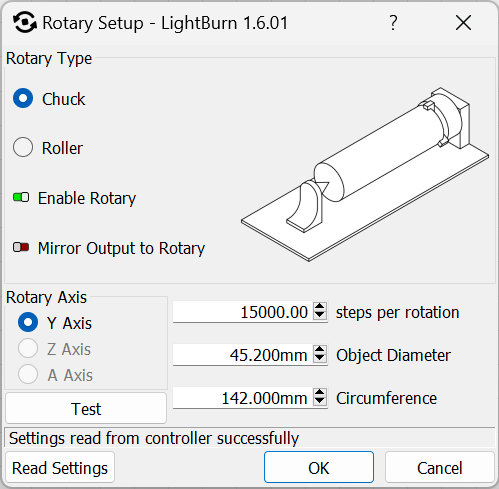
image

The Ruida has a motor driver and the steps/rotation are found there. Does Gweike specify… it’s likely the same.

See if this setup helps you out…

:smile_cat:

Maybe you would want to try a trick, not tested by me, read carefully and it´s on you to try.
This is not what you are searching and is waaaaaay out-of-the-box, but may be a solution for you, open your gcode file in Notepad++ and check if the following as any application to your use case.
https://www.ganotechnologies.com/cnc/rapidrotary/

This is a Ruida… no gcode.

:smile_cat:

1 Like

Yeah, I saw that previous post and it didn’t help. None of them did… I must have read about 20 of them before posting this. :sob:

I pulled up the Gweike manual because I didn’t recall seeing this mentioned in their LightBurn setup. They have a section called “Rotary for LightBurn” but they do not say to run the rotary setup. If I’m reading this correctly, they seem to say just flip the left switch up for rotary mode, setup the rotary, and then print in LightBurn as if you’re in plane mode.

Again, I am doing something a little “off the books” by using an RA2 with the Gweike, but I ran into someone else who said they did this before I purchased it. The Gweike rotary doesn’t have a Chuck and it generally sucks (metal rollers that slip, etc). That other person was in a FB group, and they didn’t say how they calibrated, and I can’t seem to get in touch with them again.

Like I said, for me, changing the “Steps Per Rotation” has absolutely no affect. I can set it to anything, power cycle, and nothing changes. Only changing the Object Diameter changes the rotation, and if I set it to anything other than 45.2 it does not complete a full rotation.

Just to see what would happen, I tried a test burn of a 1cm line in the middle. The container diameter is almost double the gear that I was testing and got the 45.2mm from (container is roughly 82mm). The test burn line came out almost 2cm, which probably makes sense given that the steps aren’t changing the rotation.

I have the xTool RA2 Pro and it appears the chuck diameter is about 45mm not counting the jaws. If the steps/mm was correct in the controller, that object diameter would give one rotation and back with the Test button.

My setup uses 162mm for the mm per rotation box, but your box says steps per rotation. I have no idea why they say different. Maybe your controller will not let Lightburn change that value, or ignores that setting. My Machine Properties window does nor report Rotary Properties, so yours are already stored in the controller.

In light of what I said, put a test part in the chuck with a known size, enter the diameter or circumference onto the setup window, and see what happens. It is possible your steppers (Yaxis and Rotary) are the same size and steps/rotation is already correct.

Yours is a grbl machine, his is a dsp.


Did you read the note in the Ruida setup procedure?

Did you power cycle the controller after a rotary change?


We may have to hope for @BillieRuben to drop in, I think she has a Gweike.

The firmware, I’ve been told, is special for the Gweike Ruida controllers…

:smile_cat:

Yes, painfully power cycled after each write. :smiley:

Also, I saw the controller setup info in that other post, but I don’t have an external controller with dip switches, etc. I did read the main Ruida setup instructions however, if that’s what you’re talking about.

After reading through some other posts on the FB group and elsewhere, and pinging the dude who told me he had this working in LightBurn, here is the “hack” some people are using… but this really seems like something LightBurn should be helping with.

What people have been doing with this and the OMTech Polar (they’re almost identical machines) is calibrating the Y axis for each circumference they have to burn. So they back up the planar cutting settings, then for the rotary config, usually disable X and Y homing, calibrate the Y axis (test prints, etc) and then save those settings as a unique profile for that specific object.


In case this ends up being a “solution” that works for some, here’s what others need to know (and I’m pretty sure this is unique to the Gweike and the OMtech Polar - because it’s not supposed to be this difficult).

  1. The steps per rotation don’t do anything at all. I set mine to 12800 ultimately, based on a suggestion for the Xtool RA2 in another forum, but I’m certain that doesn’t matter because no matter what I set it to, nothing changes, even after power cycling as suggested.
  2. I had to determine the “base rotation” to set the Object Diameter using the size of the main gear that I was measuring for a full rotation (using masking tape). That was 45mm in diameter for the XTool RA2, but ultimately, I had to tweak it to 45.2mm for one full rotation.
  3. With that done, what you’re about to do is all relative based on that setting, so don’t go messing with that.
  4. Backup your normal Machine Settings before touching anything. There’s no going back once you start messing with the Machine Settings if you don’t have a baseline to recover from.
  5. Setup your laser for a test print on masking tape, (400 lpi, 500% speed, 20% power). Calculate your material thickness or manually set your Z axis. Set the Start from to: Current Position. Use the Move commands to position the laser, etc.
  6. Calibrate the Y axis by printing a 30mm rectangle along the circumference, that should get you close. Then do a full circumference rectangle print, and see how much over or under you were and recalibrate again. Feel free to repeat until your Y axis calibration is perfect.
  7. (Optional but useful) Go into the Vendor Settings and change the Enable Homing to “False” for the X and/or Y axis. Especially with the Y axis or else it’s going to try to spin around LightBurn’s default value of 10000 until it gets back to Zero (0). That’s super annoying and there’s no way to have LightBurn only move the X axis as far as I know.
  8. Save these settings for future printing of this object. It’s tuned to the exact circumference, so you’ll need one of these files for every object.

I just did all this, and calibrated the full circumference, and have it dialed in now, but this is time consuming, super annoying, and again really feels like something in LightBurn is either not working correctly with this machine or maybe a new feature waiting to be implemented.

I’ll try some more interesting test prints tomorrow, but this strategy should work for now. In the meantime, it basically means that the Rotary settings in LightBurn are pretty useless to me with this setup.

In the end, it’s going to be worth it because the rotary they sent me with the device was a horrible version of a roller rotary (spiked metal wheels that slip and scratch everything they touch). So until LightBurn can help make this better (fingers crossed) I just wanted to share the solution for the benefit of others.

The Ruida cannot driver a motor directly from it’s outputs… There must be some kind of electronics acting to drive enough current to step a motor. If there isn’t a similar driver, you should look at how the X and Y axes are driven from the Ruida.


When the Gweike and Polar first came out, I was told by many they were clones of each other. After the few years they’ve been out and having watched numerous videos of their operation, I’ve decided that although similar, quite a difference in how they operate and how the firmware operates.

I think the controller in the Gweike has specific firmware, but also pretty certain that the Polar has some modification also… No Ruida that I’ve ever looked at has an error output when there is slop or other error, but both machine light up the red ring. I’ve actually seen people add a Ruida console to the Polar, but have never seen one on the Gweike. Heard of people wanting to do it, but all I’ve heard so far is it doesn’t work…

Don’t have one so it’s all speculation.


I don’t think many people understand that the Ruida comes from a closed communist country and they don’t have to tell anyone anything and don’t. So I’m sure what Lightburn has used to develop with these has been pretty much on their own, with, likely, no help from any of the manufacturers.

I was hoping that @BillieRuben would drop by and give us some words about these… I think she has a Gweike.

Sorry …

:smile_cat:

1 Like

I’ll keep my fingers crossed for more info or a better solution, but this Machine Settings hack seems to be doing the trick for now.

In case others who find this thread are curious, XTool tech support actually replied with the details I requested about the RA2 Rotary Tool in the Chuck configuration.

Regarding the question, one step of the stepper motor is 1.8 degrees, and one circle is 200 steps. We use 1/16 stepping, so it will take 3200 steps to equal one circle.

Now, if I could actually use that information instead of needing to manually store settings for each diameter, that would be great. :wink:

1 Like

Sorry, I do have the gweike, and I’ve dabbled with the rotary for an afternoon. I remember it being confusing, but I didn’t take notes at the time, and I didn’t try to do a full wrap, and I have the older roller version, which I think works quite differently. I have never used an XTool.

Are any devs able to respond? I seem to have a temporary solution by carefully calibrating Y axis and saving profiles for each, but that’s super annoying to have to do every time I have a new object to setup.

Is it something special about the “non-standard” Ruida controller on this device perhaps? Is there anything else I could provide that would help?

The GWeike Cloud uses a special controller for just that machine, as far as I’m aware, while the Polar uses a more generic Ruida 6442.

I’ve just watched a couple of videos on using the Cloud with a rotary, and it’s quite possible that they just baked all the settings into the hardware for their own rotary and don’t support others. I can’t say that for certain - you’d need to contact GWeike and find out if other rotary devices are supported.

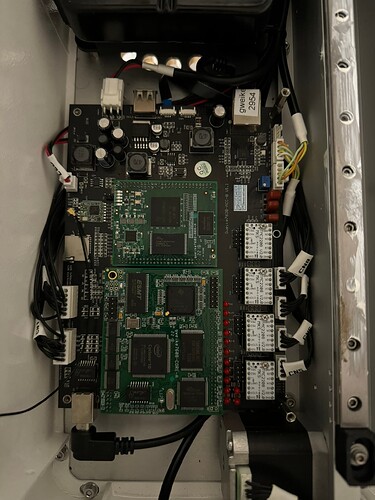
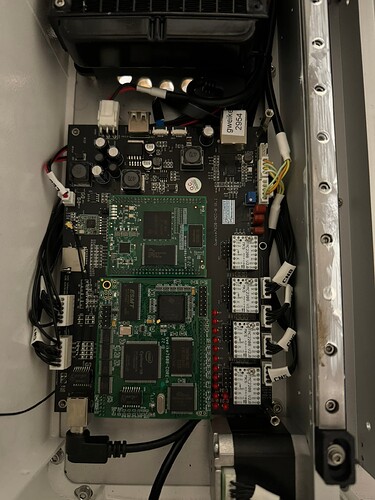
Yes, I confirmed this recently when I disassembled the left side to see if I could add a Ruida console. It’s something similar, but not the same.

Here are some photos of my Gweike Cloud II Pro 55w controller boards:


Gweike’s “official response” is that it doesn’t support a Chuck and is only supported to work with their rotary.

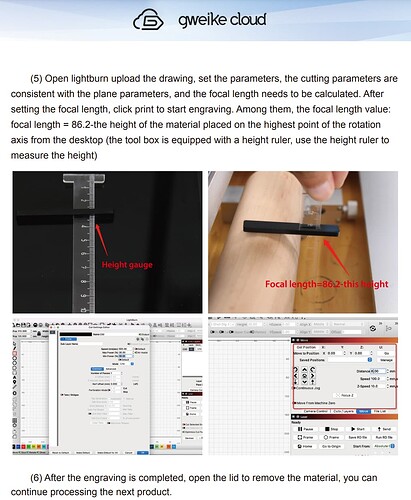
What’s strange, is even their documentation for using the rotary with LightBurn does not say to use the Rotary setup tool, etc. They just say to use the “plane” parameters (see photo in original post).

Maybe the controller just knows that it has a 300mm Y axis and adjusts accordingly itself?

The custom config does work for now, but man, it is really annoying to have to save the machine settings with a custom calibrated y-axis for every rotary object.

This topic was automatically closed 30 days after the last reply. New replies are no longer allowed.