I could see how it would work with swapped connectors.
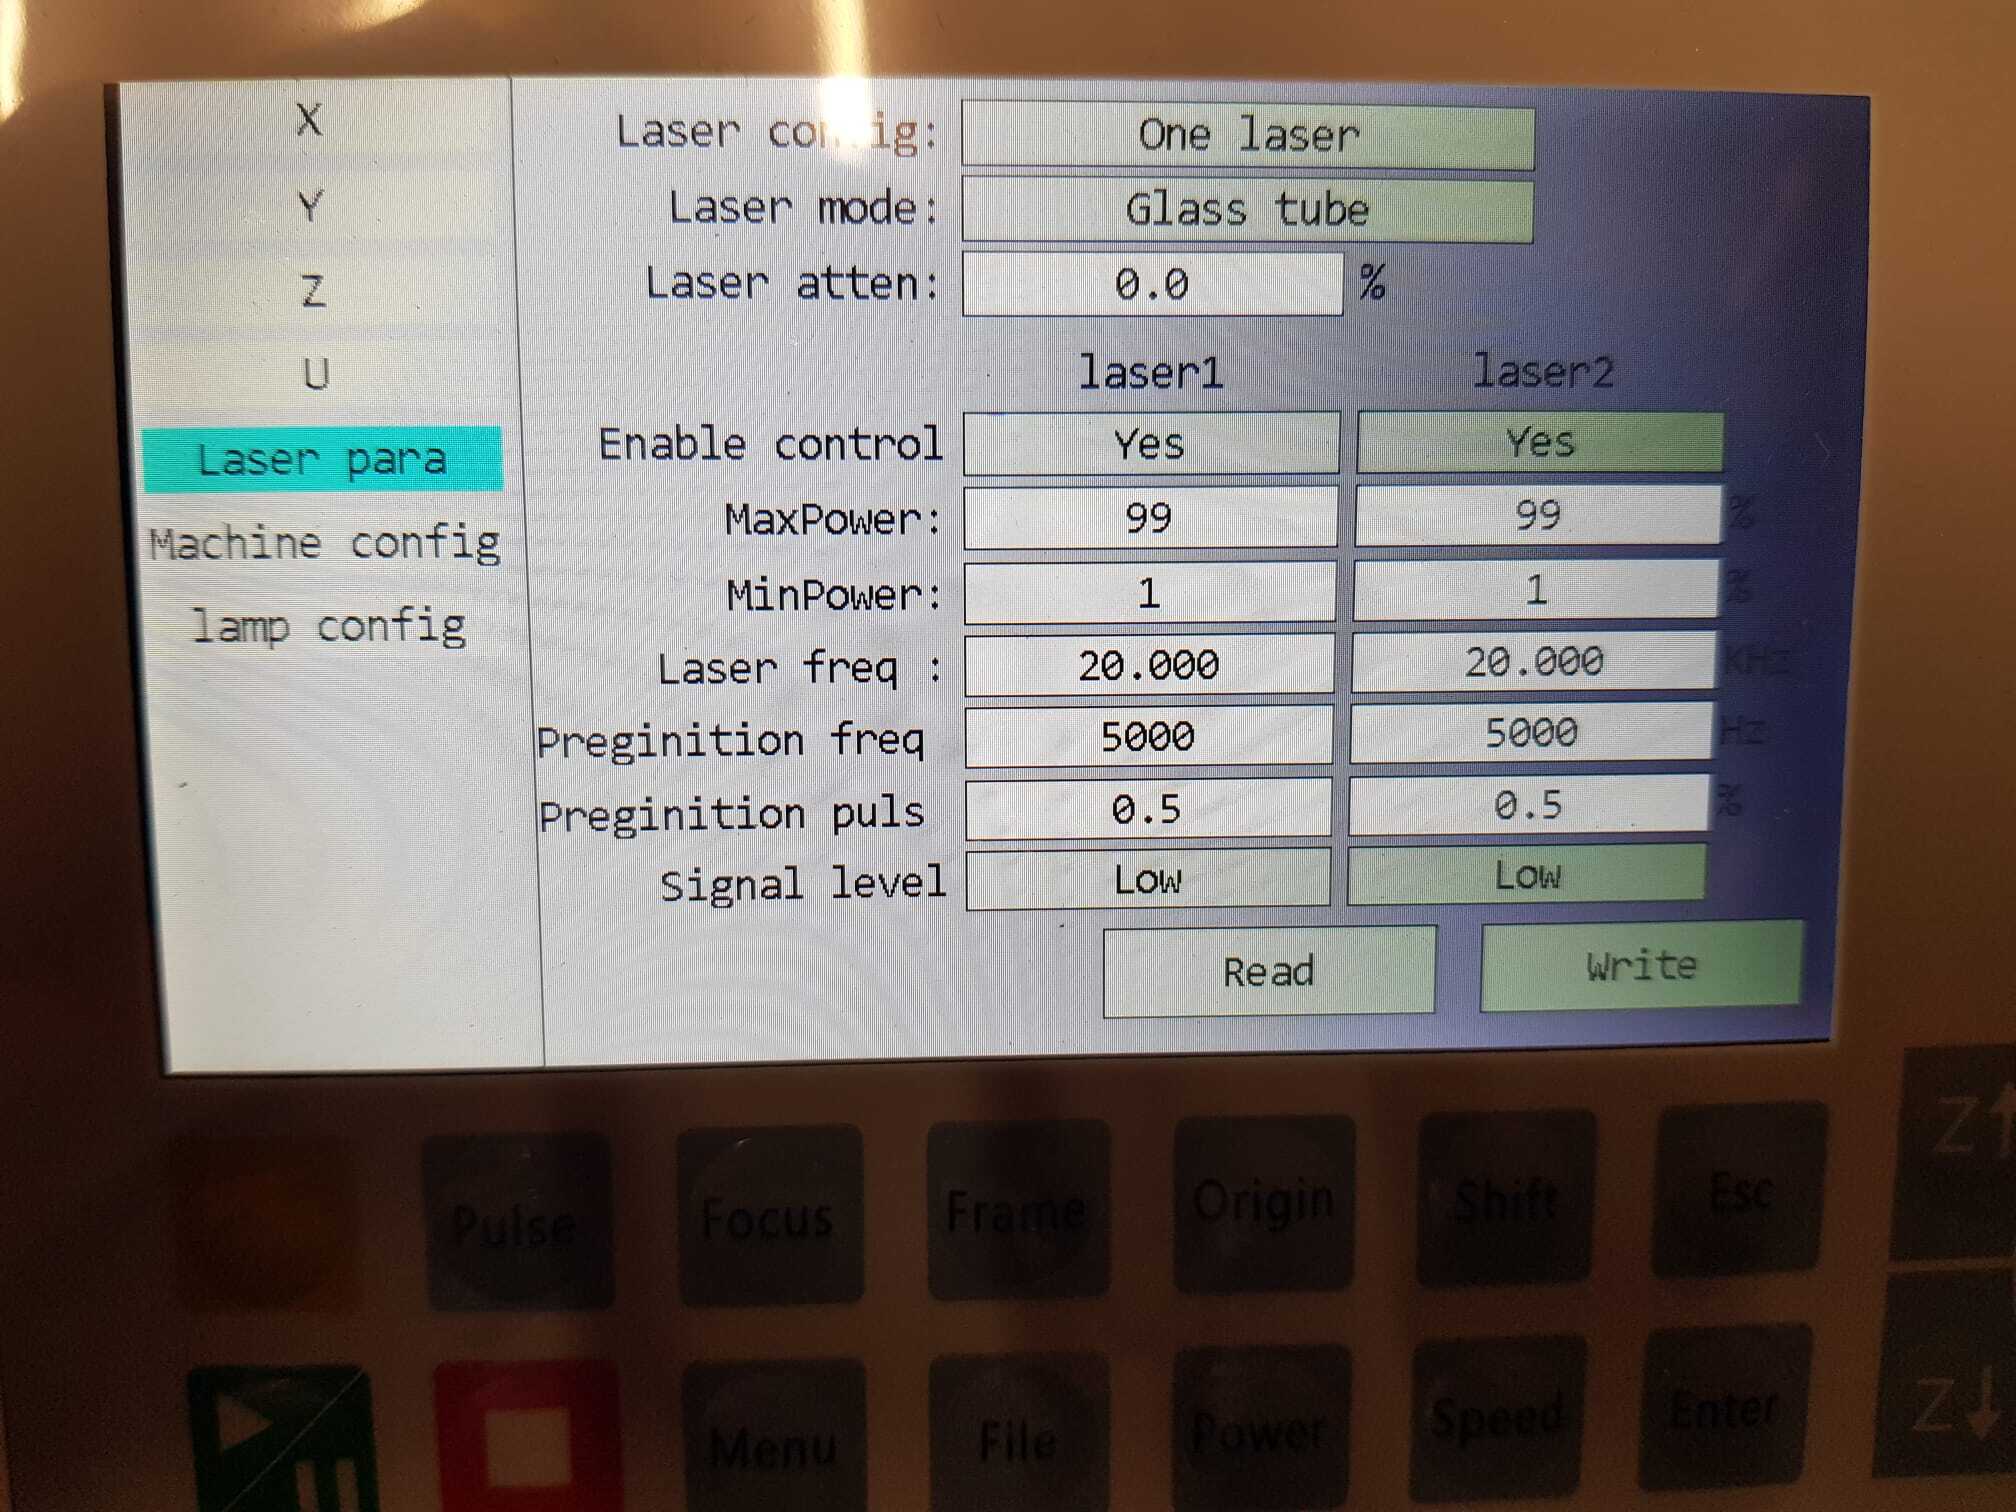
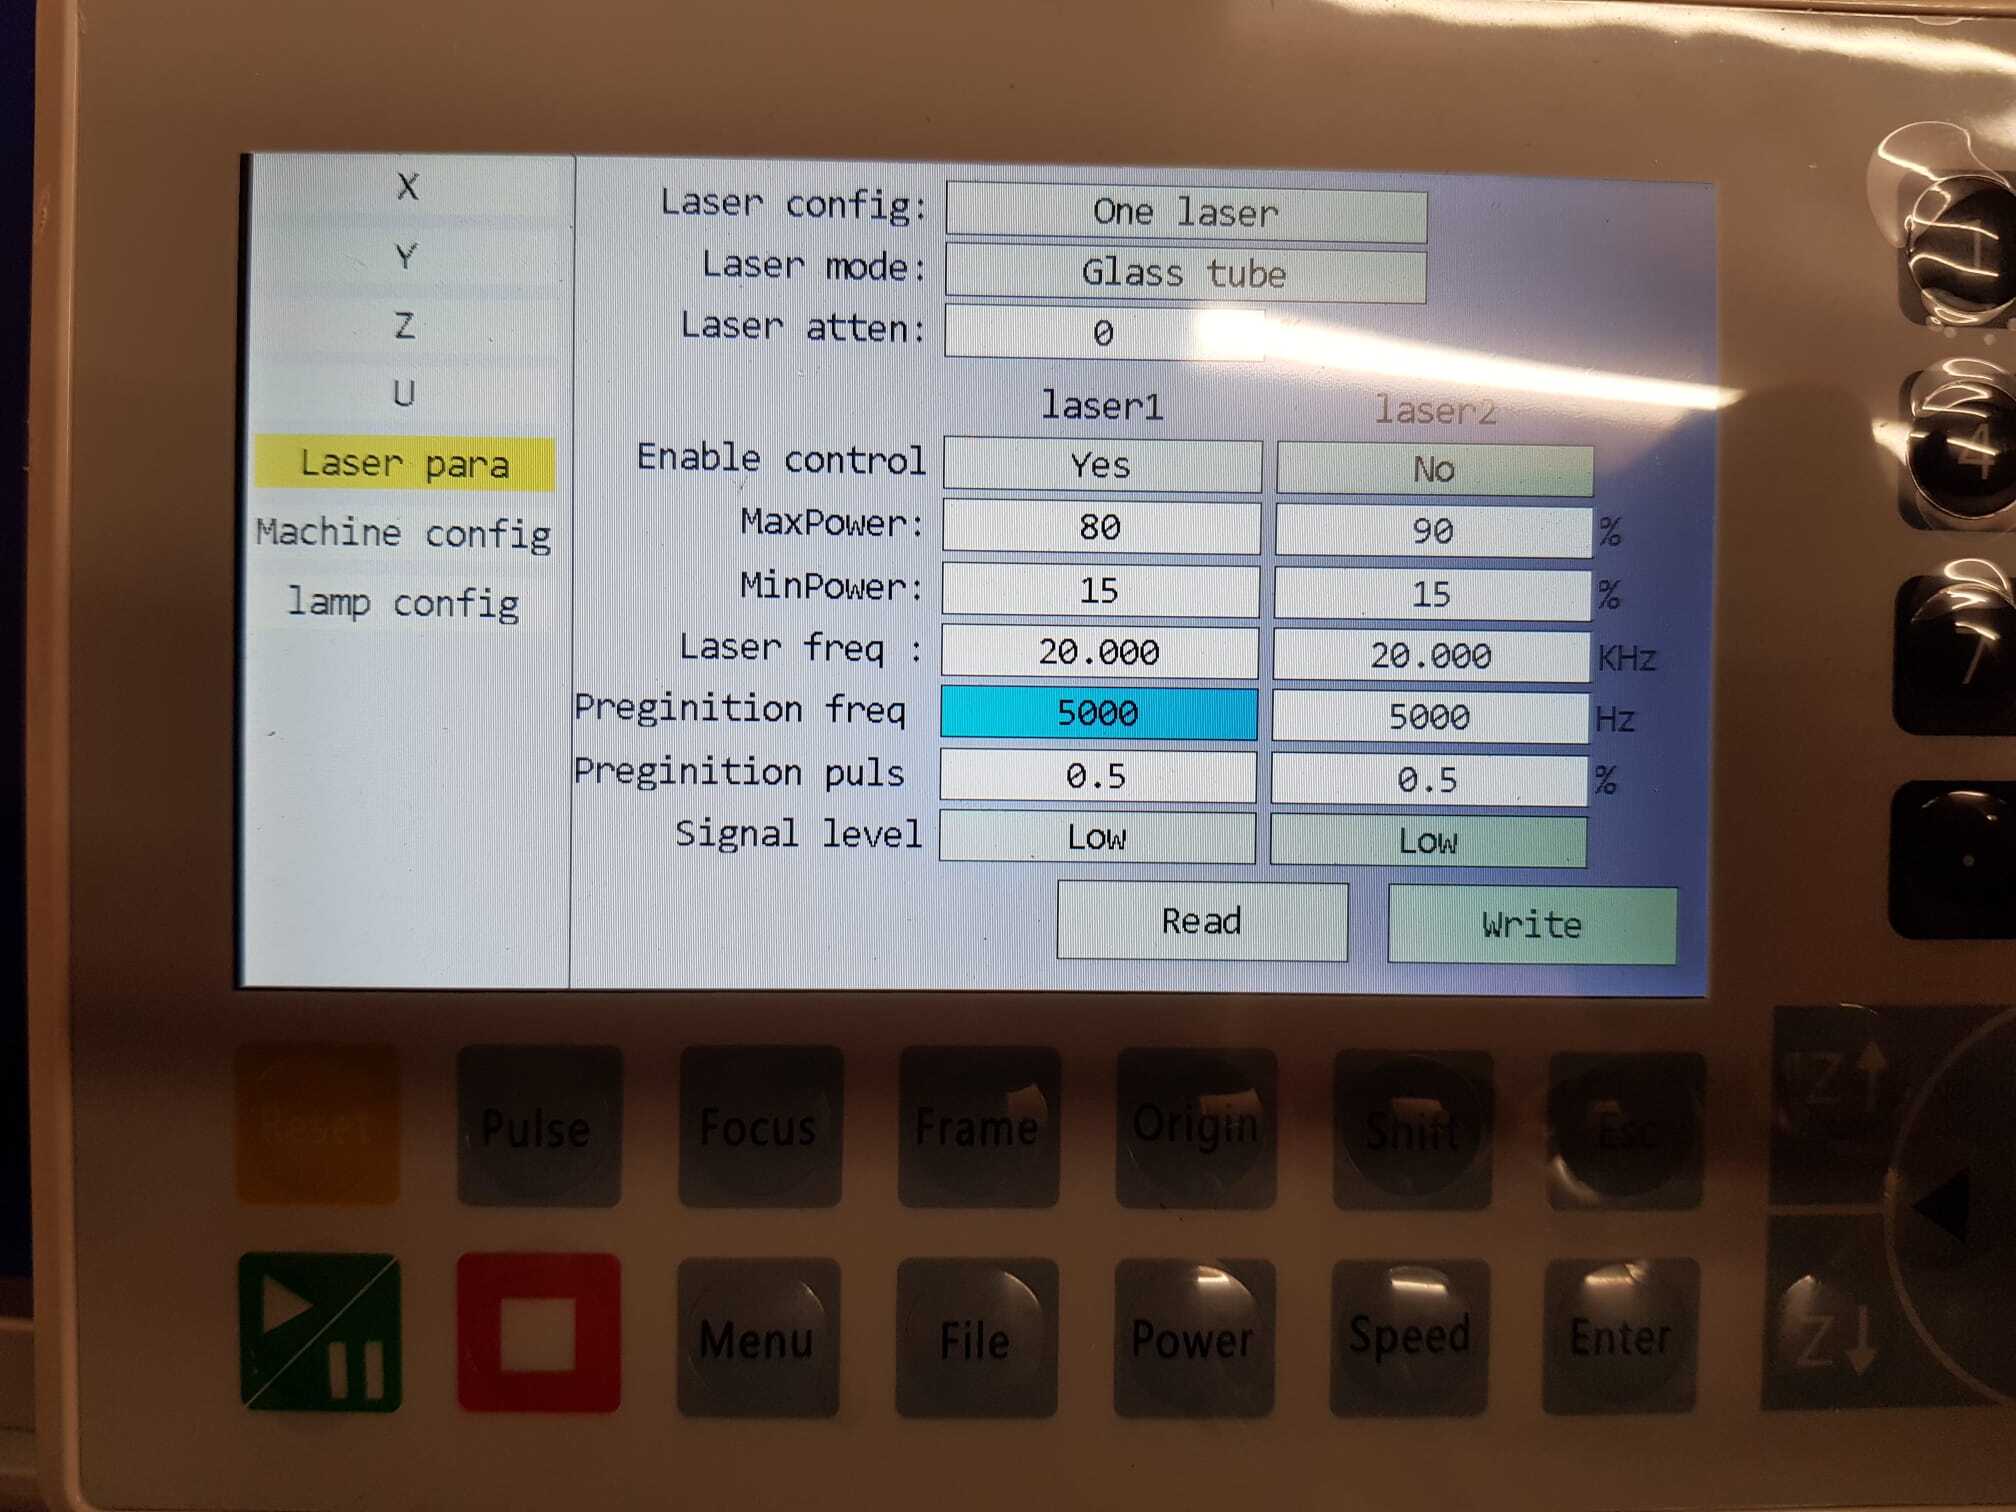
It is configured to use laser 2, not laser 1.
So is it working now?

I could see how it would work with swapped connectors.
It is configured to use laser 2, not laser 1.
So is it working now?
That’s the thing it works when I pulse it from the Ruida controller but does not fire when I try to use LB to burn something. I’m no expert so I’m really not sure what is going on with it.
If you are now using CN6 you probably need to enable laser 2 in LB under device settings.
This setting? I had it enabled if so.
Thinking differently, I see the controller set to laser 2, meaning it will expect the controls to be out of CN6.
Having the controller set to laser 2 means Lightburn was configured incorrectly as it was set to laser 1.
Sound like all the hardware is working properly as is the software, you have ‘confused’ the combination.
IMHO, go back to laser 1 and configure the Ruida and Lightburn properly… I think this will only lead to confusion down the road when things are not ‘working’ right.
If it isn’t now…
Good luck
Jack,
I’m not sure I completely follow what you are suggesting I do. Can you elaborate a little more?
I think he is thinking about disabling laser 2 in lightburn and moving the connector at the controller to CN5 and see if everything works as advertised.
It appears as if all the hardware is working. Albeit not in harmony as they should.
Rarely do we find a hardware problem, compared to how many times it is just a configuration issue. Something or multiple things in the configuration can cause strange operations. Most of us do not have a single tube machine and run it as laser number 2.
I’ve been involved a while and I’ve never seen one configured that way… Doesn’t mean it doesn’t exits.
What I was suggesting was to go back and set it up correctly for Laser 1. Then setup Lightburn for Laser 1. Then we can really compare the configurations without making assumptions on Chinese logic.
All the steps you’ve taken have shown the hardware is working.
In all reality I would think it should be configurable to do this, but I didn’t program it or work/educated in a country that reads right to left… we simply think differently in many areas. You might find out that it just won’t work with Laser 2, but we can be pretty sure it will work as Laser 1 if it’s set up correctly.
Most of these signals are easily chased down with just a voltmeter for most diagnostic problems. The water protect sensors have led’s on the controller so you can physically see the state.
In one of my previous posts, I gave you the connections, there are only three… all can be evaluated with a simple volt meter…
I feel you are making this far too complicated…
I’m sure you’ll get it, just don’t get in a hurry and break something… 
Jack,
Thanks I really appreciate all the assistance. I tried going back to CN5 and it would not fire. If I disable the multiple lasers option on the controller it will even stop pulsing from the controller.
I can hook it back to CN5 but this was a working laser with the configs it had. I seen someone suggest to change it to CN6 to test it and that gave it some life as it was able to pulse from the controller at that point.
I’m open for trying whatever makes sense and appreciate everyone’s guidance.
I hope you have a ‘group’ of saved configurations that you have tried…
What I suggest is to ‘normalize’ the configuration to something that we know works, which is the laser 1 controls. That is a known working setup, yours is not what I’d consider a known ‘working’ setup.
Do you have a voltmeter and can operate it? It’s much easier to use a meter than to mess with wiring, such as changing connectors… This is especially true when you start from scratch.
These signals are relatively simple in operation. If it works in CN6 (Laser 2) then the hardware from there out is working…
One or more of these signals are not making it out of the Ruida CN5 (laser 1) connector. Generally something isn’t turned on. Assuming that LED 13 is not illuminated, which indicates a hardware failure.
This is more than likely a setting in the controller and isn’t likely a hardware problem, which is always lurking.
Since you are setting this up from scratch, it is a challenge. Many people here ‘factory reset’ the controller and end up with a big mess to get it configured back to where it works.
So ensure you have saved how it is now, you can always reload the configuration if you save it, uniquely named for proper identification.
Go back through the configuration, I’d get the manual and go through each step to see if it applies.
Here is my Google drive copy of the Users manual RDC6445.
In a last ditch effort, and you have access to a Windows machine you can get versions of RDWorks that will have other configuration options that Lightburn might not have. I hate using Windows and RDWorks even more so…
Once your configuration is appropriate you can check the signal levels and you will probably determine that the Ruida isn’t outputting the required signals… back to setting it up properly.
I spent lots of time with changing the pwm frequency for different materials. The results were very inconsistent and confusing… Turns out the when you set the frequency for a layer, it stays there until you actively change it on another layer… Never thought it’d just ‘stick’ there until changed…
Good luck
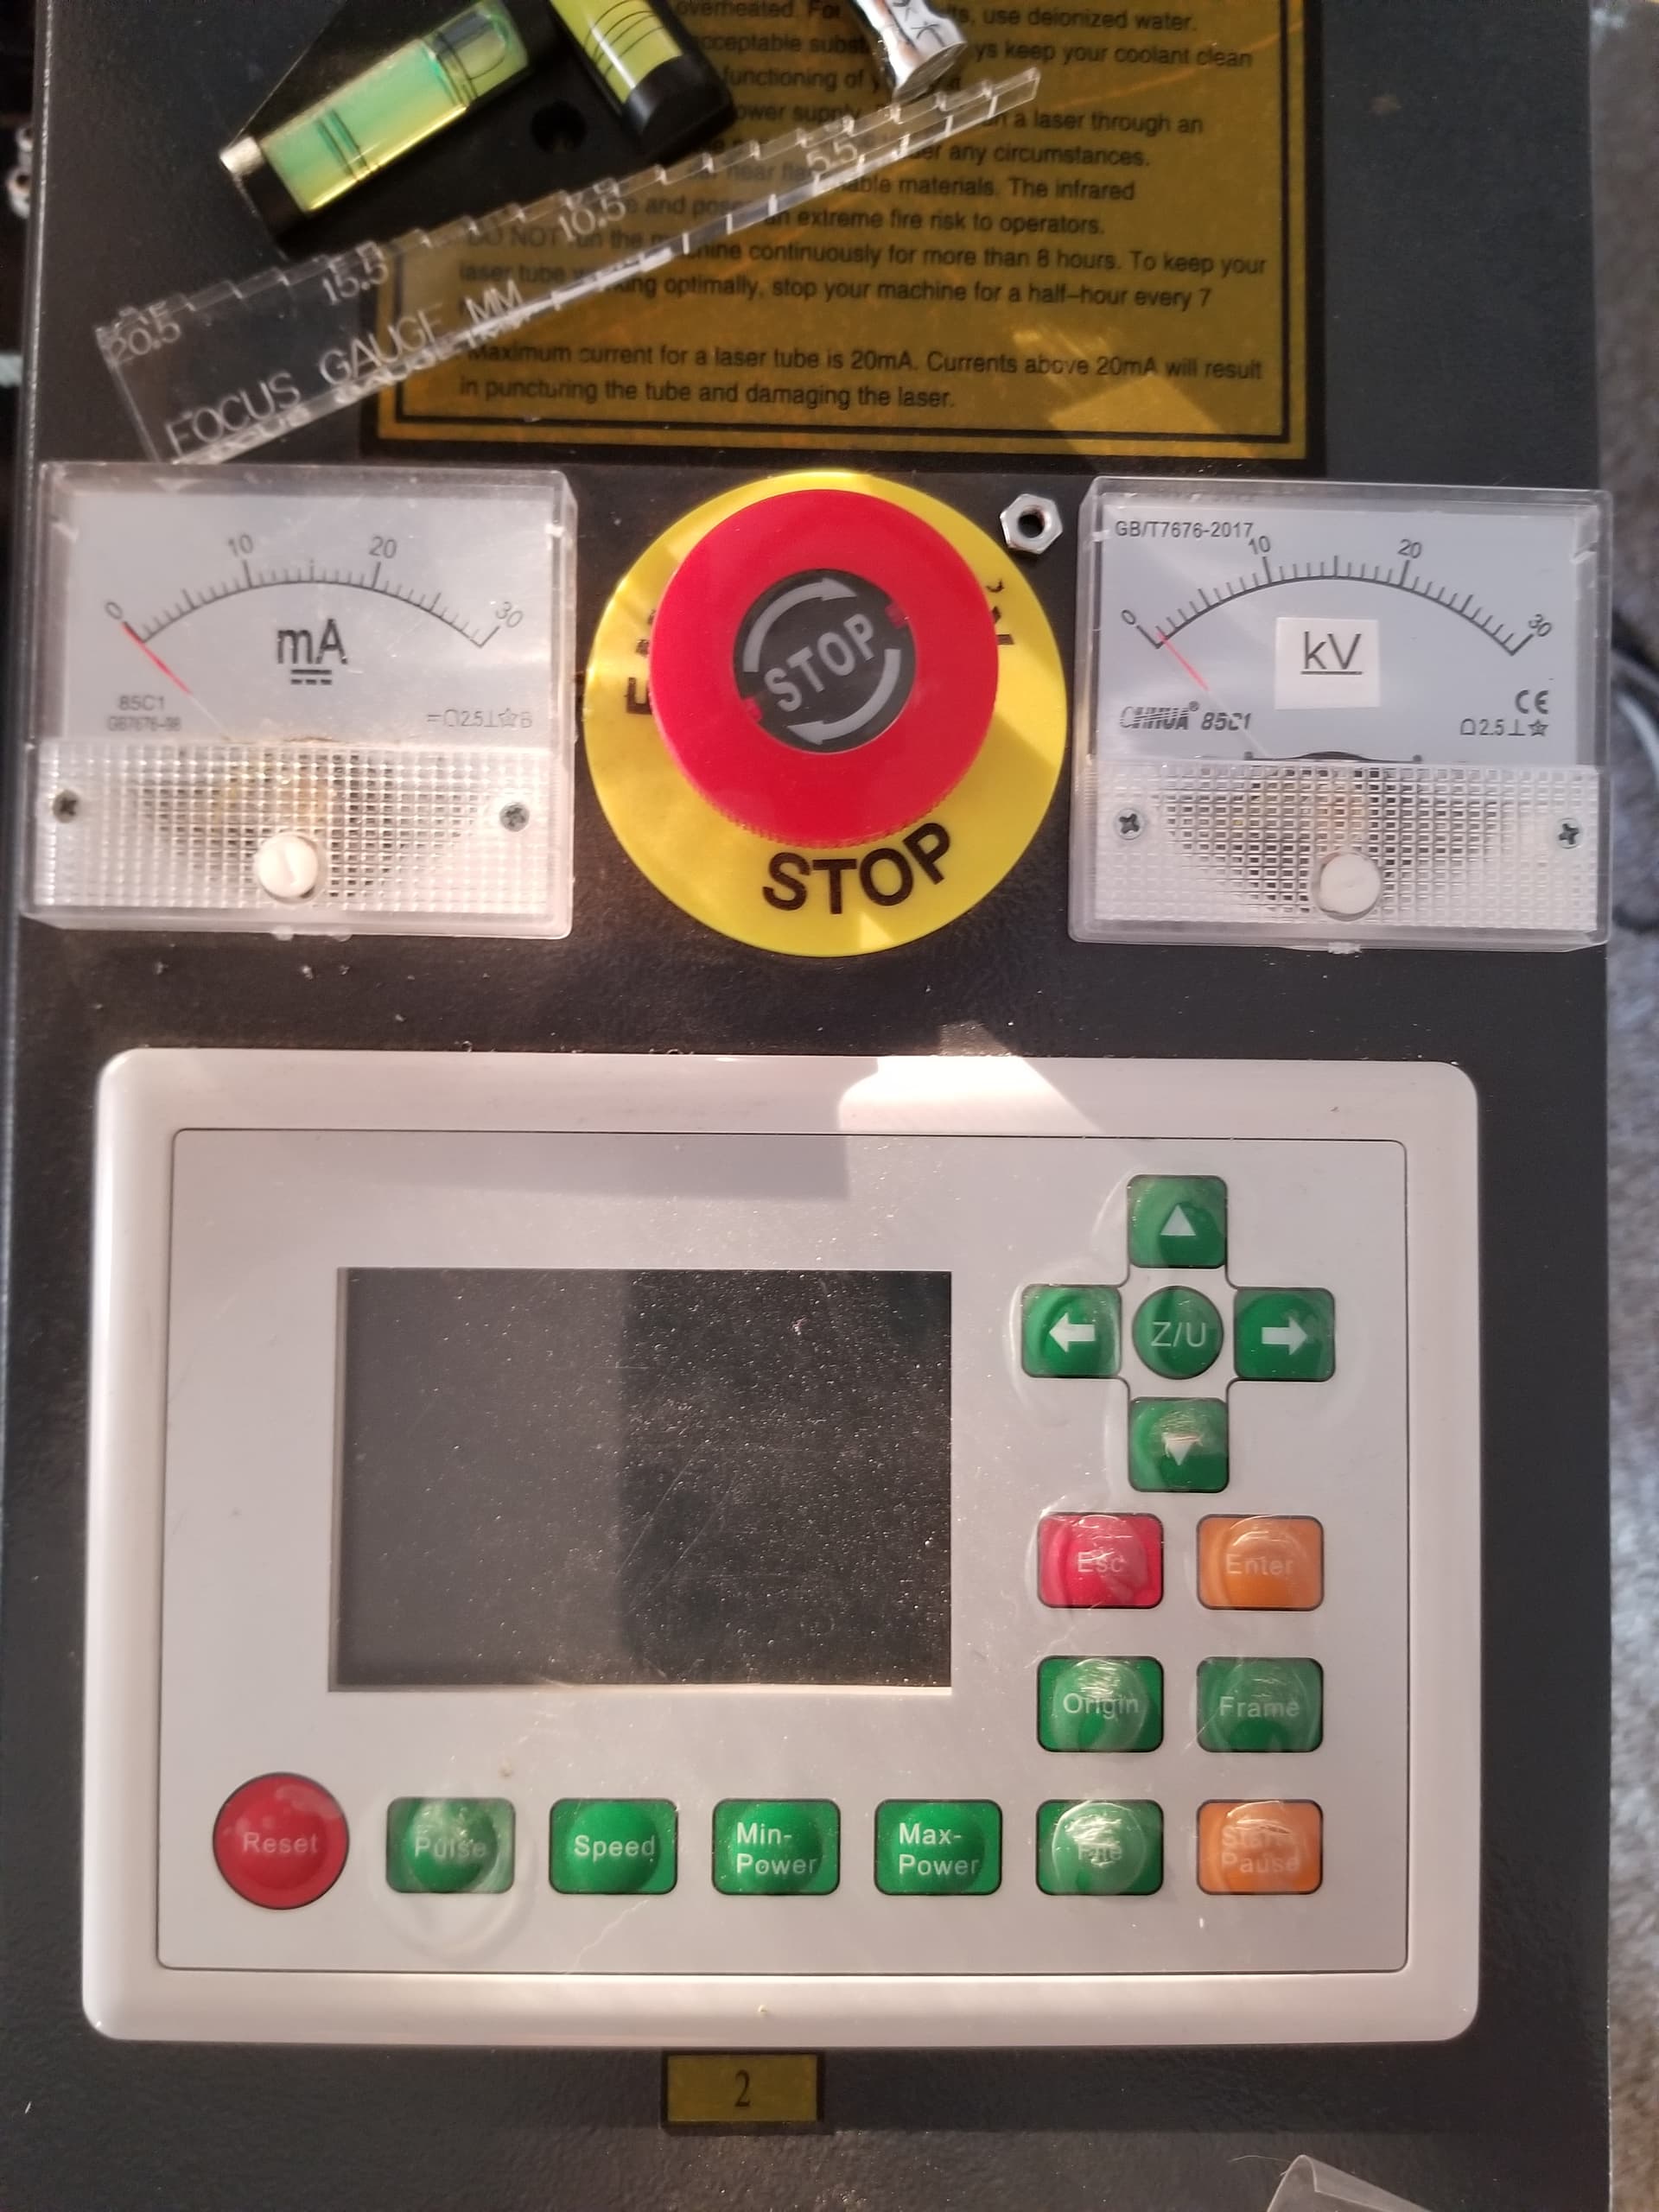
Great information guys appreciate it , i am having the same issue, i have fitted a water flow meter ( working) i haven’t set up lightburn yet as i was verifying and validating the build. I set min max power on the LCD, press pulse and nothing however when i press pluse it triggers the green light on the LPS.
You notice a couple of photos contradict each other, i tried disabling and enabling laser 2 and switch connector from cn5 to cn6. When i hit pulse on the controller as mentioned earlier, the green light on the LPS activates. I haven’t tested the voltage yet as my volt meter is in work. Are there any parameters i am leaving out guys that you can notice.
Me too…
I think pre-ignition frequency is really used for RF lasers. It gives them a faster response to lase.
I think you should hook up Lightburn… unless you enjoy fiddling with those terrible keyboards on the machine. All of these parameters are displayed, modifiable and the ability to save/load a different configuration is very handy. This is especially true in the stage you are in.
An addition benefit is most of us are familiar with the Lightburn names/displays over the Chinese names…
Setting your controller for 99% power maximum will allow you to run 99% power. Do you want to do that in the testing stage? Mine is limited to 90%, this give me near max current. Meaning when I ask for 100% I will get 90%, 80% I will get 72% power…
This is my own preference as it will be yours, just ensure you know how it works. When I test mine, I test it at 50% power. No reason to go higher for testing. Save the high power use for when it’s needed.
This is for the machine when it’s in ‘run’ mode. The console has a MAX power button or something similar. When you ‘pulse’ you get that power level.
You can also set the ‘pulse’ duration… On my Ruida, press Z/U then select ‘laser set’. You can give it a duration or set it for ‘continuous’.
Do you have coolant running?
![]()
Thanks for the reply, I agree with you on the max power i tried different settings , the image i sent was a random photo i took. I tend to have max set at 90% like yourself however i might aswell download Lightburn at this stage. My flow meter is working fine and have a cw5200 chiller connected also. All working fine. I can pulse the laser when i unplug the 5 pin connector from Ruida controller so that rules out a dodgy LPS. Has to be something silly in the background because when i hit pulse it activates the LPS green light. Next step is to try controlling it via software. Thanks i appreciate your asvice
Assume you have the chiller connected to the Ruida water protect?
As I have stated, the hardware appears to be working properly.
My only suggestion at this point is to ensure the state of the signals from the failing connector CN5. I think you will have to break out the volt meter…
Good luck
Hi Guys
While the 6 pin connector is connected to LPS from Ruida controller. if i hit test on LPS nothing happens however if i keep the LPS test button pressed and press pulse on the Ruida controller the laser activates. Seems i need the orange light on for the signal to energize the laser ? Water flow sensor is working fine. i don’t have a cable coming from P LPS connector should i . thanks
P is the ‘water protect’ input. This should be held low for an enabled state.
Some machines wire them to the water protect switch. Just another way to handle it if the controller doesn’t.
Mine is wired to ground.
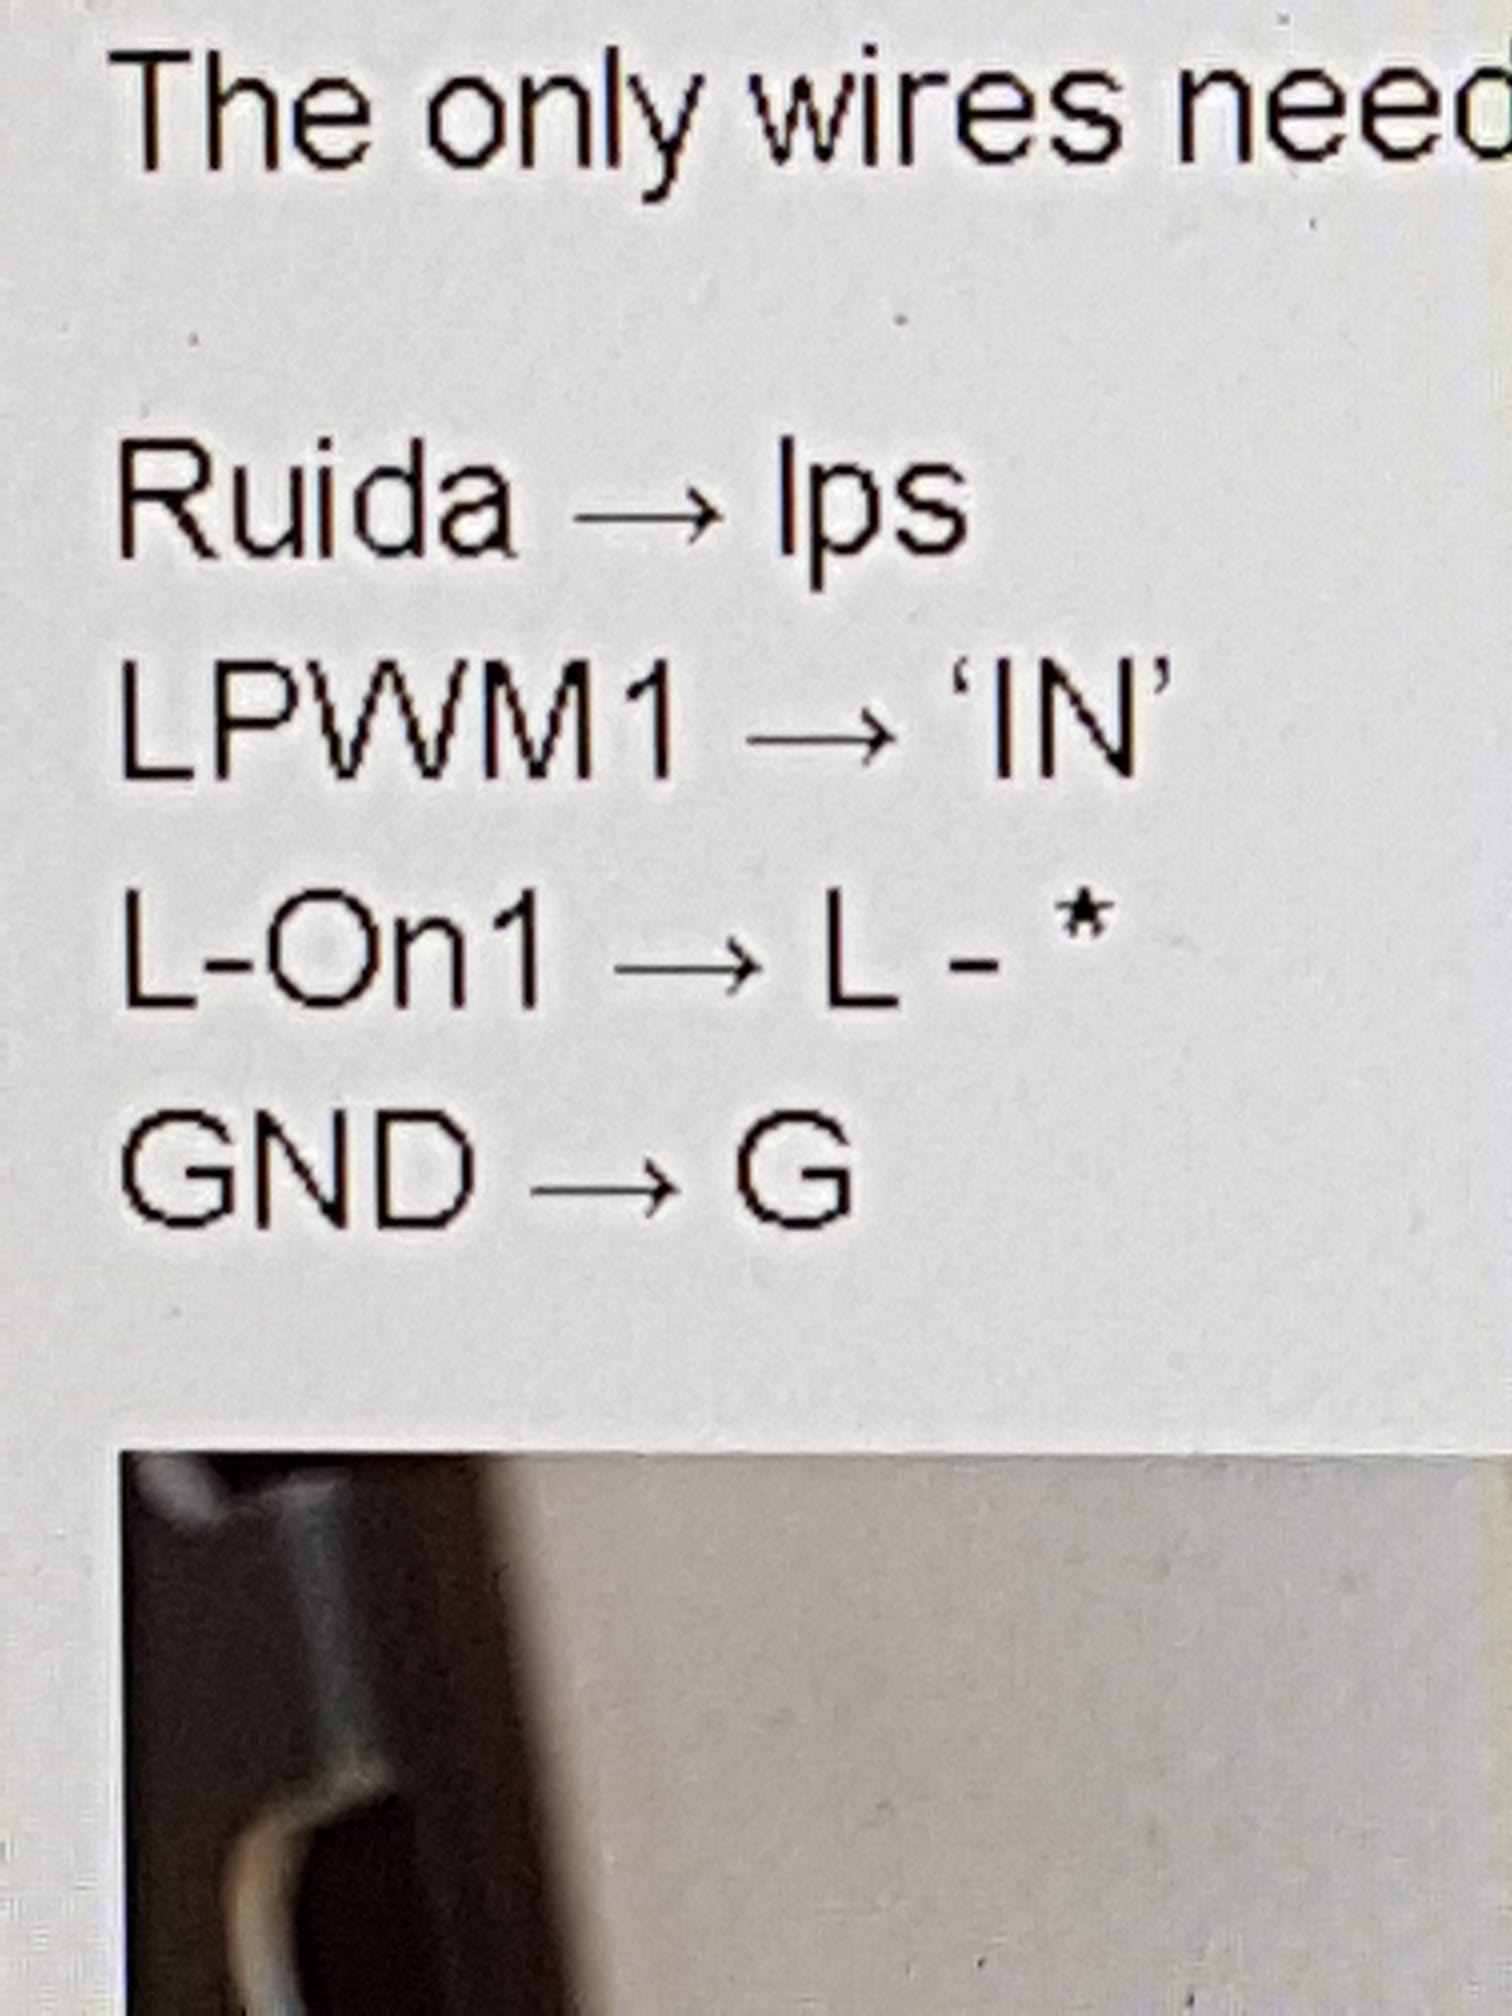
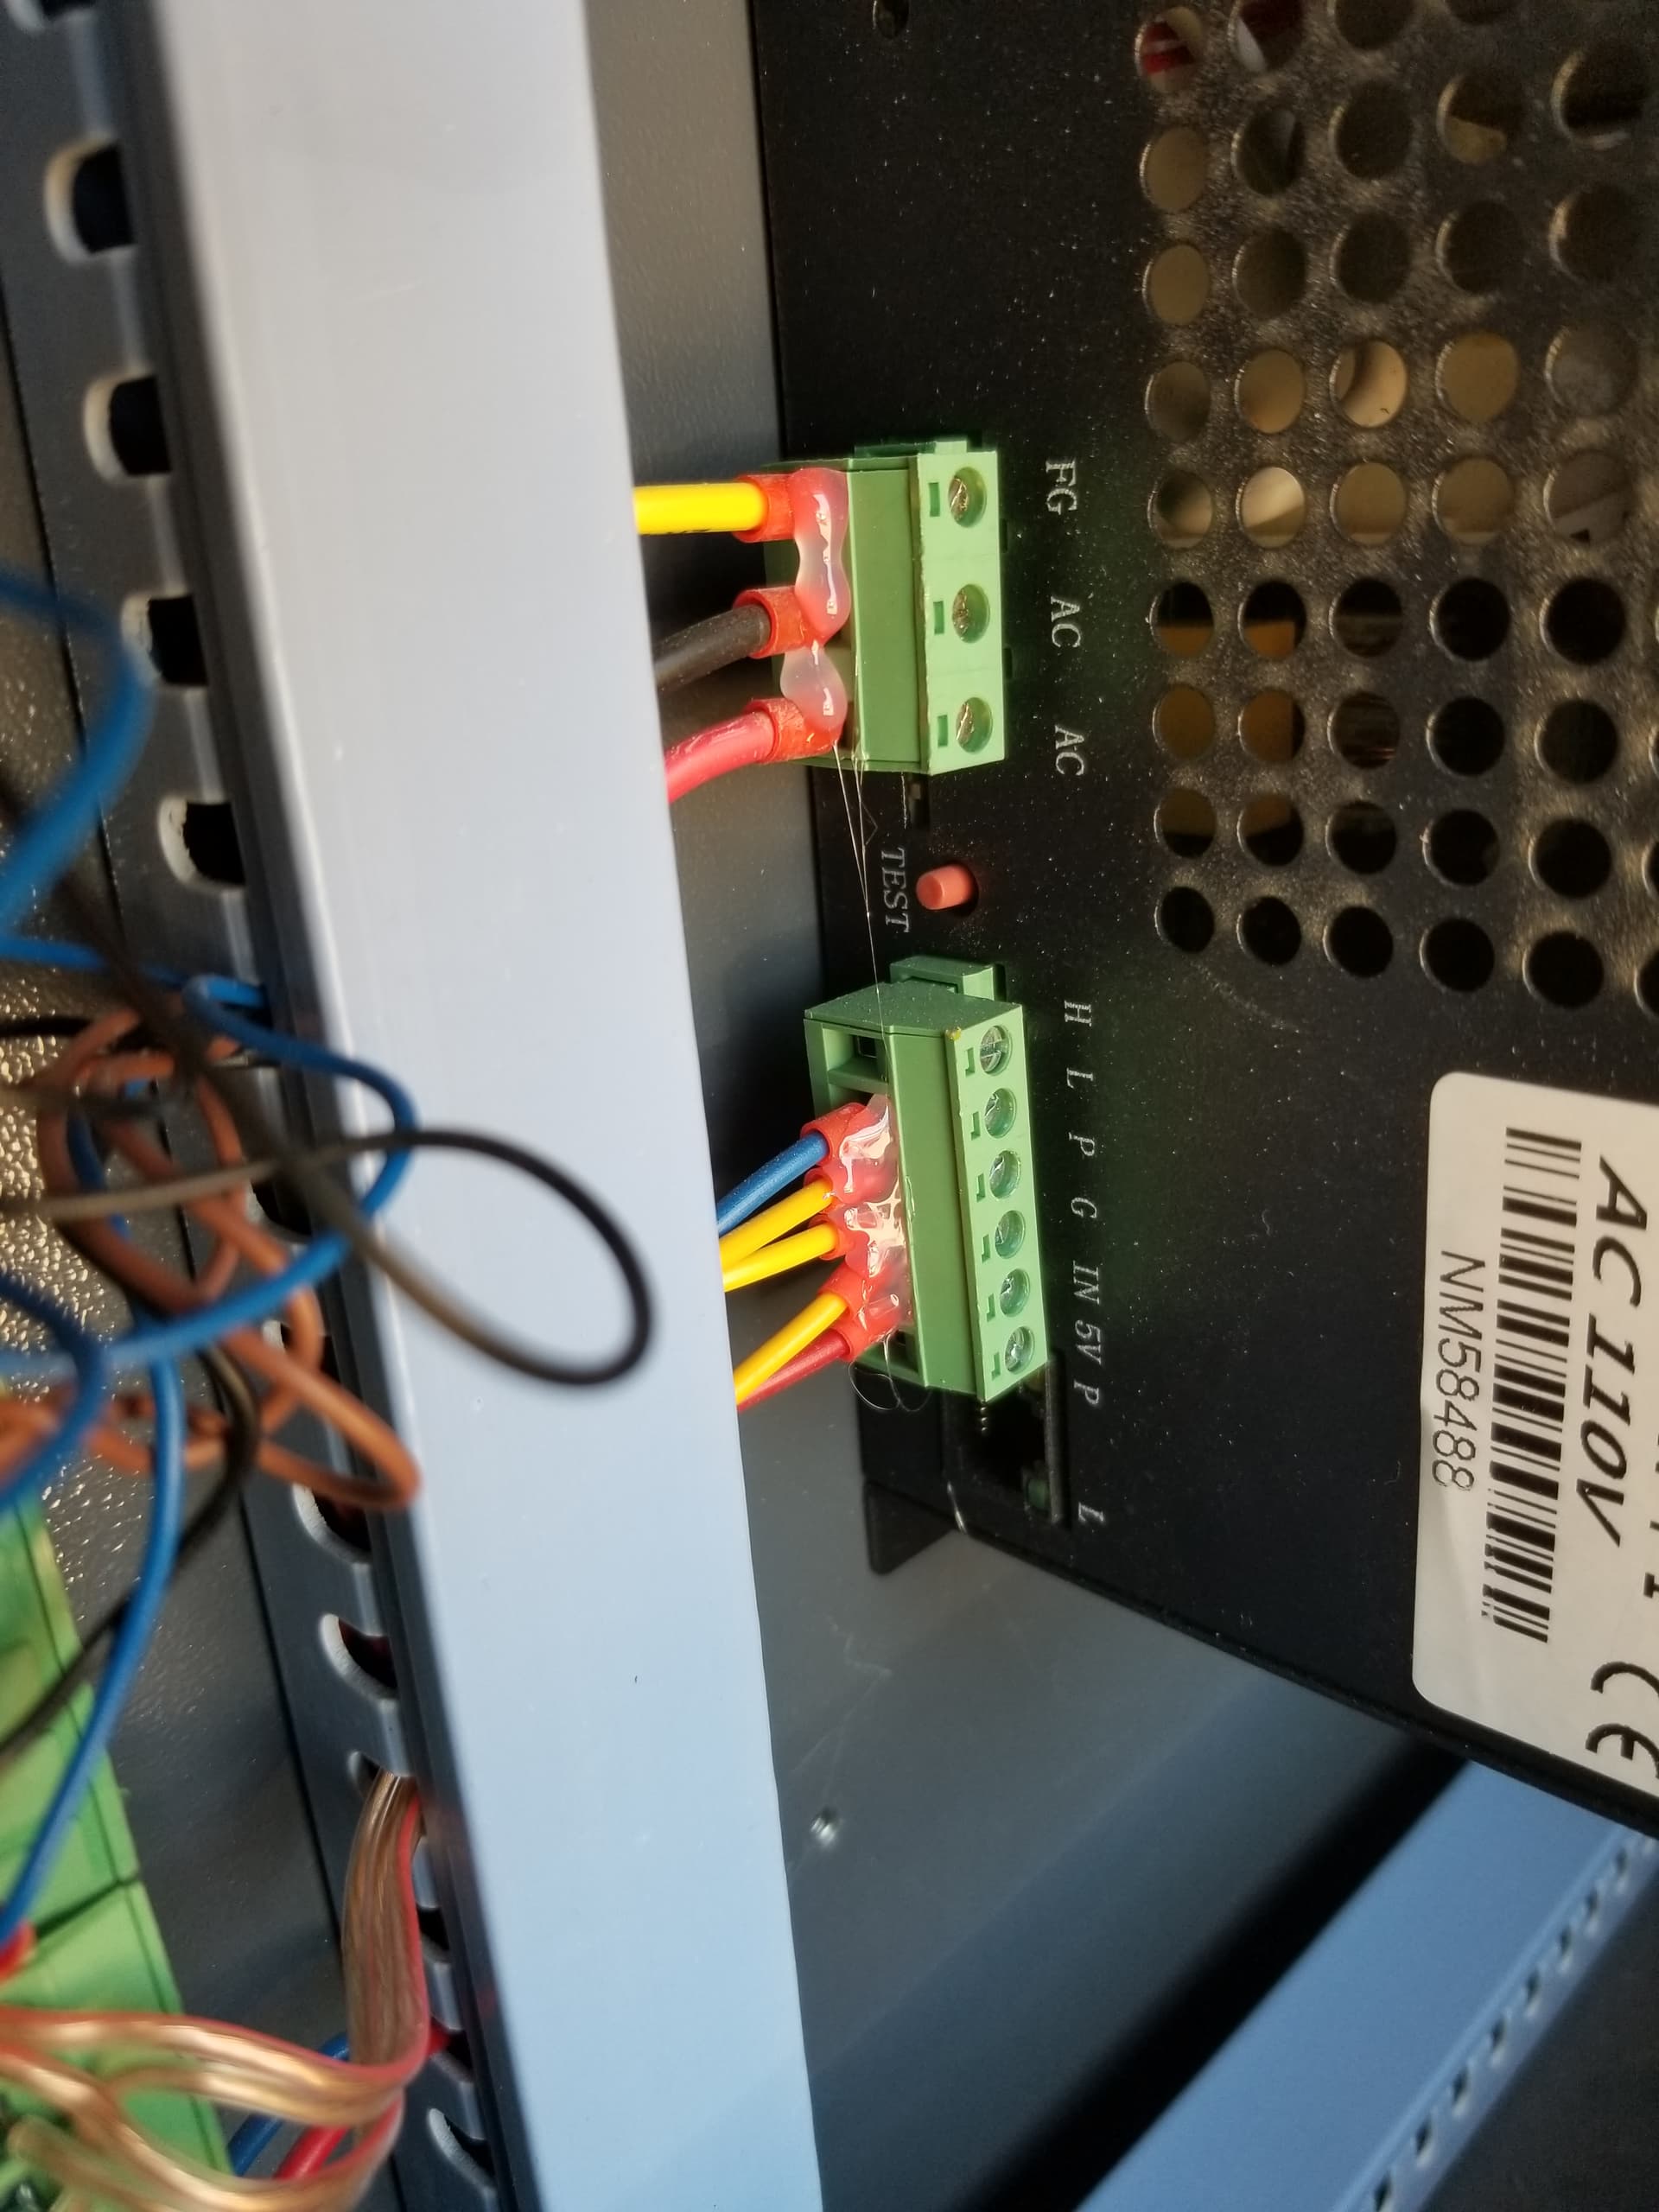
The only standard signals you need to the lps from the Ruida is
LPWM1 → IN
LOn-1 → L
Ground, needs to have a common path between them.
This is my lps. All the yellow wires are ground, the red is pwm and the blue is LOn-1 or ‘laser enable’.
Good luck
![]()
Thanks Jack, all working now appreciate the advice thank you.