I am using Lightburn 1.5.06 and have set up a yeti tumbler for an engraving job on OMTech 60W laser. I have it positioned in the middle of the bed, I have the artwork laid out, the preview looks great and normal, but when I do a trace it only does half of the engraved area and I do not know why. When I try to run a test run at low power with a taped up tumbler it gives an automatic y access error. I am new to Lightburn and OMTech lasers, having to adjust from Corel and Epilog for many years which I had down to a science.
If there some reasonable explanation for why this is happening? Seeking advise from the pros, I know i am missing something small.
They all work basically the same… you just have to get used to the subtle differences, usually in terminology.
Did you get the rotary setup or configured properly?
Can you clarify… in edit mode, there is a trace option for images using artwork, it’s not sent to the machine…?
Don’t recognize this error… is it verbatim?
Usually this is because you have homed your machine and the rotary is sitting at 0 location for one of the axes. Depending on your start from and job origin settings, this could be an issue.
The “y access” error you’re describing sounds like it may be an error with Y travel limits — your controller believes it won’t have enough room in the Y dimension to run the job you’re sending it. With a rotary enabled there is, of course, no actual travel limit, but the controller still thinks there is.
Try jogging the Y axis from the controller, and reading the Y axis location. Somewhere about halfway between 0 and it’s maximum Y dimension should be safe. You can also jog it to 0 and select one of the top positions for Job Origin. Be sure to use Current Position as your Start From mode.
Here is a bit more information on Start From modes:
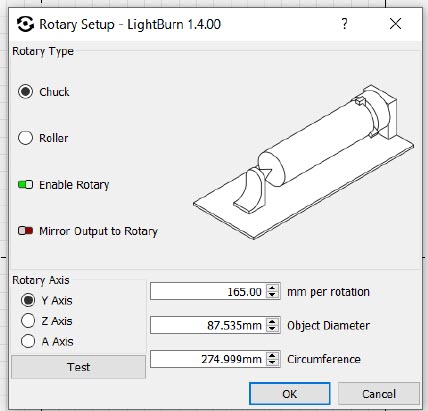
How to set up rotary:
Enable the rotary Set the MM per rotation and do a test. The rotary should do a rotation in one direction then the other direction and end up where it started. My setting for the Atomstack is 165 mm but yours may be a little different. After that measure the circumference of the object you are burning and enter that into the circumference field. After parameters are set up manually move or jog the laser where you want to start. Then change from Absolute to Current Position. You should be good to go
So heres the steps:
Plug Y Axis Cable from MB into Rotary
Open Lightburn
Turn off Home at startup
Turn on machine and connect to lightburn
Change from Absolute to Current Position
Enable Rotary
Set MM per rotation (165)
Do rotation test. (I put a little marker dot on top of the chuck to see start point)
Set Circumference of part
Mount and level product
Manually Move or jog laser to position you want to start
Focus Laser
Do Frame to check position
Adjust as necessary
Run Job
If you get an out of bounds error you can ignore it. Since you didn’t home the machine doesn’t know where its at. As long as your sure your machine isn’t actually going out of bounds