Corners dropping out with high speeds and low powers

Using a Just Add Sharks SilverTail A0 laser cutter converted to a smoothieboard a few years ago, and with a 130W laser these days.

I’ve noticed that when doing etching, so high speeds and low power, bits of the lines drop out.

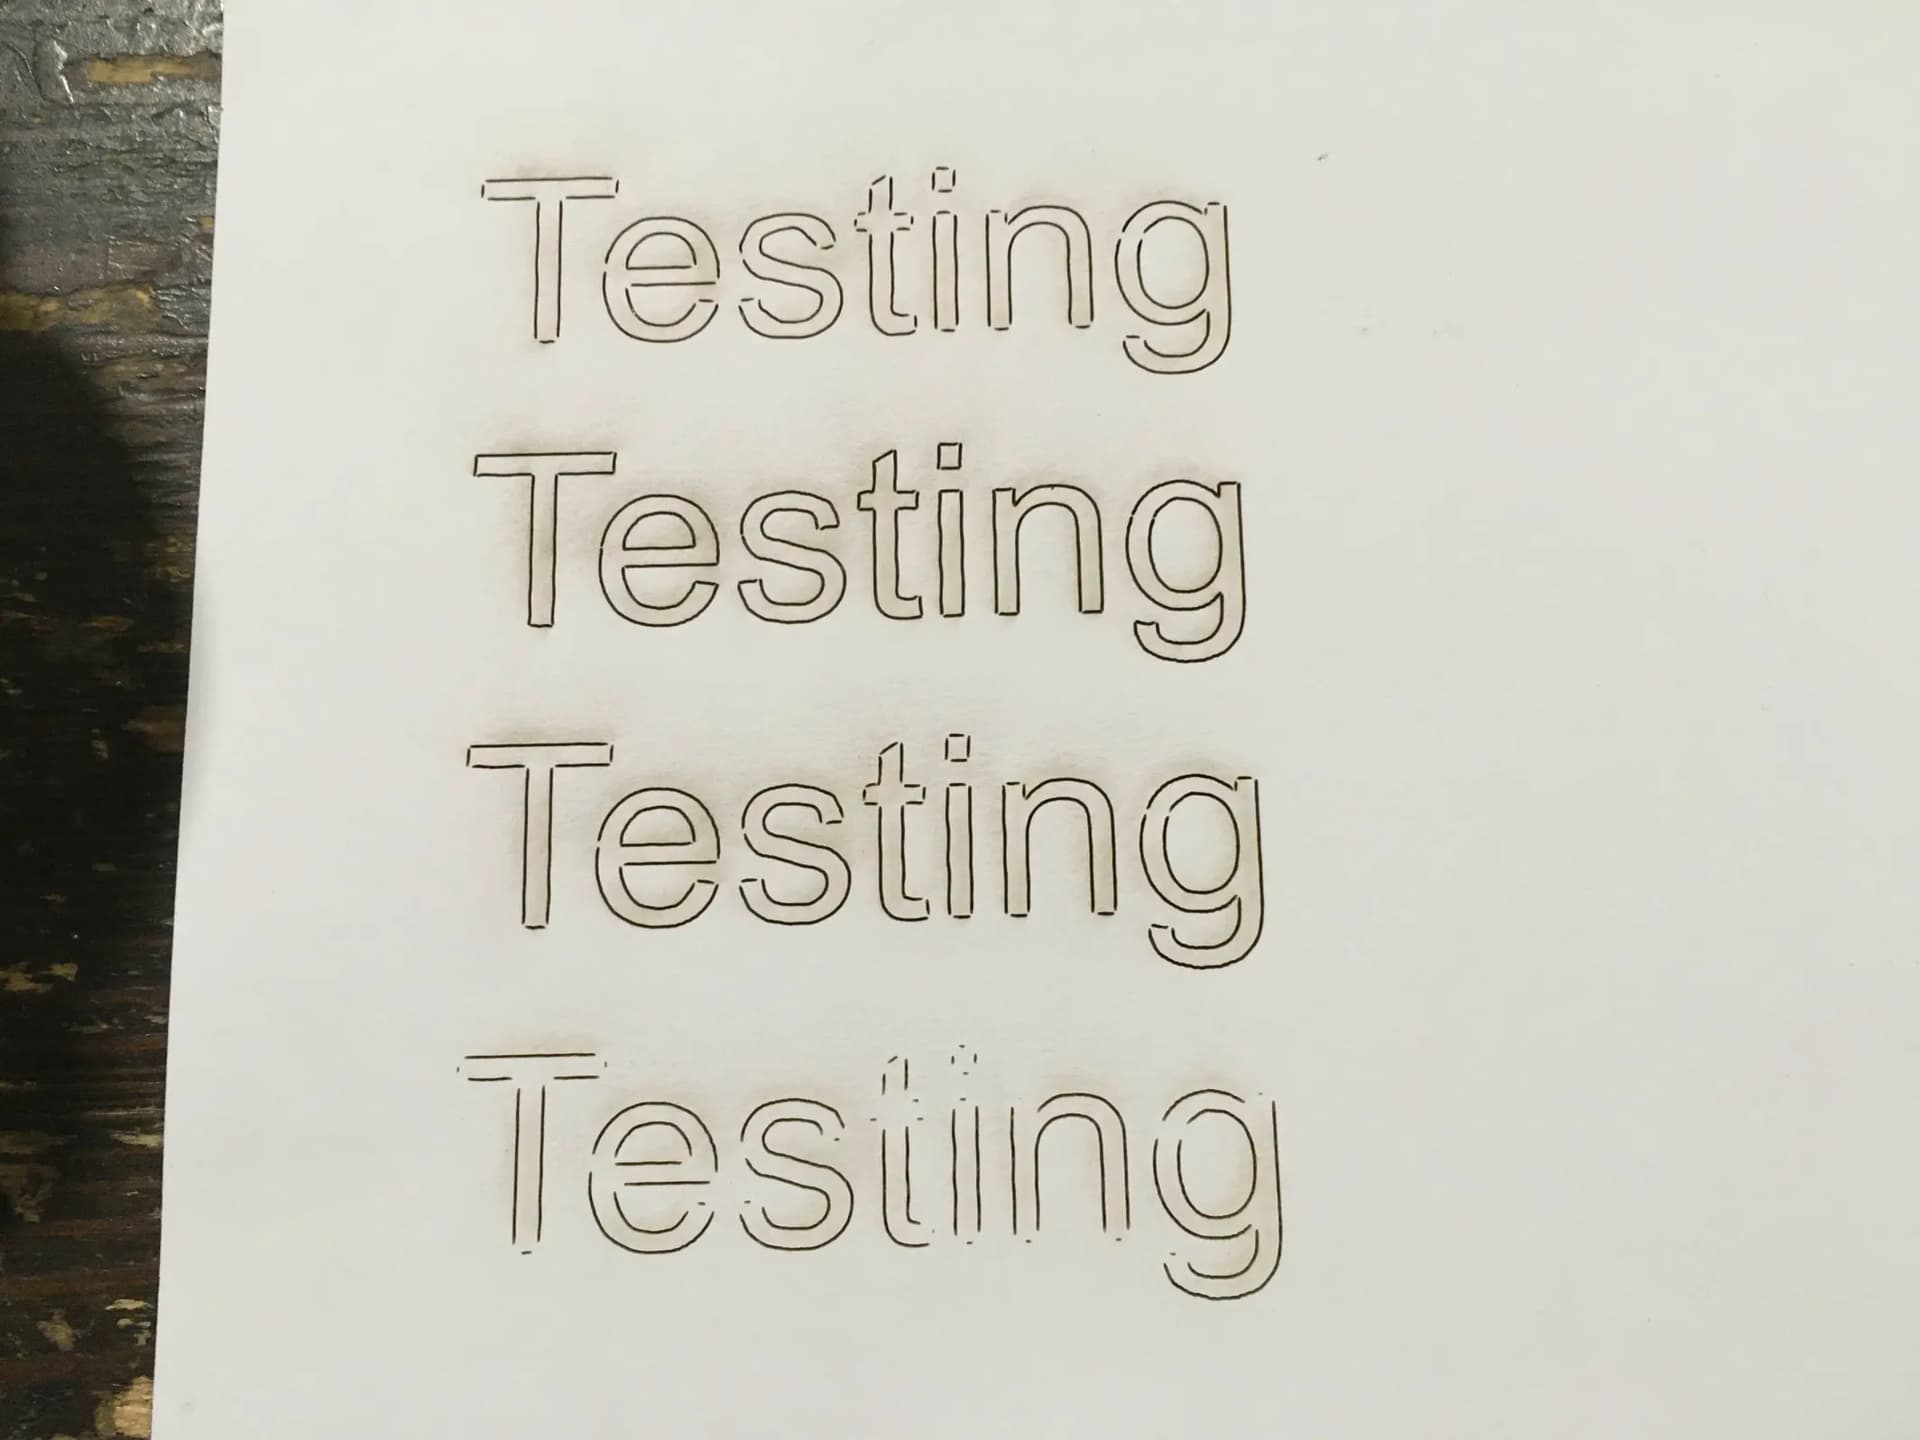
The picture shows four cuts made with exactly the same source and just the power and/or speed settings changed on each cut. I just moved the laser up by 30mm each time, changed the cut settings, and hit play

The material is 200gsm card

So the bottom cut is with 20% power at 100mm/s, the problem is clearly visible
The second from the bottom I increased the power to 30% and left the speed at 100mm/s, as you can see the problem is much reduced, but the very corners are still not being cut
Then the next one up, power was increased to 40%, this seems to have complete cuts.
So the more power, the smaller the problem.
But then the top one the power is still 40%, but the speed has been increased to 150mm/s, and as you can see it looks very similar to the 30%:100mm/s cut
So it seems that both speed and power have an effect.
I’ve looked through the various parameters I can find in lightburn (cut settings, device settings), and also config options for smoothieware, and I don’t see anything that might be causing this. The old software we used to use before the smoothieboard conversion had a separate corner power cutting parameter, but lightburn does not have that as far as I can see (at least not with a smoothieboard).
Am I missing something in the lightburn or smoothieboard options? If not, does anyone have any suggestions as to what might be happening and what to do about it?

Min power will adjust this.

If you mean this min power, then I don’t have it (I grabbed this from an online image)


It seems min power doesn’t work with gcode controllers?

To be clear, I don’t have min power in the cut settings for lines at least, it may be there for images (I am not in the same location as the cutter right now, so I cannot check)

Is the Smoothieware more like a GRBL controller than a Ruida? Min Power is available only in Greyscale inages in GRBL.

Yes, as I understand it, smoothieware is a g-code controller.
It does seem that the laser is being turned off at the corners though, which suggests some sort of incorrect scaling. But it’s a bit unclear to me what settings might affect this and where in LightBurn or the smoothie config to find them

Mix of CO2 and GRBL, I like it!

Ok, GRBL with Constant Power off varies the power as the speed changes. This keeps from frying corners in the burn where the laser slows down. A diode laser can go as low as 0.2% and still fire.

A CO2 laser minimum power is in the 8%-10% range from what I have read. Below that and it just ceases to ignite. It sounds like you are dropping below that threashold in the corners.

The solution is to raise the minimum power setting. In Lightburh for GRBL, only Greyscale images have a Min Power option. However, GRBL parameter $31 can be set to 10 or 12 to give you the same control.

If this does not work for you, I hope I still wrote an interesting story.

You’re likely running below the lowest power that will reliably fire that big tube. My 60 W tube doesn’t fire well below 10% and reports indicate 20% may be about as low as 100+ W tubes can handle.

A GRBL controller handles the power scaling internally, so it does not have the Min Power setting available with DSP / Ruida controllers. That means the controller will reduce the power based on the actual (not programmed) speed, so corners and direction changes tend to get lower power … which, in this case, will cause the tube to stop firing.

As other folks suggest: Moah Powah with Moah Speed! :grin:

I rather wish that the smoothieboard hadn’t been the choice, though to be fair when the decision was made I didn’t know enough about the subject to provide any useful input. I’m only just learning about the differences between the capabilities of GRBL and DSP controllers
Where do I set $31?

The problem with more power is you also need more speed for the same result, and we seem to have some rigidity issues so fast cuts get artifacts in them (wavy lines, corner overshoots, etc). It’s not losing steps, I think things vibrate and twist a bit.
We’ll need to take a closer look at that, but optimizing the firmware/software configuration is also necessary

Looks like these machines had a Ruida or dsp controller in them stock.. why would you put a grbl board in there?


Most of the grbl boards do not run the tube as an analog device, the run it like a digital device, much like a diode or rf excited laser. With these, to get 50% power, they run 100% power for 50% of the time. A tube can run 50% power continuously.

If the controller is slowing it down to go around the corner, then usually, that would create a burnt corner. You have the opposite issue.

I’d suggest you figure out what these wobbling line are from. This needs to get sorted out or all you’ll produce is scrap anyway.

This thing is just creeping along… You need to re-evalute what you’re doing or at least clarify what you’re telling us.


You screenshot says 200mm/m, you’re text indicate 200mm/s.

200mm/m is only about 3mm/s. I trust what the machine is displaying… sorry, set in my ways, I guess. But 200mm/s with 21W, that’s way too fast for a cut…?

Even with paper, it’s doubtful you can reach these speeds, if not 3mm/s, in such a short distance…?

I cut 5mm sub flooring at 11mm/s@45% with a 43W laser or about 19W… yours at 16% of your 130W is about 21W… If I believe what I see, then your 21W is going 3mm/s… seems wrong to me. 20W at 200mm/s seems overkill on paper.

:smiley_cat:

Firstly regarding the GRBL board.
The lasercutter was purchased new in 2014, and saw a very high use in the old premises of the hackspace (before my time), largely I have heard because it was located very close to an art college. Anyway in 2020 (after the hackspace had moved locations and I had joined) it developed some odd and erratic behaviour (which became known as “the vertical cut of doom”) where suddenly it would deviate from the programmed path and do a long vertical cut. It was concluded that there was some issue developing with the controller board.
Add to this that it was understood to only be compatible with Lasercut, which people were finding a bit long in the tooth, and a decision was made that rather than spend time troubleshooting the original controller board, it would be replaced with something newer.
Looking back at the old thread it doesn’t look like there was much discussion about what to replace it with, certainly there was no discussion of the nuances of the different options online. Someone proposed a Smoothieboard and Lightburn, and then it was done.
In retrospect I think perhaps a little too much trust was placed in one person’s knowledge and not enough due diligence done, but we are where we are now. We can’t afford a new lasercutter, and while I would love to give this one some serious mechanical TLC and also convert it to a Ruida controller, we don’t currently have the budget for that either (unless it will make a significant difference to our membership numbers in which case it might be financially justifiable), so getting what we have working as well as possible is the only option for the moment.

Now, on to the rest of your points
Firstly, ignore the screenshot, I did say “I grabbed this from an online image” in that post. I was nearly 8 miles from the lasercutter when writing that post (as I am now). I was just using for an illustrative graphic to ask if when MountaineerTradepost referred to “min power” they meant that cut setting.
My original text is correct, our lightburn is set to display mm/s, and I ran three tests at 100mm/s (20%, 30% and 40% respectively), and a fourth one at 150mm/s and 40%

Also note that the real issue here is not one of cutting paper, rather it is engraving of other materials. Most of the time overcooking a cut is not a big deal, you may get a little more charring at the edges, but the result is still functional. However with engraving you can’t do that.

I just used paper because it is cheap and illustrates what the laser is doing quite clearly.

As for the wobbles, they are almost certainly mechanical. I can’t say how long they have been there or if they have developed over time, as it is only relatively recently that I have personally been doing things where they show up. They happen when there are rapid direction changes, so mostly etching of smaller graphics, when cutting through thicker material or etching larger graphics they are imperceptible. In short it seems things are not as stiff and/or damped as they would ideally be.
I’m not dismissing the problem, it does need to be looked into, but for the moment it seems to be a separate issue to the one I am asking about here.

1 Like

Enter it in the Console window. Record the current value, then enter $31=12.

What does this mean?

I thought this was minimum spindle, so I’d expect it to be zero?

:smiley_cat:

For a diode, yes. But he has a CO2 running on GRBL. You have said CO2 lasers will not fire below 8%-12% minimum power (spindle), right?

If the pwm never drops below the percentage to cause it to lase, then, I’d think, the tube will always be lasing since the pwm will always produce at least the minimum spindle pwm?

I don’t know smoothieware, so I’m probably not the person to give any concrete answers.


I think I see where you’re coming from.

:smiley_cat:

Yeah, I am just guessing. Knowing nothing about it is wired does not help much either.

$31 does not work, “error:Invalid statement”

I thought the laser_module_minimum_power value in the smoothieboard config.txt might be what I was looking for, but it seems to make zero difference

Might try this site, has configuration information for spindle speeds… if that’s your problem.

:smiley_cat:

OK, so if the problem is the scaling of power at the corners then smoothieware has a couple of settings that theoretically should affect that.
One is a config value named laser_module_minimum_power, which is the minimum value the laser should be scaled to when turned on, so if it is set to 0.2, then a nominal laser power of 0% should in fact be 20%
Changing this makes no difference, but I have not found a way to check the config is being read correctly, so a little bit of a question mark on that one.
However the other option is to do M221 P1, which is supposed to turn off all scaling, and indeed when I send the command the message I get back is “Laser power scale at 100.00%” which seems to imply it is doing what I expect.
This also does not affect the corner dropouts.
Which is currently making it look like the problem is not what it looks like