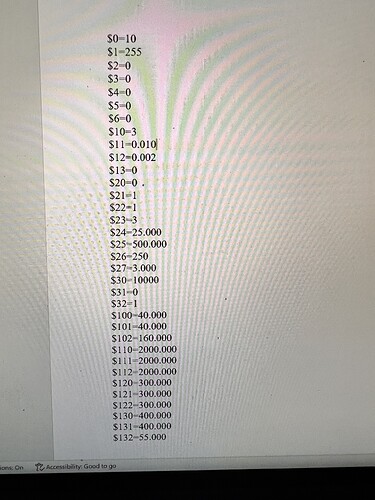
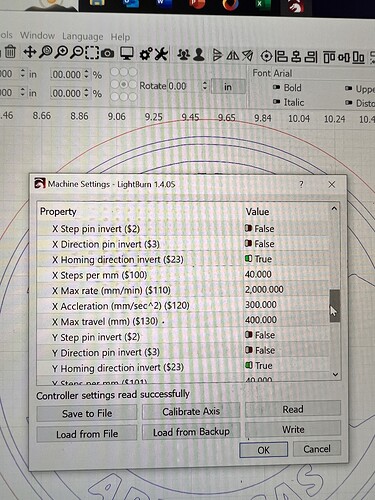
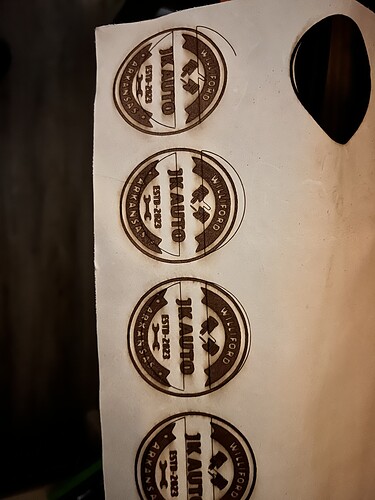
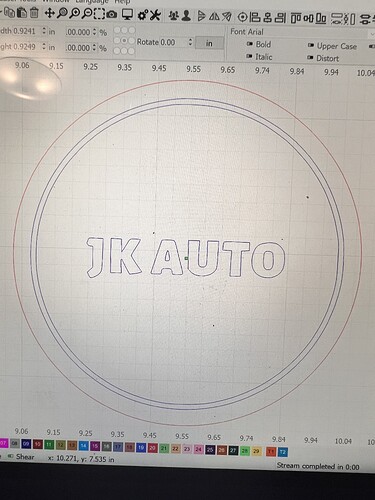
I’m using a Fox Alien 4040XE with the Fox Alien 40watt laser and lightburn to run it. I’m trying to engrave some hat patches and then cut them out. It seems to fill everything correctly but then when it goes to cut the line it’s skewed up and slightly to the right. My x and y axis are square. My belts have good tension. I slowed my speed down to 1200 at 30% power (I’m engraving very thin leather). I checked what I’m assuming are my PMW settings for the x and y axis and both are set the same. I’ll try to add pics of my current settings and the project.
It appears to me that the fill layer is shifting left as it moves up. The vertical lines of the cut layer (I assume) appear to be in line with one another, although they don’t seem to produce what I would consider a usable patch. Is there a third, complete, circle in the design? Also, the arcs appear to be slightly distorted, pointing toward something mechanical. Most likely a pulley on the x axis of this is run in the pictured orientation.
I apologize I should’ve rotated my photo. I started in the bottom left corner. The fill went first, then the half circle outlines, then it was going to have a final circle cut but I shut it off on this run since it was already messed up but on other runs the Final Cut is off too.
I would go through and check all set screws on couplers and motor pulleys with an allen wrench. Not just look at them. Loose set screws prime suspects when cutting/engraving get erratic.
Another point related to your settings $30=10000 is this correct?
Fernando
Yes that is correct. And okay I’ll check my set screws. I put blue loctite on them when I built it.
This is right, but do your smooth hardened rods have flats ground on them? If not, it can still slip easily.
yes they have flat spots on them for the set screws
Make sure the setscrew is centered on the flat, because it’s absurdly easy to tighten it with the shaft slightly rotated and have it feel snug. When the shaft rotates in the other direction, it moves the flat out from underneath the screw and … suddenly you have plenty of backlash again.
A handy trick: loosen the screw, then wiggle the pulley / coupler / whatever back and forth as you tighten the screw, so that you end up with the screw snugged down in the middle of the flat.
Loctite is definitely your friend!
Yep I went through and made sure they were all centered on the flat spots and tight. It’s still cutting the line layer off center. It does my fill layer perfect but its like it’s losing it’s home position when going from one to the other.
Or the other way around.
I suggested a way to figure out which layer has the problem in a previous discussion, but never heard back:
The general idea is to run each layer separately and verify the machine position after each one, with the intent of figuring out which layer isn’t where the controller thinks it is.
If that makes sense, give it a try and report back which layer is incorrectly positioned.
With the line layer it doesn’t return to the exact start location. I have it start from current position and from midpoint. My fill layer is centered where it should be. On lightburn the designs are centered perfectly.
The back-and-forth motion during engraving is very well controlled, in contrast to the abrupt direction changes in vector layers. Assuming you’ve removed the last bit of slack from the machinery, what’s left is excessive acceleration.
That makes sense, because the machine is slinging a relatively high power laser head, which means a heavy laser head. Although it has two Y axis motors, the additional weight may be more than it can handle.
The Machine Settings show 300 mm/s² acceleration for both the X and Y axes. Reduce the Y axis acceleration by a factor of four:
$121=75
This will make the machine rather sluggish and will dramatically increase the engraving overscan distance in the Y direction. Run these tests on something cheap (cardboard!) at lower power (to mark, not cut), because you’re only looking for good motion, not good results.
If the vector layer comes out correctly, increase the acceleration by 50% until it fails again, then set the acceleration to 0.75× that value.
If the vector layer still fails at the lowest acceleration, then something else is wrong.
Okay so I changed my $121 to 75 and nothing changed. Then I changed my $120 to 75 and it did change but it’s still not correct. I’ll add photos.
It also doesn’t seem to home right. Idk if that could be a factor or not
Indeed it’s not.
Both of those “circles” are so far out of round that there is something badly wrong with the mechanics; this is not an acceleration or “losing steps” problem. You should return both acceleration values to 300 mm/s².
It is helpful to orient the pictures in the same way as the LightBurn design, because the direction of the errors is critical to figuring out what’s wrong. Take the pictures from directly overhead, so that the image isn’t distorted by the perspective angle.
Until you get this sorted out, use cheap material like cardboard and reduce the power until the “cut” layer is just marking the surface, not cutting all the way through.
Using the simple JK Auto design with just the outline, lettering, and engraved circle, run a single pattern (not the whole sheet) and take a picture to show the results.
Upload the *lbrn2 file so we can take a look at the settings.
Everything is deeply interconnected and if the machine does not home correctly, everything else is suspect.
Did the machine ever work correctly?
What does it do while homing and what do you expect?
Also, although it does not affect this problem, at some point you should measure and set the Scanning Offset Adjustment values to fix the ragged edges of the engraved area.
I have a suggestion, try this.
group the complete job and run it again. order the layers in the order you want to run them. If you don’t want run a layer, turn off the output for that layer.
It looks like you are selecting different layers to run and they are all running from the same origin. Grouping the layers will ensure that the layer origins will all align correctly with the machine origin.
Wondering if it’s scanning offset or mechanical? If it was just offset I would think it would be evenly offset, not that jagged.
Have you also tried wiggling your laser module and X axis for any kind of play?
