I may be trying to do something that cannot be done. I am trying to cut out some vinyl stick on templates. I draw and design the artwork in CorelDRAW. I save the file as an ai and print on the printer. I then import the same file into lightburn and it does not cut the vinyl as printed. It’s always off. Has anyone done this use your laser cutter and lightburn has a vinyl cutter. I print on an 8 1/2 x 11 paper and create a square in life burn 8 1/2 x 11 and bring in the ai file. If anyone is interested I can provide the ai file and the lightburn file if you would like to test it or if you think you might know the answer.
Laser-cutting vinyl seems to be a Bad Idea, because the chlorine gas released from the cut corrodes everything in sight. Doing a few templates probably won’t do much damage, at least with strong air assist and a good exhaust system.
You can find “vinyl” sheets made from laserable plastics, although they seem intended for heat transfer to fabric rather than adhesive application to hard surfaces.
Unless you have an EXCEPTIONAL exhaust system on your laser you are going to be producing both Chlorine and Hydrochloric Acid fumes from cutting vinyl. This can severely damage your laser as well as your lungs/eyes. All material I see says NEVER, NEVER cut PVC or Vinyl with a laser
I have been informed of the dangers of vinyl. So I have been looking for some kind of self sticking item I can use in my printer cut out on light burner I do what I want to do with them. People say there are non-PVC vinyl. All that I can find so far are not correct for a printer or sheets I have found our 12 x 12.
It is an alignment problem. I can print what I want to cut on my printer then when I import it into light burn it cuts offset. I’m trying to find a file that I can export from chorale and import into lightburn I keep everything where it should be.
As long as the Ortur is correctly homed and works properly in ‘Absolute Coords’ mode, it should work. You have to line up the target marks very accurately.
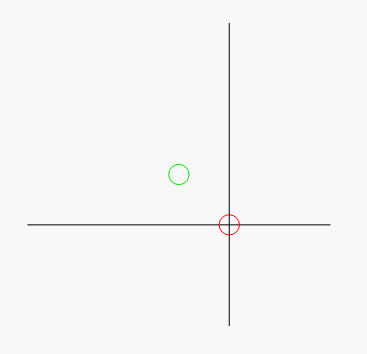
When aligning, you aim the laser at the center of each target. This is something that I’ve seen cause issues before. If you use markers that look like this, for example:
Those marker lines are not centered - IE, the place where the two lines meet is shown here in red, but the actual center of that target object is shown in green:
Since you haven’t shown what you’re actually using for your design or targets, this is a guess. Could this be what’s going on?
I can provide the light burn pile. The SVG file. And the bump map file that I print on my inkjet printer.Let me know if that will help. I also can provide a picture of how the alignment is off.
While i’m sure you will be able to accomplish this with your equipment eventually, this my not be the best way to go about this. I would recommend a purpose built machine for this process. Unless you are just doing this as a one-off, i would recommend getting something like a Cameo Silhouette machine. You can use their software to print your design on your printer with registration marks, then load it into the machine and it will cut out your design.
Also, since it uses a drag knife instead of a laser, you wont have the hazardous fumes either.
I’m not trying to sell you on that particular machine, but i happen to own one and it works very well for what you are trying to do.
All files, the picture of the alignment issue, and a summary of your workflow would be helpful.
@Strider_Matic’s recommendation of a vinyl cutting machine is a good one. They work very well for the task and one additional benefit over lasers is that no shrinking occurs from the cutting process.
Here are the files, I open Lightburn add the png file trace pick the outer most vectors. This includes the outside 8.5 x 11 vector… I then add a printed paper to the bed of the Ortur Lm2 . I have burned an 8.5 x 11 mark for paper alignment. It always cuts off. Scroll-rev02.lbrn2 (57.9 KB)
I have been warned about using vinyl so I am using something different. They do not take long to cut, and I stay in the room. Fire not a problem. I looked at cutting machines, but cost is a problem. Right now, very low production.
I’m not following how you’re trying to do this. The outline shapes look like they’re placed in an arbitrary location. How are you aligning this to your paper?
This could be easier if you printed registration marks on the design and used Print and Cut to align your work.
OK here we go. I print on the inkjet printer page center. I also save the as a png. I go into the room with the Othur. I start lightburn load the png file, do trace . I move the vectors to center. I remove all vectors not needed.I then go to the laser place the paper in center. I did cut a 8.5 x 11 outline to place the paper. Cut and it comes out off registration.
I see a few opportunities for errors to be introduced in the process:
1.
This process is almost certainly shifting location of images to paper. The printing process itself is not repeatable. Printing 10 times is likely to get you slightly different print location every time.
2. The PNG trace in LightBurn will shift location of items… in this case the important one is the outline. Notice that the dimensions of the trace do not match the PNG.
3.
This did not look centered to me on the bed. Remember that lasers are actually specced in millimeters.
How did you do this? If you were to do it again with the traced figure, would it work repeatably?
In any case, to do this with precision I suggest you add registration marks to 2 opposite corners of the design. Then use Print & Cut to align the laser to the registration marks and cut that way.