Hey all,
New to the boards. I have received my GWEIKE Cloud Pro and it has been great engraving on the plate.
I have been unable to engrave using the rotary included. I am able to frame no problem (rotary spins, laser moves, no errors). However, when I hit run, I get a “red light” immediately. It is likely user error with a cut setting, but do not have any errors or ideas where to start trouble shooting. Have read some comments about issues with graphic, but do not receive “outside” cut parameter errors etc. Just don’t have anything to start with on this issue.
@jkwilborn Thanks for the reply. The Gweike has a large button like the Glowforge. That button goes red as soon as I hit “Run” in lightburn. I have had issues where there was a object is out of an area, modified it…removed the error, but still get a red light.
I need to research over scanning. Unsure the concept yet. Some posts discuss issues with the vector file, maybe these are related. I received the vector from an artist, maybe I need to try a basic square or something first.
I don’t not have a console, have to rely on light-burn errors. Was hoping more detailed issues were available somewhere in Lightburn.
I understand it’s a Ruida, but I don’t know how to get any errors the Ruida are producing, probably causing the red light…
How do you know the object is out of the area? What tells you that?
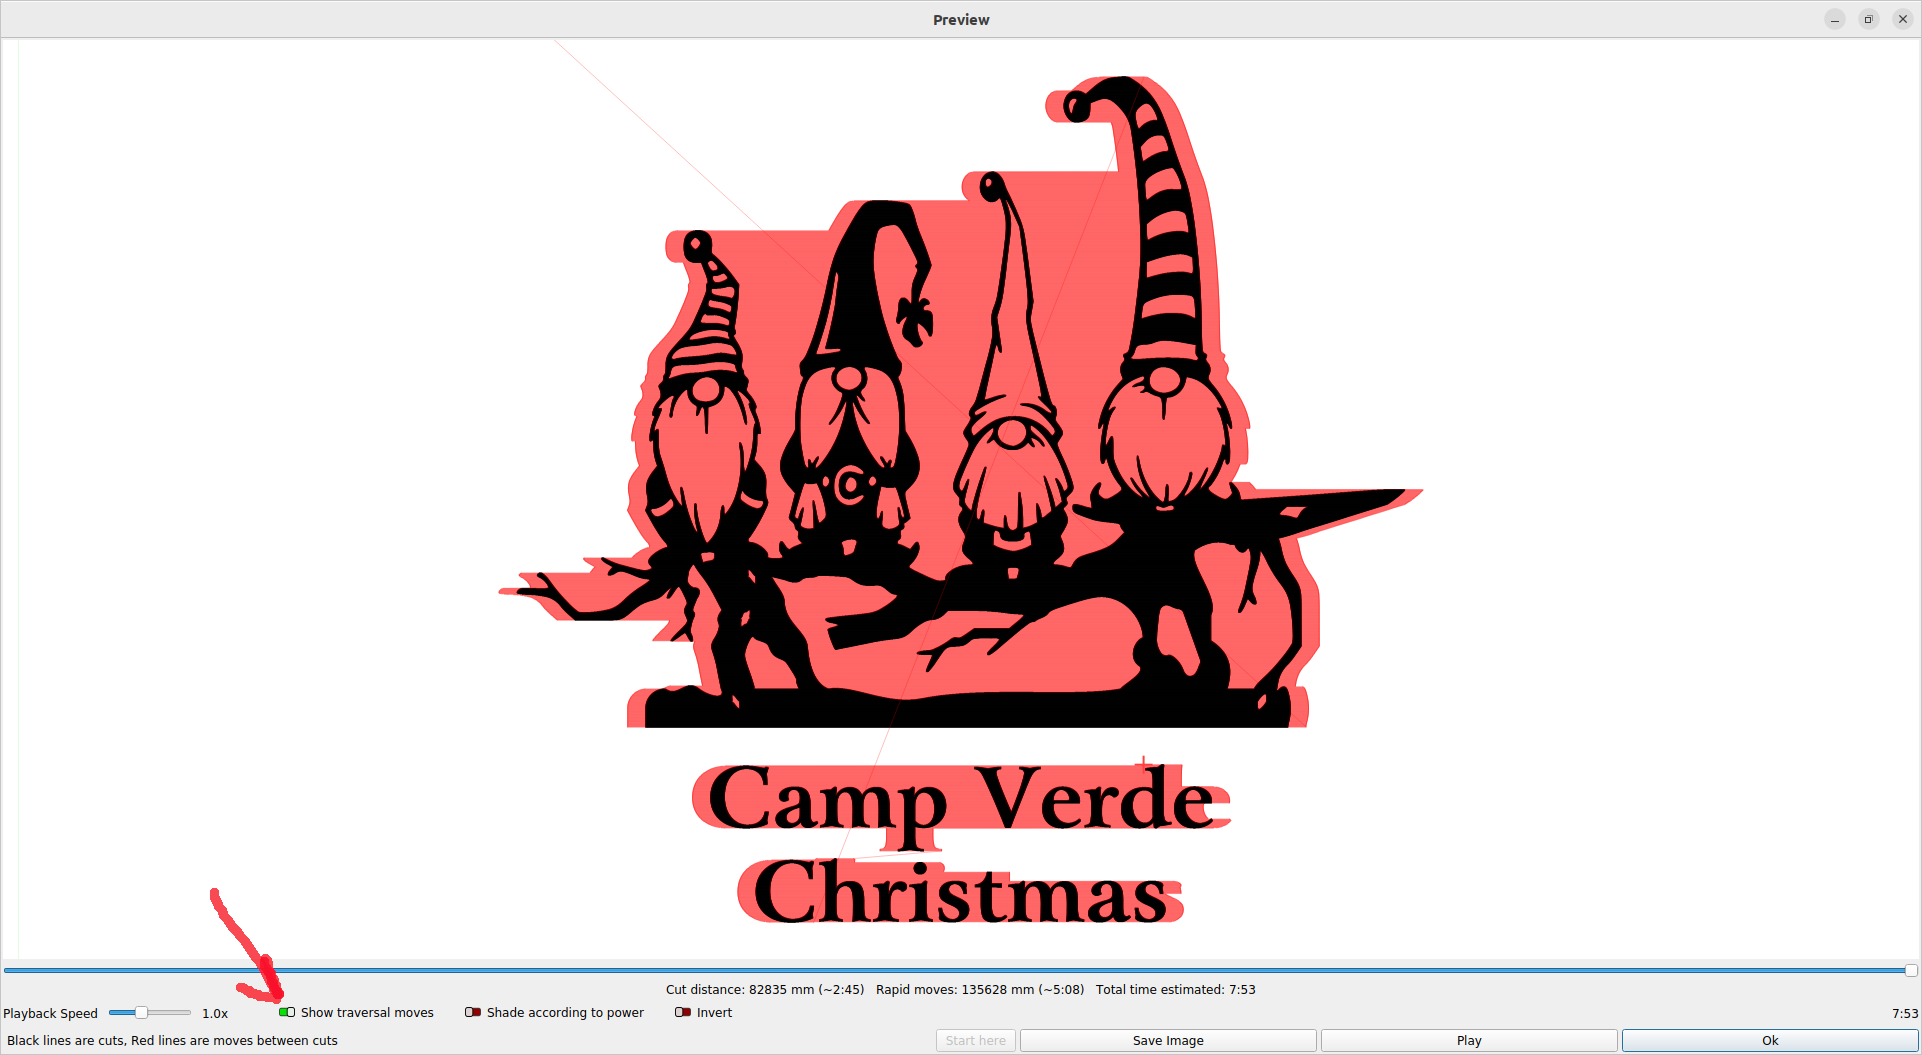
If you have version 1.3 it will show overscan with the “Show Transverse move” enabled in the preview. Red arrow at bottom points to the option to enable show transverse moves. This is ‘computed’ by Lightburn as the Ruida handles this overscan internally with hardware.
This will show were the head travels, including overscan.
In lightburn, I get the “some objects are outside…wont be sent” error. So I manipulate the file and eventually I can hit run and I do not get the error. I thought that would fix it, but it has not. I see now how over scanning is not an option for this machine.
I need to try and simple square or something and see if it is related to my vector I think. IT guy by trade, so im so used to living off errors, hard to not have them with this machine
Someone needs to clue us in on what the ‘red light’ means, how it operates and how do you tell what it’s complaining about …
I’d guess you are going out of bounds somewhere.
Do you have to do something when you reset the machine for your rotary?
If I follow your approach it will not find the Y axes limit switch, since there isn’t one. I have to halt the boot/reset process using the console and the ‘esc’ key.
How is yours handled… By the way, are you configured as a Ruida controller?
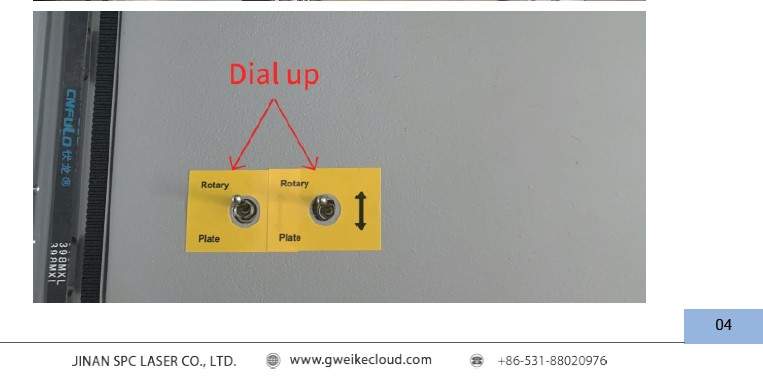
I recently had the same issue. After contacting Gweike support, there is a small piece of metal with two screws in the back right of the machine that needs to be slid over the limit switch to hold it down while the tray is out. That isn’t in their documentation or video. You don’t need to enable rotary in lightburn and just make sure the left switch is up for rotary and the right switch is down for plate. That worked for me.
@jkwilborn@Garanhao Thanks all for the help. Limit switch must have been the issue. Looks like im all good now. Curious as to the other switch…what does it do? One is clear, plate or rotary. What is the other?
I honestly don’t know, this is my first laser machine, so I’m unfamiliar with exactly how things work. From what I’ve notice in their documentation and videos, both those flip switches in the back left are labeled the same. I’ve only noticed that they say for use with lightburn that you only flip the left one up to rotary, but with their offline software, they flip them both up to rotary.
There are two phases going to each motor … If these are double pole they will handle one phase of a two phase motor, requiring a pair of switches for a motor. Switches from the motor on the Y gantry to the socket for the rotary.
They should not be different from each other, I.E. both are up or down if configured as above.
You can follow the wiring and see where it goes … that ought to confirm it…
Hi, I have owned the same car for less than a week and like you I have had the same problems. Apparently with lightburn the one on the right if you move to rotatory the butt goes red right away. I really don’t know what the 2 would do with lightburn, whereas with cloud they both have to be put on rotatory. This has been ma my experience.