If I my step in. I am new to anything to do with laser. I am coming from the cnc world.
I have a RDC8445S in a LM 1390-1 and have LB 2.1 Pro (just installed it)
How / where do I.. Adjust N,Y,Z step distances?
I asked LB to find my laser and it did not find it. I found that you could add manually, I found it, added work area size and LB said OK.
I tried to test in the Rotary window and IT worked… If it is completely right???
I have been talking with LB help and they say LB 2.1+ will run RDC8445S.
If I am in the wrong place, please point me in the right direction.
I don’t have this controller, I have a 6442g, but many of these are in the machine settings. These are read off the machine and you can change them and write them back out.
Yes, it is (like with all Ruida drivers) in the machine settings. I am away from the machine, but there are many tutorials online. There is more to it than just setting the step sizes, but this is all explained in the tutorials. Not as straightforward as it could be, but if I can figure it out I’m sure you can too.
I got the wifi to work and LB has a setup like Mach3 for setting travel distance. (not playing with X,Y yet) In trans the Z screws got bent a bit and the nuts were split. I got it together enough to test and play while parts come in.
I noticed that Z on the controller says z moved 100mm, but it only moved 1mm.
In the travel adjustment part of LB I put in 100 and it moved 1. Enter. Boy did the motors get pissed.
If the steps are any smaller then 3-4 the motors get “#¤#¤/%¤”.
I will send them a massage in the morning to ask???
If the speed or acceleration is too high, the motor will stall.
As a quick test, reduce the Z axis speed to 10 mm/s and see if that improves the results.
That suggests the Z axis motor is operating with far more friction / resistance than it should, which will overload the motor.
As a quick test, turn the power off, wrap a rag around the belt to keep the grease off your fingers, and (try to) pull the belt by hand. If you can’t move it smoothly in both directions with reasonable effort, then the motor can’t, either.
Yap. I forgot about acceleration. Thanks. It moves OK for what it went through.
Now that I got it to move and trace a box. I turned the machine off and back on. Now it goes to Origin and not home. Love the learning curve. grin
Tomorrow I get brave and put the tube in and see what happens.
PS: My brain got scrambled about 4 years back do to a tumour. So sometimes I get stuck on the simplistic stuff.
It shouldmust home successfully when you turn it on, with the head staying in the corner with the home switches. After that, the X and Y coordinates on the machine display will be zero; if they are not zero, then something is wrong with the home process.
The Z or U axis does not automatically home, so that coordinate will be something like 3000 mm after the controller starts up. Completing the controller’s Focus process will set that to zero (more exactly, the Focus Offset value).
You must set the LightBurn Device Settings → Machine Origin to the corner where the machine homes:
This laser gig goes better when you’re grindingly methodical, so go slow with plenty of notes, create checklists for anything involving more than a few steps, and you’ll do better than nearly everybody.
This machine tips in a 500kg. So shipping it back is not a thing.
I have been designing and building things forever, so fixing this with the parts they send is a drop in the bucket.
The main frame is not sprung. It comes down to they did not support the Z frame enough to hold the load. I am talking with them on a way they can hard bolt it for shipping.
With all the stuff in the crate, that was the only thing damaged. The two tubes (main and spare) made the trip OK.
On start up, the machine goes home and learns where it is in the world.
As in. Machine X - Y 0.0. CNC machines do the same thing.
Then it goes for a walk across the table. This is the part I am looking into.
Z only moves when you tell it too. A safety thing.
Thanks for the LB link. I am going through them one step at a time.
I am building spreadsheets to put the info in. I am building one for Rotary. The formula I am having trouble with is, Putting a square logo on a tapered mug / glass.
Chiller. grin… Building list. Air in / air out. Kill switches around the shop. APC / Safety switches when main power is lost, (kill laser, feed chiller to cool tube). Trash micro’s and replace with NPN. Talk with computer / LB.
Thanks for the links. I got it working with the wifi and did some playing around to get the Z to work.
They had the Z setting about 500 times to high.
?? I setup a simple box with our company name inside. Fill path first and cut path second. It would try to do the cut first. I cleared the controller memory and tried again. Samething.
So I turned off the cut and did the fill. Then did the cut. I am hooked on laser work.
What used to take me 20 + min with my old cnc took me 4+ and no sanding.
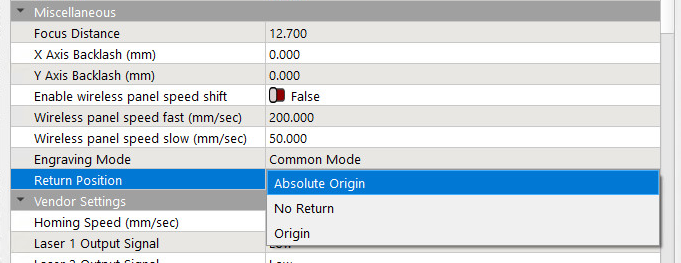
Which don’t match the four choices on the machine display:
ABS position
Not return
Origin pos
Docking point
The machine also has a Yes/No option for Return to Origin, which must be Yes for the four choices to matter. I do not know how No differs from Not return.
It’s always been set to Yes and ABS position, which leaves the laser head at the home position after startup.
Changing it to Origin pos sends the head to wherever it was when I most recently poked the Origin button on the machine display.
It requires a different mindset, particularly with Ruida controllers that do not use G-Code and do not work like CNC machines: trying to force-fit the machine and LightBurn to your CNC-ish preconceptions will only result in heartbreak & confusion.
Going through the Getting Started part of the doc will introduce a whole bunch of terminology you must know (some of which you think you know, but it’s different for lasers).
Yap.. Me and my dyslexia not saying things right.
Forced shift. My retirement was setup too use the cnc router machine I built to make, signs, plaques, 3D models and anything else.
When a Acoustic Neuroma woke up and almost killed me. My world went to “¤”¤"&#¤%&. (Doctors miss diagnose it all the time) Mine is too small and in a place they can’t get too, so I have to live with it.
So because of the sound I had to redo everything. So when I got the laser system setup and made a small sign. My brain did not go into melt down because of the high frequency noise. Can’t put into word’s what that feels like.
Thank You to ALL for your help.
When I start the machine. What it does and with. (Kid in a candy shore now!)
Got the chuck side of my PiBurn steps setup. Today I build a line up plate for it to set on.
Looking into a way to do front side / back side (fill / line) work. For stuff you want a design on both sided. In Aspire there was a flip setting. You used pins at center line to line up backside.