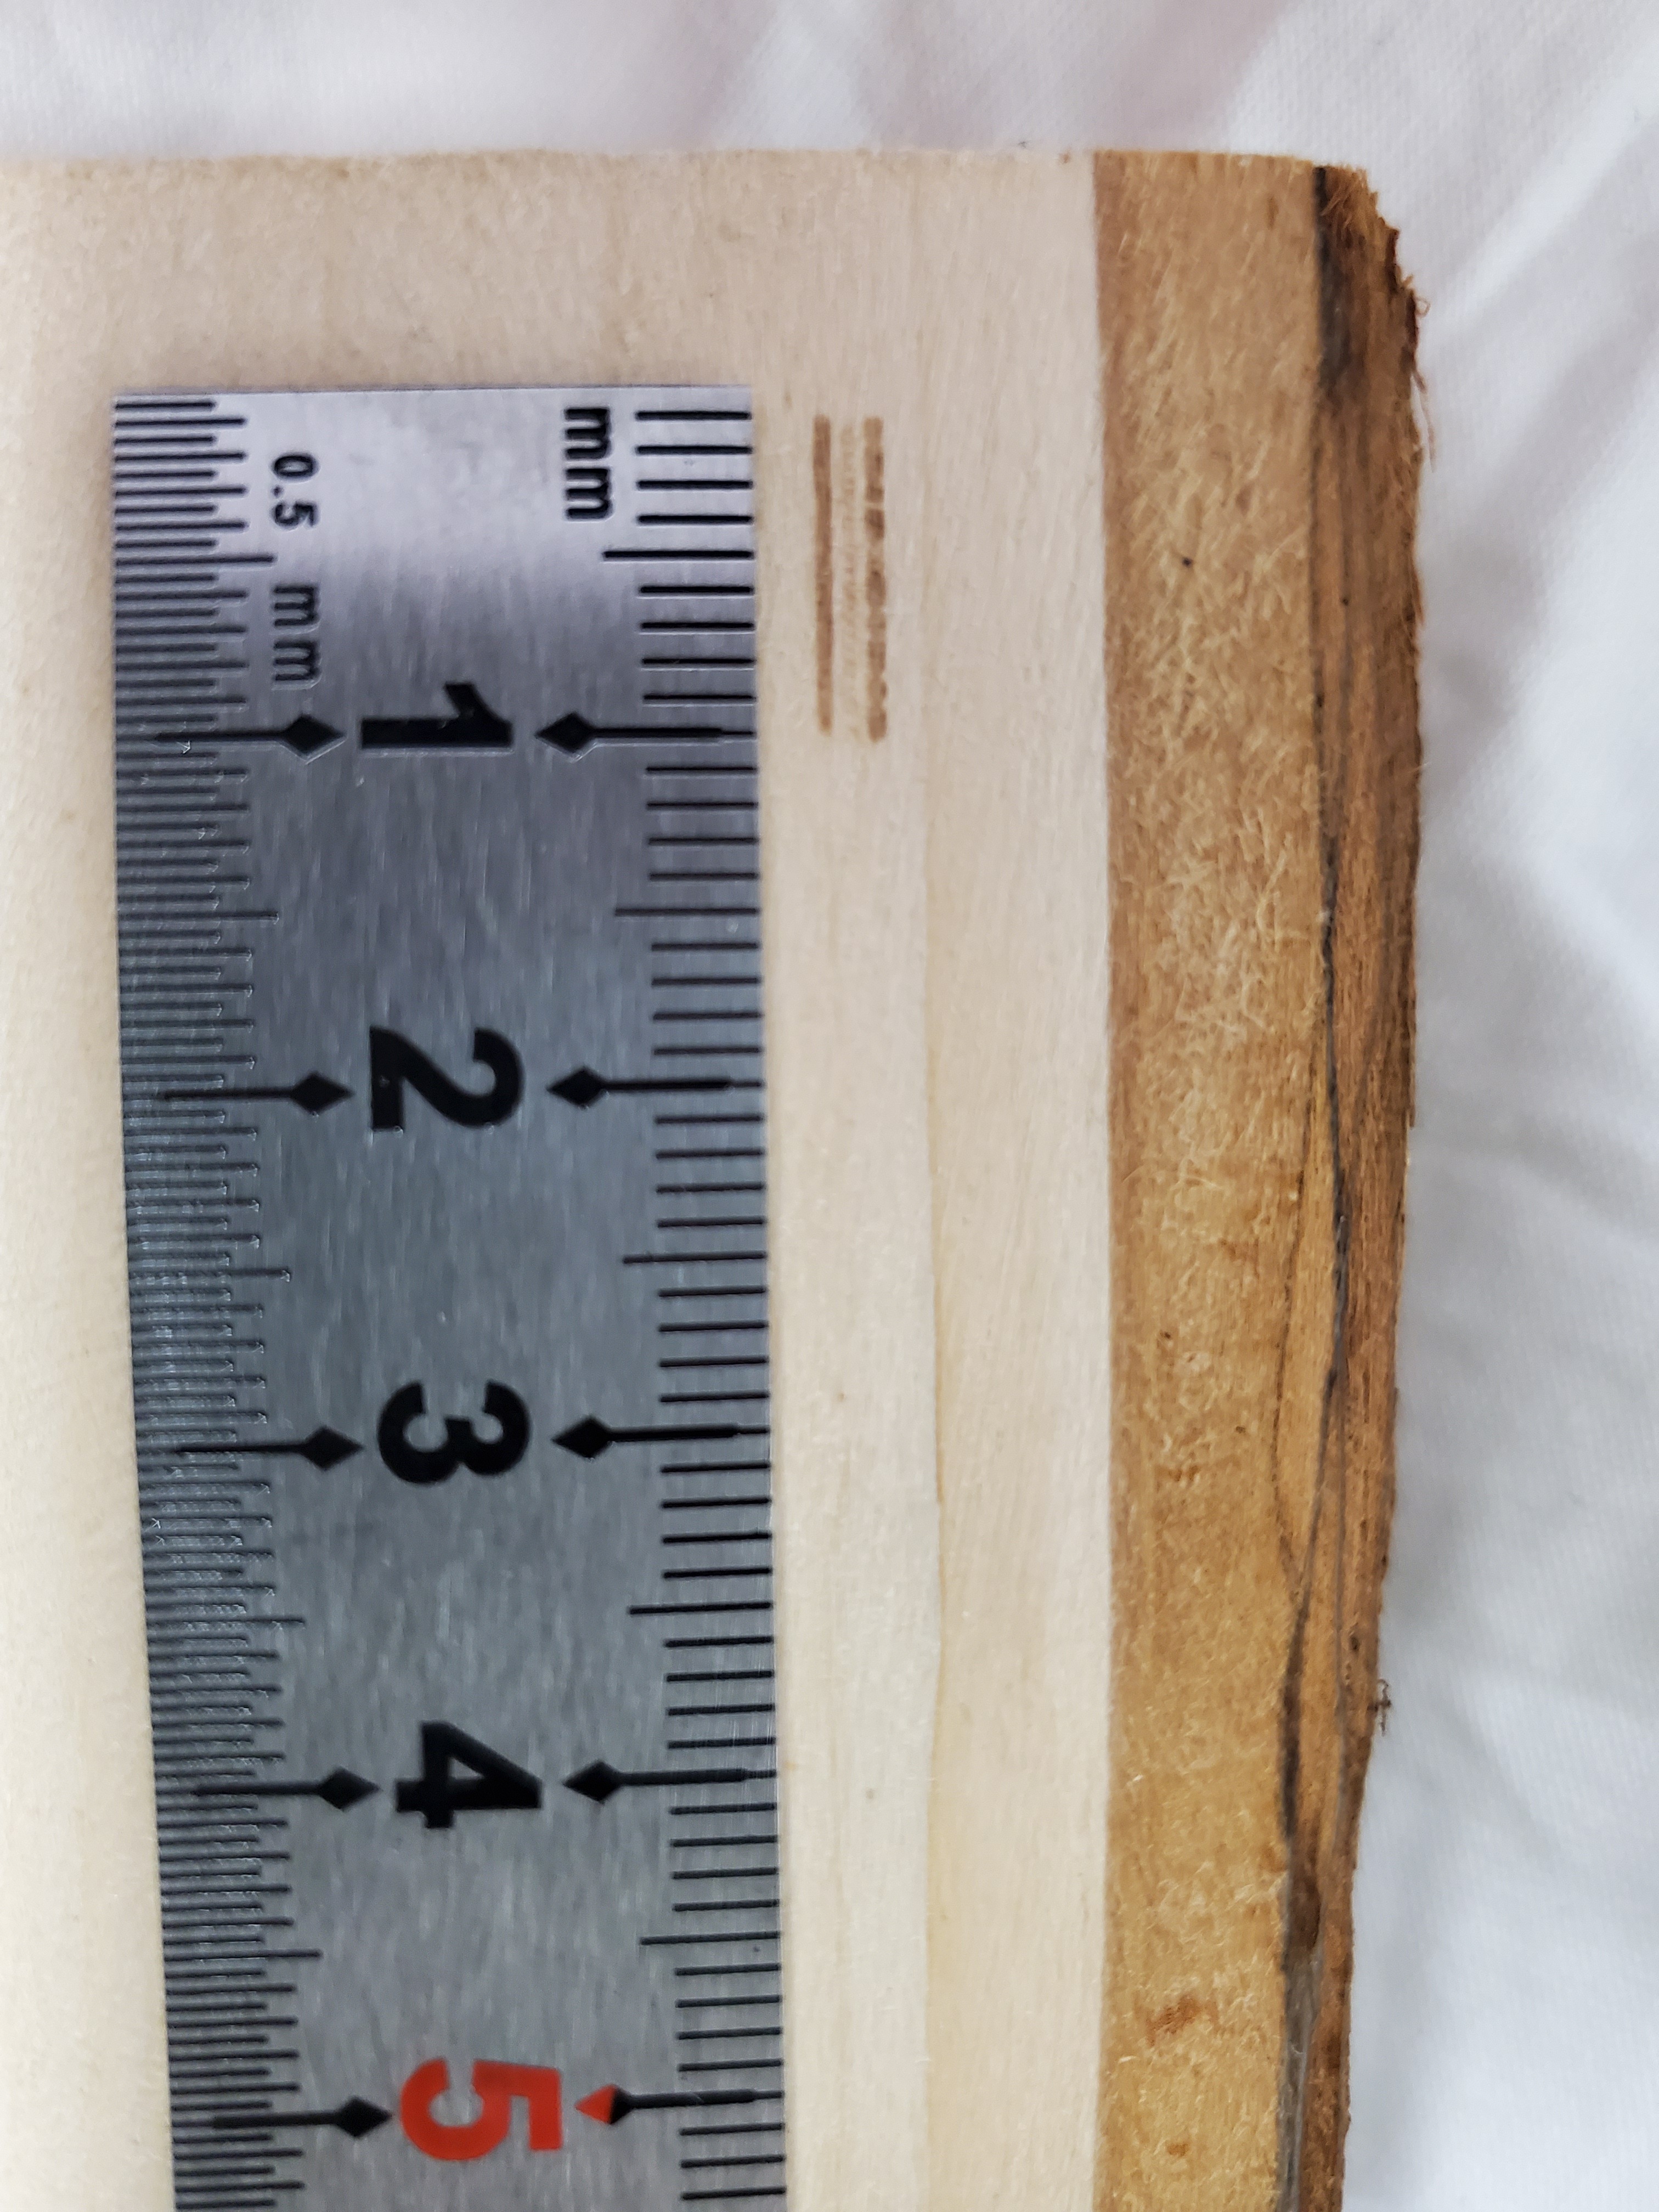
Ok I did run it at passthrough. Also the final project will on a basswood round so that is what I’ll run the dot pattern on.
Looking forward to seeing it.
Ok here we go this is using my Thunder Laser HR head using a quarter to set my Z height.
100mm/s 10% on my Thunder Laser 100watt
To me it looks out of focus but I’m new.
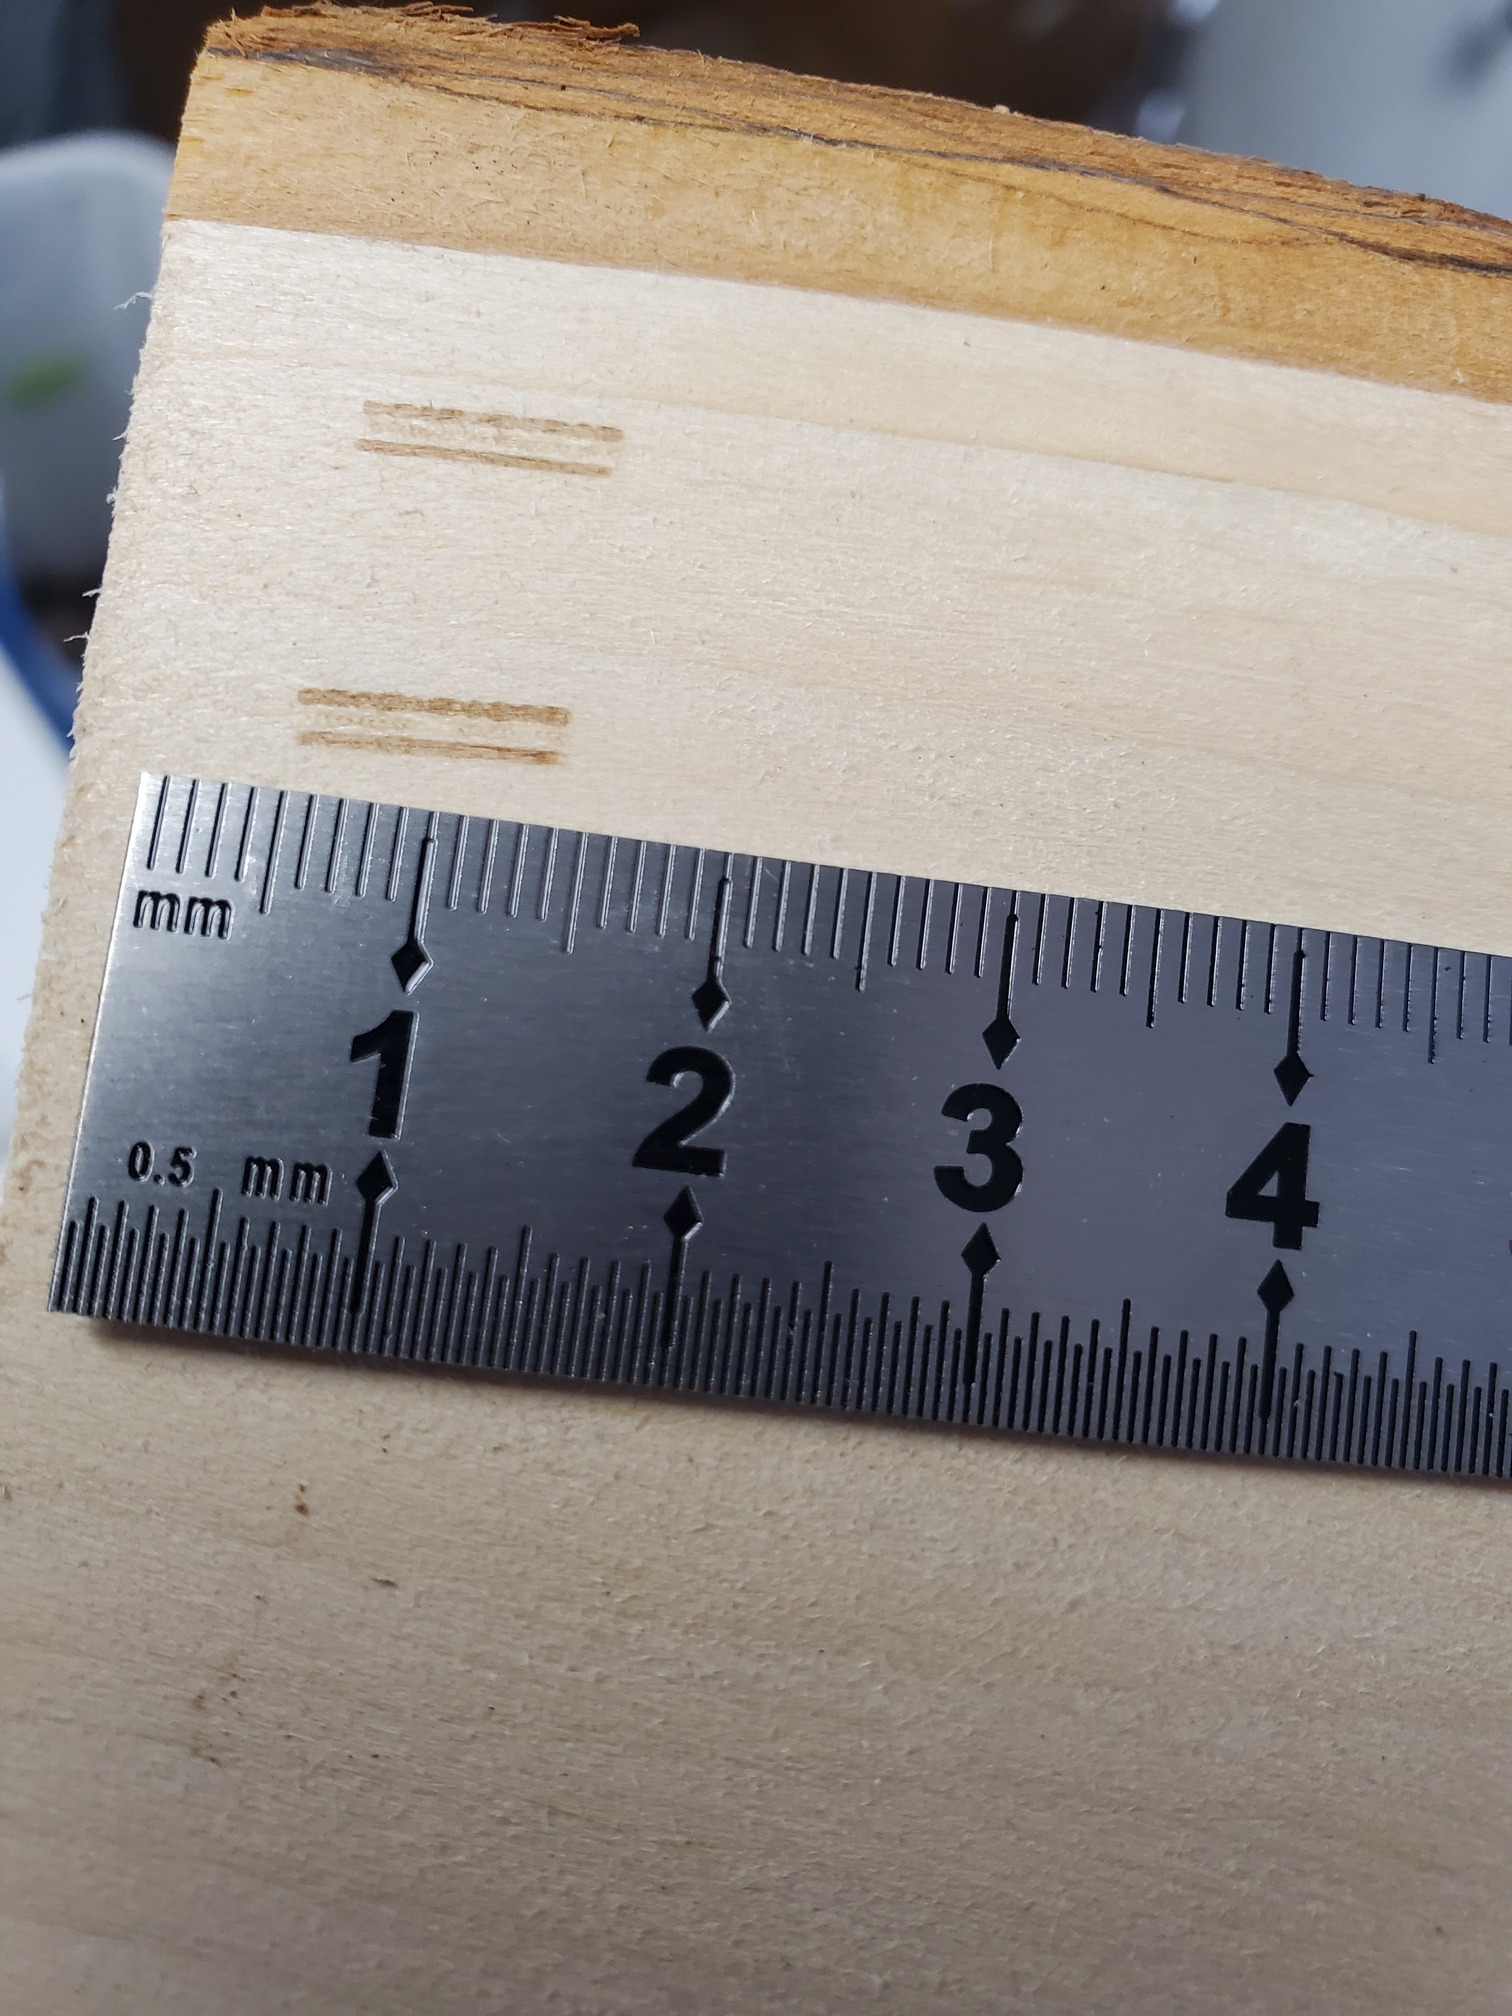

It seems like it was clearer yesterday i cleaned the lenses but i thought i put them back correctly (| |) is this correct?
Ok so I’m an idiot & installed the lenses wrong. Here is what I have now. 150mm/s 10% power 100watt Thunder laser with Z at 3mm
1 Like
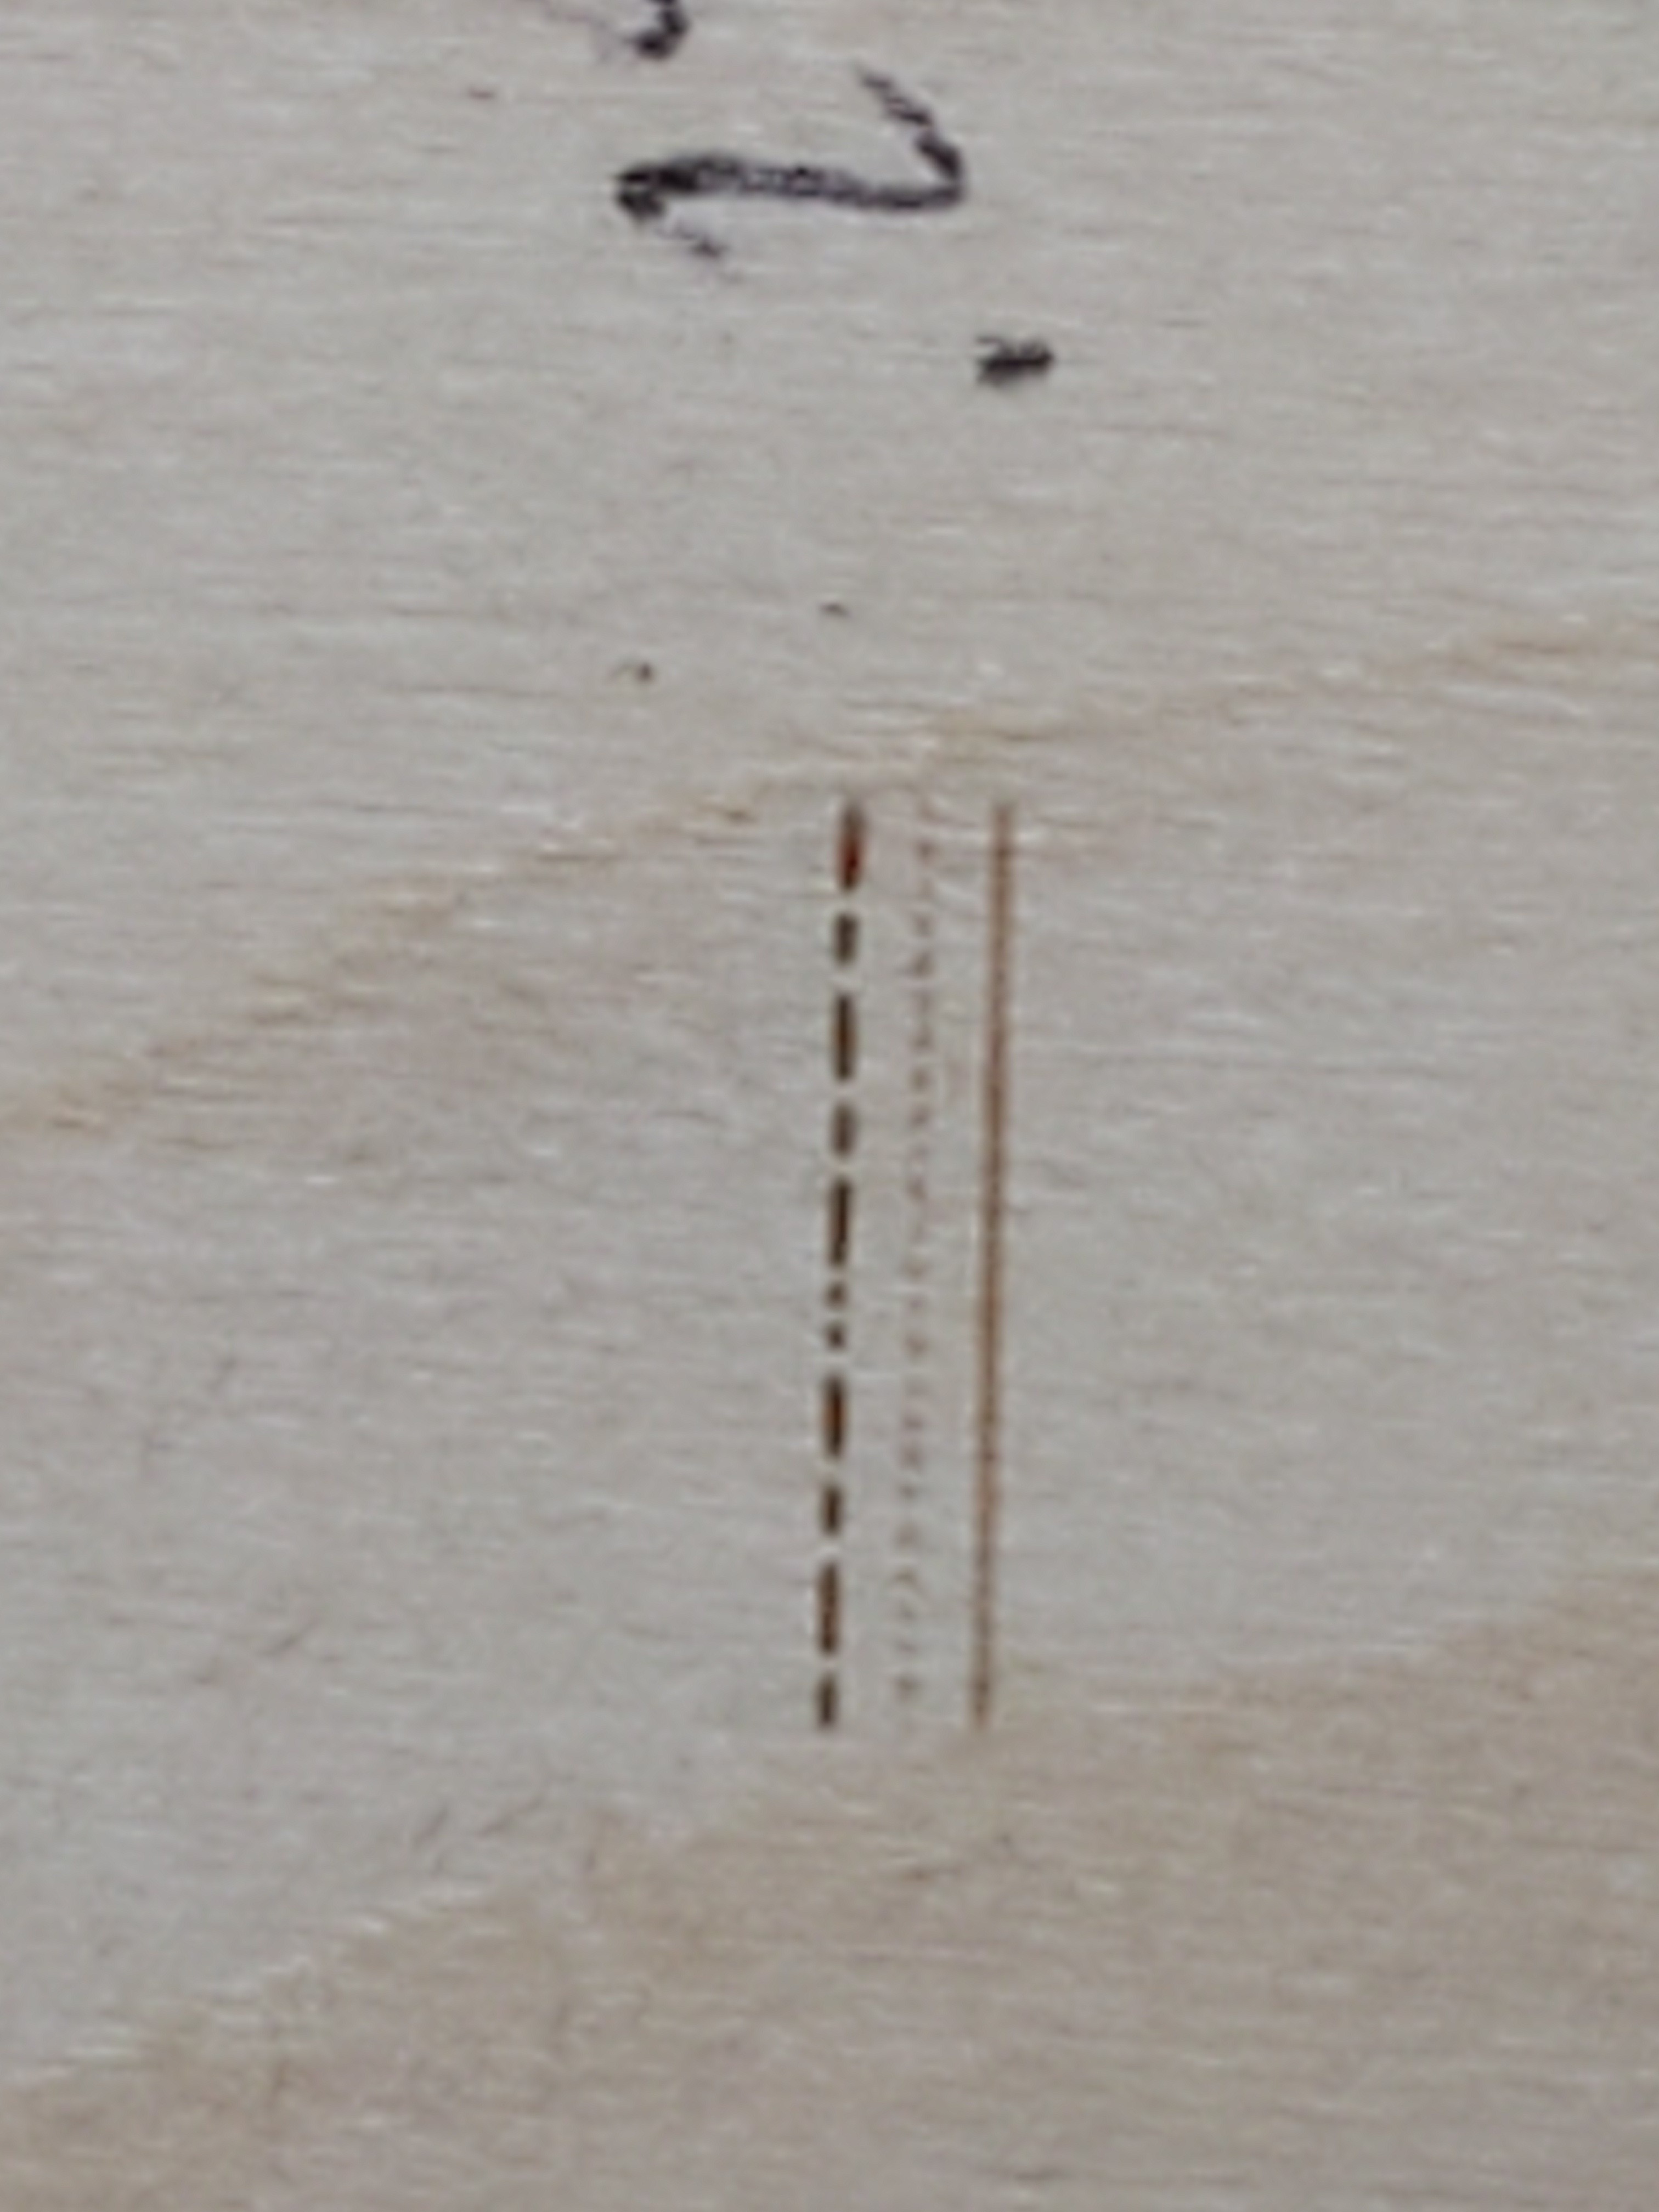
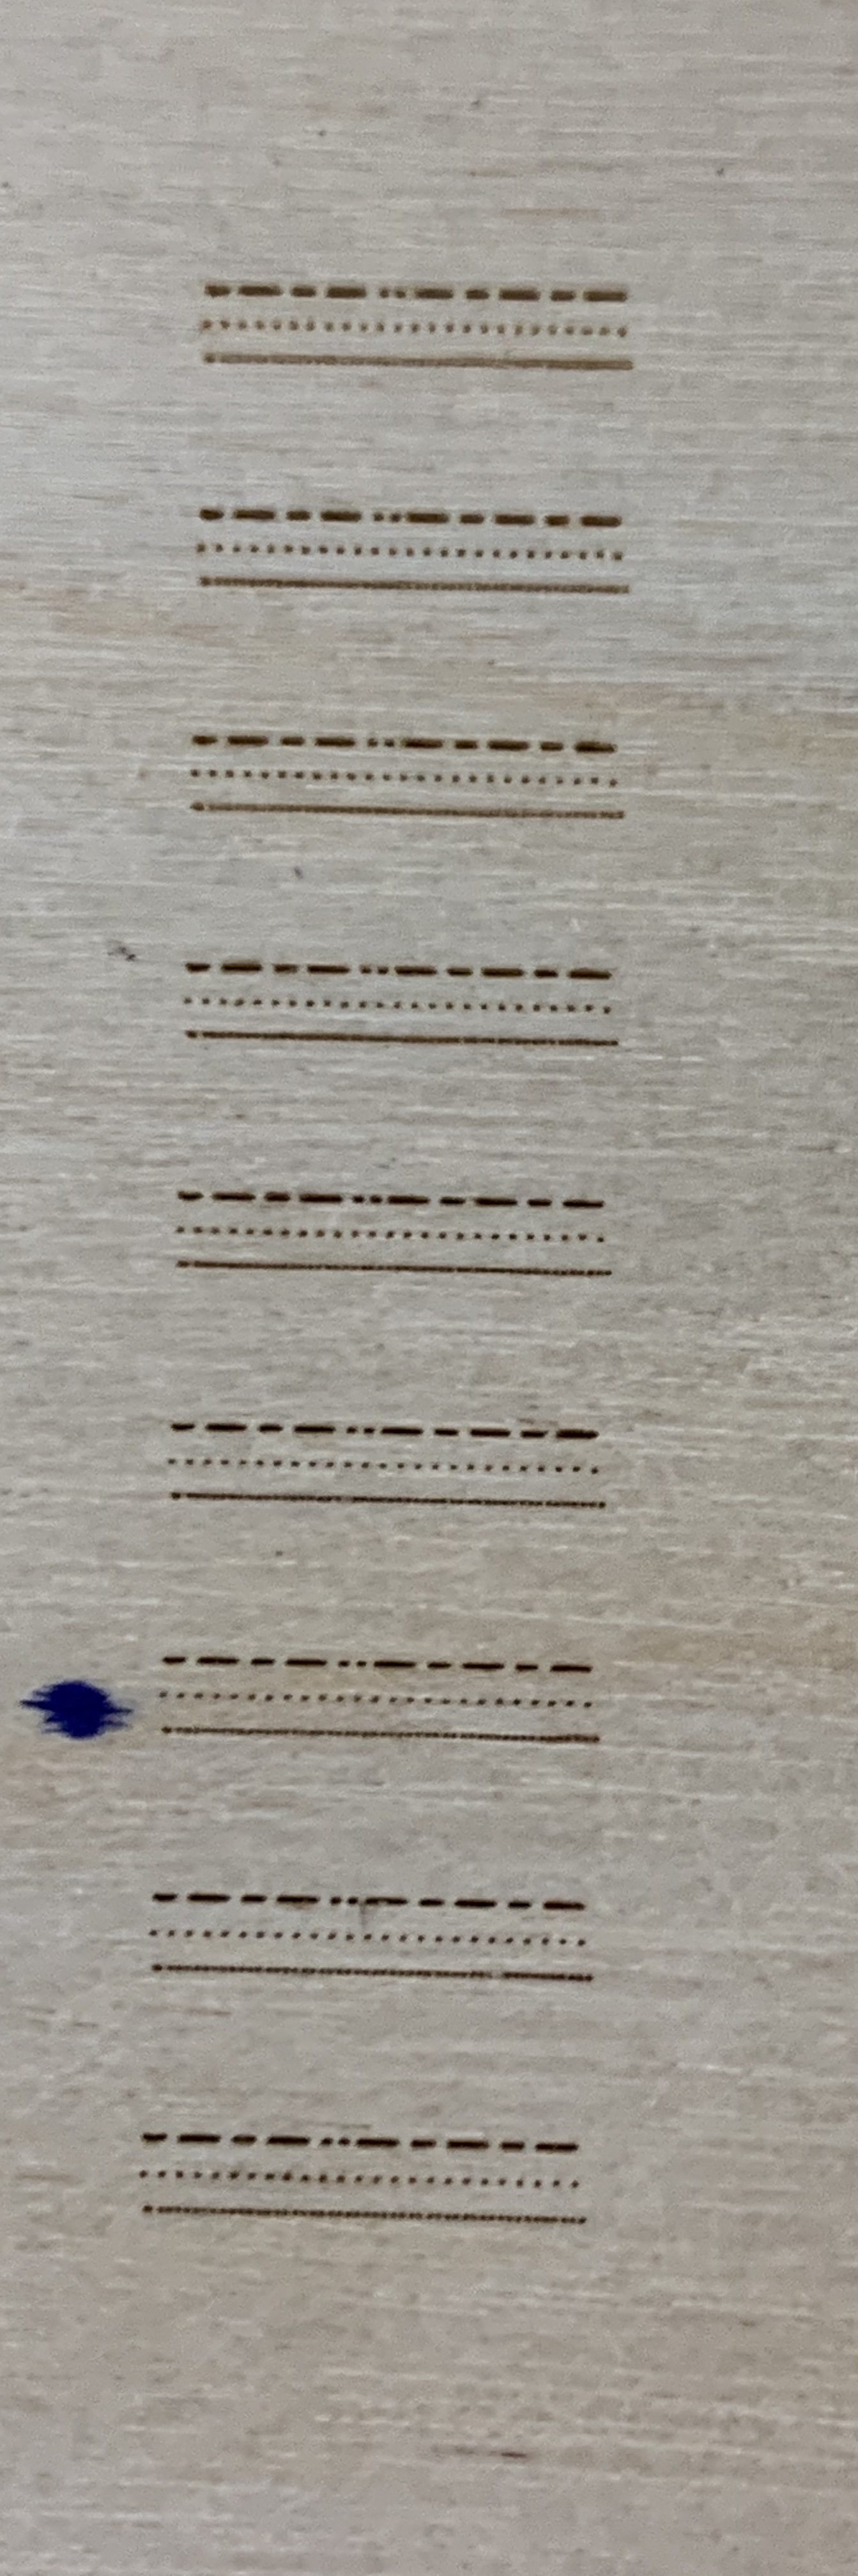
I can’t tell if the dots are out of focus or the picture is out of focus. Something definitely is and I think it’s your dots. If you think that is your best then write down your 2.5mm as nominal. Now reset your Z to 2.0mm and run that test at 2.0, 2.1, 2.2, etc all the way up to 3mm. The below photo shows me doing exactly the same. Click the picture below to see the full picture. I expected my focus to be best on the middle pattern but you can see (blue dot) that wasn’t the case. You can see my focus progressively getting better with each row and then start to go the other way. You get a very small depth of field. This also means you need an extremely flat piece of wood to test this.
You should definitely be getting sharper than what you posted as your best above. I think even your original try yesterday was better.
Tip, don’t try using the buttons on the controller to jog by .1mm. It’s almost impossible. Go to the Move tab in Lightburn, put .1mm as the move amount, then click the down chevron to move the table down by .1mm between each test.
Ok Travis Thank you I’ll try to get to the shop tomorrow and get it figured out .
You’re making progress!
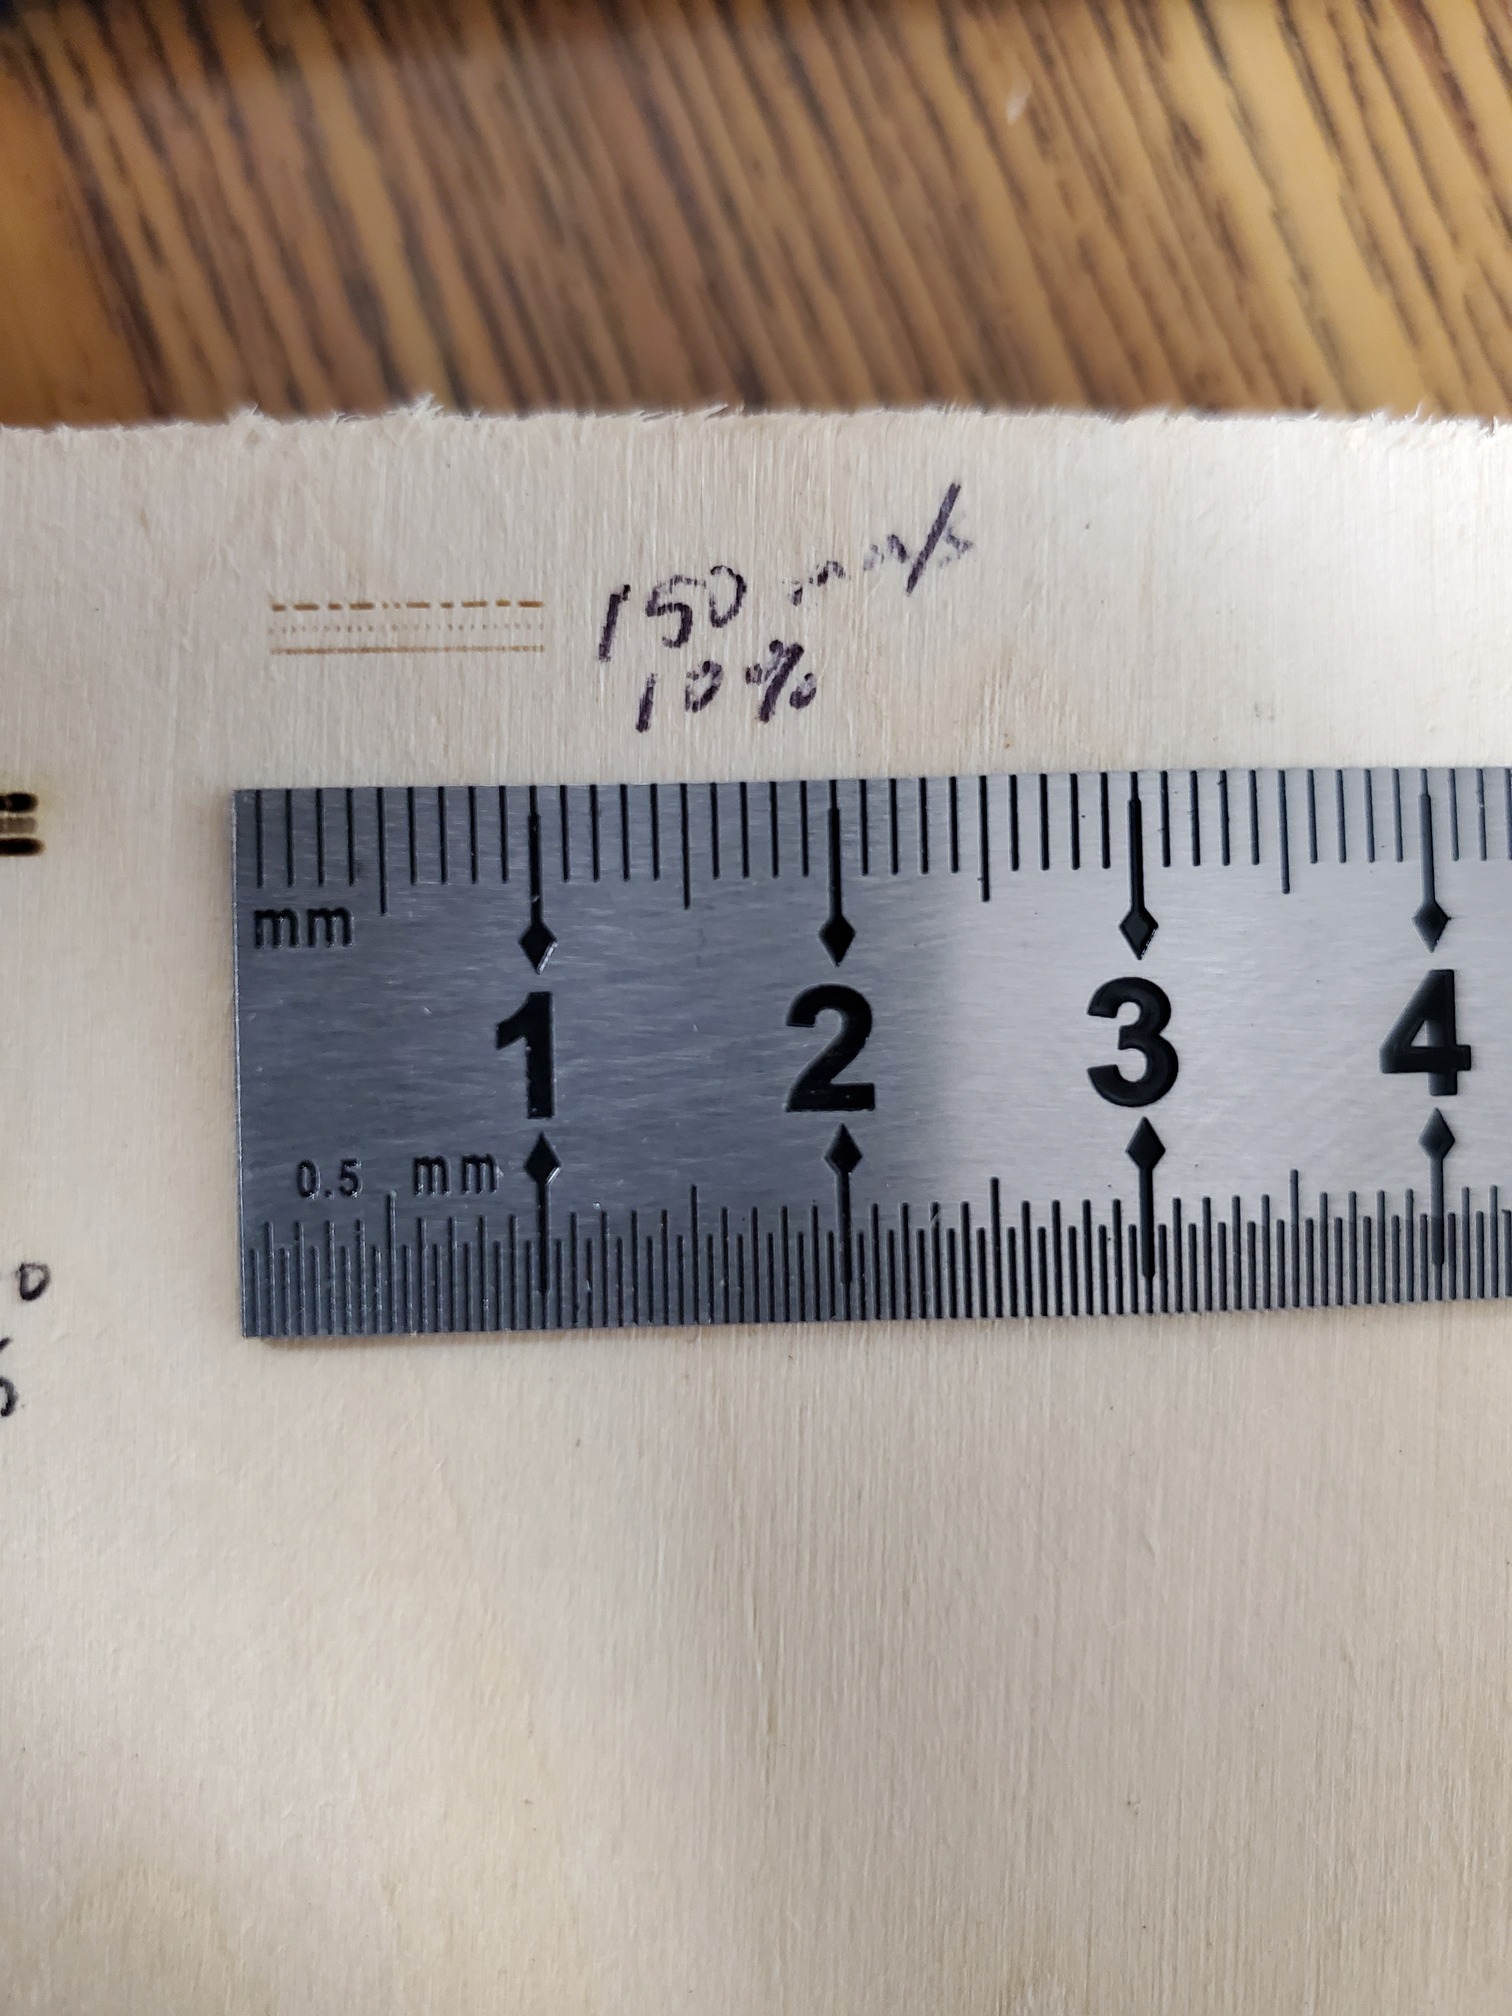
Thats at 150mm/s & 10% should i try a little more speeppd or more power?
I’d worry about getting your focus correct first. From there I’d slow down the speed a bit if you’re wanting to get a darker burn.
I wasn’t sure if I should go a little more power would make the mark crisper
I’d go with a little less speed. You’re already at a disadvantage with a 100 watt tube. Dial in the focus first. Your mark is already going to be less dark with it out of focus. Until you get it focused you don’t really know how dark a mark you’re going to make.
@Gary_Wiant I think I’ve asked a few times but you’ve never answered. What is the resolution of the original photo you were trying to engrave?
I’m not sure of the original resolution it wasn’t very high, but I saved it at 600dpi when I created the faded boarder in Gimp.
OK, I’ve def got some suggestions for the first time you get ready to try the photo again but get your focus as good as you can first.
1 Like
Let’s talk about your images. This applies to both of the images you posted. I’m going to assume that the images you posted are the original, unaltered images. You mentioned you saved the image at 600 dpi and applied some kind of fade in Gimp. Let’s walk before you run. Use an original image that hasn’t been processed or resampled in any other software.
The images you posted here are 720x960 pixels saved at 96 dpi. You can figure this out by going to your image in Windows Explorer, right clicking the image, clicking the details tab, and scrolling part way down.
If your original image is 720x960 those are all the pixels you have to work with unless you resample the image. Let’s assume your laser tube, lens, and material will let you make a .1mm dot which you arrived at through testing. If you can produce a .1mm dot then the highest dpi you can use when you engrave the picture is 254dpi. There are 25.4mm per inch. 25.4mm/.1mm dot gives you 254 dots per inch.
Now, when you bring the photo into Lightburn you want to size the image to 2.8" wide which will make it about 3.8" tall. That’s 720pixels/254 by 960pixels/254. What I’m trying to get across here is that’s the largest you can engrave that photo at 254 dpi without resampling the image. Why so small? Because that’s all the pixels in the original image that you have to work with. If you were able to produce a .05mm dot and engraved at 508dpi then the largest you could engrave that photo would be about 1.4" x 1.9". That’s pretty small. But again, that’s all the available pixels you have to work with.
To get a good photo engraving at a high dpi you have to start with a photo that has plenty of original pixels to work with. Lightburn makes resampling transparent. But if you try to engrave a photo with more dots than the original image has, your quality has to suffer because the dots have to come from somewhere and they weren’t in your original photo. You can generally go the other direction (to a point) without losing quality. If you engrave at a smaller size then the resampling simply throws some of the extra pixels away.
My iphone for instance saves photos at 3024x4032. That means if I want to engrave a picture I shot with my phone at 254 dpi the largest I can do it is 11.9"x15.8". So, that’s a pretty nice size engraving.
For @LightBurn , I’m actually curious, what does Lightburn do to fill in the extra pixels when a photo is enlarged to the point that it’s larger than the original pixels available?
Let’s see what I was able to do with one of your photos.
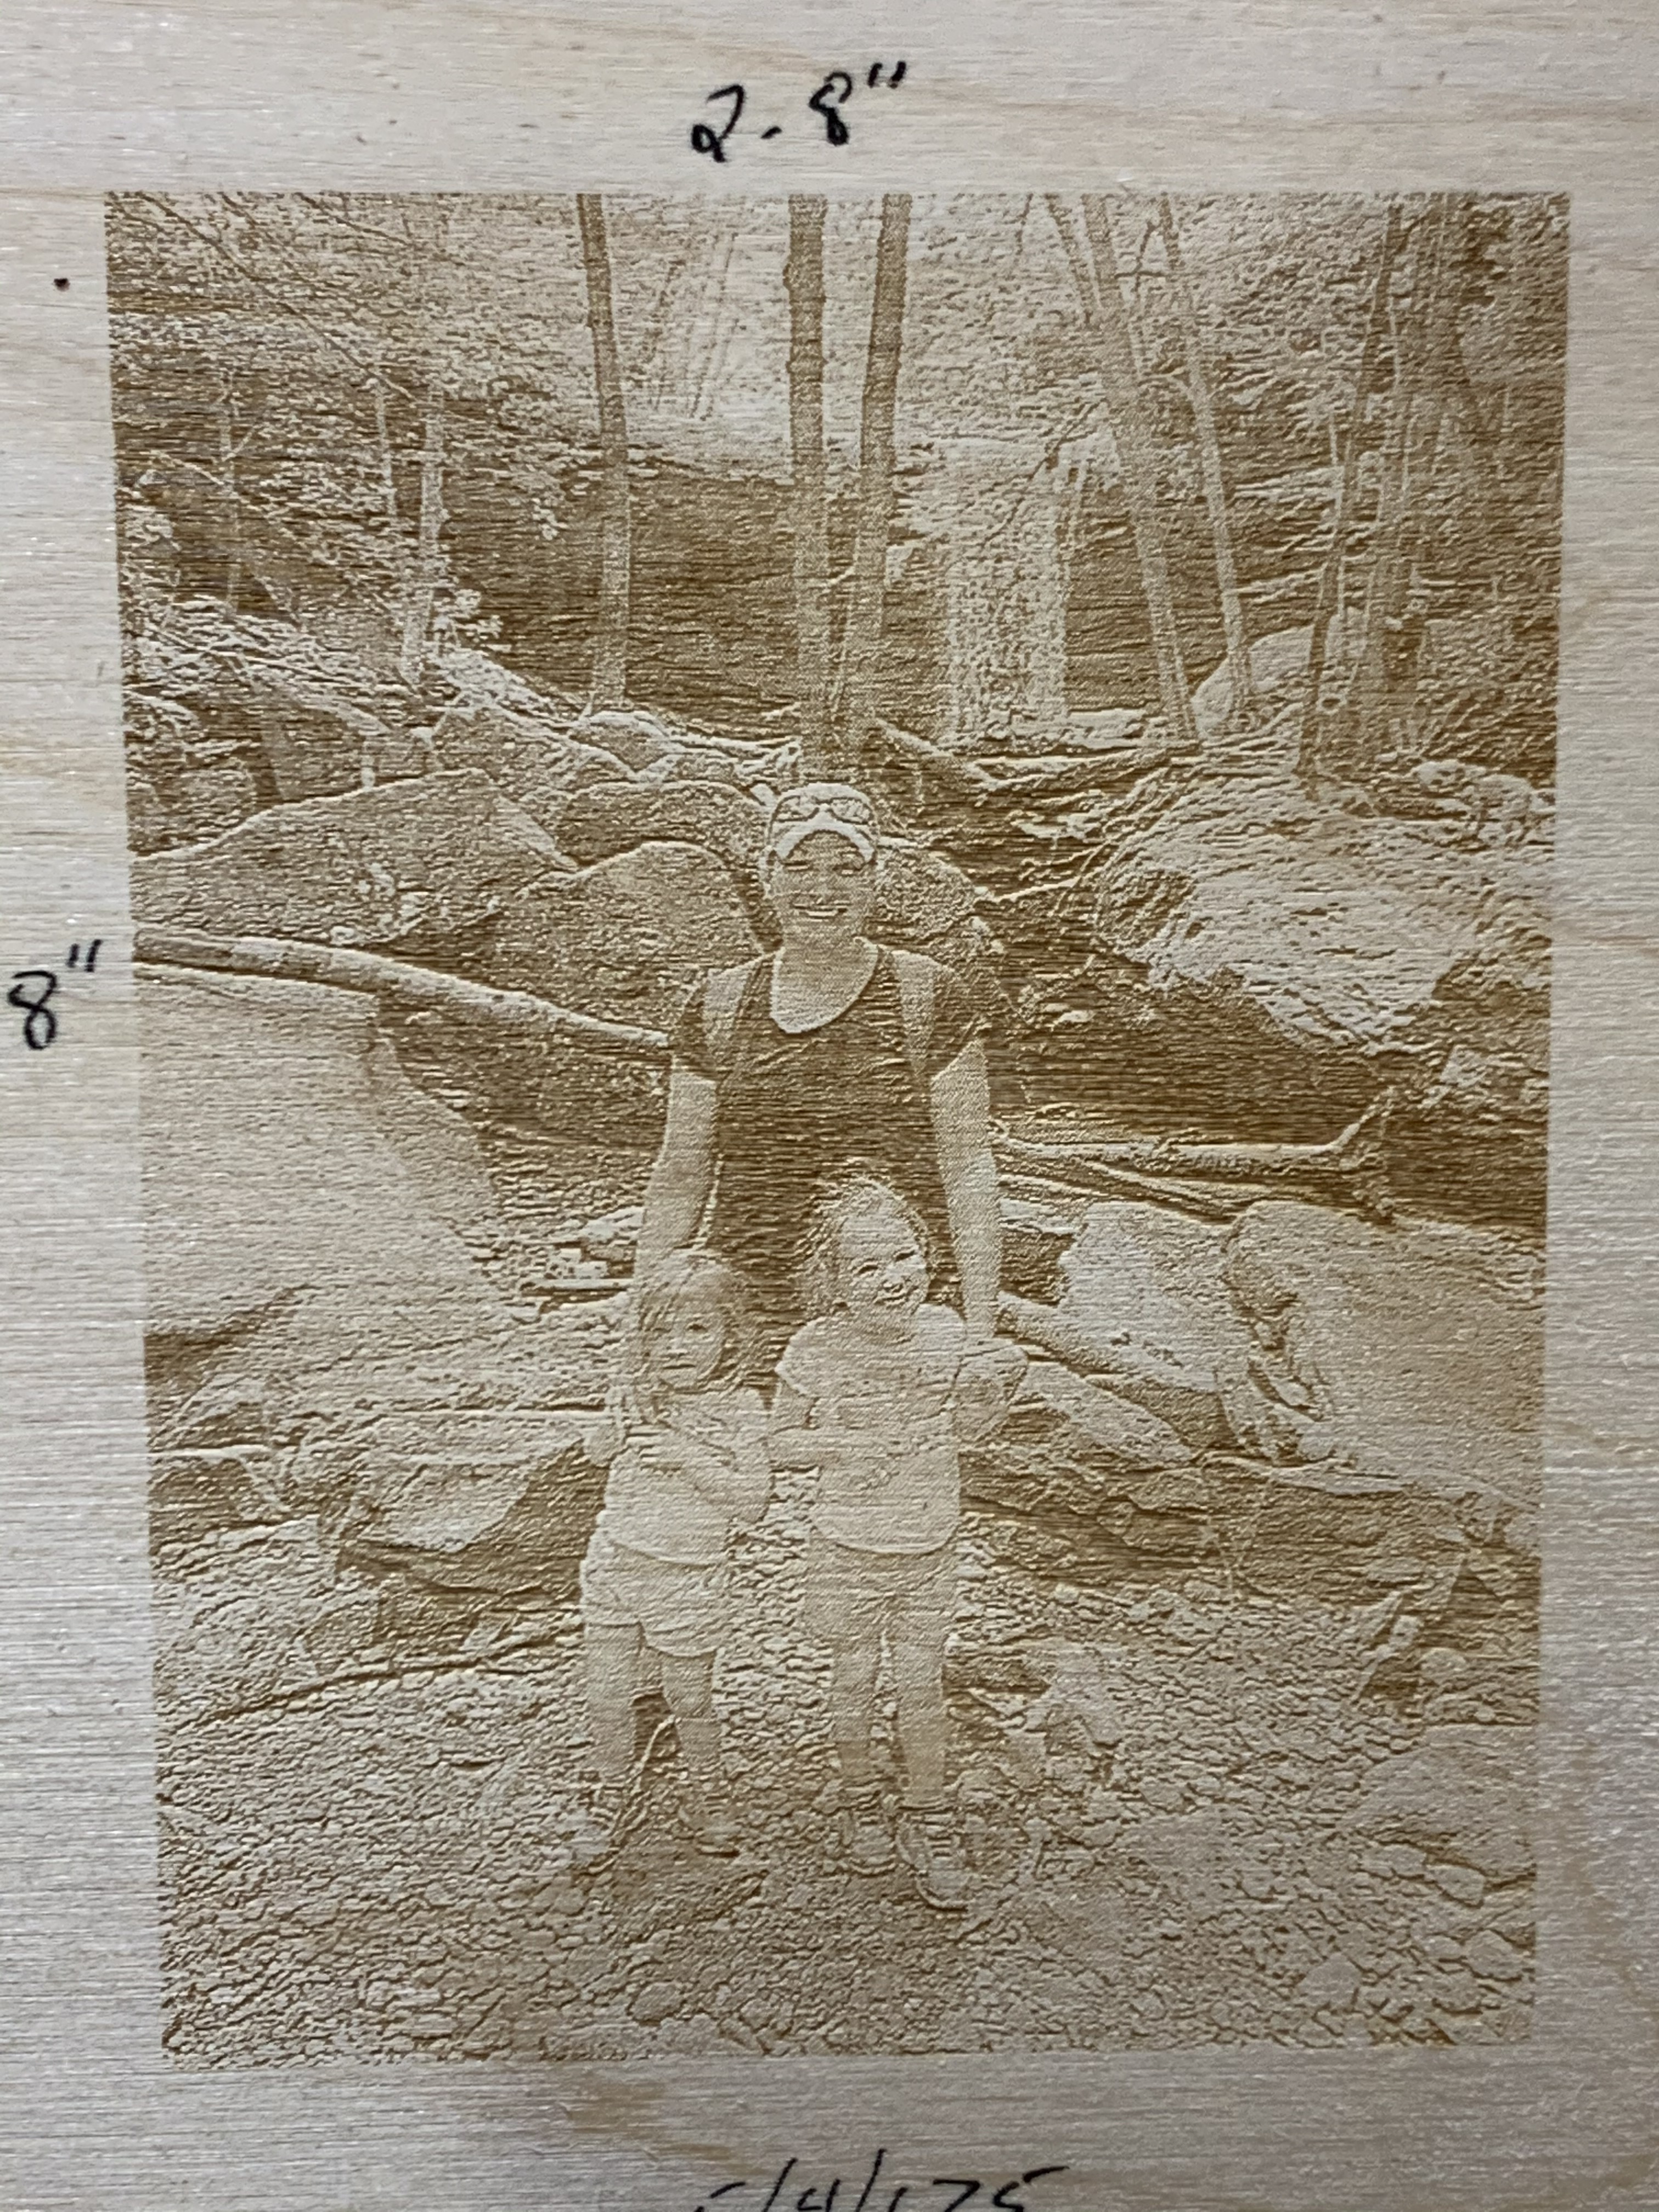
I was able to get close enough to a .1mm dot that I went ahead and did this at 254 DPI. The size of the image on the wood is 2.8"x3.8". I engraved this at 100mm/s, 18% power. I didn’t bring this into any other software, only Lightburn. The only other settings I changed in Lightburn for this was to set the shape properties gamma at .65, the enhance radius to 4, and the amount to 175. Stucki dither.
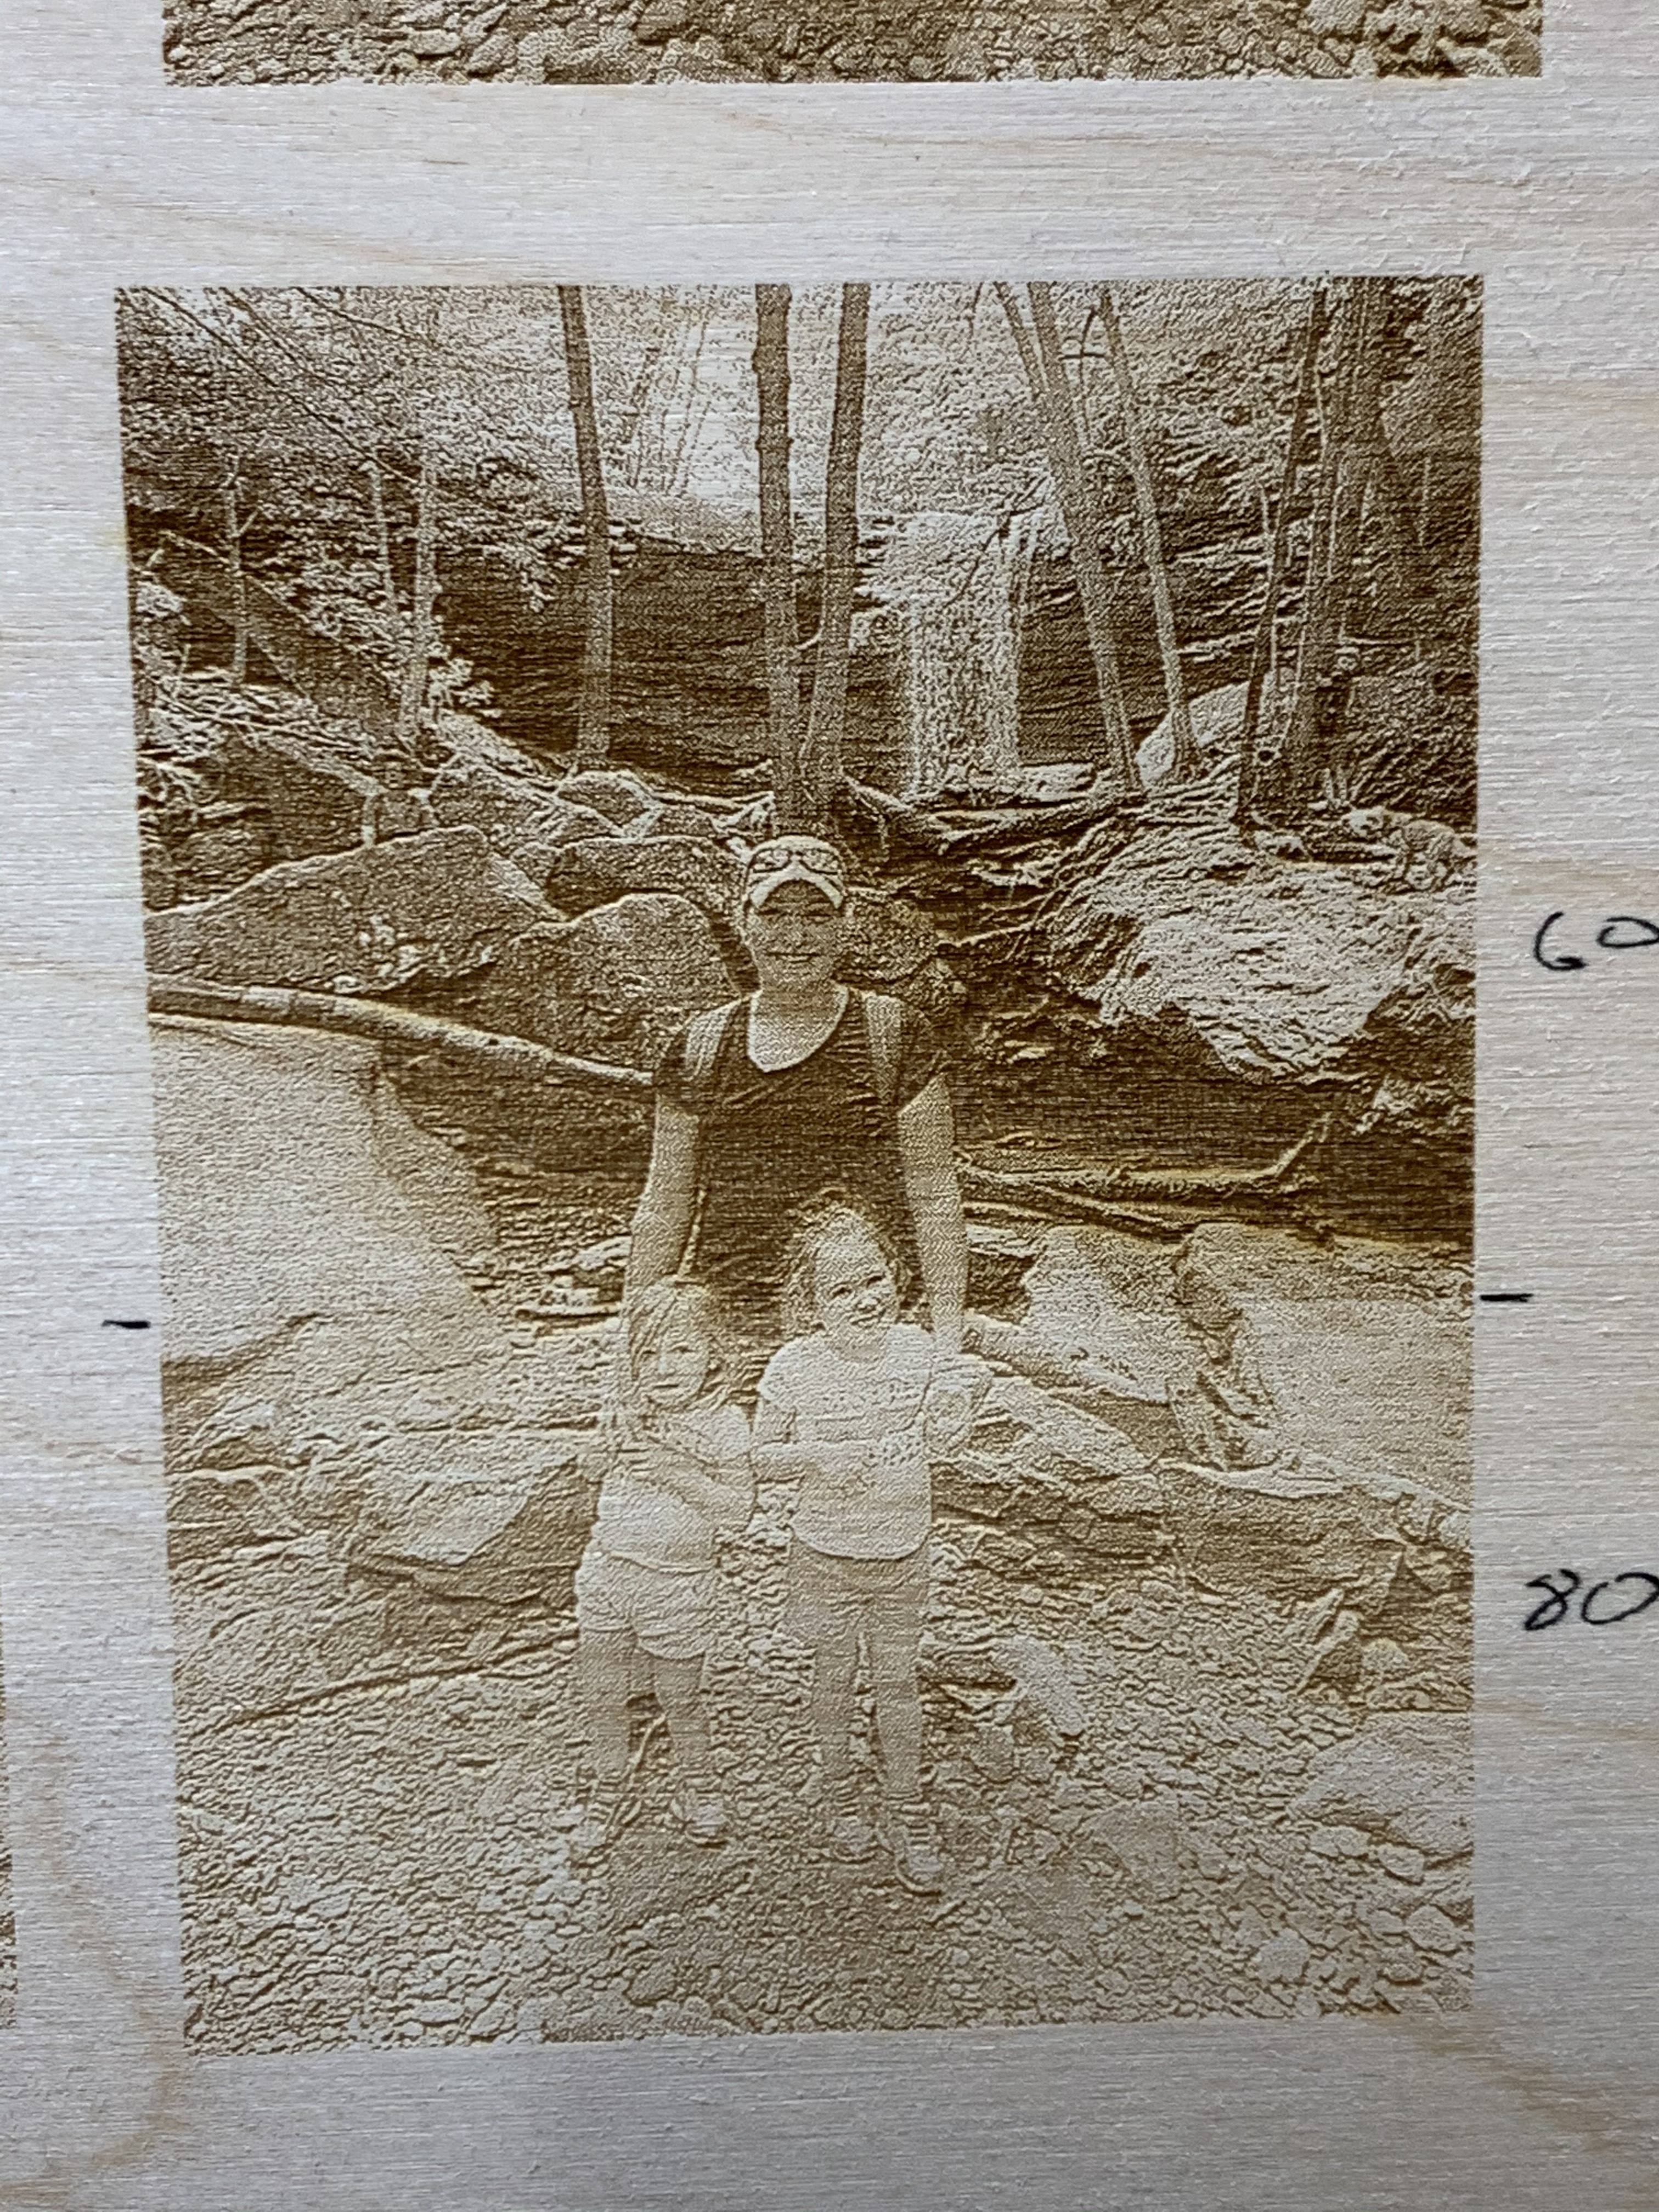
The image above has all the same settings except the bottom half of the picture was at 80mm/s and the top half was at 60mm/s. I think 80mm/s was probably the best. At 60 there’s some noticeable browning going on.
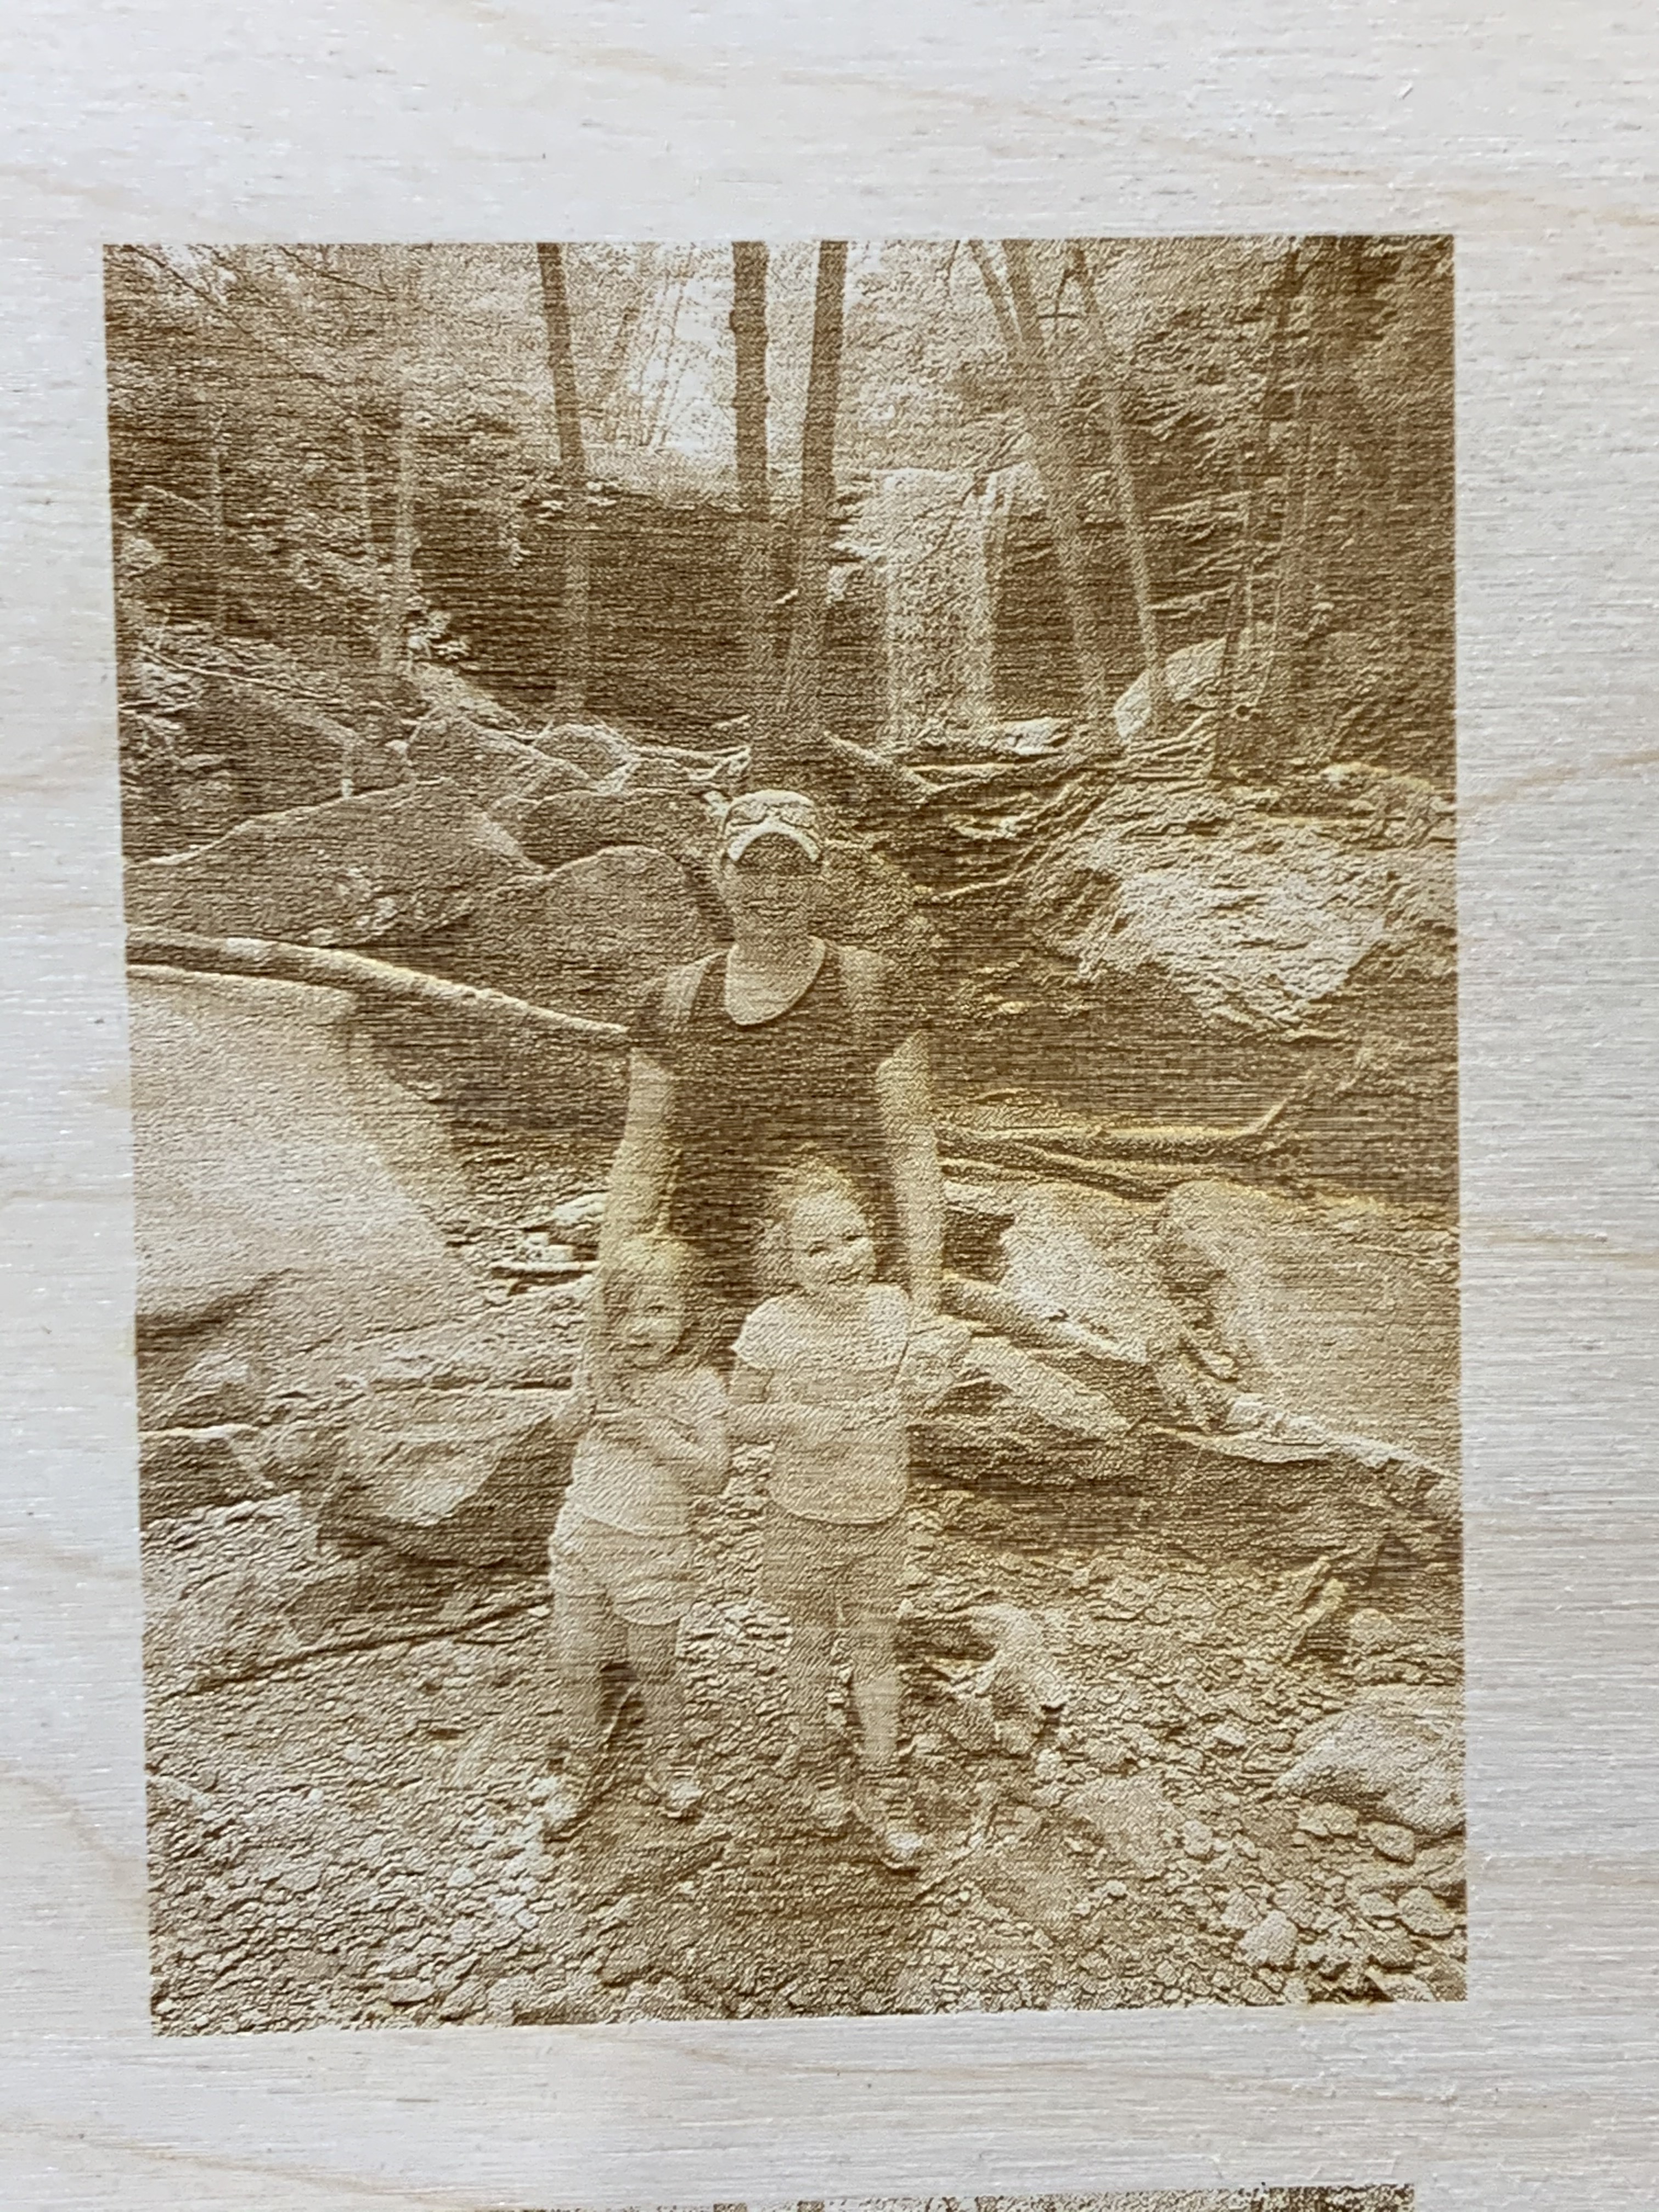
And finally here is the result at 60mm/s, no adjustments at all on the shape layer.
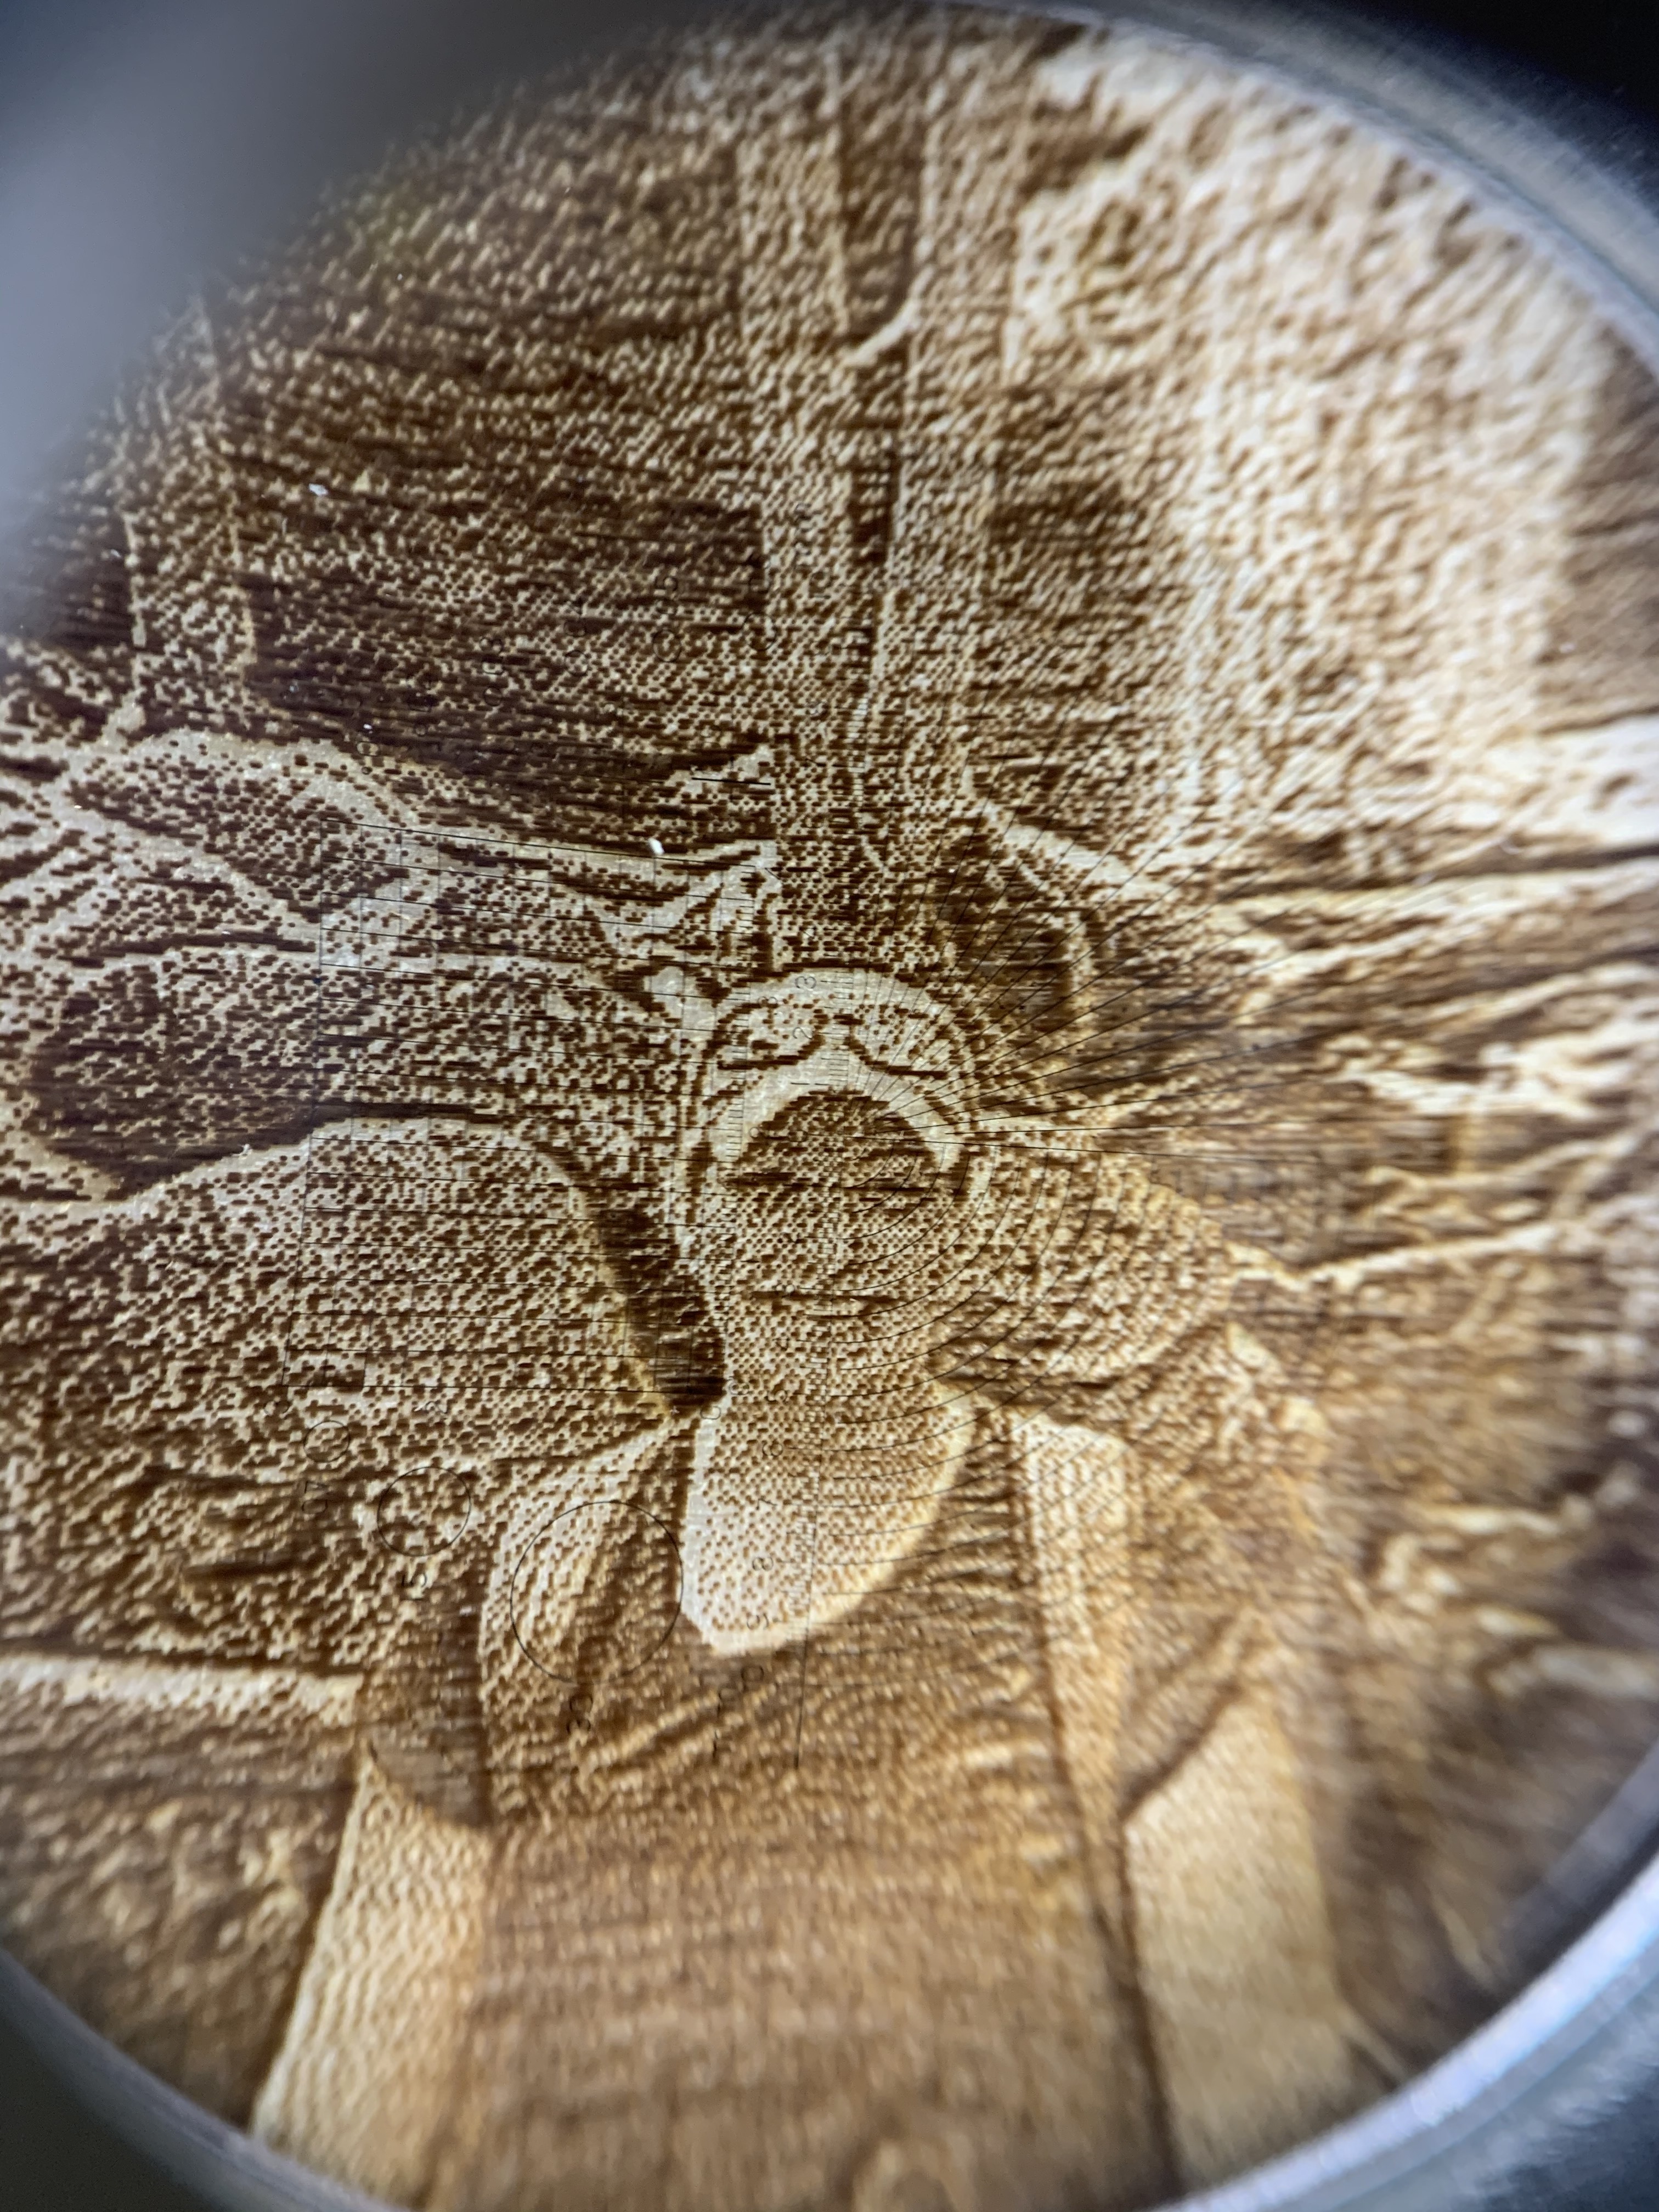
And this is a closeup of the second picture above that was done half 60mm/s half 80mm/s. You can see that even at 254dpi I’m not getting any overburn. So obviously pretty close to a .1mm dot.
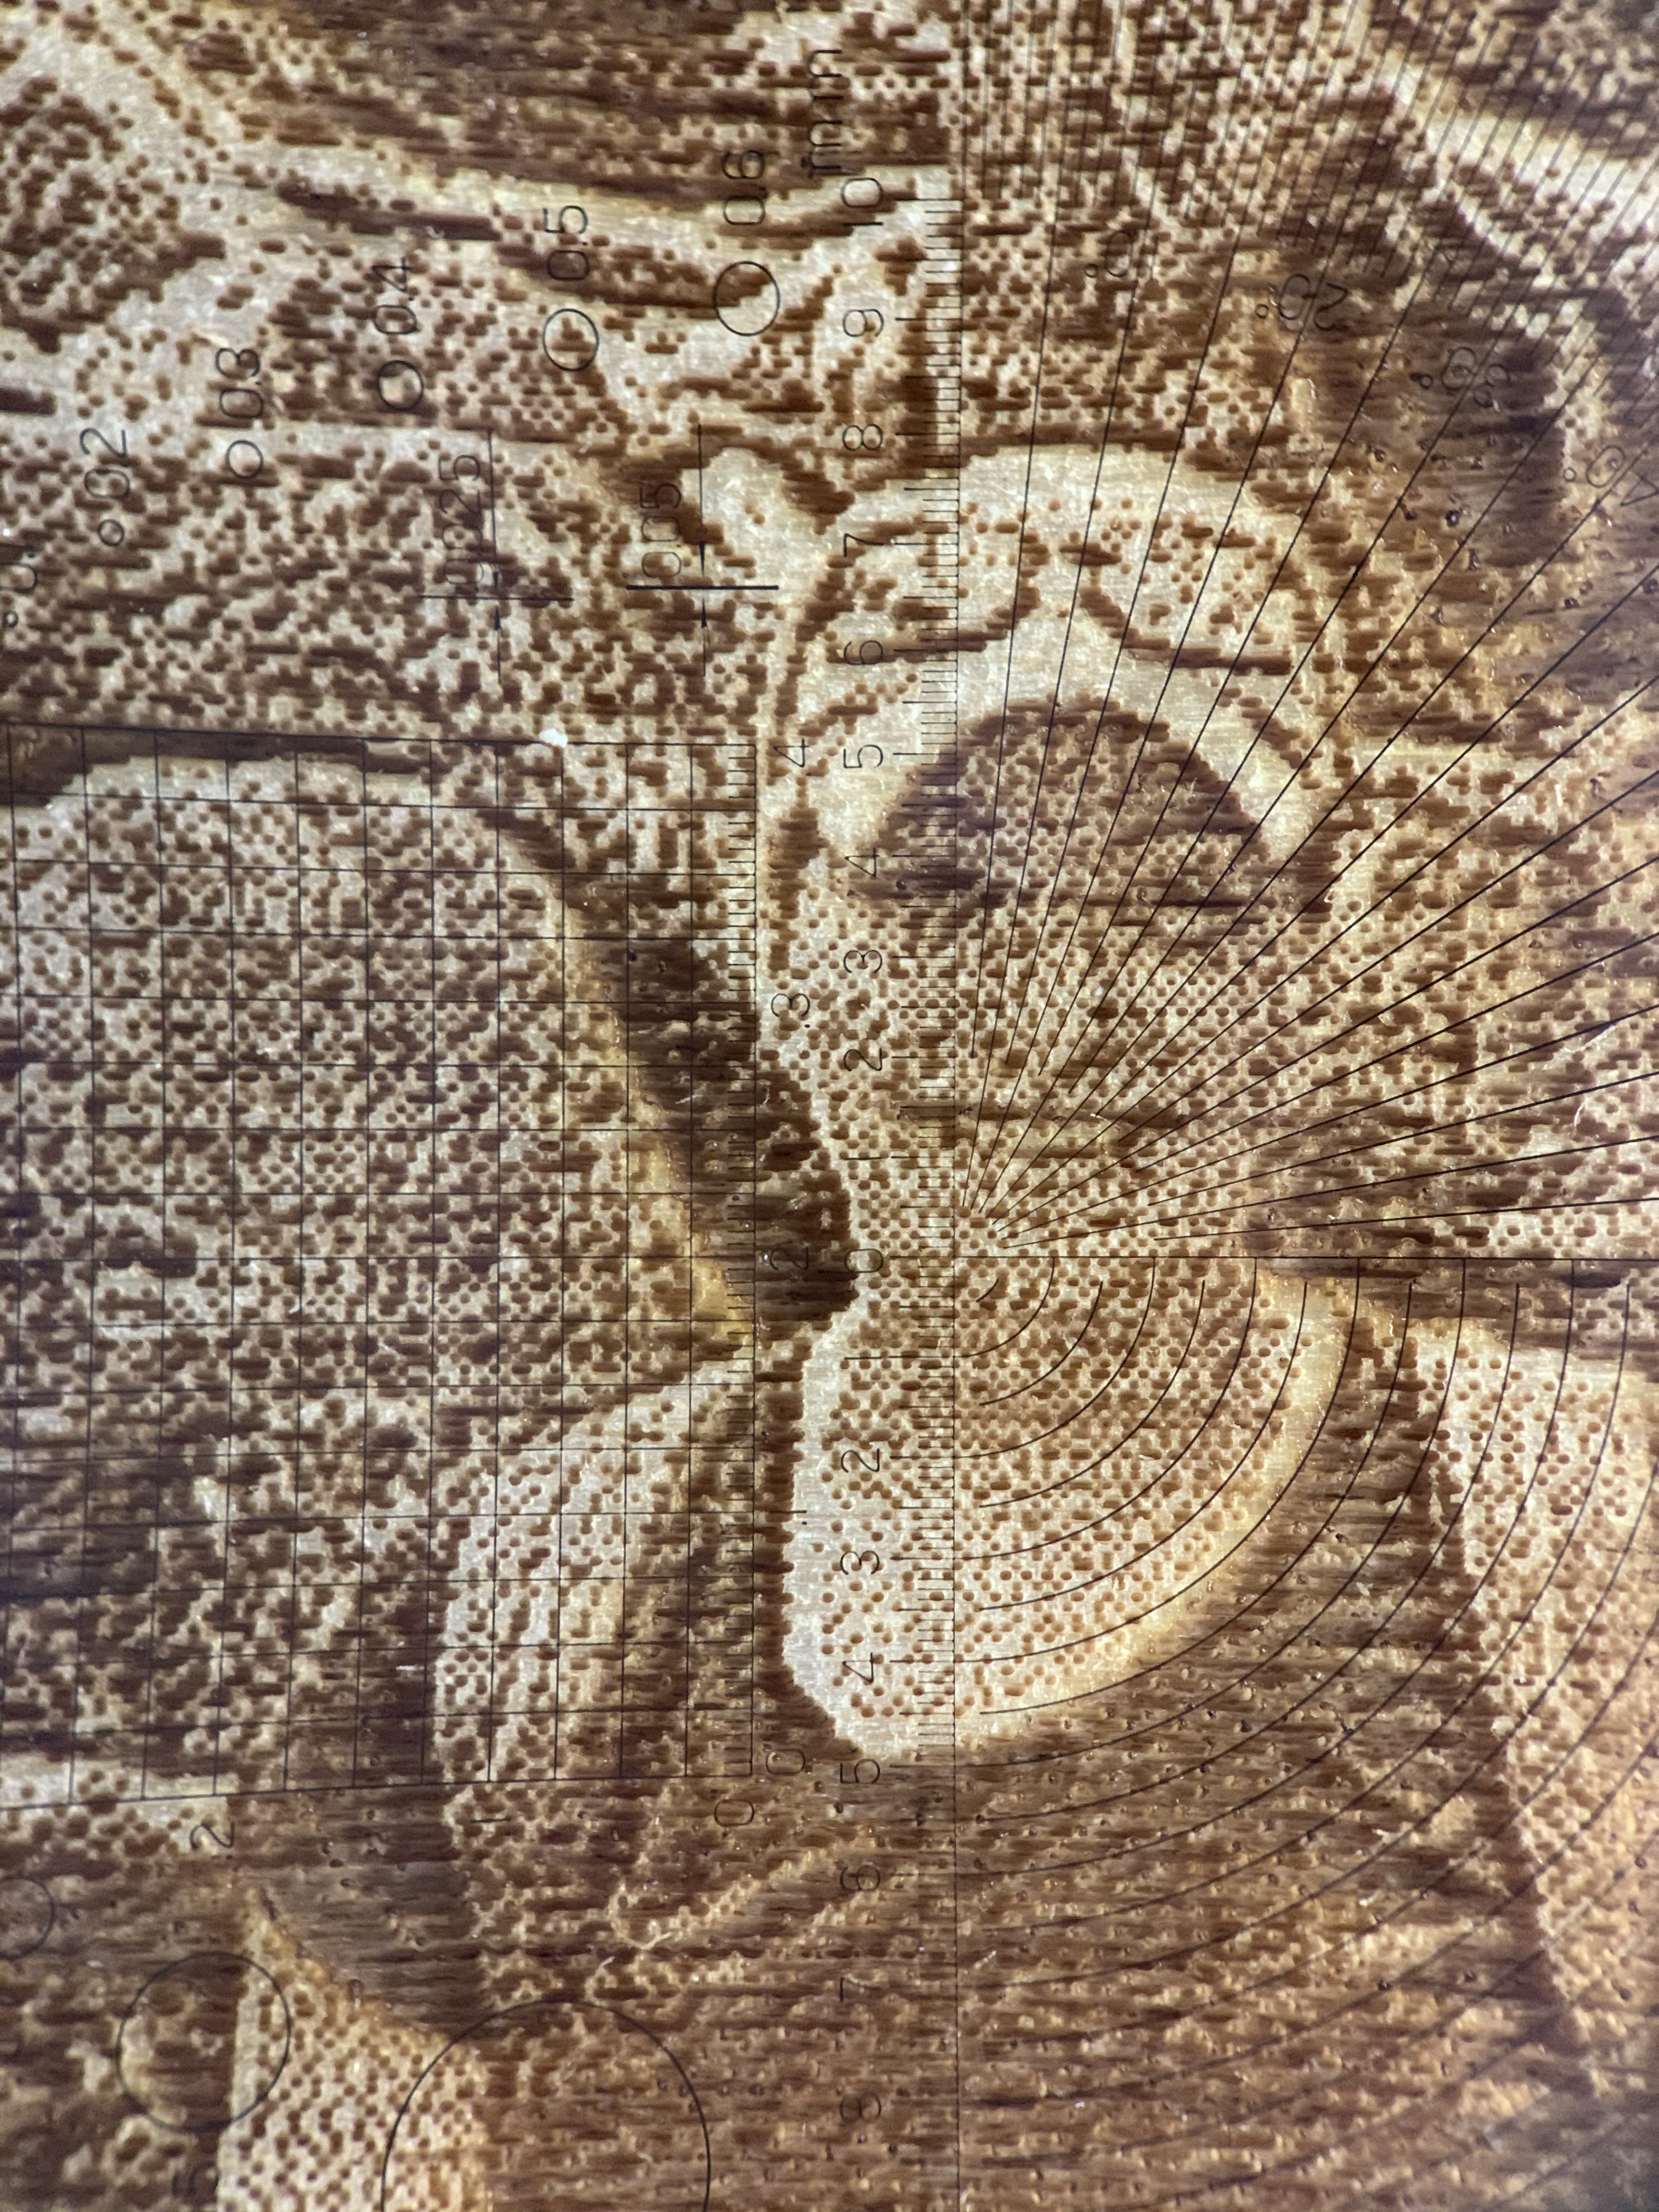
And here’s a slightly more magnified photo of the one above. Notice on the brim of the cap you can see the .1mm reticle spacing. The takeaway here is that I’ve got nice, crisp, dark dots with minimal halo.
If your original photo was higher resolution you’d obviously have more original dots to work with.
Oh, and all this is on a sheet of birch plywood.
1 Like
In the edit window, images are scaled up using nearest-neighbor sampling just because it’s fast. When sent to the laser, they’re bilinear resampled to the requested output size, then dithered from that. I plan to make it bicubic or lancosz at some point, but having to deal with arbitrary orientations makes that harder to code.