So I haven’t done much marking on Stainless Steel. Usually just small engraving on some pendant samples or removing powder coat. I discovered that I can “mark” on plain stainless steel tumblers.
So last night I figured I’d burn one of my pendants for my nephews daughter.
She’s like 8.
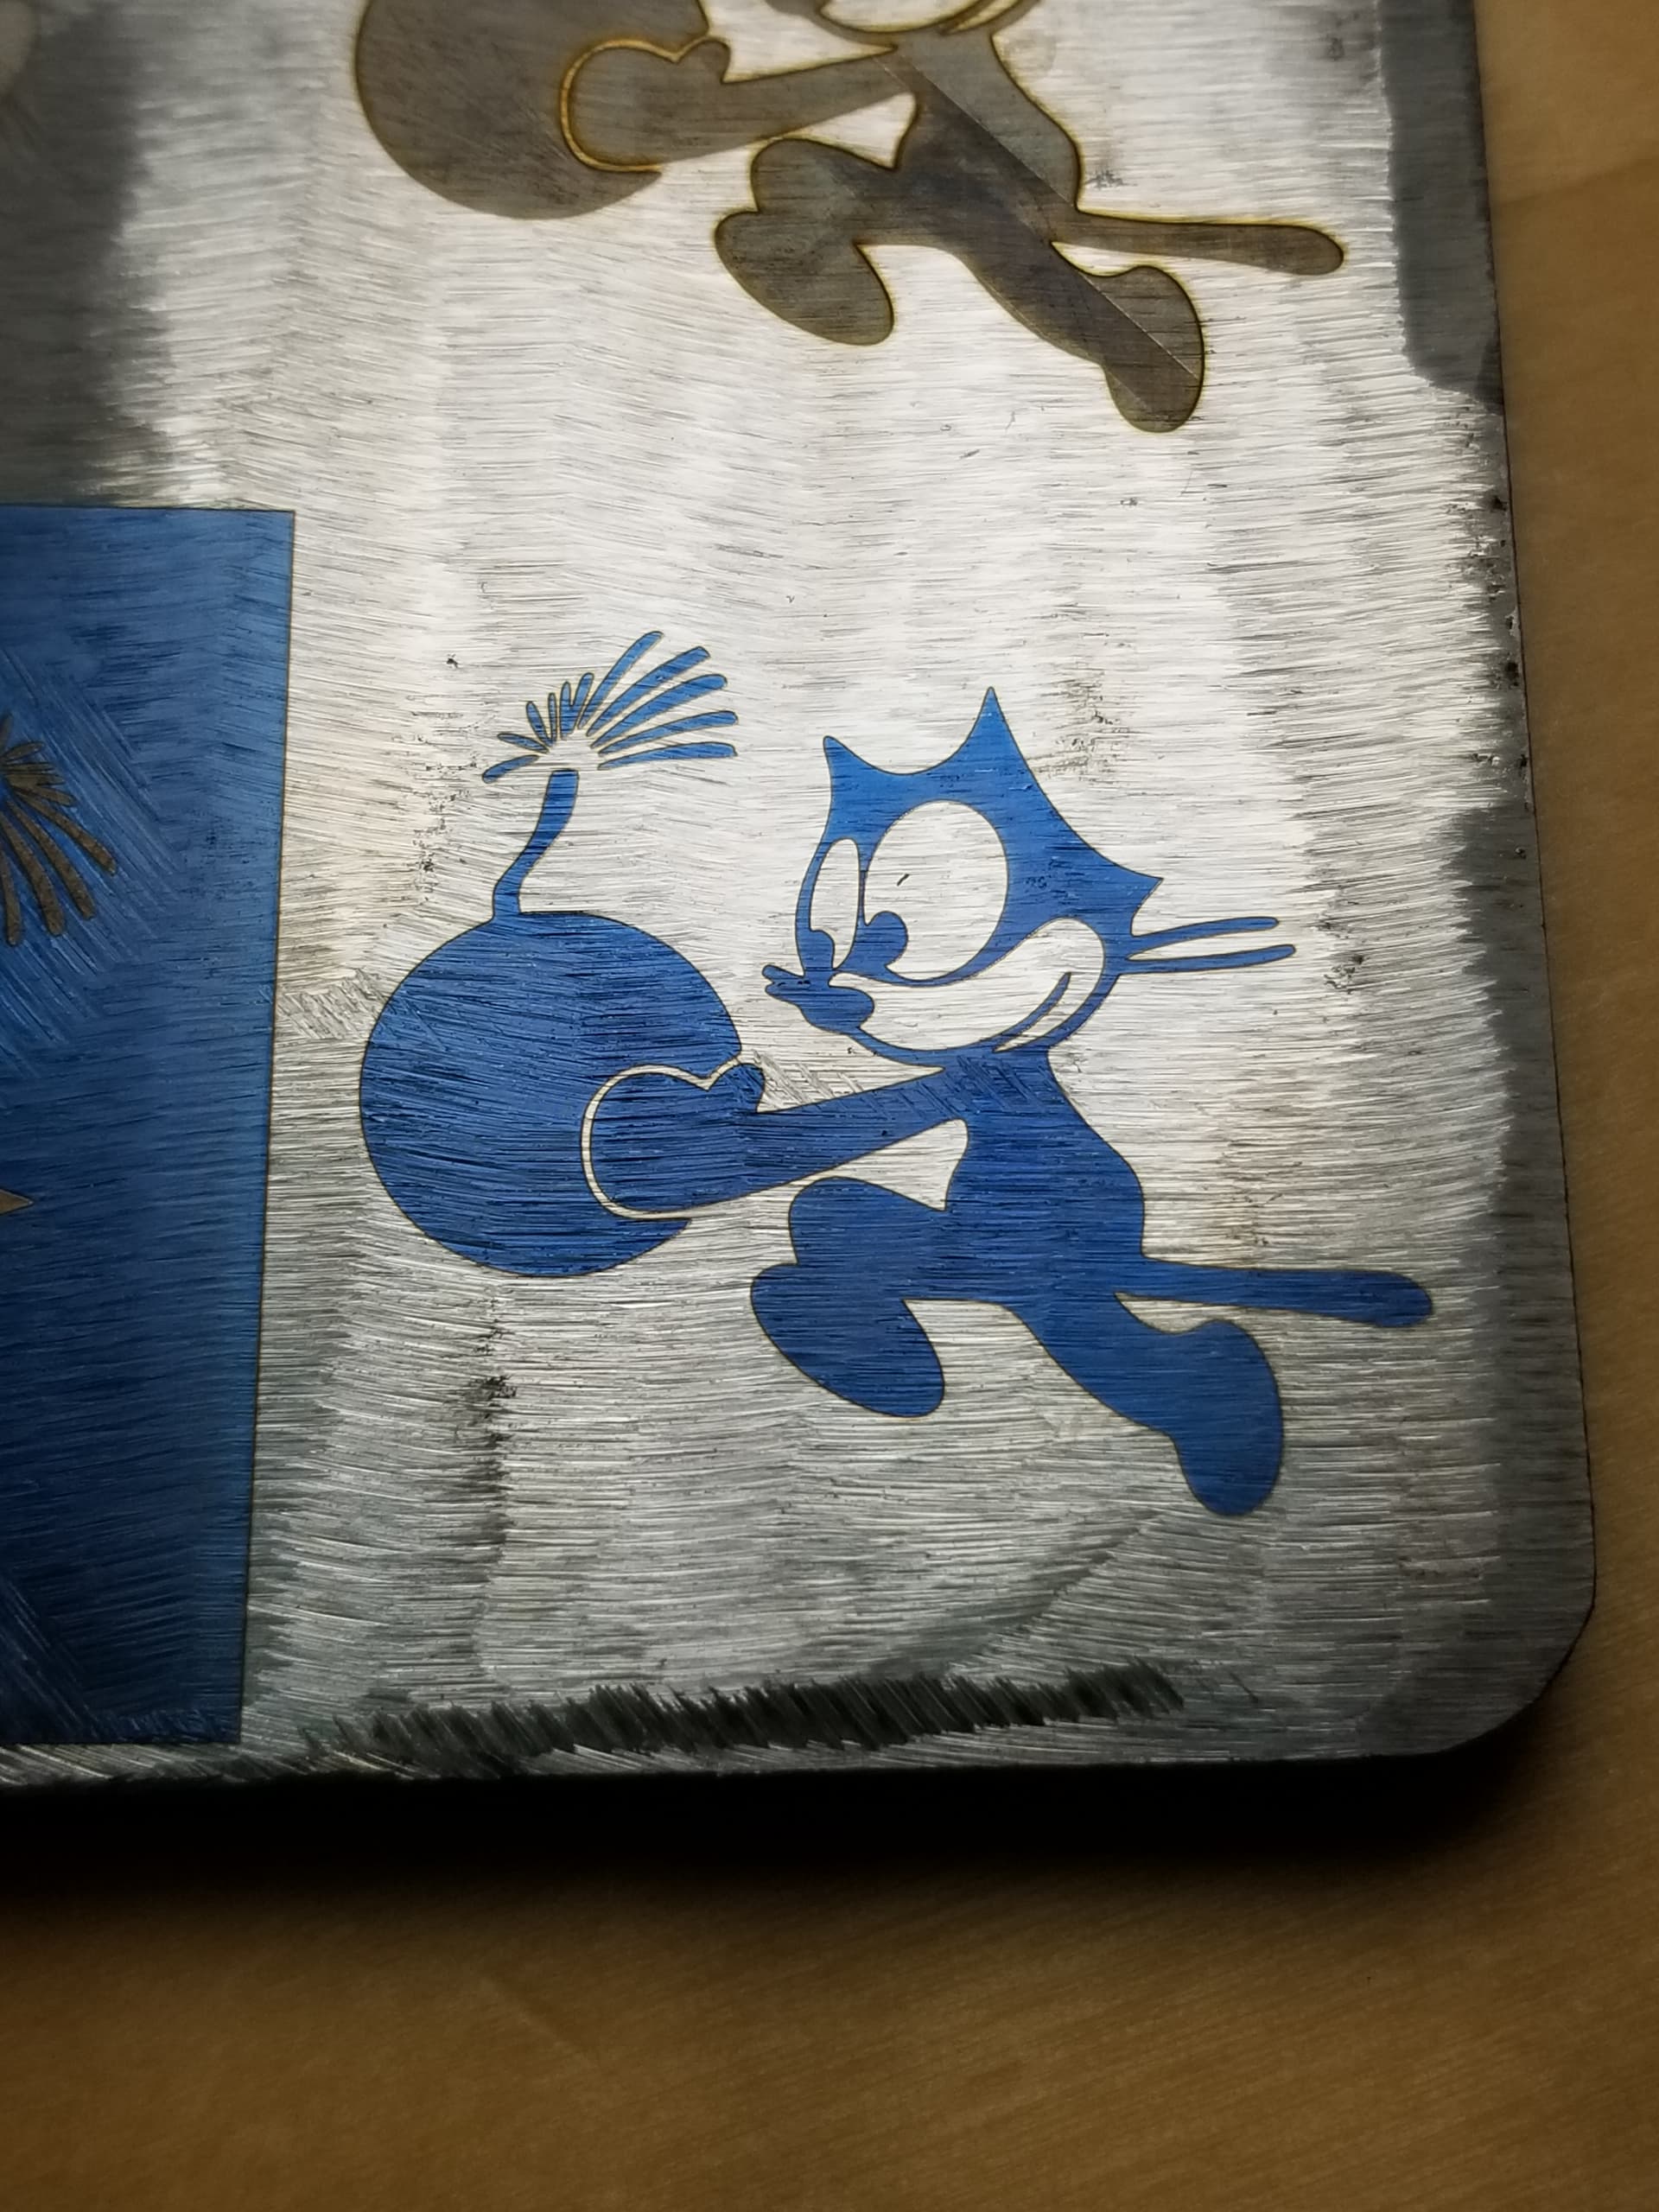
I laid it down polished side up, aligned it, and ran her name on it. Flipped it over, and did a silhouette of a unicorn on it. It had a purple look to it -vs- the black look I was expecting that I had seen on my couple of scrap stainless steel tumblers.
It was no big deal. My wife saw it, and she said how did you do purple. I shrugged my shoulders and told her I didn’t have a clue.
Having said all this, do all stainless steel products “mark” the same? I think not, since I got purple -vs- the black I was expecting.
Are you able to on demand get purple when you want it or other colors?
Not that I’m aware of… I did material tests on stainless dog tags and got some relatively good looking colors…
If I apply the same settings to a piece of the supposedly same material, but thicker… I don’t get the same color range I did for the thinner piece.
I prefer the term annealing…
It does make sense… you are heating the metal, whatever the heat is for the color needs to be reproduced. Stainless conducts heat very well. The thicker and larger the piece of metal, the more energy required to get that area up to temperature… You also induce warpage in sheets.
You should be able to find a lower frequency that will give you black markings… Run the material test on the mug… Use the same speed and vary the power and frequency values…
You will be more limited without the ability to change the q-pulse width… but you can still work with the stainless mugs.
This is a chunk of steel I picked up for nothing at the local steel supply yard…
It’s not really color, it’s the interference of the light waves bouncing off different layers and the mixing causes the change in frequency meaning a change in reflected color. If you view it from a different angle, sometimes the whole thing disappears…
There is a video out there somewhere that he figured out the CMYB, separated the colors in the photo in one of the applications, burnt them onto stainless and ended up with a pretty good color image…
Thanks all. Yeah, I had a Dollar Tree SS Tumbler that had been sitting on a shelf for 6 months. I ran it on the fiber, using that dude that is all into lasers, and it was pitch black. That was nice. matter of fact, I have 25 non-coated SS tumblers arriving Friday. I’m going to create some samples for my Florida folks and a couple local too.
I think having multiple colors on a tumbler would be Boss.
I mentioned the limitations of the machine you purchased and this is one of them… you can do a pretty limited amount of colors if you can’t adjust the pulse width…
I believe you pulse width is about 150nS… this is a thin stainless dog tag… 125kHz with an 8nS pulse, varying the speed and interval…
Another thing that seems to work, is being a bit out of focus…
Thanks Jack. I’ll run that material test on one of my SS Tumb’s when they come in. I’ve got a 1/2" steel plate here to play with as well, but I think the results would be different on Stainless Steel -vs- a Steel Plate that I have. Maybe? Maybe not.
Different annealing gives different colors… I’ve been told that doing this with steel can’t compare to the range available with stainless steel. I’ve found that not only thickness plays a big role in getting the right color you’re looking for but also the type of stainless…
Don’t be afraid to walk away and think about what’s happening at the material end.
Fiber is a pulse laser, most other hobby lasers are continuous wave (CW). The beam or heat is applied in pulses to the material… some say the pules/mm relates more to how much heat is applied than power… IMHO I think frequency and pulse rate seem to be more of an issue.
On the steel plate, you can see where I’ve ground off the previous image… Theoretically, you can heat stainless back up and the annealed image will disappear, since the annealing has been removed… I don’t even have the ability to heat a part of it correctly with a torch and have it look like new … so I’ve never attempted it…
Good luck… hopefully you can start teaching the rest of us on how to drive these things…
Yep, I’m new to lasers but an old hand at various metals, hense the “Tinhack” name. Just to confirm that the temperature is what brings out the colors. And it will be different for different metals and thicknesses. There’s differnt ways to acheave the temperatures needed to make colors. Even CW lasers can heat metal. It’s done by slowing or speeding up the movement. If you really want to see vibrant colors, check out Titanium.
I just think I could really create some nice artwork if the metal will allow it on my 20oz Tumbs for Florida, and elsewhere.
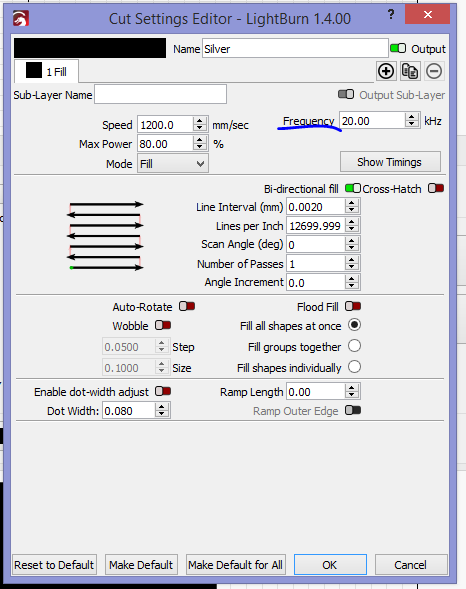
Right now, my settings for “marking” or “annealing” is 2 layers. Each at 600 speed, 60 power, and 25 Freq. 0.254 LPI, and one layer with +45, and the other -45 Degrees Hatches. This was based on Laser Everything’s YT page about getting rich deep blacks on SS.
Having said that, I’d like to get 3 or 4 different colors, but all I get by messing with Speed “slower or faster”, is just a lighter shade of Black. No yellows, purple, blue, etc… Could it be that this SS Tumbler from Dollar Tree doesn’t have the chemical makeup to give this to me?
It’s not a deal breaker, but I sure would like to create a logo with 3 or 4 colors in the SS… That would be wild.
Usually it’s dpi, frequency and pulse width… you can change your dpi and frequency, but not the pulse width…
The dog tags I posted, has the settings I used in that materials test…
Just saying they operate differently… there are co2 lasers that cut metal, but they are out of my price range…
My fibers pulse is 18kW… not to shabby for a fiber smaller than a human hair…
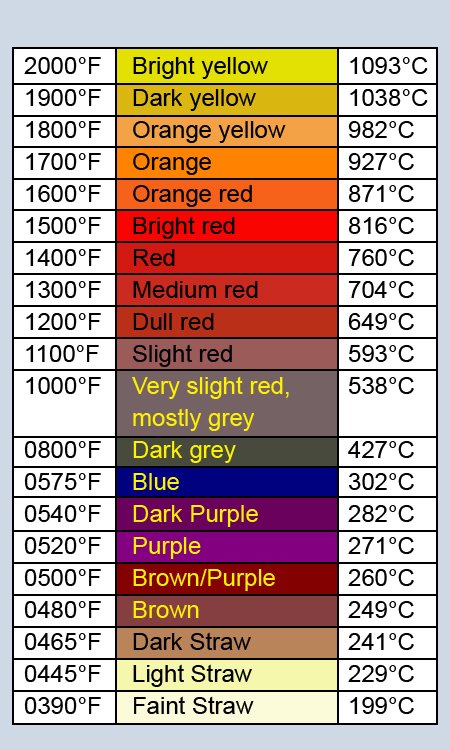
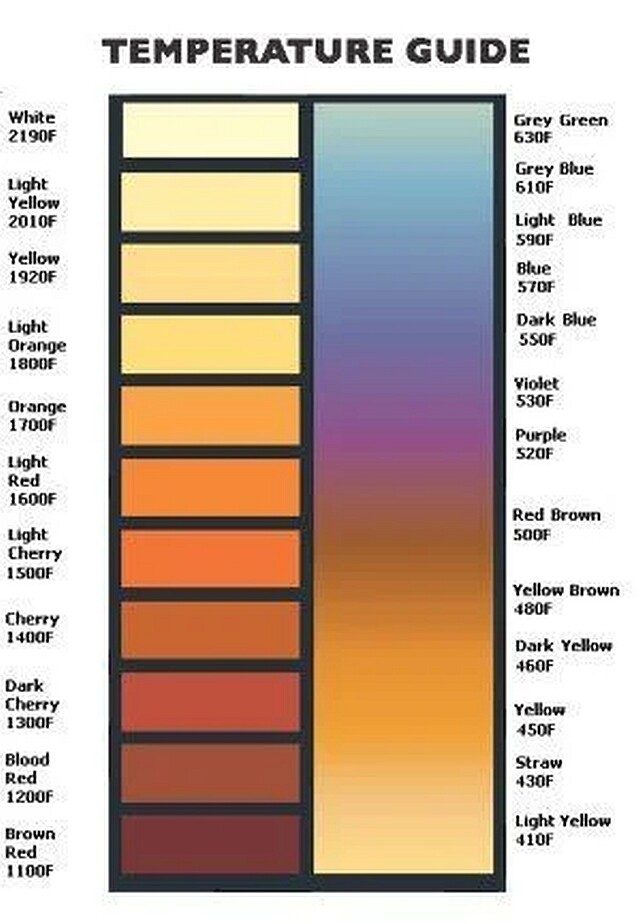
Here are some values and colors… the problem is translating to the proper heat range into fiber settings to produce these surface temperatures… maybe @Tinhack can enlighten us…?
The temperatures above 1000F is when the metal is acually glowing at that color. Typically, you’ll want temps below 700f. The right-hand part of the chart below is probably a better representation of colors you’ll get on various steels. As you can see, the temps are pretty close together.
Appreciate all the info. I’m going to grab another one of those 5.00 SS Tumb’s from Dollar tree, and run a material test on it via LB. Since I can see on Jacks Dog Tag, it doesn’t have to be really large in size material wise. I should be able to run 3 or 4 test on this dummy tumb.
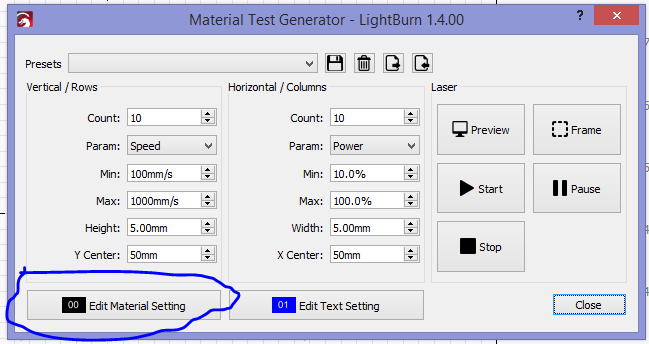
You can run several tests, and “Material test” works on the rotary pretty good. The labels are treated in a funny way regardless of how I set params in text settings it tries to run them as Whole objects/ flood fill. Suggest a 2mmx2mm pattern at first, save space and less time, when you get close then use the 5mmx5mm
I’m kind of lost here. I’ve got a SS Tumb on the rotary. I can mark it using these settings. 2000 speed, 35 power, 40 freq. 2 layers both are the same except for hatch. One is +45, the other is =45. Works great.
I create a new workspace. Create this material test, and the rotary turns a bit doing it’s thing, but nothing marks on it. I even placed an aluminum biz card in front of the laser, and it didn’t even mark it. The material test is speed / power. Frequency of 5.
What am I missing? I’ve never done a material test in my life. I have the premise in my head, but not getting any results.
Frequency of 5 doesn’t sound right.
Couple things I pay attention to on the rotary:
There are 2 tabs, material setting ad text setting, the material test grabs all unspecified settings from material and grabs text settings from text.
With 45 hatch on a rotary, you will run into problems. You should start with scans parallel with the axis unless you have a lot of small separate objects, then you need to have “Run whole objects, if possible” checked in the rotary window and you have to have “Fill Shapes individually” on the material layer.
Do not close out of the material test window without saving or you start over on the fields.
Yeah, I wouldn’t normally do 5 on frequency, but I was trying to get “something” to mark or heat up on the tumb. The settings in BOLD above are my current Marking settings for this SS Tumb. Marks great. Nice and black, and smooth. I’m just trying to get different colors on this tumbler. Maybe it’s not doable. If so, that’s fine.
I’m trying to get different degrees of heat via the material test file, but nothing happens. Like I mentioned. I can even place an aluminum biz card on top of where it’s working, and nothing even happens to it.
Let me ask this. Should I just start with a new work area? When you setup a material test pattern, where does the Frequency input come from? It doesn’t create a new layer anywhere that I can see.
Copy.
I use a cluttered work area, doesn’t matter. I do it so I have the layers available to match to the “Material settings” and “Text Settings”. The Frequency setting if you are not using it as one of the variables is set in the “Edit Material settings”