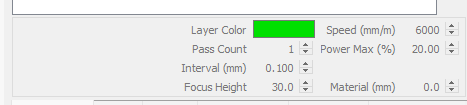
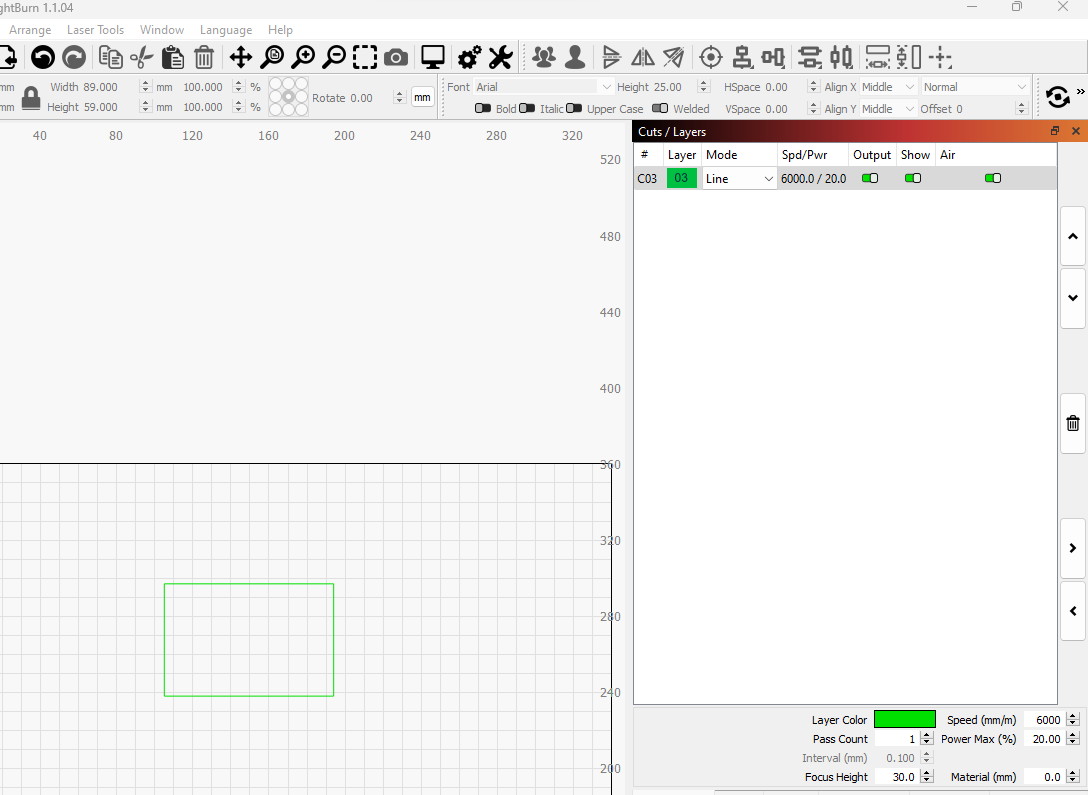
Hi, after some tinkering I’ve worked out how I can set the focus depth a.k.a. bed height, and that is possible only after drawing something on the document / canvas. This is not ideal when I am doing material tests etc. I guess all those boxes are disabled if no layer selected, could the bottom two not be disabled as they don’t vary by cutting layer? (Alternatively reclaim space and move focus height to device settings)
I struggled hard with this one as the documentation mentions nothing about depth and thickness in the beginners guide or other topics (or GRBL notes), z-step does mention it but not relevant, and if you’re trying to “setup your machine” that comes before adding graphics and objects etc. I’ve been too scared to let lightburn control the laser until this moment which is unnecessarily frustrating.
I have thi same issue with my Snapmaker A 350 I don’t know how to set the laser disttance from the material. I see you used the focus feature, I tried and it did not work for me…
I have to run several test with the laser module at different settings and this is very time consuming. I prefer to use Lightburn over Luban but this is a problem for me.
The auto measurement of thickness works reliably up to 50mm, and is repeatable to about 0.5mm, i initially used it via the touchscreen and cancelled the job just to find thickness, but now i use web browser and adjust x y coordinates in the address, e.g. my machine is ip ending 68 so I goto 192.168.0.68:8080/api/request_Laser_Material_Thickness?x=232&y=178&feedRate=1500
Shiny things work unreliably so add a piece of paper (0.1mm) or tape while measuring.
Tyeth, thanks for your reply, but I am not an expert on computers and don’t understand the second part the paragraph about using the web browser to adjust the xy coordinates.
For clarification: I don’ t know what the focus feature is measuring and when to set it. Is it measuring from the surface of the material or the bed height. Where is the Z height set when you click the focus button. Also there is a box to set the Z height manually. What determines the height to enter in that box
The focus height is from the laser toolhead on the Z-axis to the top of the bed (normally including a piece of paper when doing the automatic focus calibration where it cuts four sides of a square).
So after doing initial laser calibration on the touchscreen and it cutting the sheet of paper it told me my machine focus height and also says on the touchscreen 30mm focus height.
So thats 30mm to the top of bed. I enter that as focus height in lightburn. Then I select a layer and then the box for Material (to the right of focus) becomes enabled. I enter my material thickness there if it is more than 1 sheet of paper thick (0.1mm is a general rule for 1 sheet of paper).
I get the material thickness by visiting that URL in the browser and looking where it places the red dot (while measuring attempt happens). If it fails it takes up to 20seconds for the webpage to return (finish loading). If it succeeded then it’s only a couple of seconds (toolhead moves, red light comes on for 2seconds, measurement webpage finishes loading and shows result).
If the red dot wasnt over my object then I change bits of the URL (the x= and y= bits) to be closer to the object.
Page takes a while to load, and as it does the machine toolhead moves to about 2/3 of the way across the bed and the red light comes out one end of the toolhead, but it missed the object/wooden-spatula and instead was aligned over some marking tape.
Page finishes loading and reports success thickness=0.2mm
I know it measured the wrong thing because the red dot was over the masking tape attached to the bed, instead of the top of the object/wooden-spatula, and the thickness is unrealistic.
I estimate that the red dot is off by about 50mm down and 30mm left, so i adjust the webpage address arguments accordingly and the new url becomes http://192.168.0.68:8080/api/request_Laser_Material_Thickness?x=202&y=128&feedRate=1500
The webpage says 9mm so I set that as Material value in lightburn.
The only issue i found was the machine must be homed before doing a thickness calculation. Also lightburn and luban started using workspaces which changes the way coordinates work. This has meant if a job in lightburn was paused or stopped and then I tried to measure thickness it would need rehoming or resetting or the coordinates system (workspace number) updating before thickness measurement. When it went wrong once it tries to continue past the end of the axis (power off the machine or wait for command to finish)
The other bit of this topic is that the focus box can be used for a combined value of 39mm, to include the combined bed and material thicknesses/heights, instead of 30 focus and 9 material, and my confusion that the material box is disabled until a layer/object is selected.
If I understand you right, when you do the focus calibration (yours was 30mm) the only thing that will change is the material thickness? So no matter the material thickness, the laser focus is always going to be 30mm above the surface of the material. Once I set my material in place and ready to start engraving I lower the Z axis to almost touch the material and then start. Or because I calibrated the Z focus the Z axis can be at any height and when I start the job it will automatically turn laser on at 30mm.
One more question about this. In LB in the cut settings window, I think that is the right one but there is a Focus window. When do you press that button? I never see anything happen when I click it.
Thanks alot for your assistance.
Somewhere it was mentioned other snapmaker users dont use that button, or certain other buttons. Just ignore the bits that don’t work, or read a few posts on here related to snapmaker to find more tips.
You can also add custom buttons/macros like the Gcode to turn on Enclosure fan.