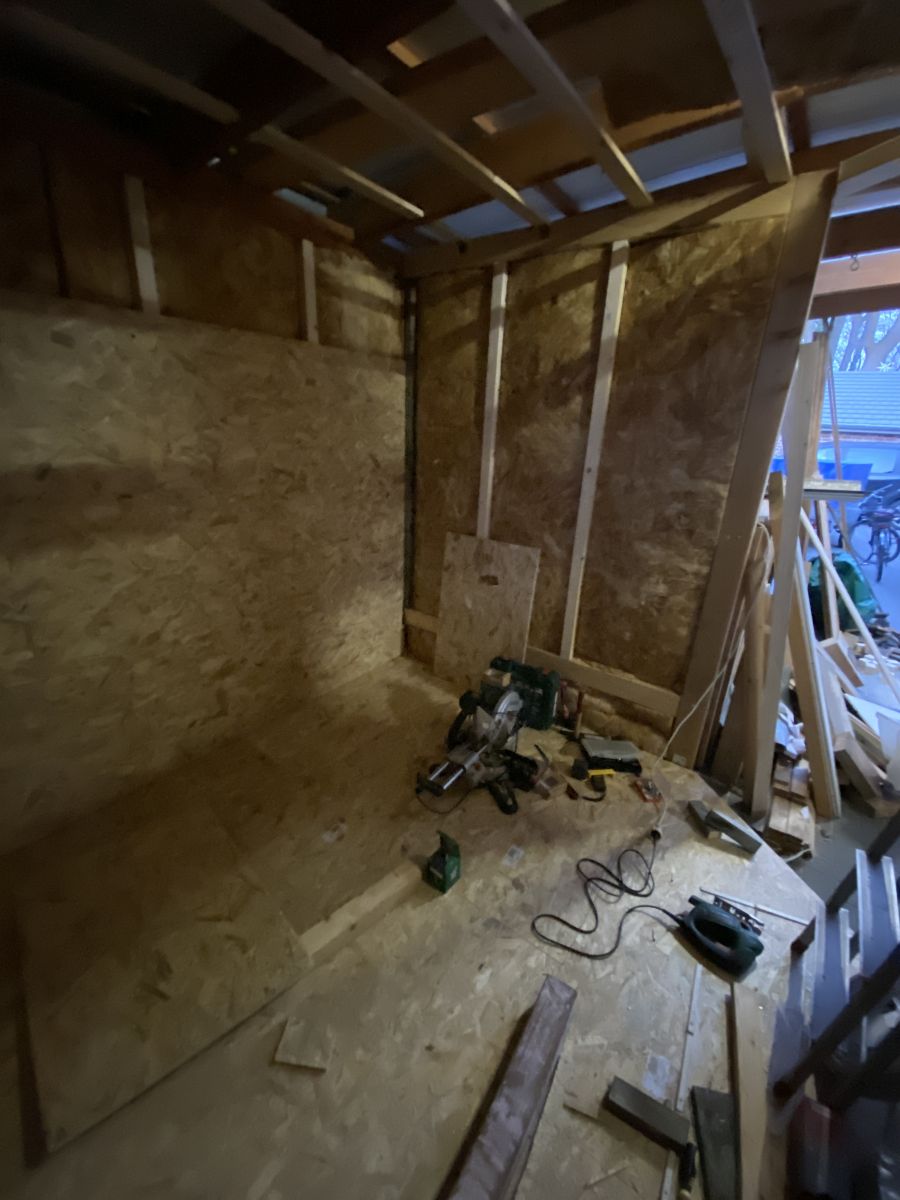
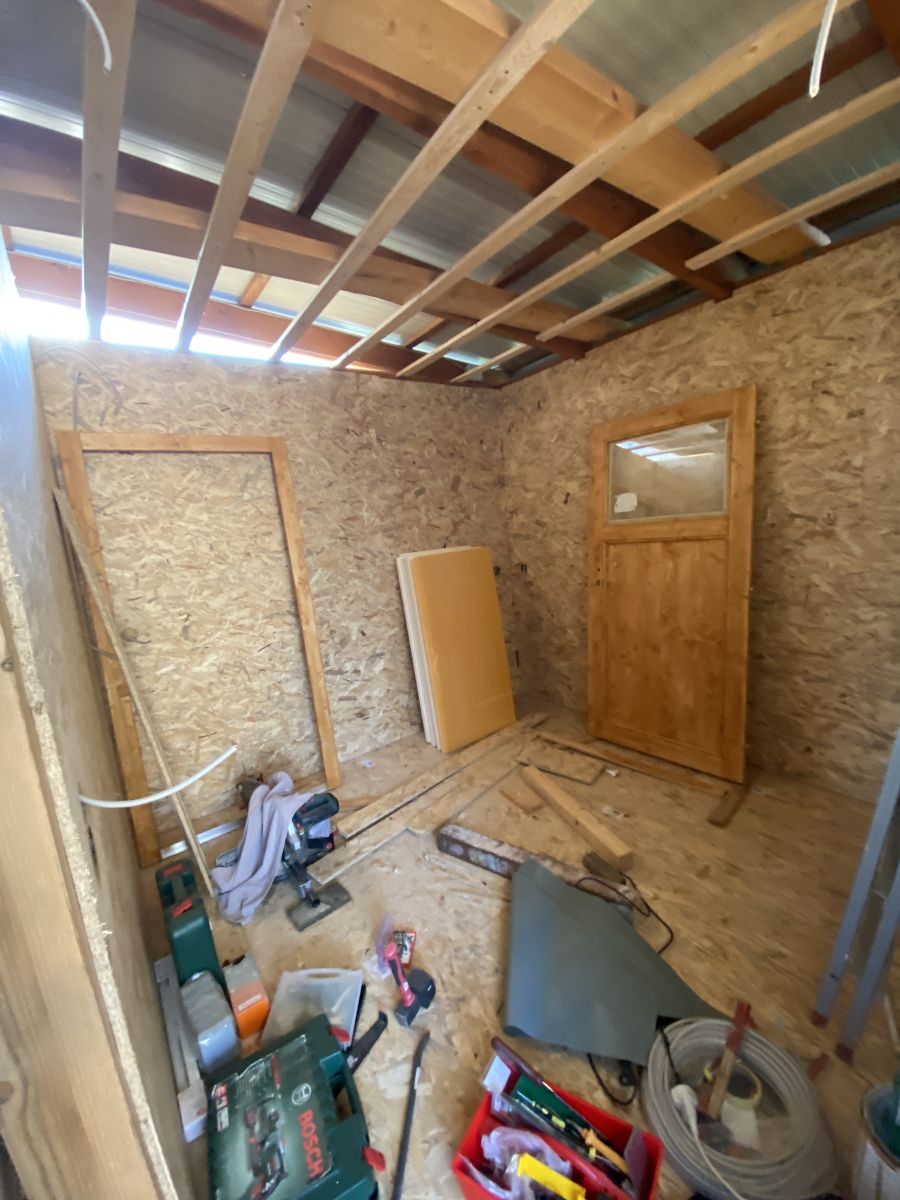
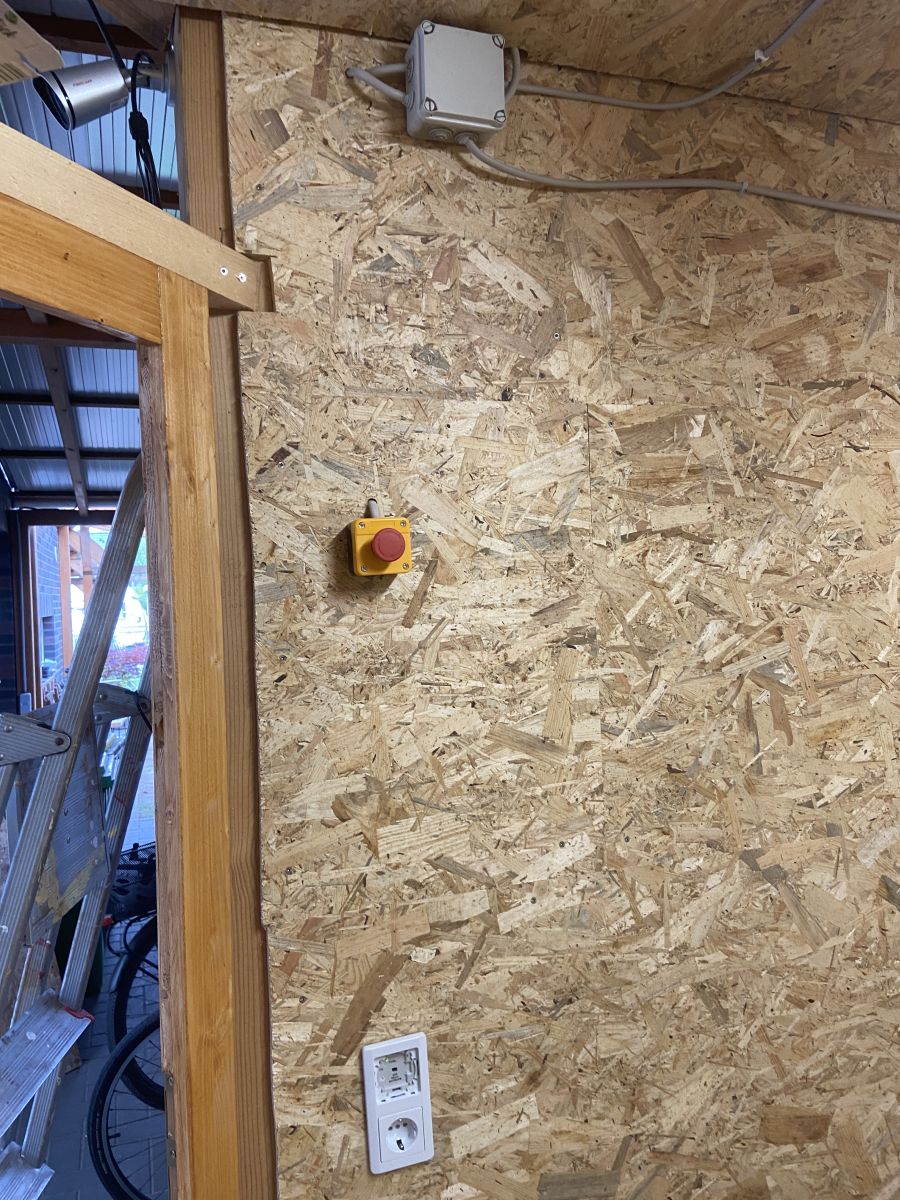
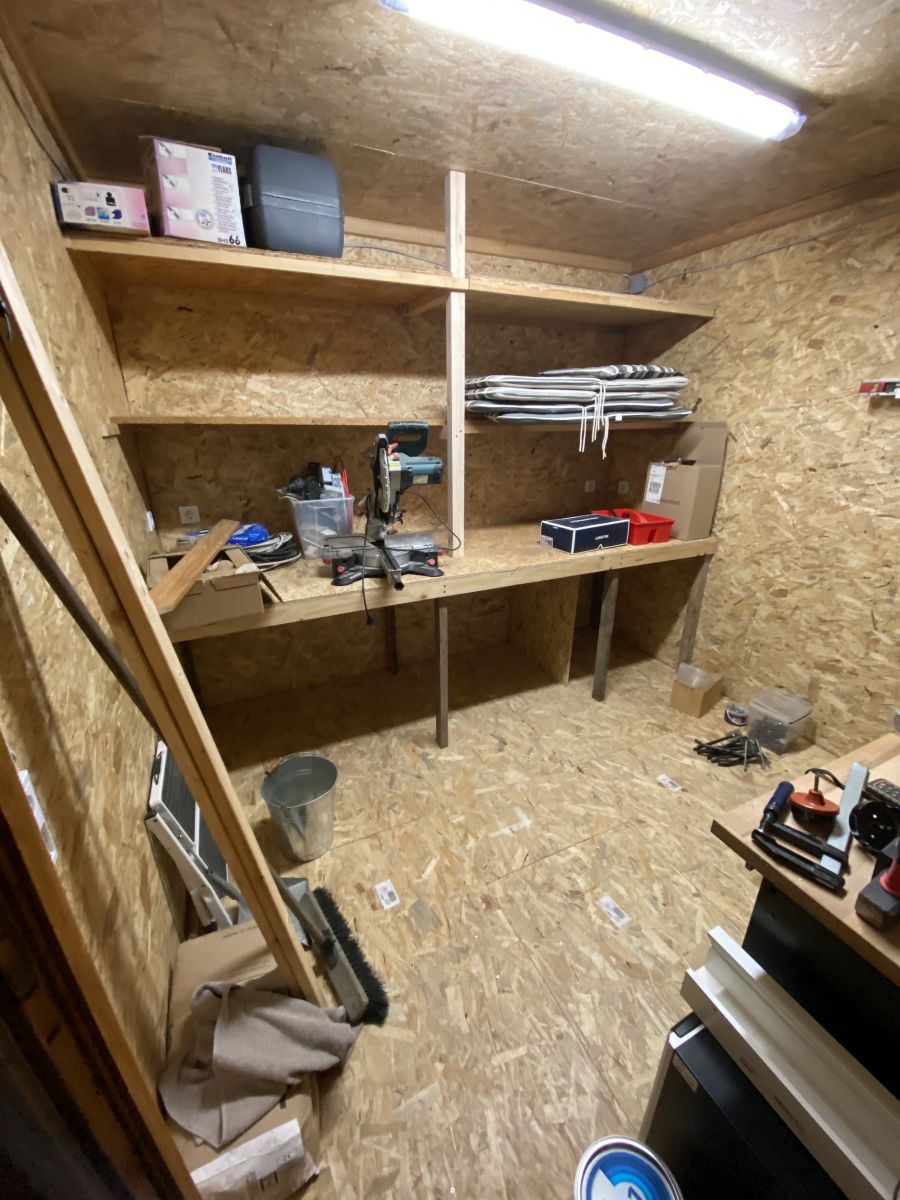
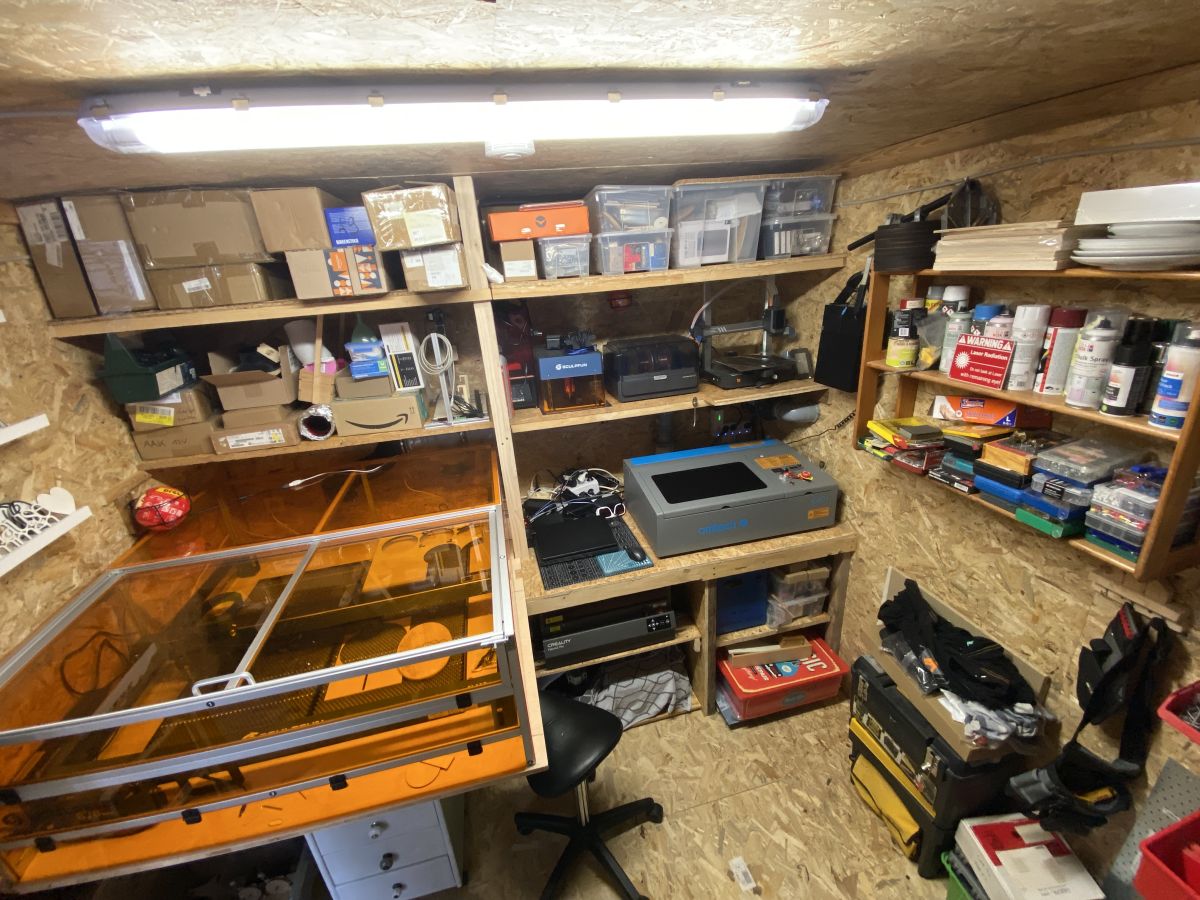
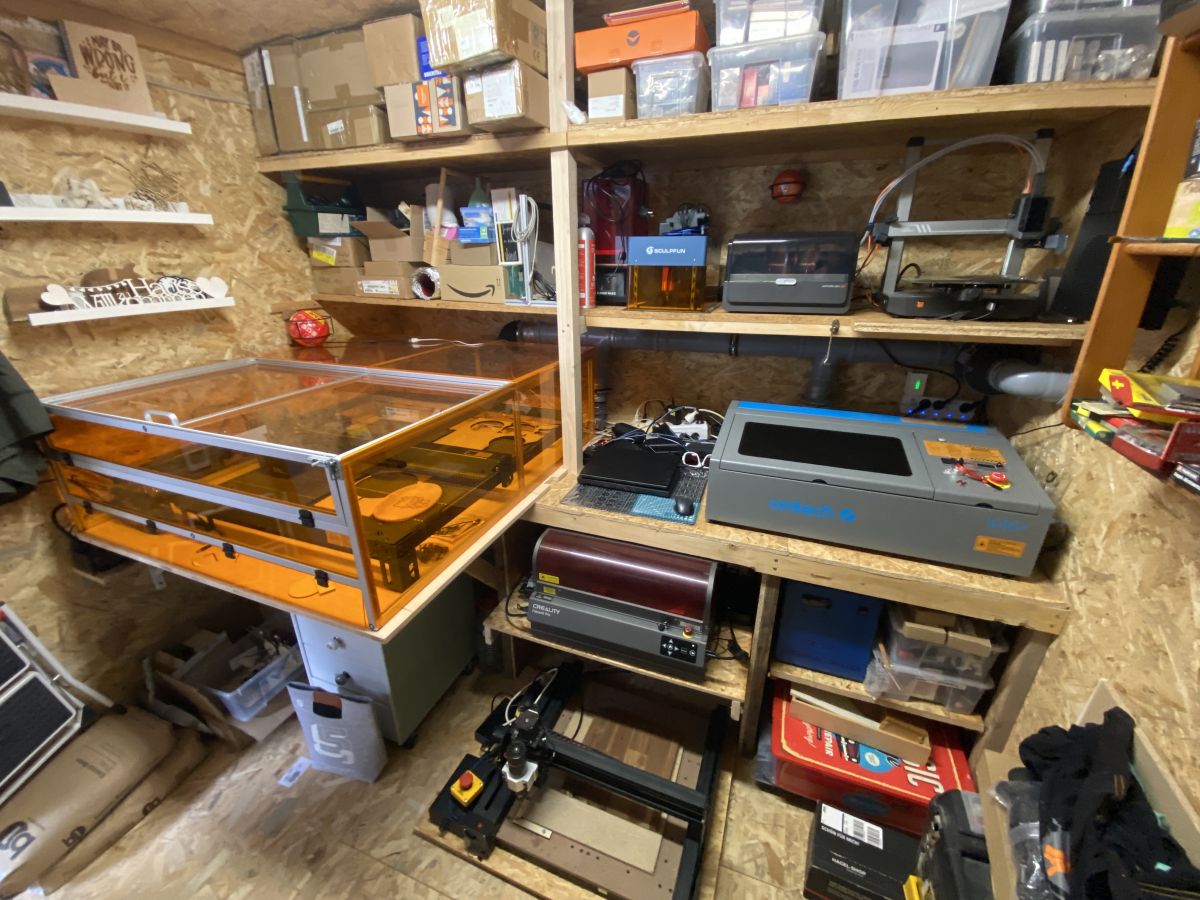
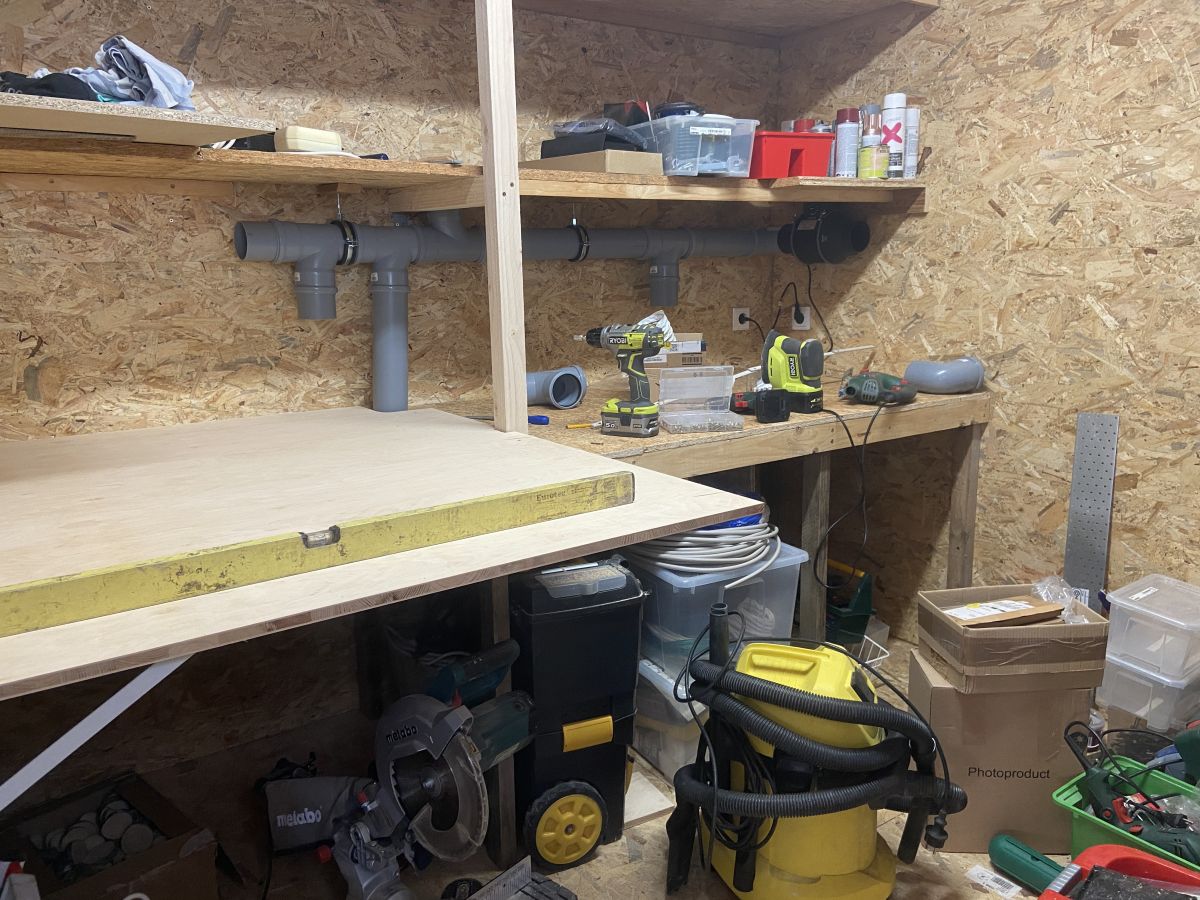
over the last few months, I was not that active in terms of new laser projects, since most of my machines were dismounted and waiting to be moved into the laser shed that I was building (in my free time beneath family and work). Now it’s somewhat finished (it will never be finished, but it’s usable ) and I can use the lasers again. Here are some pictures of it
I still have some more machines that I need to find some space for, since the shed was too small from the beginning (I knew that but there is not more space available).
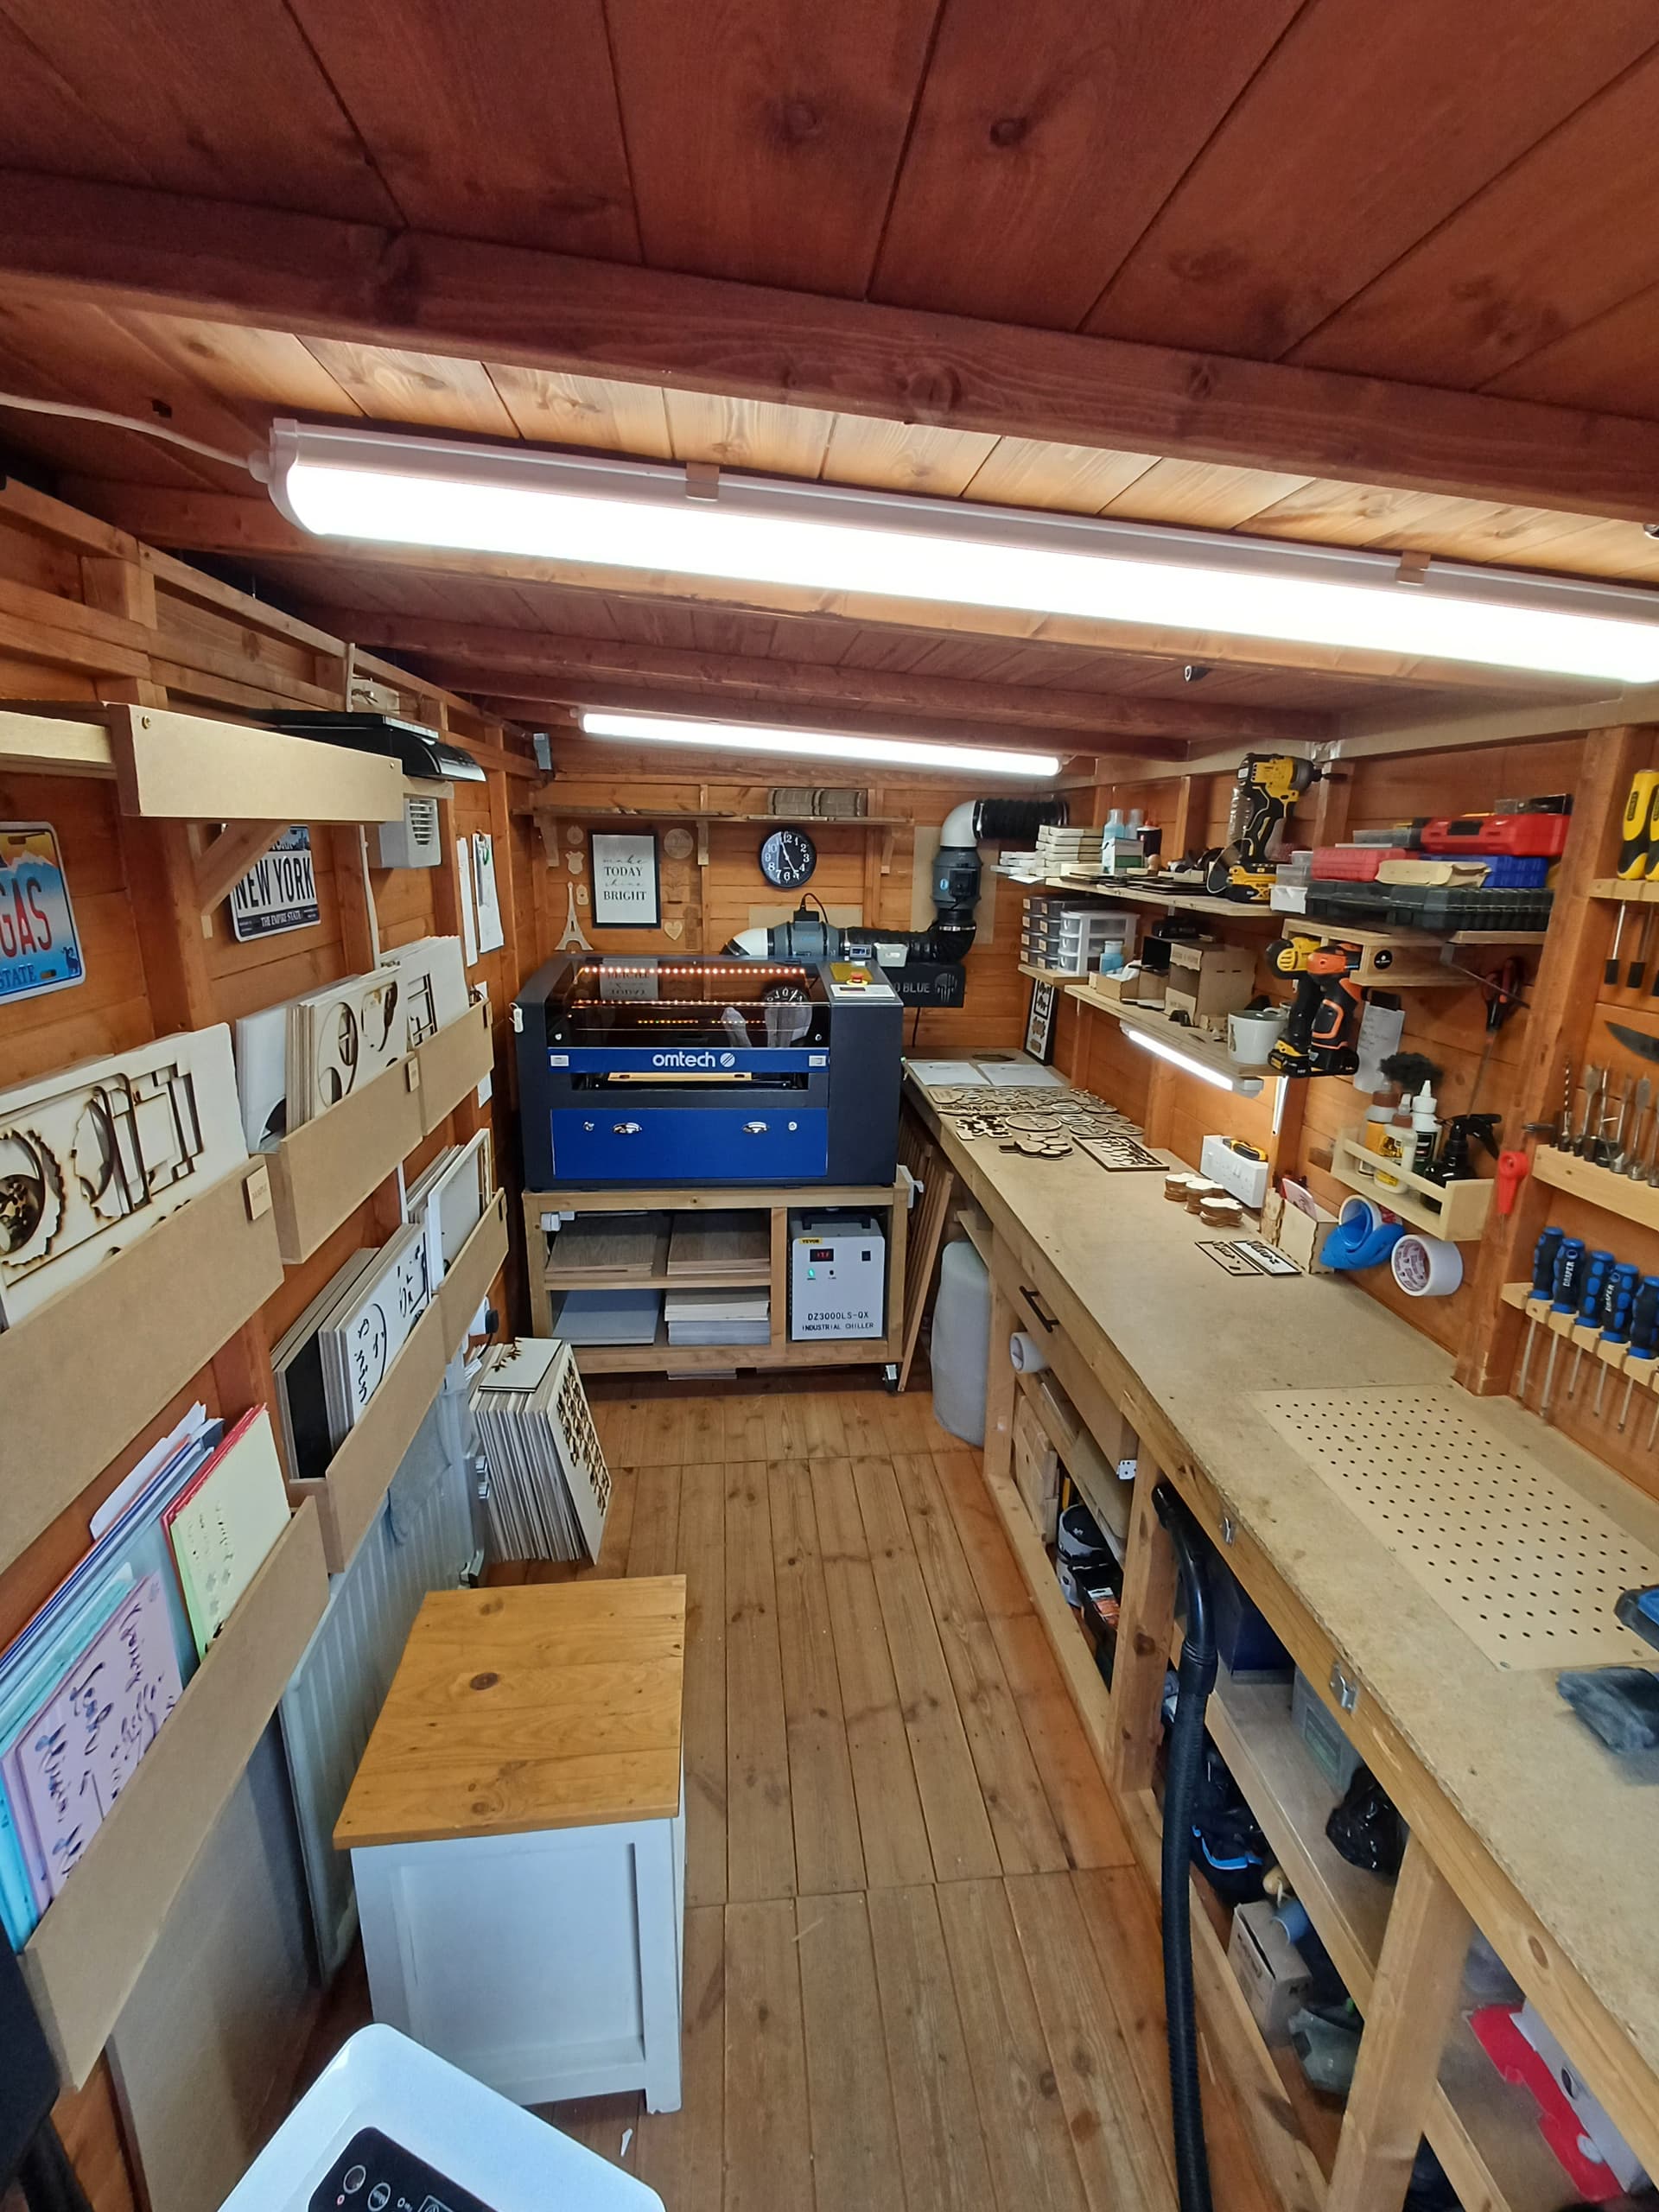
Features are:
main emergency power-off for machine power supply
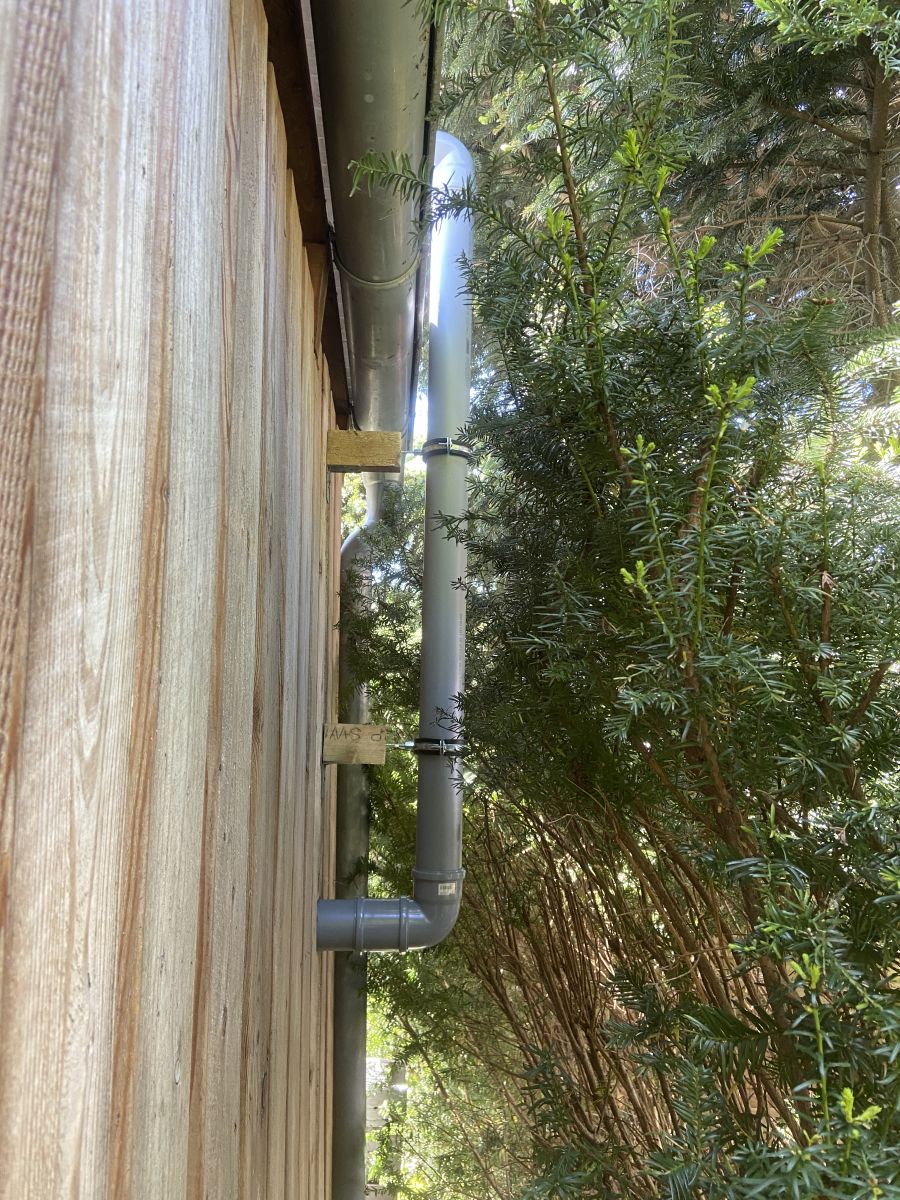
centralized exhaust system to connect multiple machines
drawers at full machine size to make them usable below the desk as well
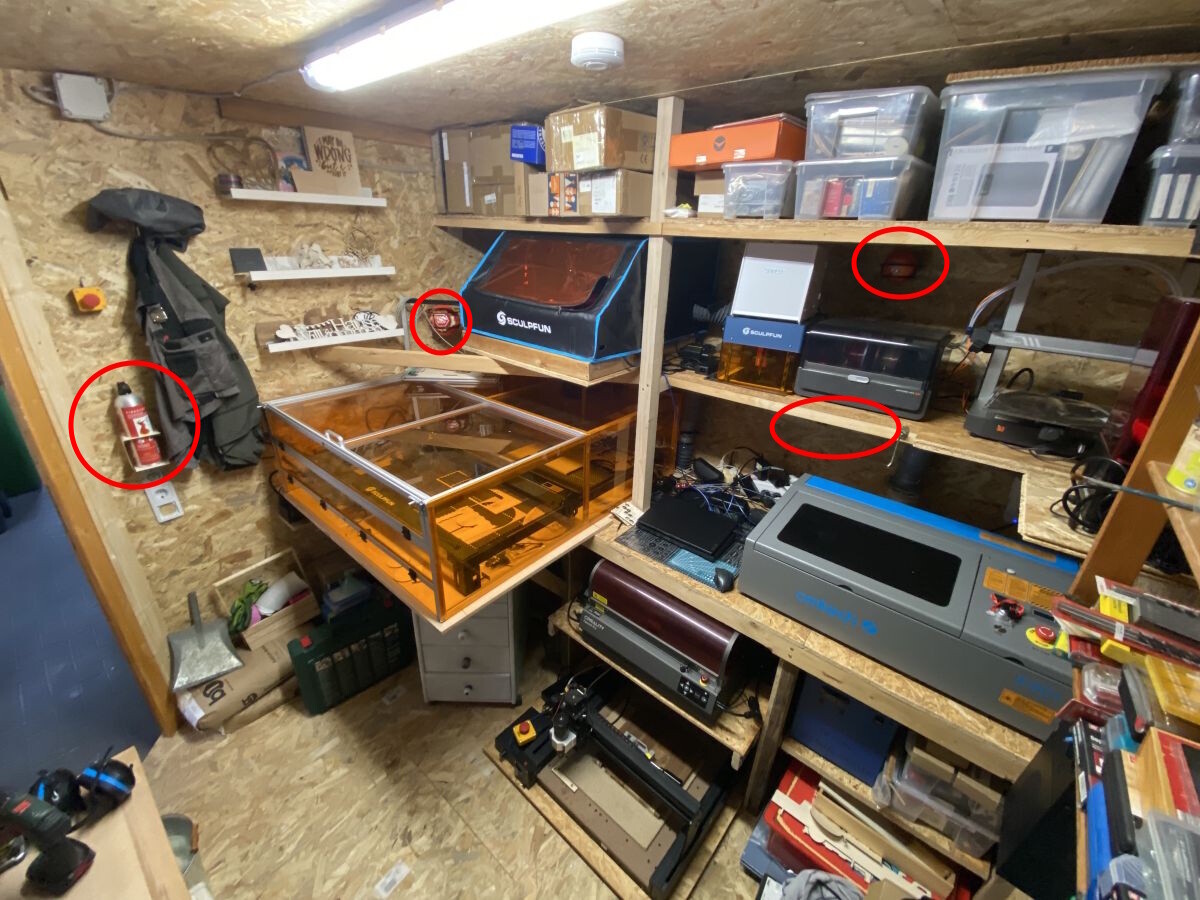
some automatic fire extinguishers (though still not perfect, too much wood in the area )
At this stage I’m able to run up to 6 machines in parallel from a single control laptop. But a few more might move in as well
I will elaborate a more adequate comment but for now, WHERE IS THE FIRE EXTINGUISHER?!!!
I know you will not forget that but I have to take advantage of the opportunity while I don’t see it.
Ojee, I recognize your dilemma And it is waking up old memories from my first workshop.
I had to get rid of my first CO2 laser to be in my “new” workshop and I gently expanded “my” area to the rest of the lower floor/basement of the house, without starting a teritorial war with my wife, who also uses parts of Basement.
Congratulations to your new workshop when everything is in place you will be happy.
@GPG342
Thanks for joining in the fun. In my defense, I must say that in Portugal this is considered a non-conformity as it is not signposted, it is not in a location with good visibility and its location is difficult to access.
@Misken Jokes aside, I admire your commitment.
I’ve thought about doing the same to avoid, not so much the risk of fire, but more the smells inside the house. If I didn’t live alone, someone would have already wrapped a machine around my head and thrown me out of the house.
In my case, the space I have available will either be to build a larger garage where I can maintain my cars or to put my laser machine(s). That it’s never just the machine(s). In addition to the machine, we always have the raw materials and all the accessories that should be close by and accessible.
Obviously you are aware of the risks in the material you chose for construction. (I won’t bore you with this.) Keeping in mind that we are in very different countries, access to certain materials can be much more difficult.
I will use what we call “sandwich” here, which is basically two metal sheets treated against humidity, with insulation (which is fireproof by law) between them.
I believe it is more expensive than the material you are using, but it will be more durable and easier to assemble.
Either way, you’ll have your own little corner where you can concentrate all the equipment together and where you can supervise all the machines simultaneously.
Above all, it gives us an example of what we should all do (depending on each person’s possibilities, obviously) as well as (I speak for myself) making us a little envious.
I feel your pain about lack of space. My “shed” is the 11"x11" bedroom. With Florida’s 90+ degrees and 80+% humidity, I had to have an A/C space. I could have built a shed with A/C, but this room was already ready to go.
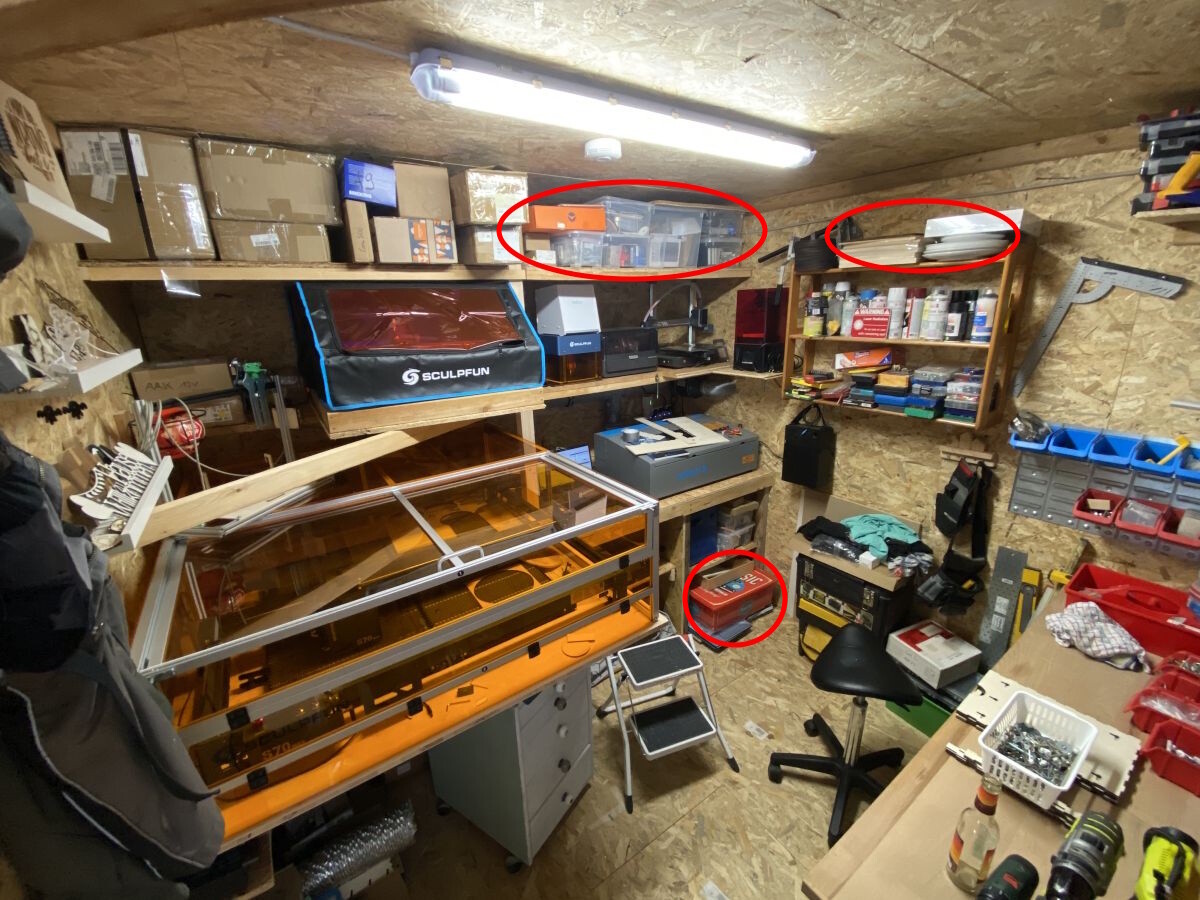
Actually, there are four mounted, all of those that have collected over the years There are two fire balls, one fluid-filled one (you can’t see it in the pictures, it’s mounted over the laptop and K40) and the extinguisher that was already spotted in the shelf, which is usually mounted at the door below the emergency switch
Yes, we also call it sandwich plates here. The roof of our carport is done using them. In this case they were too expensive and two of the walls were already there, so I just went on from there. Though I have 12cm insulation inside the walls (14 cm wall thickness in total), so hopefully, I can survive the winters as well But I guess it will become cold anyway with the exhaust system that sucks out 200-300m³/h of the inside air to the outside
I do not have that many materials, since I do not use the laser for professional work or mass production. I have collected a set of different materials, but only a few of each. Wood is stored on the bottom right behind the red box (the drawer is about 60x70cm in size, so also large wood plates fit in). Materials like jewelry, metals, boxes, textiles etc. are on the top shelf. And some A4 plywood that I use most is just put on the small shelf on the wall.
I’m truly happy for you—there’s nothing quite like the excitement of a brand-new building and getting to set it up exactly how you want, especially when it’s packed with awesome lasers and other cool tools!
Welcome to the Shed Life!
What an amazing setup! Seriously, welcome to the exclusive club of those who disappear into a garden shed and emerge smelling faintly of burnt wood and ambition.
I’ve been holed up in my own little workshop haven for nearly four years now. It’s strategically located at the very bottom of the garden, which is perfect for running a full-time business – and for keeping me out of my missus hair during the day. It’s a win-win, really.
Being in the UK, the winters have been a delightful exercise with heatignon times and heaters in my water pump to stop my lasertube cracking, while the summers have been fantastic for racking up a truly terrifying AC bill. My laser cutter probably thinks it’s on a tropical holiday.
We should totally start a “Shed of the Year” award or a “Best Workshop Escape” competition. Who’s got the most gloriously ramshackle, yet functional, garden hideaway?
I knew you wouldn’t neglect such an important factor as safety!
Interesting are the ball-shaped fire extinguishers that I only know from TV series. Here in Portugal they are not used, perhaps by firefighters, but not by the general population.
With that air flow, no matter how good the insulation is, you will definitely cool the interior. But the air must be renewed and not recirculated when smoke extraction is required. The only way I can see without renewing the air and “extracting” smoke would be to recirculate the air with a filter system to retain harmful particles, which would not be cheap to maintain.]
This is most like a Shed Pro Max.
The dehumidifier came included?
It even looks like you put wheels on the laser bench to move it when need to be maintained. Is this accurate?
Thays after a day of work aswell
Yeah used to have material on shelfs and was a nightmare finding odd cuts to use so had a brain storm one day and just have new material under the machine now, its even in wood type and thickness sections lol! Made from some simple 10mm MDF
Hahaha i use that as my AC in Summer!
Yeah caster had to be done, so easy to pull in and especially when maintenance is required. 4yrs of modifications but still not hapoy with it all, who ever is hey
Fortunately there’s an economical -in the long run anyway- solution to that very issue most of us face.
Heat/cold recovery unit that heats or cools the supply- or make-up air is a must for anyone not wanting to waste great amounts of money for keeping the shop warm, or insane amounts of money for keeping it cool.
Heat/cold recovery units are plentiful (at least over here) either new or second hand, and there’s a lots of room for DIYholism as well.
The easiest and often the most economical solution is to modify a second hand (or dumpster dived) air handling unit of an adequate capacity.
Most are well thought of and well engineered, and all the various and important bits and pieces are already there in one compact package.
The second option is to source a cube style plate heat exchanger, add filters, the supply/make-up air fan, heating/cooling coil, drip pan and plumbing, etc, and wrap it into a box of ones choosing.
There are other styles of heat exchangers out there as well, but the plate-cubes are the most common, and probably the most suitable and easiest to build and maintain for this kind of a task.
Even though those cubes are not the most economical when it comes down to efficiency vs. the space they take.
Because if (and usually when) the air volume is large, so have to the surface area and the effective length be as well.
So the cube style heat exchangers are rather large if even a moderate heat exchange efficiency is required.
Yes, that’s an option But I think that’s too much effort for my shed What I thought about first is to use a dedicated air inlet with a fan of the same size, which would also increase the air flow inside the enclosures. Then the air extraction would be decoupled from the air inside the shed.
But since the enclosures are all different in size and position, this would mean a lot of new hoses. I planned a different housing setup in the beginning, but I didn’t have enough space to create a pile of boxes that could have inlet on one side and outlet on the other.
 )
)