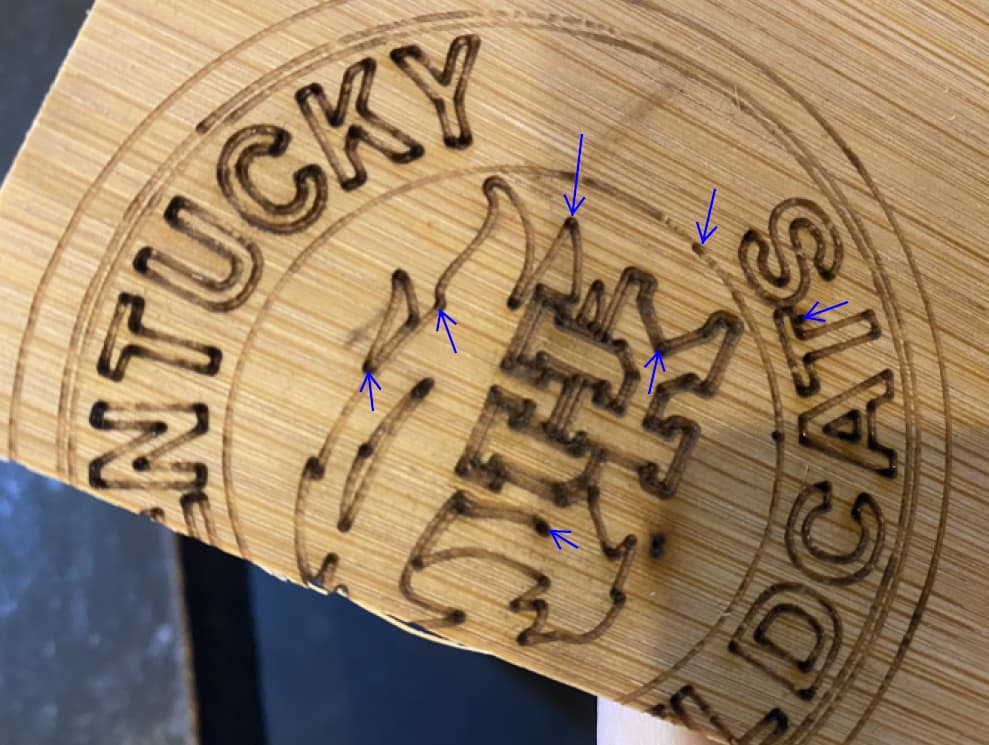
I am engraving 1/4" bamboo and every time the laser stops and starts the laser beam penetrates deep into the material, leaves dots bigger than the lines . I have a Red and black 100W machine. Settings are 6ipm at 11% i cannot go below the 11% or the laser will not fire. Any suggestions?
You may get better results with a higher speed and more power, because 6 inch/min = 2.5 mm/s is extraordinarily slow for a CO₂ laser on what’s basically wood.
Ruida controllers have a minimum starting speed, below which they apply only the minimum layer power. If the layer speed is below that value, there’s no power modulation at all, so the corners get burned as the machinery slows down and speeds up without compensating power adjustments.
However, large lasers don’t do well following small complex shapes, because they have relatively low accelerations. Running at a higher speed may not allow enough power modulation near the corners, because the speed can’t change rapidly enough.
Instead, convert that layout into filled shapes, then use a Fill layer, rather than Line. The laser will scan back and forth over the entire pattern, switching the beam on and off, so the whole thing gets a uniform exposure.
If you have the original layout as a JPG / PNG image, you can use that. Otherwise, converting the layout will require some redesign to broaden the fine strokes and adjust the lettering.
I will try that thank you
Also what do you set your start acceleration and minimum power to? When your laser starts moving and gets to a corner or the end of a line it has to slow down so the power needs to be reduced to maintain the same line qualities. Your minimum power will determine how low the power goes when slowing down as well as the curve while slowing. If it’s set too high you can get burn-through or higher amounts of the halo around the lines.
So i have a question about your answer. If my minimum power is below the level that the laser will fire, will that cause it to fire at the max when it starts back? SO should I make sure i have it set to where at the min setting it will fire?
AFAICT, the controller behaves according to the graphs in that link:
MINpower until the speed reaches the starting speed- Power scaled linearly up to
MAXat the maximum speed
Whether the laser tube actually fires at the minimum power isn’t relevant: the controller output assumes the tube can do whatever it’s commanded.
If the MIN power is less than the tube’s firing level, then it won’t fire until the speed rises enough to scale the power upward enough to trigger the tube. That should be well under the MAX level, but it will certainly leave gaps at the corners where the laser isn’t firing.
Remember: You’re responsible for ensuring everything works the way the controller expects. ![]()
So (IMO, anyhow) it’s reasonable to set the MIN power to whatever will reliably fire the laser over the expected range of temperature / aging / supply variations. Doing so deliberately leaves a few percentage points on the table as insurance against a ruined workpiece when the laser doesn’t fire.
For example, if you know your tube won’t fire below 11%, then using no less than (maybe) 13% would provide enough headroom for unexpected variations.
If you’re not in production, can stand some scrap, and are willing to tinker for a specific effect, then use the lowest value that fires the tube on that day. Just don’t expect those settings to work all the time, because they won’t.
Hobbyist here, no production issues . Thank you for all of this information I’ll experiment with this. again thanks for the help
Set the controllers minimum laser power to where it lases… I’ve been doing this for a few years.
![]()
This topic was automatically closed 30 days after the last reply. New replies are no longer allowed.