Endurance makes an external PWM that it looks like I will be using, I envision that this in simplified terms will be a dial that i set the power to be transmitted when I call for it with my program. The Masso controller allows for a TTL output (normally setup as a flood coolant control) that I will be using to turn on and off the laser. I am somewhat at a loss on my needing to vary power as I am not planning to do grayscale images, just line engraving. Your second statement bothers me in that Stainless is certainly out of the picture. That is the reason that I went for the DPSS laser. If necessary I plan to use dry moly lube spray to aid in coupling the beam. My intended initial product is stainless steel bezel inserts for diving watches, this requires that I engrave radial lines and numbers for the diving elapsed time readout. Additionally I want to engrave on stainless steel bezels the representative airport id for the GMT time zones, I have some designs for stainless steel watch dials where I need to engrave my logo, some simple text and again some radial lines for the minutes. It would be good if I could cross hatch areas to create a darker area that the reflective stainless surface. Once all of that is done I have plans to cut vegetable tanned leather to support my watch band building. The laser would generate the outer shape is a given, the real wealth of using the laser would be the cutting of the holes for the buckle tongue and the holes for stitching the leather. These are time consuming and a pain to get the exacting spacing for an esthetic product.
I missed that you weren’t referring to their standard diode laser that emits ~450nm. I’m not familiar with Endurance’s DPSS lasers but I’ve seen some of the claims. I don’t think I’ve seen much if any mention of them on this forum so would be interesting to hear your experience with it.
Even if you are not looking to dynamically vary power there is a benefit to being able to control power output to suit various materials and speeds. If the Masso has TTL output that you’re using for on/off it may already be able to control the laser directly. If not, I’m assuming you’re going to connect TTL out to external PWM which would then be able to drive the Laser. I’m not certain Endurance’s DPSS laser’s work the same way as I described in my previous post but a quick look at their website makes it look about the same. Although it looks like they also support an analog signal.
I’m not familiar with how power will affect the stainless engraving process but experimenting with speed, power, focus, and engraving patterns will give you various ways of affecting the final quality.
I’m curious how the DPSS will perform on leather. I haven’t seen it really advertised for cutting organic materials other than plastics.
All in, it sounds like you’ve got some exciting plans for the laser.
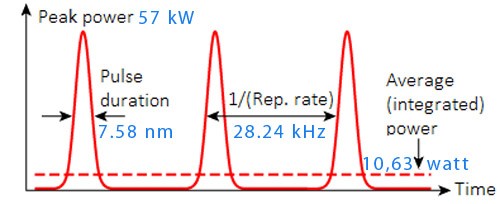
My prior experience was using CO2 and flash lamp charged NdYAG, in far more power (CO2 5 to 6 kW) NDYAG .5TO 1.5kW. I was concerned with the ability to couple such a low power to mark stainless, however their peak pulse is 57kW, and they show engraving of stainless using the 4W DPSS so I feel reasonably confident with that. The leather will be more of an issue not from the coupling of the beam but from the fumes. Endurance recommends using an air assist to protect the lens. I did similar back in the 1990s with my CO2 welders making a cone enclosure for the beam path and ending it at the exit opening with a ceramic nozzle commonly used for plasma torches, worked great (unless you dropped it, then you needed to replace the nozzle).
If this is the kind of laser you have, it is kind of a different animal that most of us are used to.
 for metal engraving / metal marking.")
It would be nice to see a photo of yours… How much does the whole ‘laser head’ weigh?
To engrave properly you cannot just turn the laser on and let it run it’s pattern.
Any laser that is cutting/engraving, will change speed as the head changes direction. The controller must be able to vary the power during directional changes or too much power will be applied. Especially when vector engraving.
The TTL out is probably not really usable in this application because it has no connection (or way to relate) to the ‘feed’ speed. This is needed to compute laser power at that moment. No way could you do this manually. Not to mention there is no need to ‘quickly’ turn the coolant on/off as there would be for a laser pwm.
Good luck…
![]()
Was not thinking about the directional changes, will also have to look into the response time on the flood coolant ttl output.
I don’t think there is any way you can associate the ‘coolant’ switching rate with the head speed in the software that isn’t connected to the laser to tell what it’s doing.
I think the manufacturer shot you in the foot with the proprietary spindle control system.
It might be we are talking different ‘ideas’ of what ‘turning on the laser’ is…
One is you turn it on and do the pattern.
The other is you control the laser power based on the speed of the head. Pretty much a requirement for vector engraving.

I am starting to wonder if I have gotten into something that is not what I intended. My plans are to engrave designs that are very dimension specific. A quick look at lightburn did not appear to be a CAD like interface. To create a watch dial for instance I would be looking to create horizontal text centered on at a set diameter and radially located on 30 degree steps, conversely for the bezels, the text would be similarly radially and circumferentially located but would be orthogonal to the radial vector. I can create this in Fusion 360, if I import it as a DXF file will lightburn maintain the size so it will fit in my application I want to engrave?
You can import it and don’t underestimate what lightburn can do for you in the creating of artwork. It continually surprises me.
I have made a box for my laser that holds a flow meter in Freecad. The part is 3d printed. I export the ‘lid’ via a DXF file to lightburn and use the ‘offset’ tool to round it out a little. Then cut the ‘lid’ out of acrylic with the ‘screw’ holes… Yes can can import DXF watch the size as you can easily change it in lightburn.

Thankyou for your reply that takes one worry off my list. Now I simply need to understand how I am going to the control the laser. It appears that I am going to have to invest in another cnc controller and the conversion hardware to upgrade my manual dro mill to cnc. The front runner for this is the acorn controller since I have information that this has been successfully done integrating a Endurance DPSS with a Sherline.
Not a fibre delivered pump on the yag rod, mine is the model where the diode pumps are mounted on the head Endurance Lasers - 10 Watt DPSSL Laser Module Kit – endurancelasersusa.com not reallly sure what the fiber delivered pump buys you other than lower head weight. Maybe that is enough. The video says a peak pulse of 20 kW, the literature for my model says 57 kW.
I just took a look at the endurance website. Well written with tons of help for the user. it has a section where it covers dozens of controllers but no mention of Masso. All of them are controlling power using PWM terminals and S commands. So S50 means 50% power. pretty basic.
I agree that looking for an alternate controller is the best direction. Especially if you don’t want to spend a great deal of time getting something to work (and vary power), and then solve the question of how to easily control it using software.
What kind of input power is required to run this thing?
The video I saw had them using an external 12V 30A power supply. Not sure if was the 10W model they were driving.
All of their lasers are designed to be plugged into basically any setup. They accommodate many different voltages. The laser module wouldn’t receive S commands directly. It would need to be interpreted by the controller which would translate that to PWM. 50% duty ratio would be 50% power.
@grindaur If time is more important than money I’d say go ahead and get a known working replacement. However, if you’re willing to tinker with it you might as well try out what you have and see if it will work for your needs. I’d say you have a better than 50:50 shot that your existing setup will work with some tweaking.
Even if you can find a source for variable voltage the Endurance control board can take analog voltage and will convert that to PWM.
The better half when I fully presented the problem agreed with my path forward. Buy Acorn CNC controller, x and Y axis cnc ready package from sherline (bearings, thrust washers, couplings and motor mounts, 4 limit switches for end of path dectection. Total without shipping and taxes will be under $525. Then i need to add a copy of lightburn to the mix. Long poles will be machining the mount to hold the laser, getting the cnc ready packages from sherline and installing them and the limit switches. Acorn CNC documentation is very impressive, that is one of the high points of this path. Tomorrow is the day for the delivery of the laser. I have the block for mounting it to, as soon as I have the laser to verify mounting locations. Question for the team, do you mount your laser perpendicular to the work surface or do you mount it 1/2 included angle off of your focus beam? I asked this because we had issues coupling a 500 W NdYAG laser we were using to weld copper. I had them take it 1/2 focus angle off of perpendicular and we never had a fiber failure after, I credit this to elimination back reflection that occurs until you properly couple the beam. Your thoughts?
The normal school of thought is that the laser would be aimed perpendicular to the cutting surface. However, you’re dealing with a bit of an exotic here so I don’t know if that guidance still holds.
You specific example is interesting, however, and I’ve often wondered why back reflection is not more of a problem.
I have seen a couple of other folks with a DPSS post on here but those topics never went very far. Never saw so much as a first engraving. Hopefully they’ll come onto this topic or else you might be able to message them directly.
My thoughts is that it won’t hurt anything and you may not hit an exact perpendicular anyway.
I noticed in the video that jack posted that the guy wasn’t wearing safety glasses. That would make me nervous. Especially since you brought up reflection.
I noticed the same thing. They seem to start addressing safety but then change subjects.
The safety issue is a concern especially since we are working in near infrared. Were I to be working with CO2 not so much. Normal glasses will work (but OSHA and AZ department of public safety do not agree). They require that the glasses you wear be certified for protection. I cannot argue with lack of side shields but really CO2 in high powers doesnot even like going through air. I used to play in my shop with exposed beams and with low light I could get glowing dust.
I plan to post the progress on this endeavor, so perhaps if I am successful you will have further information on DPSS lasers. The major problem with the anti-reflection concept that I suggested is that you now enter in another variable on kerf at least in cutting and welding. Since i am not aware of the polarization of the beam, I could be either exacerbating the effect or minimizing that effect. I do hope the beam is circular polarized. Another issue to be addressed is what is the throat distance of this laser, how sensitive will it be to flatness/thickness variation? I am going to laser from machine engraving since the width/depth of mark with the engraving tools I was using varied so much. I understand why drag engravers are spring loaded, but have not found a rotating tool that had a spring compliance built into it.
Both the Diamond Tip Tool and the Carbide Point Tool can be dragged as well as rotated in the Spring Loaded Engraving Tool
![]()