I remember no hard drives, and just floppy disks, when you used pc-dos, cobol, fortran, and cards to load into reader to load the program,.. LOL
1 Like
Been playing with the camera calibration and workspace alignment. I have found the easiest for alignment to work perfectly, is to ensure you do not have a lot of light going into your laser cabinet (I have Xtool S1). I actually shutoff my shop above lights and have a little light on next to my work desk, then turndown the lights in the Xtool S1 to about 15-20%, and the calibrations come out almost perfect. More testing, but this is how I have found to get increased success, at least with my setup. I hope this may help others. I also cover my bed with a piece of white poster board to eliminate the bed confusing the software during calibrations. Brian - RlDesign Innovations
2 Likes
The first computer I placed my fingers on was TRS80 that belonged to a friend. All data was saved on a regular cassette tape.
A small file, maybe 5k-10k would take 30 minutes to load… if you where lucky. Sometimes you had to do it more than once while hopping on your left foot, right hand on your head and doing the hokey-pokey before it loaded correctly.
1 Like
seriously? they made all those updates? iI am still trying to learn the basics after the last update.
2 Likes
They aren’t. Modern AI files are just renamed PDF files, that part is true - it’s called PDF Preview Content, and it’s on by default but can be turned off. The actual AI file is embedded in named chunks within the PDF.
LightBurn supports both, but the AI chunks have more detail, and it’s less complicated than the PDF data. I know because I wrote it from scratch. It’s worse, actually - it’s 3 levels deep to get at the real content, like a weird Russian nesting doll of a format.
The “normal” way to support PDF, for anyone in the print world, is to use someone else’s library to load them and rasterize them into an image for printing or viewing on screen.
If you didn’t want to be able to use the vector data in the PDF, or change the text, I could write that in a couple days.
If you want to be able to modify the text or the vectors, now you need them in their native form, and you need to support the entirety of the format, including composition painting. That isn’t simple.
1 Like
In my conversations with Adobe in the past, there are those that will agree and disagree with me. This said, in the 10 years since I retired things may have changed. I do know it’s the opinion of many print professionals that PDFs are more versatile and easier to deal with.
In most cases, but not all, the font is embedded into the PDF file. If it isn’t than yes, the font must be available on the user’s computer. This happens when the font is only licensed to the original creator and not allowed for distribution .
In the commercial print world, digital printers have a RIP (raster image processor) built into it’s controller (computer). This RIP would take vector images and fonts and rasterize them. It would also take any RBG image or PMS Spot color (Pantone Matching System) and convert it to CMYK. Since all this information is built into a PDF this is completely hands-off. Once the PDF is loaded into the controller the operator only had to assure the parameters are set for the job (Qty, size, fold, staple, trim, etc.), run a proof copy, then just load the paper, press start, and box the order. I could train an average person with no printing experience to run a digital printer within a week.
That would be nice and yes I would prefer this as would many others as well.
I can’t tell you how often I’ve read on your forum and on FB the amount of people that are confused as to why the text doesn’t appear in LB when importing a PDF.
For now how about just having the text show up outlined instead of being editable with vectors remaining vectors. This would solve many problems for many users of your software.
While you are at it, how about adding a thumbnail to the exported .ai file.
There’s a chasm of difference between a print professional looking to send a document to a printer, and a developer looking to extract usable information from a file in order to reconstruct a document. PDFs are great for printing.
Illustrator itself loads the Illustrator content embedded in the PDF, like we do, and on save, just regenerates the PDF preview content. You can verify this easily - the PDF will generally clip anything that’s outside the visible page, while the native Illustrator content embedded in the PDF does not.
PDF is a print format, but not really an editing format. If you wanted to load a PDF and simply emit it to the laser as a rasterized image, that’s quite doable. If you want to edit the content before sending, that’s much harder, because we’d need to make LightBurn “understand” the PDF content and be able to manipulate it, not just rasterize it using a 3rd party library.
3 Likes
Sorry, I disagree.
PDF = Portable Document Format.
Now if you’re using Acrobat Reader then yes you can’t edit.
If you are using Acrobat Pro, then yes it is quite editable. Everything from changing text and fonts to editing, resizing and changing graphics.
So we agree that it can be done
If you have the source code for this software, then you can confirm how it works internally. PDF is not a format, it is a wrapper application. I do think there is a raw PDF format, but none of that applies here.
I don’t think Adobe gives out their source code.
Of course not!
Yes PDF is a file format.
Illustrator, InDesign, MS Word and WordPerfect (and others) are all wrapper applications, each with their own file format.
The problem is LB can import .ai and .pdf files with vector graphics along with the ability to edit them. What it can’t do is parse fonts correctly.
You added ”file”, which changes the meaning of what I said.
What you say then doesn’t make much sense
Sorry, I do not know how to explain it better without going into my programmer and applications mode.
Hello
In the past, with lightburn, as I created different calibrations for different material thickness, after the calibration, I would export the setting via right clicking on the camera panel, and saving the file with a name such as 4mm material. This is how I create a library of material thicknesses. With Lightburn 2.1, the calibration file is tied to a workspace calibration. I have done several workspace calibrations, and export via right cloick camera panel, and named them with the material thickness in the name.
Here are the questions, when reloading the camera profile I exported, it will sync to the work space calibration automatically, as the name of the workspace calibration is stored in the exported camera profile.
- How do I export the the two together?
- Where is the workspace alignment stored, so I can back it up?
- Is there a way to name the workspace alignemnt, such as (4mm Material May 26), otherwise the naming does not tie to my camera profile based on a name I want.
- Wiithin the workspace calibration,there is a field for material thickness, where is this entered, as I do nto see this anywhere, right now it defaults to 0
Right now, I can re-import the different camera profiles for the material thickness i’m workring on, but when importing it adds another camera, so I remove the camera first, then import the camera profile, and all works. It will automically select the workspace based on the embedded name in the profile, but I have to have the workspace file, this is why I would love them exported together, so I know where they are located, and can tie them thogether, as I do many material thicknesses, and not knowing what workspace file goes to what is frustrating, without writing down the long workspace calibration file name.
Regards
Brian
RLDesign Innovations
Anyone who has tried to edit anything but the simplest PDF document will disagree with you. Editing a PDF with Acrobat is often a special kind of hell because most PDFs simply are not designed to be edited. The intent is to be displayed, whether that be on a screen or in print. Because of this, you’ll often find text not flowing as one might expect (or how it did in the source document), images chunked up, overprint cut out, et cetera. It depends upon how the PDF was “distilled.”
If you have some control over the source of the PDF and can tailor your implementation to it, there’s a lot you can do to handle nthat flavor of PDF consistently. Unfortunately, there are a LOT of different implementations, and they adhere to the PDF spec in different degrees and target different versions. I’ve even seen Adobe do things contrary to their own spec and have seen some really unexpected acrobatics (no pun intended) with the PostScript inside. Acrobat will handle a lot of these undocumented twists and sins of third party implementations, but that’s a mess to maintain and would be unrealistic to expect Lightburn to do so.
All this is to say that implementing a PDF reader would be absolute hell because something would always be broken and everyone would always be pissed off because their particular document didn’t work. Sorry, but there’s nothing but sorrow down this road.
2 Likes
@Skwerl
I totally disagree with your perspective
Obligatory XKCD:

1 Like
So the good news is that we’ve added new features to automatically apply different alignments for different material thickness. The bad news is they’re a little complicated to set up and it’s not well documented yet.
The key idea is that we can now store multiple alignments in a single camera settings file, but also synthesize new ‘in-between’ alignments. When you do an alignment, it’s named (and tagged) with a height value that comes from adding the current Support and Material heights together.
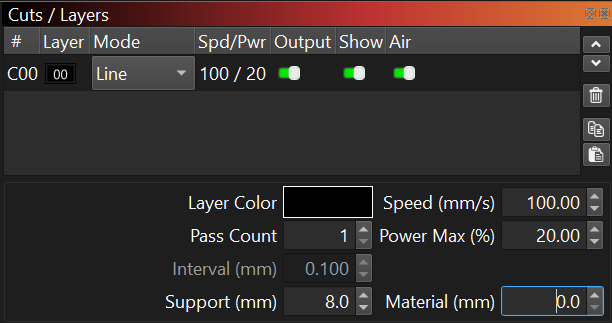
Now we remember the height the alignment was done at. Typically you have to set those numbers before you do the alignment pattern burn, but if your Z-axis isn’t motorized you might have to remember to do that step.
If your machine doesn’t have those fields then that’s a problem we should talk about. It’s supposed to turn up when needed (when you have a Z axis) but there are situations and devices which turn it off.
If you do multiple alignments at different heights, they will build up in the list and you can manually choose between them, no need to save and load files anymore - everything is managed within the camera.
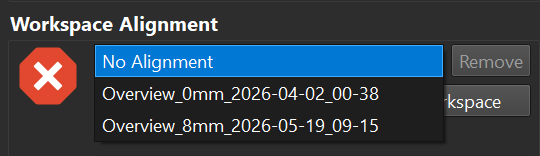
Re-alignments replace the previous alignment at the same height, but different heights will add to the list.
You can manually choose the current alignment that is in effect, but we’ve added a new option called “Interpolate Alignment Height” which you can find in the ‘Advanced Settings’ expander:
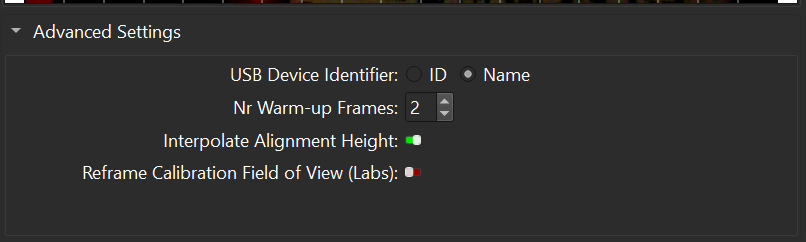
If you turn that on AND you have multiple alignments, then LightBurn will automatically select the alignment that matches the current height. But even better - if you ask for an in-between height it will proportionally blend together the two closest heights. It can even extrapolate the alignment past the original heights. (a little bit)
This synthesis isn’t perfect. The expectation is you will align at a couple of important heights (at least two) where you want the most accuracy, and let the interpolator do “good enough” when you’re in-between.
Unfortunately we don’t have a good way to ‘assemble’ a new multiple height alignment from a set of existing alignment files. The height information is entirely missing from the older camera files (in your case it’s probably stored in the filename) and there’s no way to edit/reassign heights in the app after importing. (yet)
There are secret ways to edit prefs.ini and the camera settings file to “frankenstein” all your old settings files into one, but it’s probably going to be faster and more reliable to do a new set of alignments using the new tools.
(however if you really, really want to try: load the camera settings files with a text editor and look for “ImageAlignments”: [ ... ] which is a list of { ... } object entries, and hack away by copying and pasting entries from other files while setting MaterialHeight and AlignmentName as appropriate for the appended entries. So long as you don’t make a JSON syntax error and they’re all based on the same calibration, you probably won’t crash the app.)
6 Likes