Logo's from rotary are stretched. Settings advice?

I attached pictures of all my settings and my stainless steel mug. I am just testing this out for the first time trying to get it centered and correct. The image keeps stretching.

I confirmed in the manual and by opening up the controller and checking myself, that the steps per rotation are 12,800. It’s set to 12,800 on the controller board.

I am new and probably have one of my settings wrong. Can you spot it?

Logo_tumblr_template.lbrn2 (64.8 KB)


Some thoughts…

  1. The mug is not straight so perhaps I’m slightly off on measurement? Couldn’t me more than a mm or 2.

  2. The speed has been messed with from 300 min to 500 min. I’m literally doing some more now and will update if that’s the fix.

What your eye sees is a round graphic displayed on a curved surface, so it looks distorted. If you were to cut your tumbler and lay the side flat, the logo would be a circle.

Hi Claude. I attached a better image so you can easily see how it’s stretched vertically.

I’m still not sure what I am doing wrong.

When I had that problem I had to increase my $101 setting. But I use y axis for the rotary. Not sure if $102 or $100 is for x.

Hi Mike

I have no idea what you’re referencing. I’m on the galvo version. Where can I check these settings?

And where can I read about what each one does?

Thanks

Oh, I am on diode. Not sure how the galvo works.

1 Like

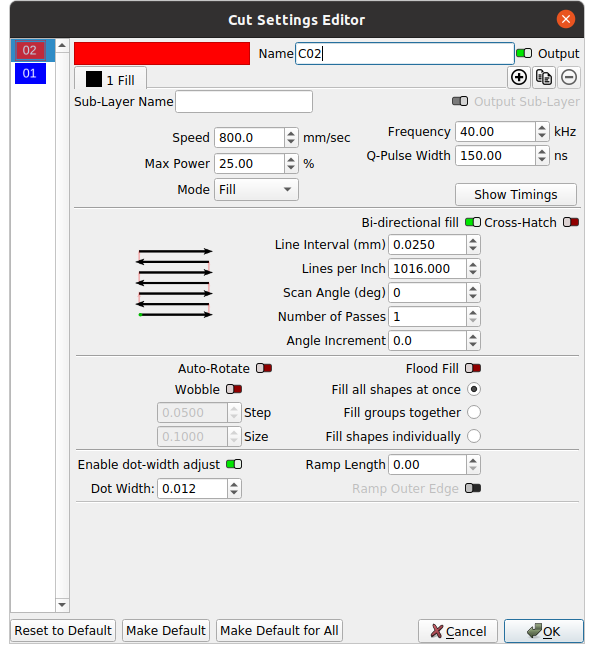
I use a dpi of 0.025mm or 0.0254mm, I notice you use 0.10mm…

The dpi/lpi is critcal for most laser jobs… I suggest you watch the Laser Everything video on photo engraving… even if you are not using it for photos the education of how to select the proper dpi/lpi will be invaluable throughout your laser journey… The process works for any laser with any material…


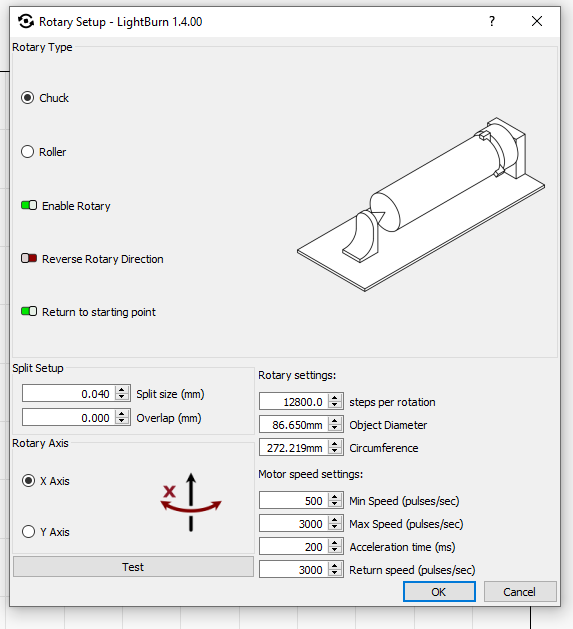
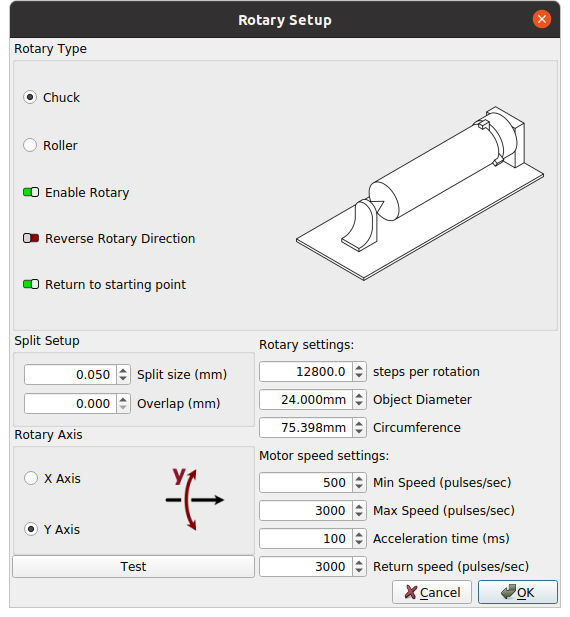
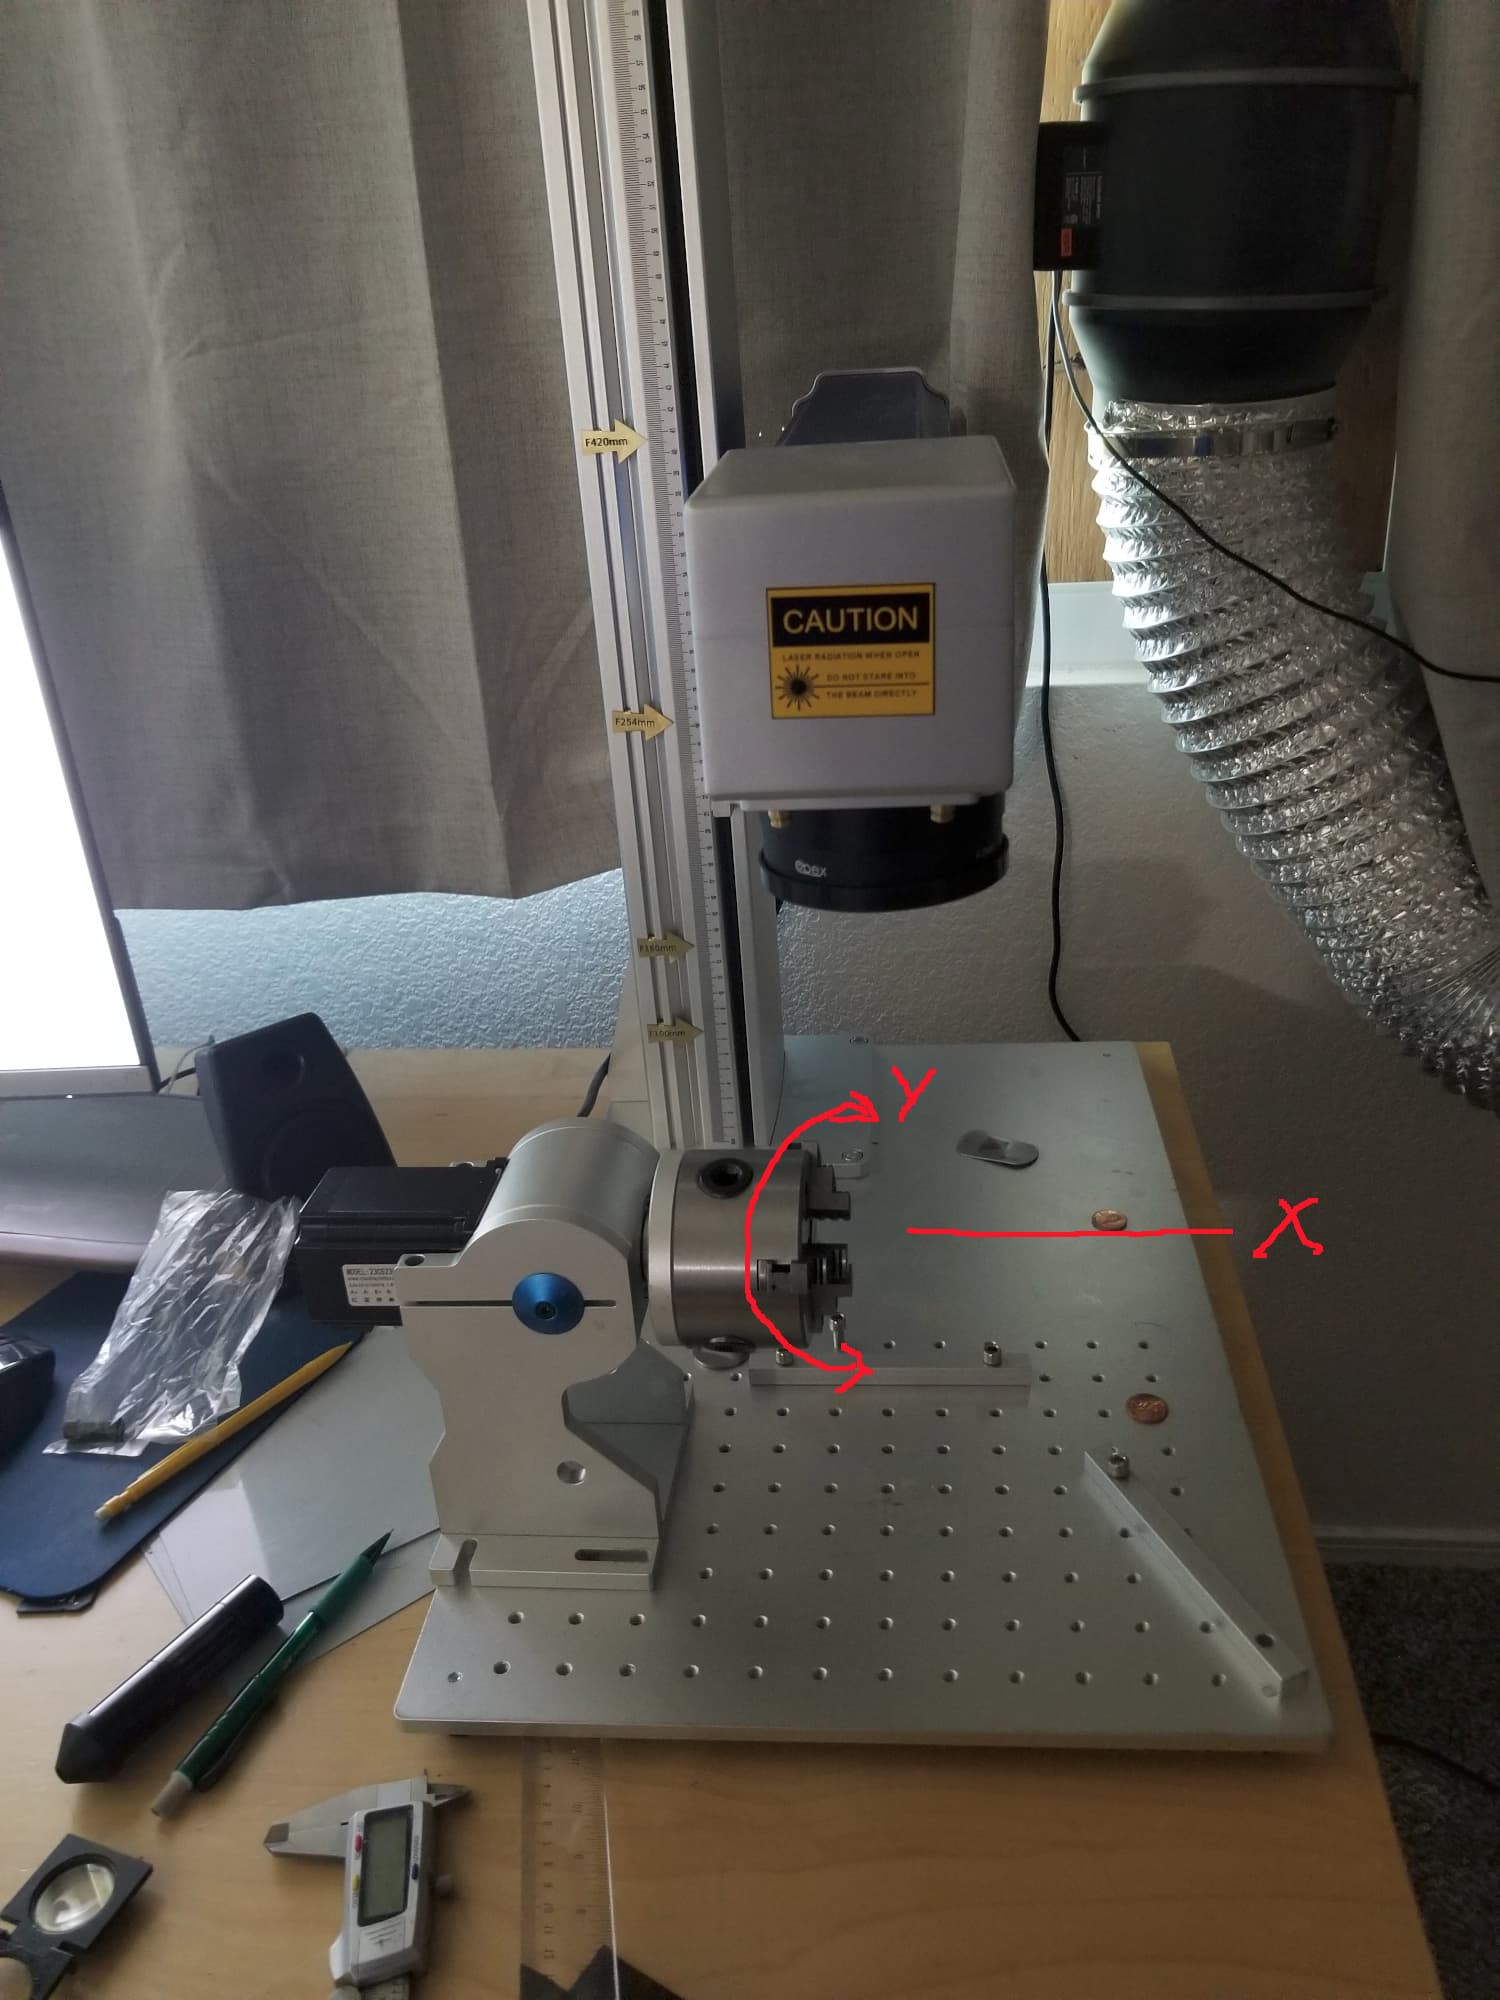
I also noticed that you have it set for the X axes and you turn it 90 in the layer for the scan angle… to correct for the actual alignment of the rotary.

If the rotary has the mug where the tall portion is going left to right across the X axes then the rotary is rotating around the Y axes… You have the X selected for the rotary…

It might be a moot point, as changing the scan angle to 90 corrects an incorrect axes setting, this kind of obfuscates what you are doing for us trying to help you…

Make sense?


The other selection I noticed is the split size.

Usually the split size is related to how far your lens stays in focus over the curvature…

In theory it’s a multiple of the dpi… the smaller it is the more time it will take to do the job…

For example if you had a 55g drum, you could use a much larger split size as the lens would probably cover the small amount of curvature in a large distance… the larger the split size the quicker the job…


This is my rotary settings for a lens tube and it’s cut/layer settings… same idea…

Art, rotary and layer… I have an M60 JPT M7 MOPA … notice that Laser Tools is on the tool bar.


The rotational direction of the mug (tube) is in the Y direction…


I don’t know if either of these is your problem, but it’s a start… if the setup was more consistent with what many of us use, it might be easier to diagnose your issue.


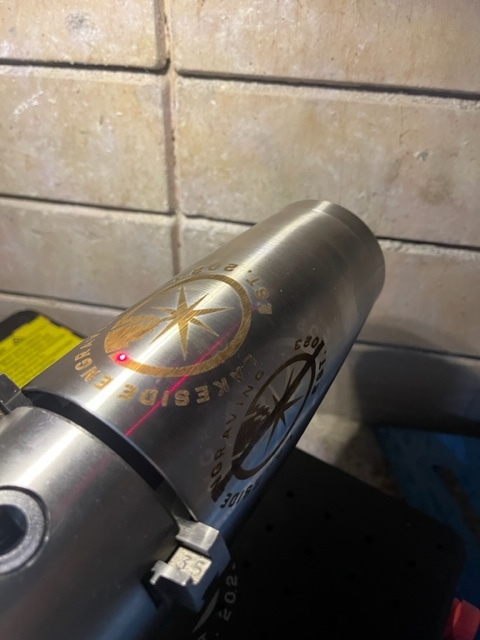
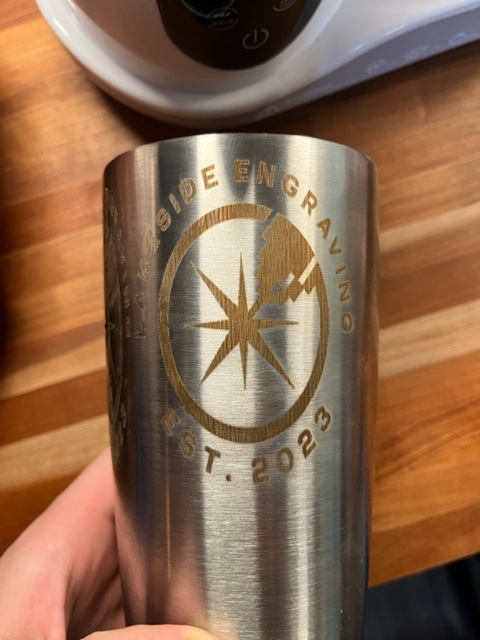
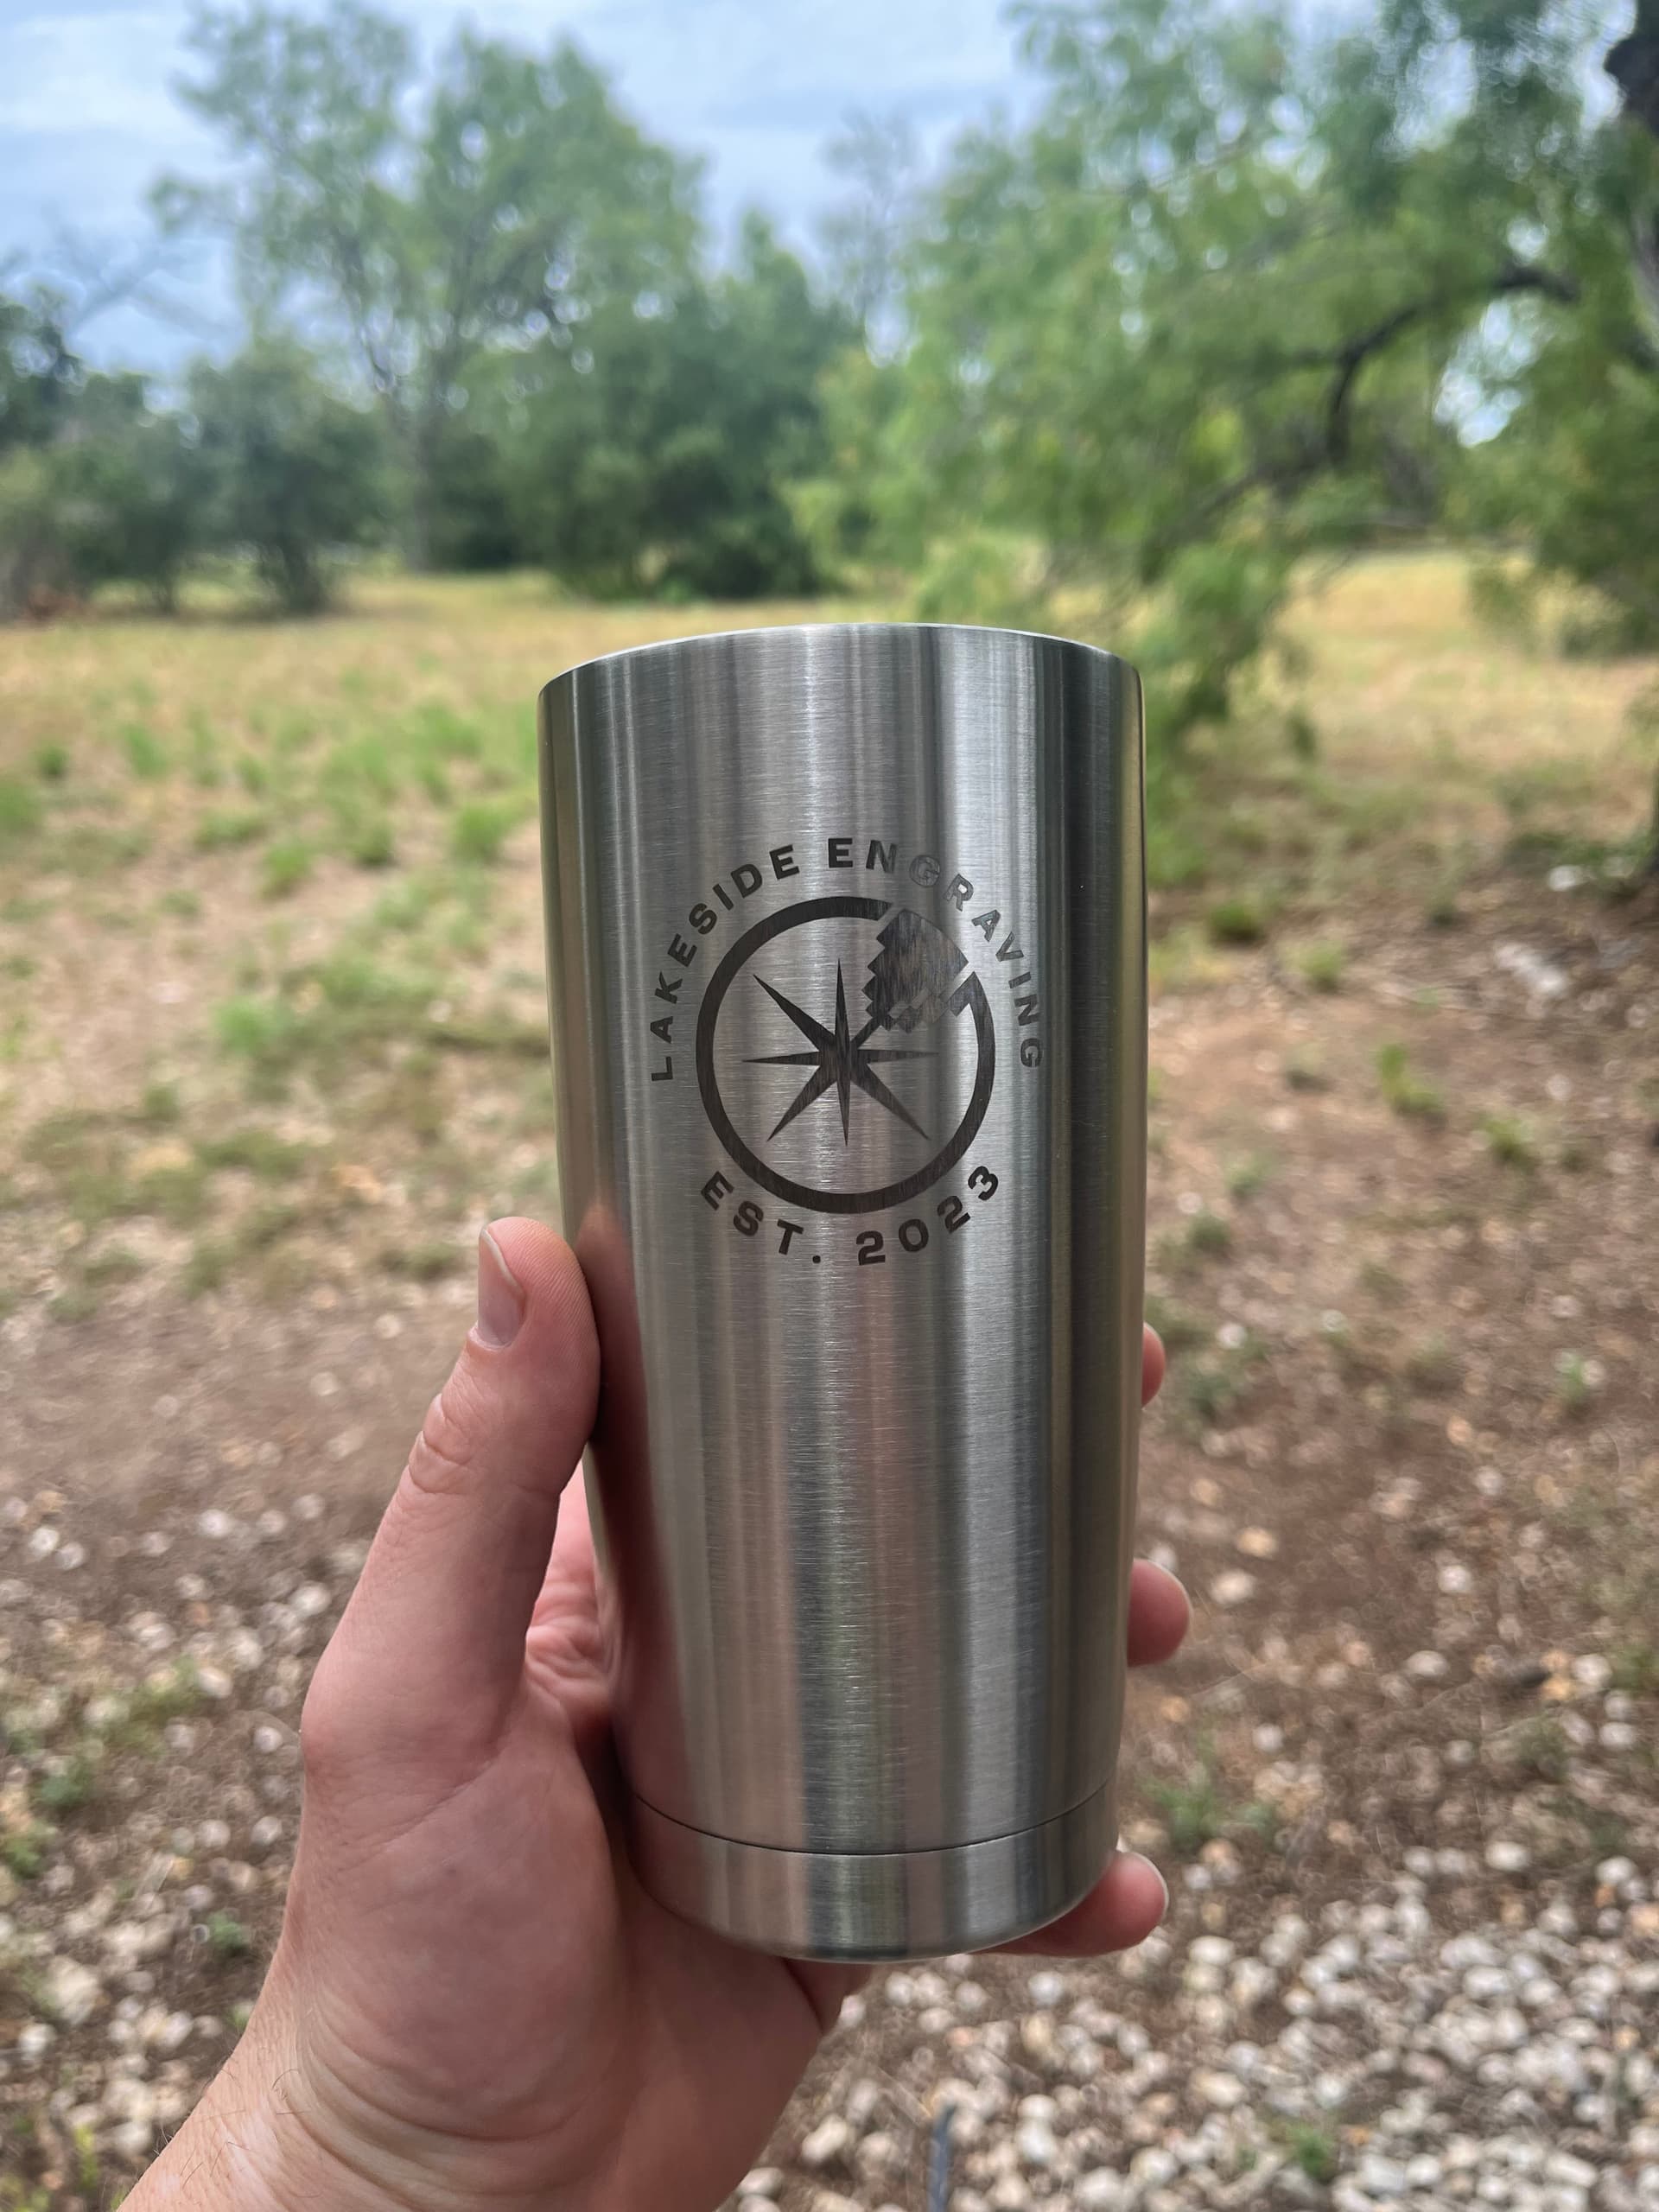
Are you actually engraving the stainless or just annealing it to leave a black mark?

This is annealed/oxidized, depending on what you call the process… it’s smooth to the touch…


What lens/source/power is your machine?

Does any of this make sense?


Usually when I get the browns with stainless, it’s running too much power, low frequency and/or a long q-pulse.


Most of us read your information or profile to determine what kind of machine you have… it might be of benefit to you to add fiber to the type of machine you have… that would tip people off you don’t have a grbl based machine…

Probably why you got a response from @Bikemike related to grbl machines… we all have fell into that trap… In all references… I believe fiber machines are pumped by solid state (ss) diode dpssl lasers, so they are also diode lasers… :wink:

You can read a users profile by clicking on the users name on the post…

Good luck

:smile_cat:

1 Like

Hi Jack

I have a 110 mm lens hooked up and a 200 mm lens on the sidelines. This machine focuses with three red dots so when they’re all combined the lens should be in focus. I have been in focus through all of my tests. It’s a commarker 20 watt fiber laser btw. I am trying to anneal it but atm more focused on fixing why it’s stretching, but i’m adjusting them occasionally as i go.

  1. I changed my DPI from .01 to .025 per your recommendation.
  2. My tumbler/rotary are perpendicular to the laser but the tumbler is spinning left/right on the Y axis. Won’t lie this part is a bit confusing to me so i added the picture below of my set up.

  1. I adjusted my split size to .05 per your recommendation.

I am trying to anneal but atm i’m putting all of my attention towards the stretching issue and not so much the power/speed.

The picture above shows what I got with the adjust settings. I also don’t have a Q pulse option and Commarker said my max laser frequency is 60 so i’ve been going with that for now. It’s like the image is barely stretched like 10% or something. The logo is basically a circle and i’m getting a mixed circle/oval.

Any other ideas?

Could it be the speed settings on the rotary?

When I tried cyclinder correction and basic engraving on a flat surface the logo is round. It’s just the rotary.

EDIT: Something is wrong with the steps per rotation. I got confirmation from ComMarker that the chuck rotary is 12,800 but when I put a 100mm x 20 mm rectangle across it doesn’t even meet up halfway. It’s more like 1/3 to 2/5 ish. Yeah i’m even more confused now HAHA (sad)

Should be doesn’t really cut it… Especially with short lenses. I don’t use those and have them turned off… I have a proper focal measurement, but always use a test piece to ensure focus…

I have focus stickers and approximate focus values on the column

The shorter the lens the more critical the focus… Doesn’t look like it’s a problem for you… the focus on a F100 is very small…

Whatever works for you is probably the best way…

Looking at yours, it appears the front is to the right…?

I think you have it swapped, the 90 Deg scan angle corrects for the wrong axes selection in the gui setup… the scan angle should be 0 for these rotaries…

You can adjust the frequency lower than 60kHz… the lower the frequency the longer the pulse width as a general rule. The reason is that the fiber needs to be pumped up by the diodes before it lases. The faster (higher) the frequency the shorter the time to pump up the fiber for lasing.

The JPT manual on mine states the most power occurs at 40kHz but it will go up to 4000kHz…

Cylinder correction is for laying something like a flask on a flat surface…

Are you sure you have the diameter correct?

If this is incorrect, the Y image will be the incorrect size… sounds like that’s what’s happening…

Good luck

:smile_cat:

The way you’re rotary is set up is the exact same mine is set up. When I select Y axis with 0 scan angle it literally just makes a thin line on the Y axis in my cup. It doesn’t go up or down on the tumbler, just a line. See picture (line where red dot is sitting on)

How exact can you get for diameter on a tumbler that changes width? I feel like I’m within a mm of the average.It ranges from 85.5 in the middle to 87.2 at the top. I set mine to the middle of where i’m engraving which is 86.8 ish.

If I switch to the Y axis and go with 0 it just engraves a line and won’t activate the rotary. If I choose X axis it works with 0,90, 180 or 270 and I get the same result. An egg shaped circle.

I apologize for needing so much help but I just cannot figure out what I am doing wrong.

Don’t even think this way… there are so many ways these can work we can’t possibly know all there is… I’m learning every time I try to help someone…


I’m starting to wonder if the x and y axes (not the rotary) in the device settings are swapped… I’m not sure if this would/could be an issue… It’s possible that if they are swapped in there, it may effect how the rotary is managed within the controller and/or software…

I think this is a good indication that something is not configured correctly… but I can’t think of anything else for you to try… other than ask the vendor what it should be…

It’s a good question for @Rick, I think he has a fiber and knows much more about the internals of these machines…


It appears it’s setup correctly, at least from what I know… another set of eyes may help and hopefully answer the question if the original axes are incorrect…

I don’t think any of these issues will address the actual problem you are having with it being out of round.

Another thought was that the tumbler is tapered… do you have the rotary head tilted to accommodate the taper? Doubt it would be off as much as your photo shows…

Hang in there…

:smile_cat:

One thing I found out was I had an incorrect setting in device settings. It was reset to Raycus instead of IPG_YLP. I changed it back to the correct .cor file and reset up the tumbler. The circle is still egg shaped.

I will update this thread if I get it fixed so nobody has to go through this. Until then i’m off to try different settings.

I figured it out. I reloaded my .cors file in device settings and drew a circle. It filled a circle. Then I tested it with my proposed logo and it came out in a circle. Thanks to everyone who helped me, but once again I fixed a mistake I made previously. Hope this helps someone out in the future.

4 Likes

Great you’ve got it up…

Thanks for clarifying the fix…

Have fun :wink:

:smile_cat:

1 Like

Really excellent work, Enjoy it!

ComMarker Team

There are a few youtube videos hat address this. it may not be the exact scenario you are looking at, but you may find them very helpful. Better Round logos on tapered glasses | Laser engraving rotary | xTool D1 and RA2 Pro | UPDATED - YouTube
& Circle Logo Engraving on Cups: How To Make It Look Correct - YouTube

On round logs on round items try stretching your logo about 7-10% wider in LB. On screen it will look like an oval, but visually on the cup it will look round. It’s an optical illusion. I’ve tried it a few times and it’s amazing how it changes the look of round logos.

This topic was automatically closed 30 days after the last reply. New replies are no longer allowed.