Hi all. I am very new to laser cutting and bought a small 65 watt used Boss LS machine to see if it would be wise for my company to invest in a new huge machine. I went through it and installed a new lens, mirrors and belts. I also gave it a full alignment. I set it up to cut some test patterns in 1mm and 2mm acrylic in Lightburn. The cuts were perfect. I made a change and tried to cut 4.5mm acrylic. I set the machine to something like 30/60 (30mm per second and 60% power) and it cut at about 22ma. The cuts went about half to 3/4 of the way through the material. I then backed the speed down to 10/60 resulting with no change in the cut depth. I then went to 15/90 with no change in the depth. Out of desperation I set 5/90 and still cut about 1/2 way through. I then noticed that the current was now low at 5/90, about 5ma. I then jacked the speed back to about 25 and the current came back up to 22ma. Why does the power drop as the speed drops? Is there a setting for this that can be changed? I would imagine that a high power fast cut would be be the ultimate goal of laser cutting. In the end I managed to get through the material with terrible frosty looking cuts at 1/90. Yes, 1/90 @5ma. (: What am I doing wrong? Ultimately it was a terrible cut and took forever. BTW, the Rudia max is set to 80% and I tried various focal depths with10mm being optimal. It seems counterproductive that at lower cut speeds the power isn’t available. Please help as I am very hopeful that we can use a laser machine for production.
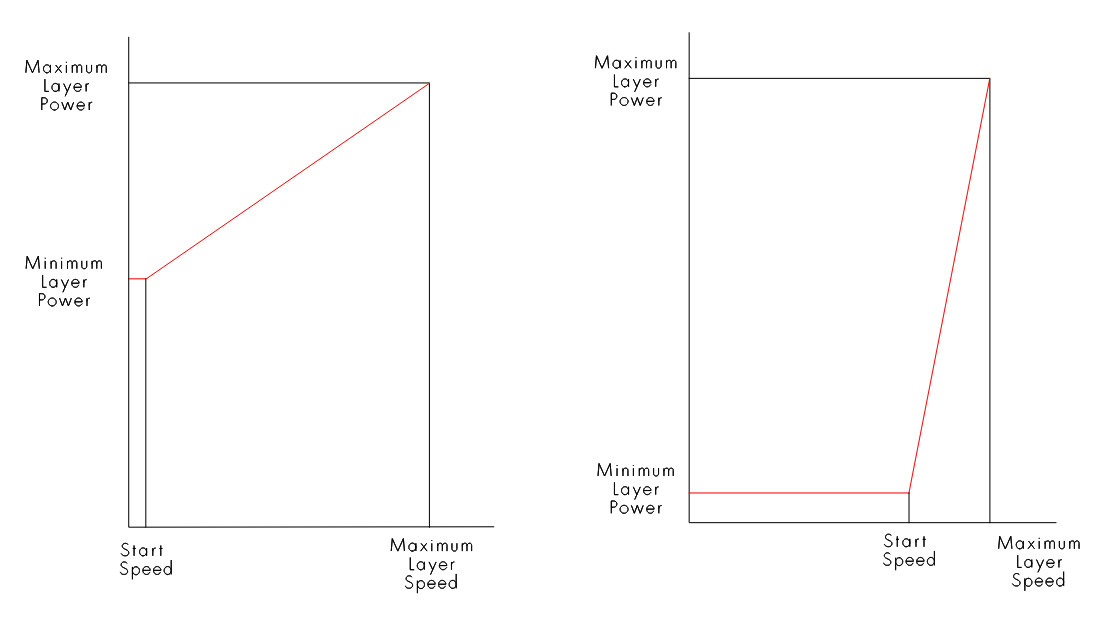
It’s likely that your slow speed forced the Ruida to use only minimum power.
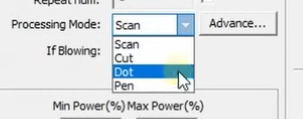
The minimum/maximum power range is used doing vector cuts/engravings.
The minimum power level is used anytime the start speed is equal to or greater than the current speed.
Most of these controllers have the start speed set to around 20mm/s, so you’re right there.
I think it works like this.
These values are in the Ruida and you need to change them via the Machine Settings.
![]()
Great! At least there is a reason for the seemingly strange behavior. I hate to claim ignorance but in looking at the two setup screens in Lightburn I see no provision for modifying this information. Is it that it needs to be changed via the keypad on the Rudia? In setting up the default autofocus I had used Laserworks to interrogate and change the value. Do you know if this setting can be changed there? Thank you very much for the reply. I would have never figured it out on my own.
You should be able to change some of this via the machines console.
The machine settings in my 1.7 version of Lightburn has the Machine Settings under Edit, newer versions are in Laser Tools I believe.
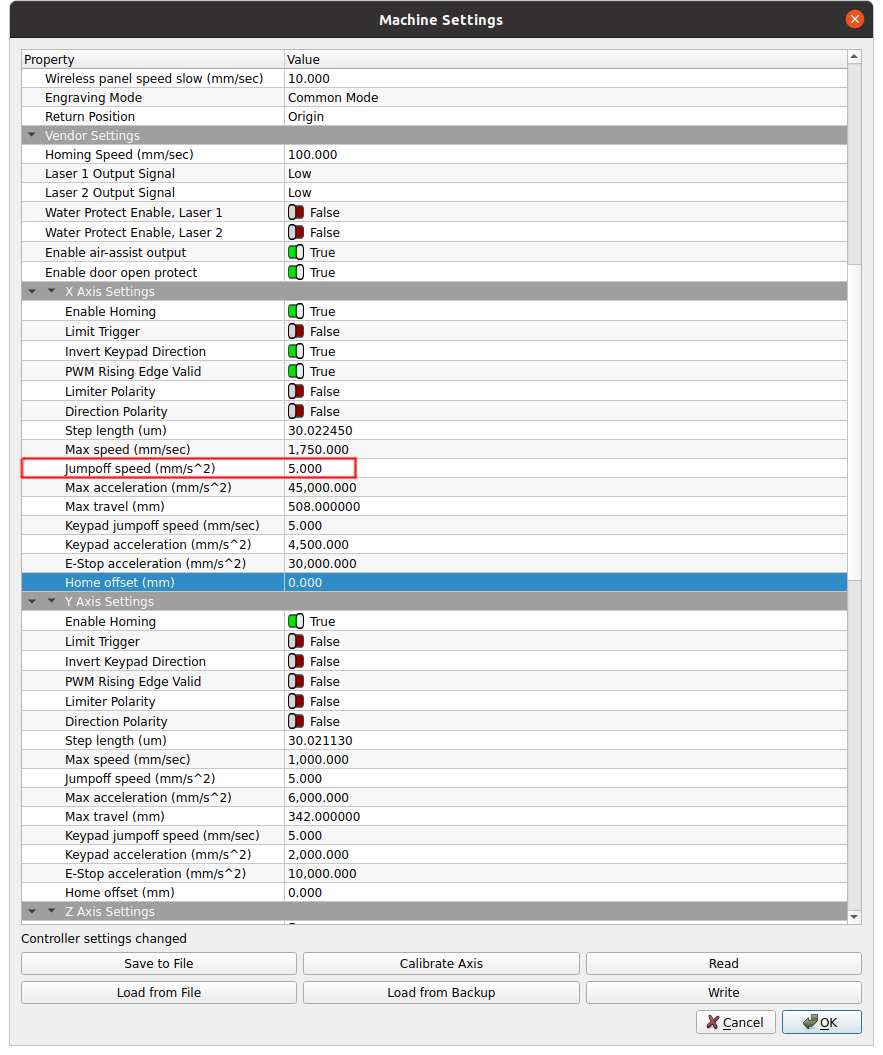
Each axes can be set differently.
![]()
Jack, Thank you again. You are correct, in 2.0.0.2 the settings are in “Laser Tools”. I will work with the settings and report back.
I am not on site but through the magic of the internet I just managed to interrogate the machine. Interestingly, the X and Y settings are set to different values. Do you know if there are any ill effects by changing the values?
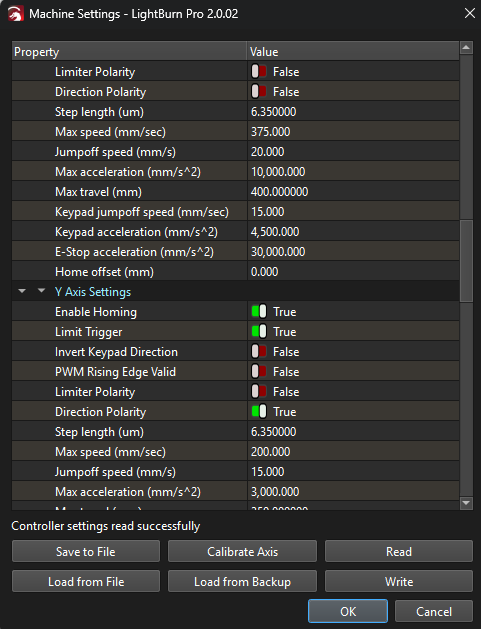
I dropped both of mine down to 5mm/s^2. I can’t think of anything this could harm.
![]()
I’ll give it a go and let you know. (: I got pulled onto another project today, ): but tomorrow I should have the time. Thank you again.
Sorry for the late reply. I set mine both to 5.0 as well and it worked line a charm. I can’t thank you enough. The sample part came out better than i had ever hoped for. I am curious, how is it that you know so much about the machine setup? Do you work for a laser equipment manufacturer or service organization? It is a pretty obscure setting and you knew right where to go to fix it. I would have been lost without your suggestion. Thank you again.
Helps to be clairvoyant. ![]()
Just working with it. I got my laser about 5 years ago to learn how they work. Part of that was dealing with the Ruida.
One of the issues, is that being Chinese, most of these entries are in Chinglish so there isn’t straight across relation to the name and what it does.
I know what’s called the tip of the iceberg as there are still settings I’m unaware of or haven’t had a need to use/modify them. This is especially true when using a multiple tube system.
EZCad will complain, it can’t find the dog, which isn’t very clear but it isn’t detecting the usb stick. I’m sure it relates somehow to dongle.
Glad you’re up – Have fun.
![]()
Too funny… I think I should take an “Chinglish as a second language” class. (![]() smile:
smile:
Thank you again. Chris.
Here you go.
![]()
And to think that I thought I was only joking! This is getting worrisome! ![]()
Have you changed the Jumpoff speeds?
Those settings should (AFAIK) be left alone, as they are factory-tuned to your machine, reducing them might slow your machine down - particularly for the X-axis which should be a much higher speed than Y as it has less interia to overcome (at my machine these are set to 21 and 10mm/s respectively).
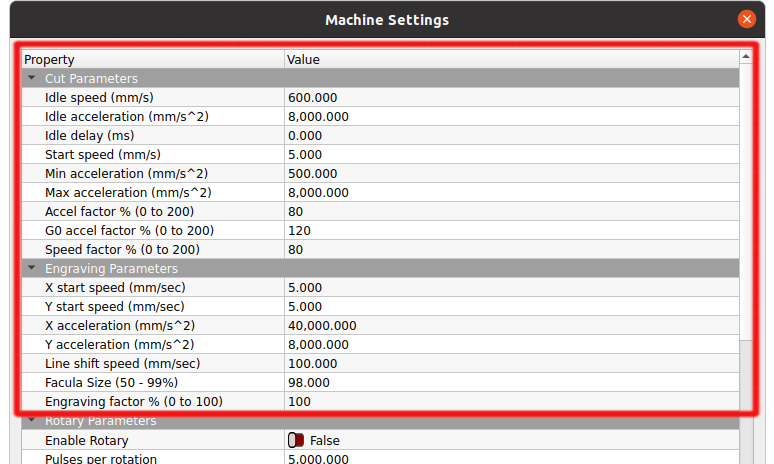
Probably best just to increase the Min Power% of the job in these circumstances where job speed is at or below ‘Start speed’ , and if you really must change the Start speed you can do that here under ‘Cut Parameters’:

How does Lightburn or the Ruida know if I’m doing a cut or an engraving? In other words how do I know which parameters the Ruida is going to use?
This is pretty clear in RDWorks software. Is there a cut option somewhere I haven’t found?
I don’t see any way in Lightburn that I’d call a definite way to distinguish between the two.
I’m willing to learn, but I’d call BS that the factory is spending an extra second doing anything to tune any of these… I’ve only worked with these controllers about 5 years and I’ve seen nothing that leads me to believe the factory did anything but assemble it.
It takes time to set these up, not to mention all I’ve seen have a start speed of 20mm/s, which is absolutely wrong for what @Gearbreaker is doing and I think his results confirm he made the correct changes to the Ruida.
After you advise him to change the jump off speed, and then you state he shouldn’t change these.. you kind of lost me there.
From my experience using my rotaries, the jump off speed is where the acceleration starts to be applied. If your jump off speed is 30mm/s the 30mm/s speed will be applied initially then at or above that value, the acceleration for that axes will be applied.
If this is too high, the mug looses traction with the drive wheel at the start. If anything slows the machine down, it’s lowering the jump off speed.
Working with these, I see what I normally seen in production machines for the public, set parameters that are the most conservative and create the least amount of support problems.
I am willing to learn from anyone, if you know more about these, please advise.
I would like to know how to use the cut and engrave parameters and I’m sure you can advise us how each is selected via Lightburn.
![]()
All motions are subject to acceleration limits at each end, but “engravings” have pixel-by-pixel power variations during the constant-speed section. The difference may be as simple as an array of power values covering the length of the vector, with “cut” vectors having nonzero power values up to the endpoints and “engraving” vectors having zeros beyond the constant-speed section.
I haven’t been able to figure it from the reverse-engineered code:
At some point I must set up MeerK40t and feed a simple design through it to see what the decoder has to say.
AFAIK, if you are using ‘Fill’ or ‘Image’ in LightBurn the ‘Engraving Parameters’ of the controller will be used (anything that uses line shifts, and scanning offsets) - otherwise I’m fairly sure everything else from LightBurn will use ‘Cut Parameters’. (@LightBurn might confirm?)
When I asked “Have you changed the Jumpoff speeds?” I wasn’t advising it, I was just asking a question.
We officially advise changing Min Power% to fix this issue:
My concern would be that a blanket reduction of the Jumpoff speed may unnecessarily slow your machine down.
Hi, I’ll chime in but am claiming ignorance. Your comments are mostly way over my head as I have only had a few weeks of laser machine experience. I just want to say that when I was having the problem, adjusting the min/max settings in the Rudia it would not correct the problem of low power at slow cutting speeds. Changing the afore mentioned parameters did make the machine do what I needed it to do. Perhaps its a setting in Lightburn or even a glitch in the Rudia but the parameter change did fix the problem.
I have a strange problem with the machine where when attempting to engage the “fill” in a burn the controller would run a file that was no longer in existence. In fact, it was a file from the previous owner that was in the controller when I bought the machine. I cleared and fully formatted the memory and the file appears to no longer exist in the controller until I try to use “fill” in a certain project (“offset fill” worked fine). It then rears its ugly head. Strange, yes. I am afraid to update the Rudias firmware as I’d hate to brick it because of the looming memory issue.
Just throwing my .02 in to help you to sort this out. I will research your parameter comments to learn more as time permits.
Everyones help is always appreciated. Chris.
So if you try to use ‘Fill’ in LightBurn and send the job file to the machine, the machine will run some other phantom job file which is not even present in the job memory?
Haven’t heard that one before!
Are you using ‘Start’ or ‘Send’ from LightBurn? Usually best to ‘Send’. After sending a job, at the machine panel, try explicitly using ‘File’, select the job, and ‘Enter’ to see a preview, do you see the correct job?
If you used a fast “speedily” format last time, try a deeper “In grain” format of file memory:
Got it. It will definitely slow down the machine. Of course, if I’m doing mugs, I’d rather have them come out slowly and not garbage.
Advising an increase in power means one of us doesn’t understand what’s going on, as it will still go to minimum power, which now would be too high. So IMHO, increasing power is clearly the wrong answer.. As you read @Gearbreaker advises it fixed his issue. Thanks Chris.
The Chinese know everything about these and all applications is a poor assumption. The only way to make a mug stay on a roller rotary is to reduce the jump off speed. Of course it’s going to go slower, but as an operator you should understand that.
I don’t recommend random changes, but certain changes are needed to get the machine to do what you want and many times, changing settings within the controller can help with this.
So if I engrave 3mm basswood in line mode, I’m using the cut parameter list? Doesn’t sound right to me… maybe a clarification from the developers would help. I’ve often wondered and asked why isn’t cut one of the option so we know what it’s doing, not guessing.
I’m not picking on you, but I think Lightburn should be clear on how to use the Ruida, maybe that’s the issue. I’d like to know rather than guess, I’ve been burnt on these before.
![]()