Thank you for thoughts that I take into account but…
Do you want to explain this in other words? I probably got lost somewhere in the translation and “rotating” the piece doesn’t solve the problem because I intend to make it up to half the thickness of the material on the front side, and then turn it around/flip it and cut the other half of the thickness on the back side of the material.
This is because I already realized that trying to make the full cut on just one side ruins the internal foam.
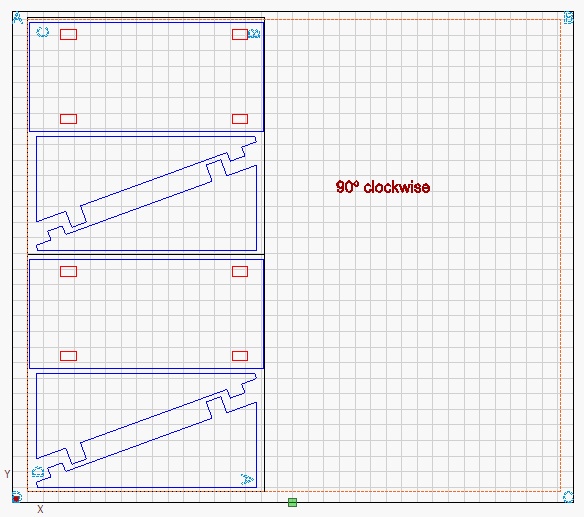
If you can guarantee the corner placement you can use it to accurately cut both sides. Starting from the top left front, you have corners A, B, C, and D - if your placement is based on “D” (bottom left) when you flip your piece over horizontally “D” is now in the lower right corner - so rotate the piece 90 degrees clockwise to get it back in the lower right position (starting at top left, your corners would now be C, B, A, D) - and your reference corner is very accurately placed.
You second cut shape would be mirrored around a 45 degree line from corner “D”. My explanation makes this sound complicated, try it on a piece of paper to see what I mean
This video I found yesterday.

In fact, this was the first video I found that deals with exactly the issue I want. Make a cut halfway through the thickness of the material, turn the piece of material over and make a second cut that will coincide exactly with the first.
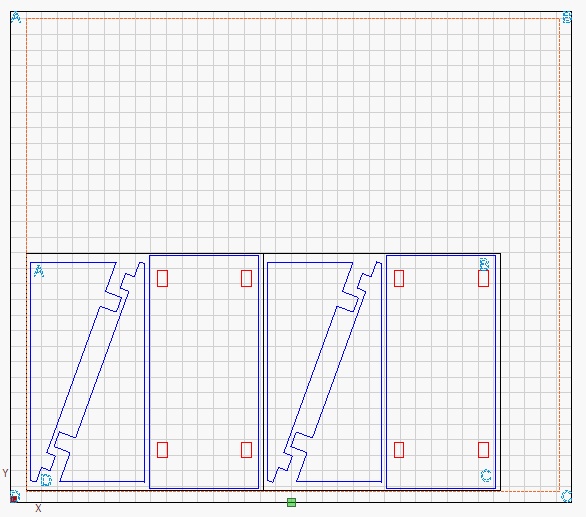
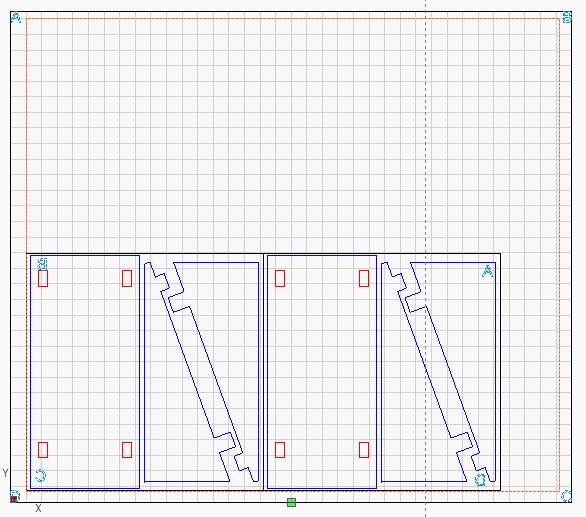
Now I will try to show you what I am understanding with pictures because it’s more fun! ![]()
So…
If this is what you mean. this is a good strategy to approach the question too.
Thank you! ![]()
Exactly - sorry I wasn’t in a place to draw the picture.
1 Like
There’s no problem at all. Thank you! ![]()
Okay, Sunday morning, let’s try again.
This time I opted for the @onhiatus technique.
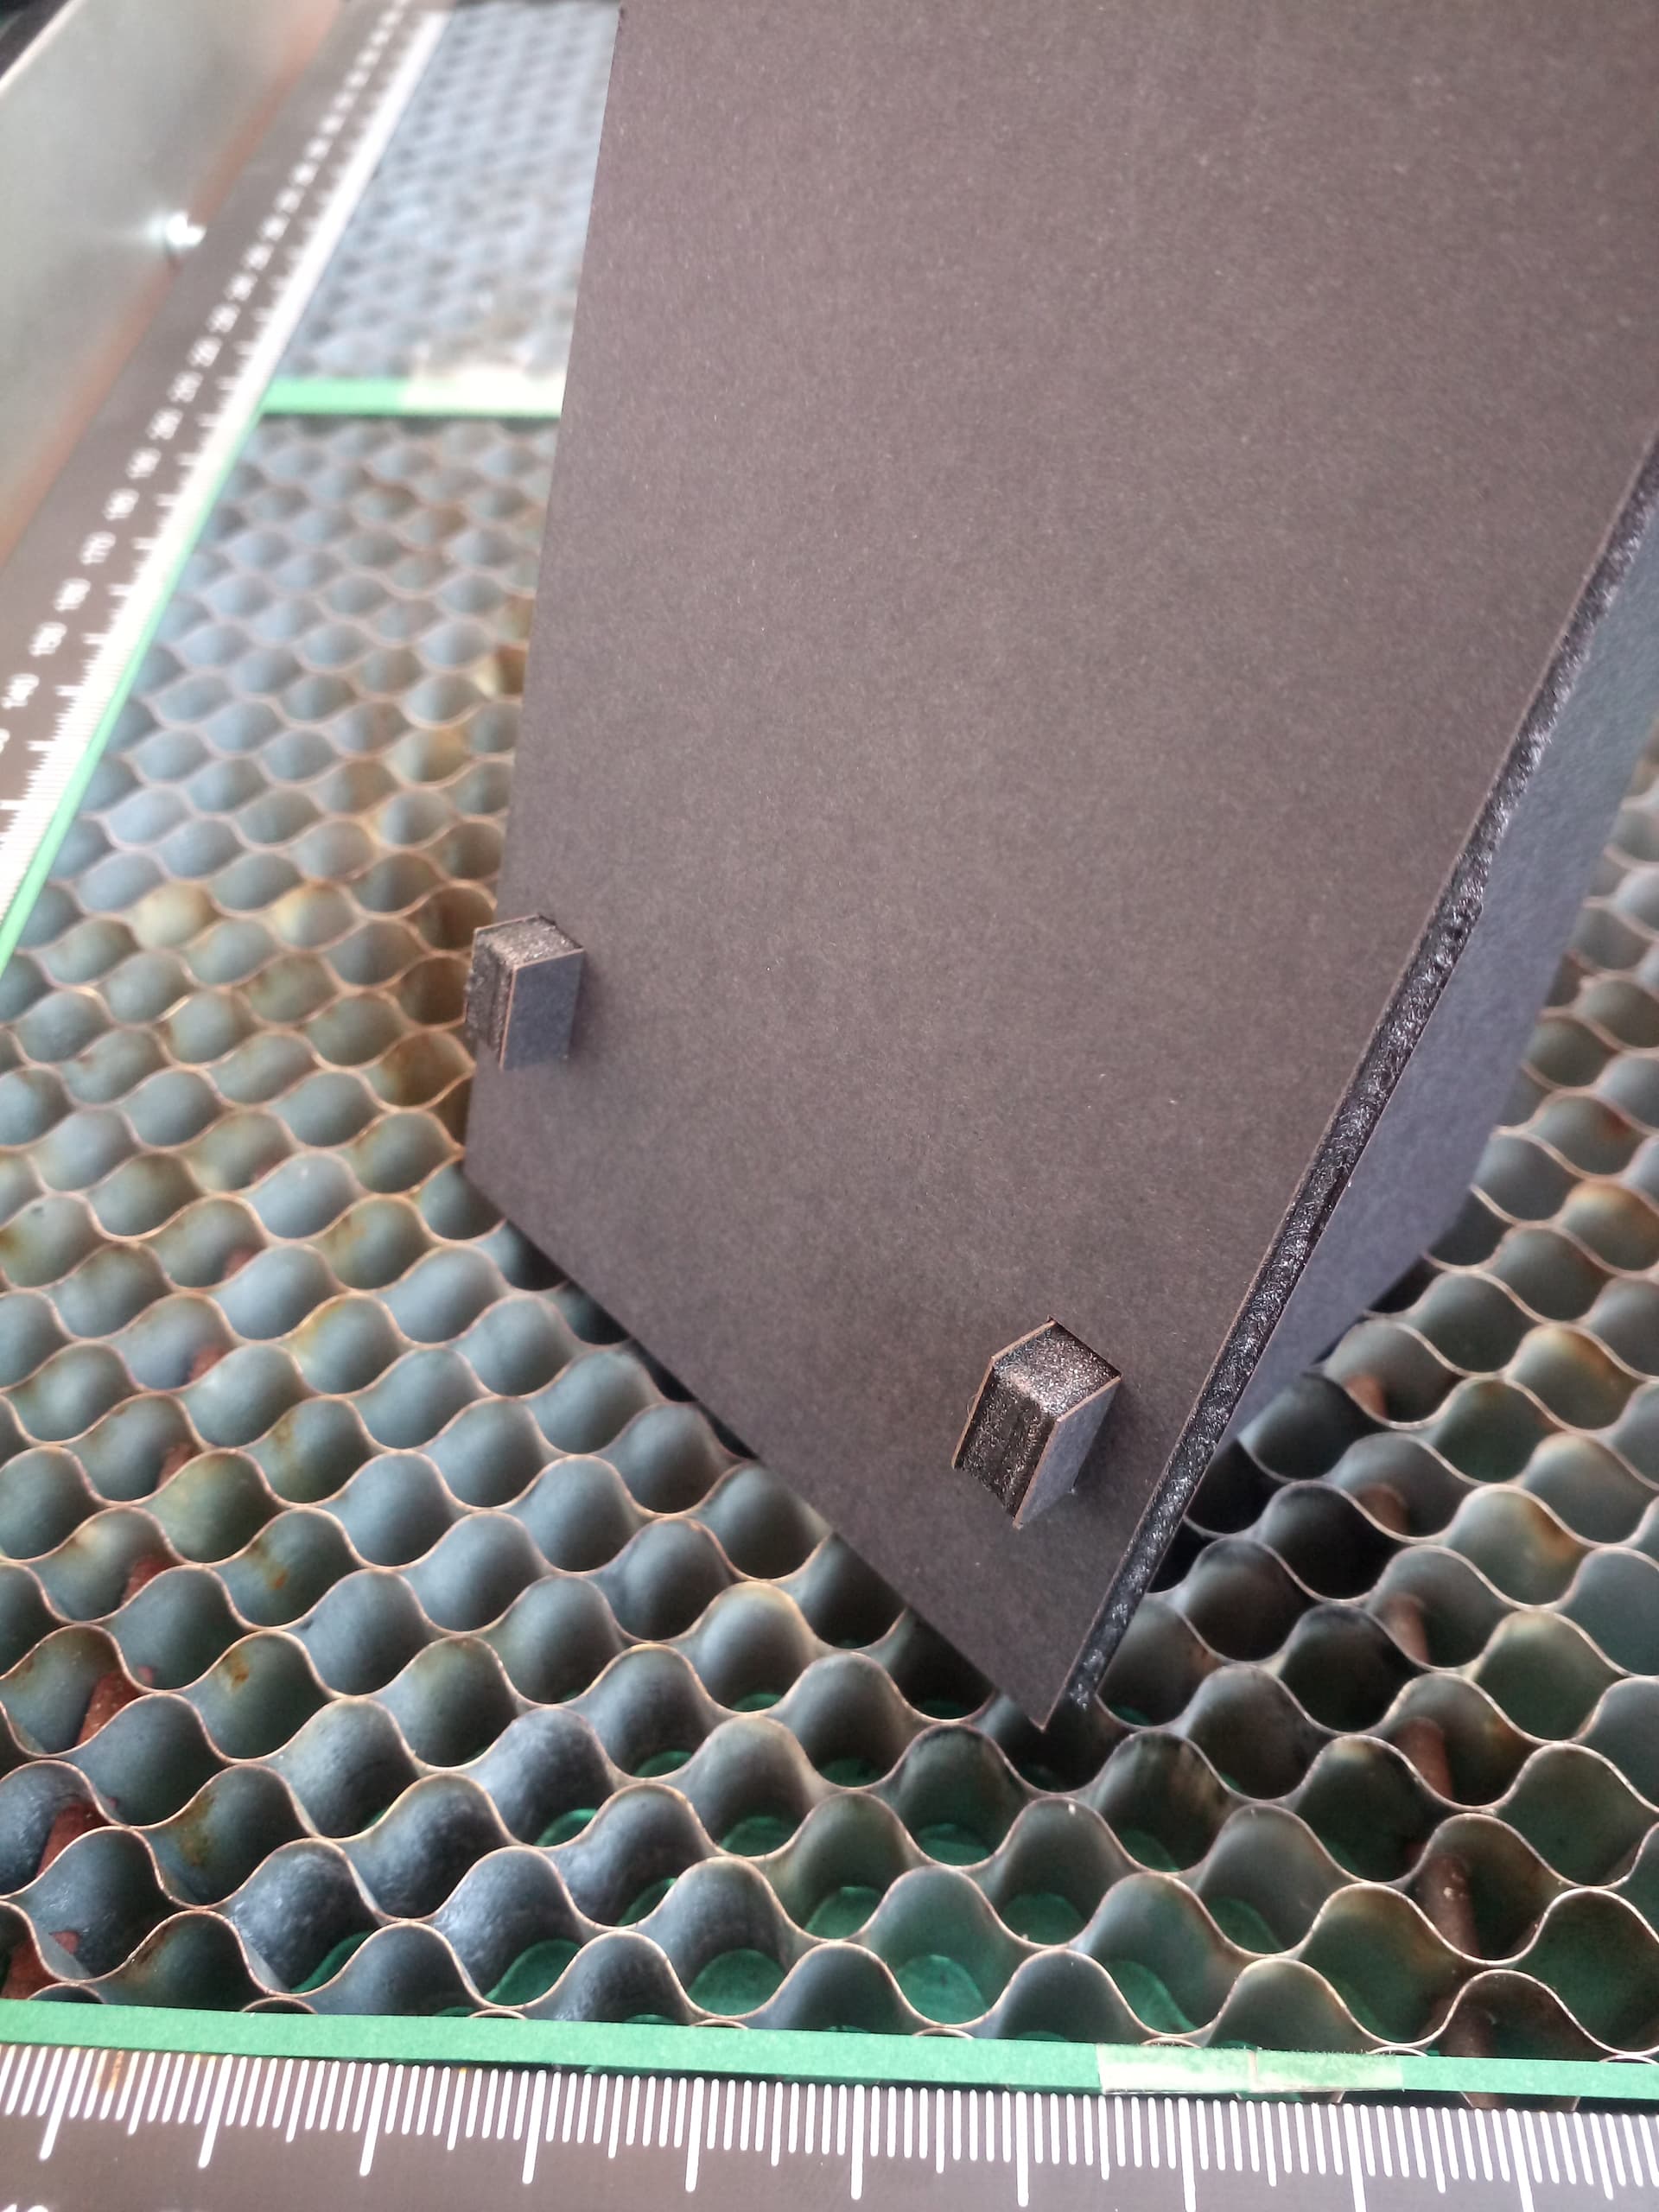
I did a test on cardboard and another on K-Line. In both materials I came across with a beginner’s difficulty.
Secure the material in the honeycomb.
If in the case of cardboard it moves due to the air assist (which can be disabled) in the case of K-Line it is warped enough that, from one end of the piece to the other, the laser protection that is only 0.8mm away distance from the face of the material (for focus purposes) touch the piece and make it move away from the spot.
I tried to use double-sided tape but when removing it damage the material surface.
Painter’s tape has little adhesion, and forces me to create an area of extra material that could be damaged when removing the tape. But probably the most reliable option.
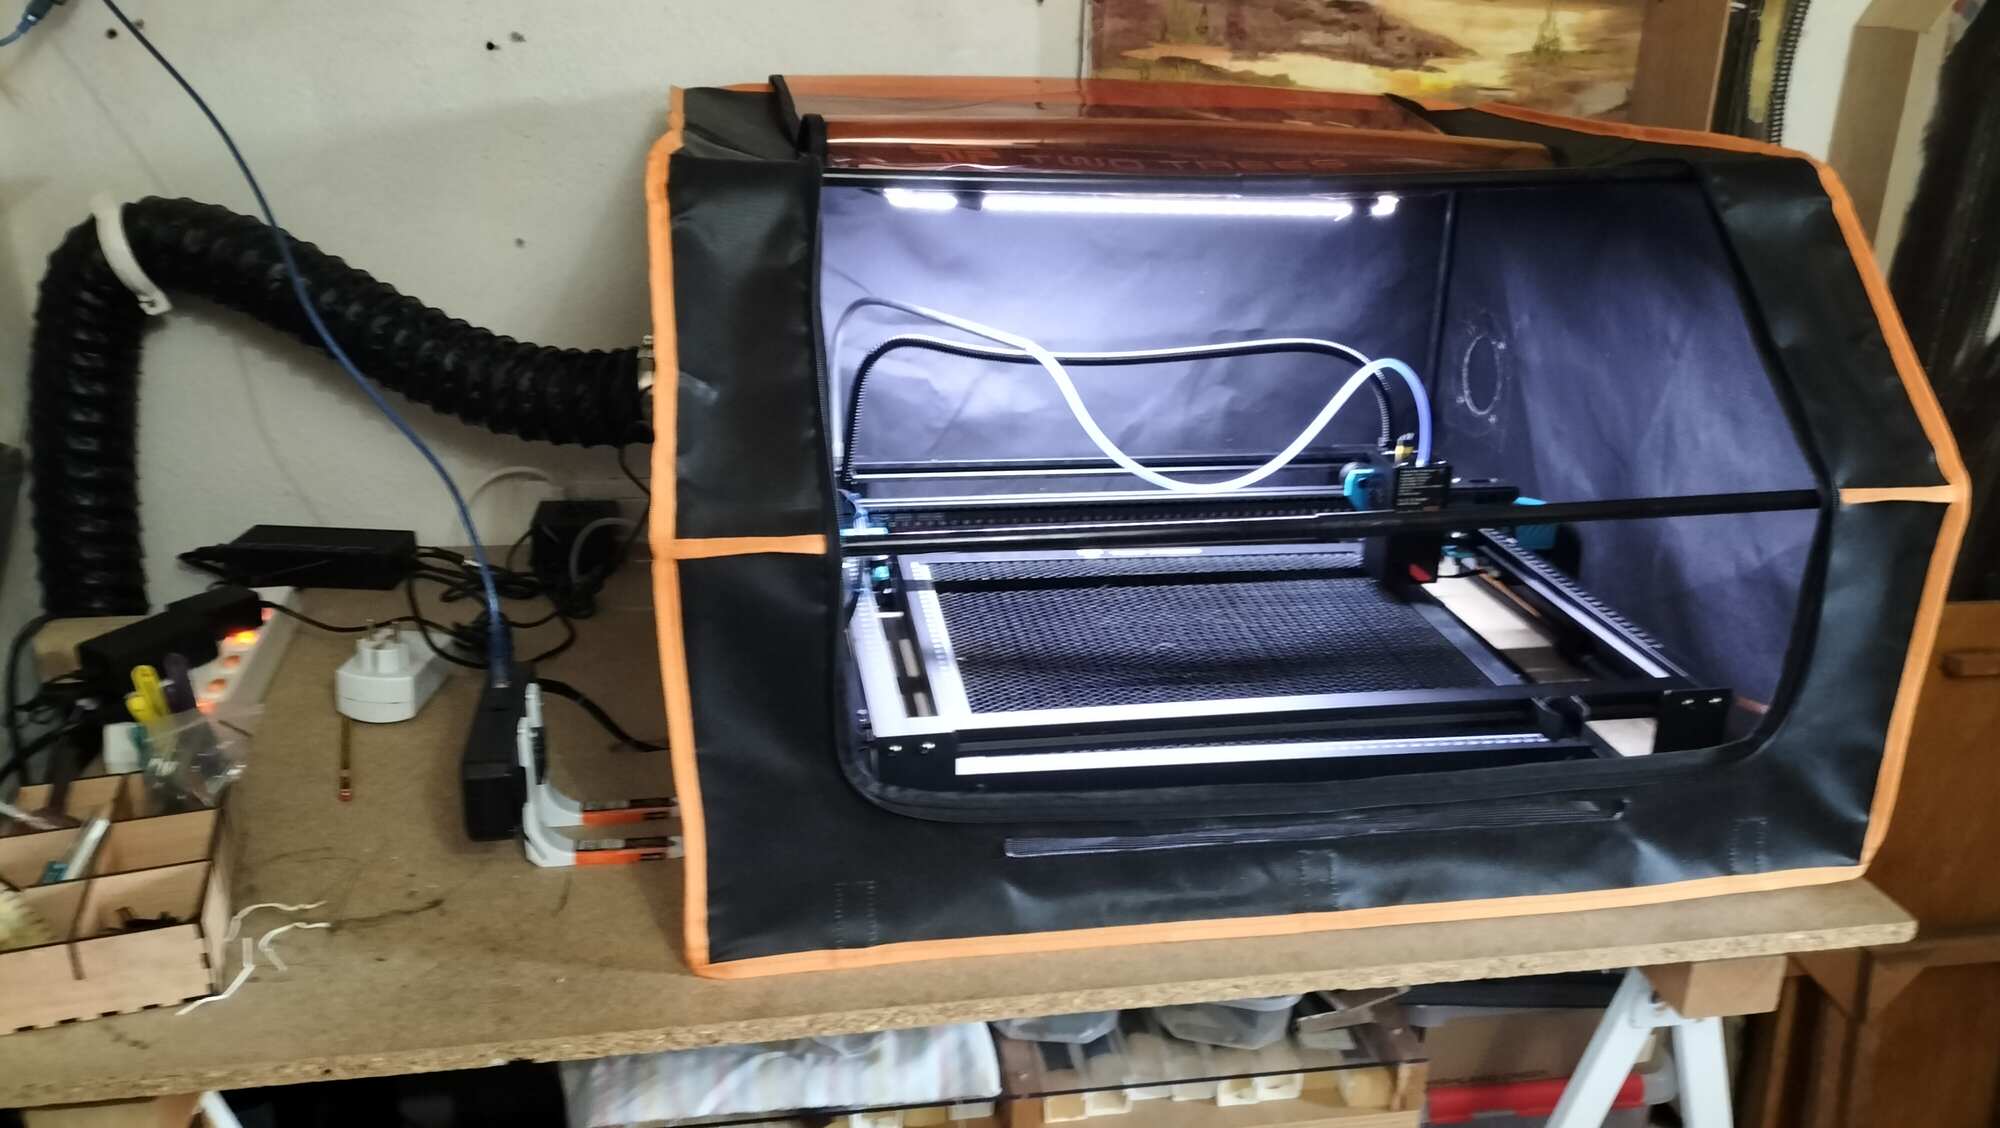
I’ve thought about using some fixing pins but taking into account the jig and the length of the pins needed plus the excess material needed (According to my calculations, around 60mm more (30 for each side)) I don’t know if it would be reliable… ![]()
For some time now I have been putting off building a bench with suction where I intend to support the laser machine. This bench will allow suction to be carried out underneath the honeycomb, which in addition to helping to fix the material to the honeycomb, will also extract smoke (in cutting mode). I may have to proceed with this build sooner than expected.
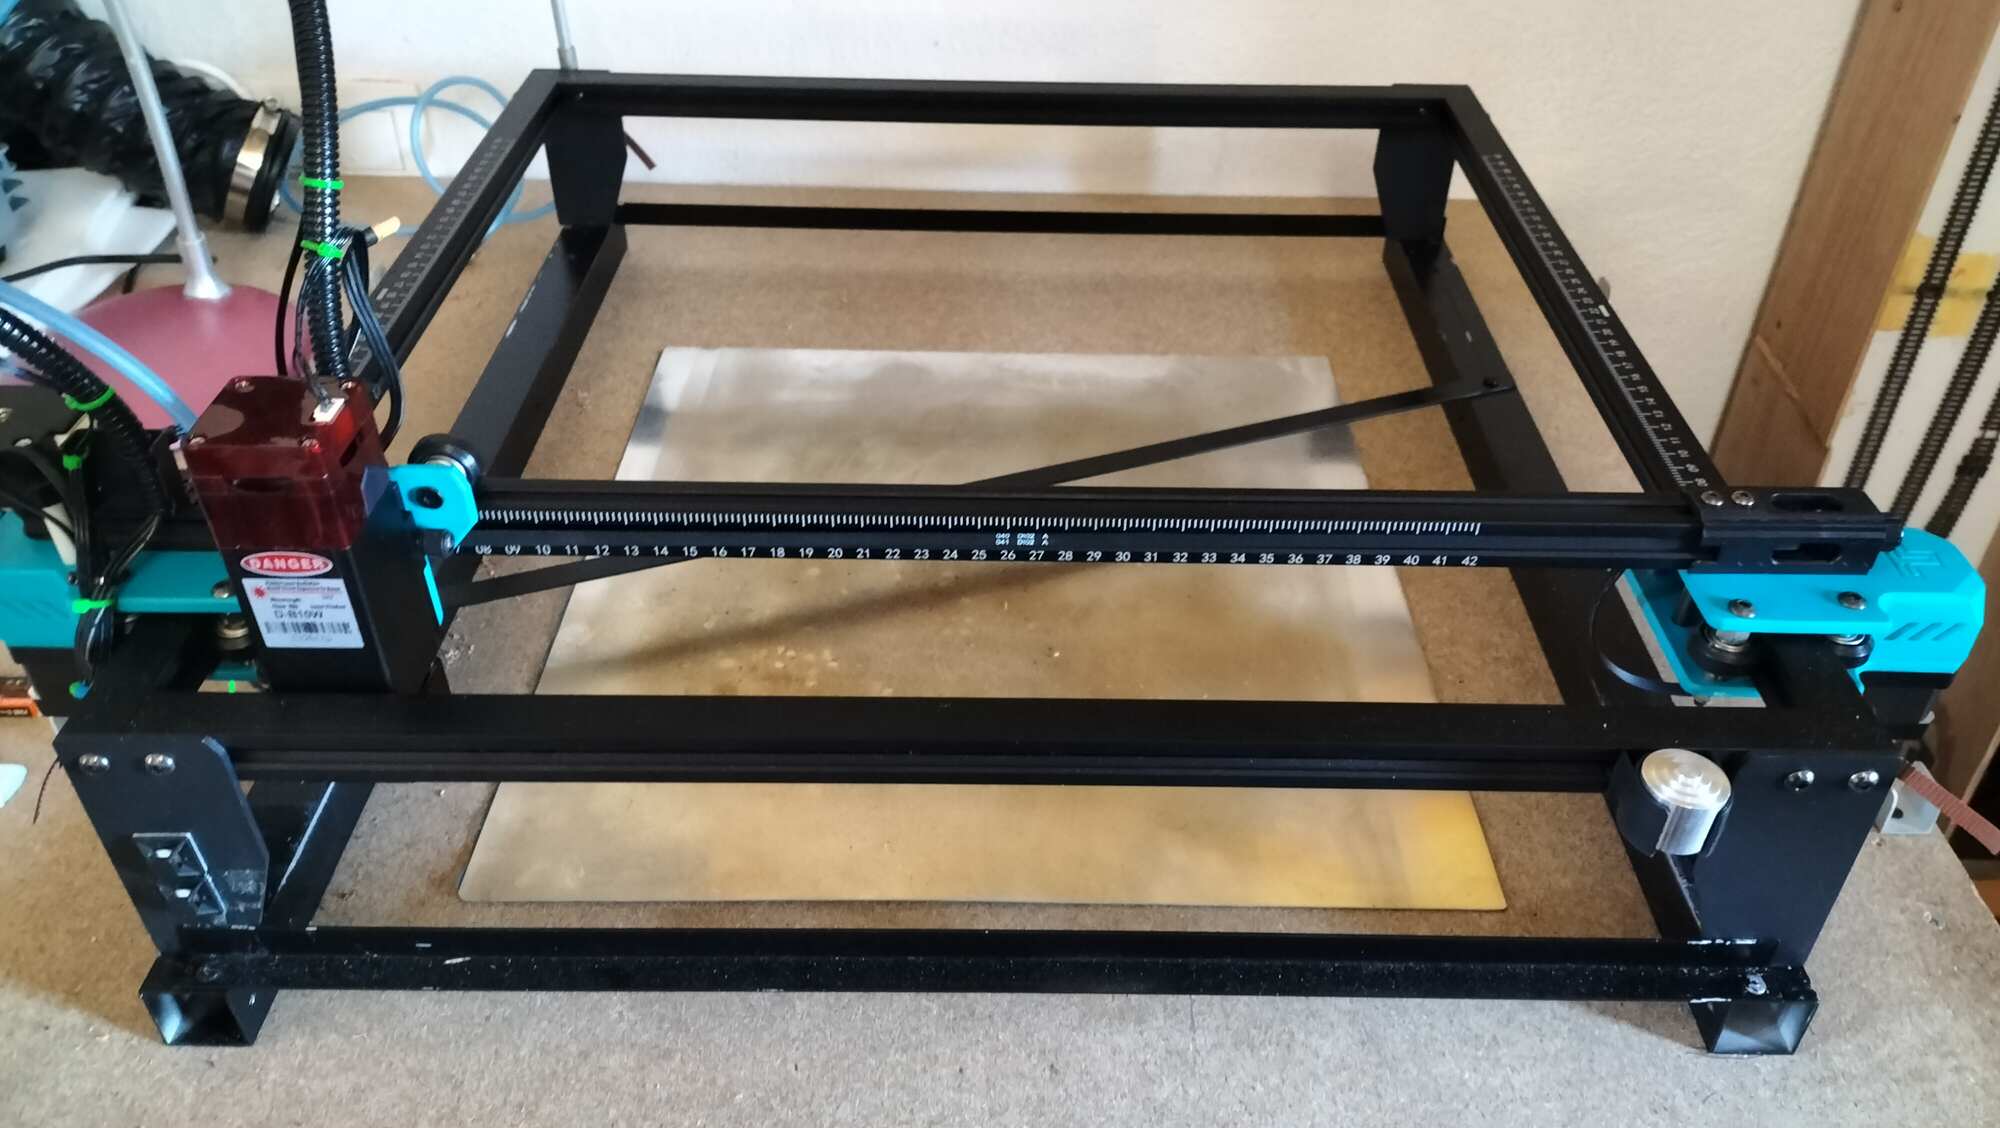
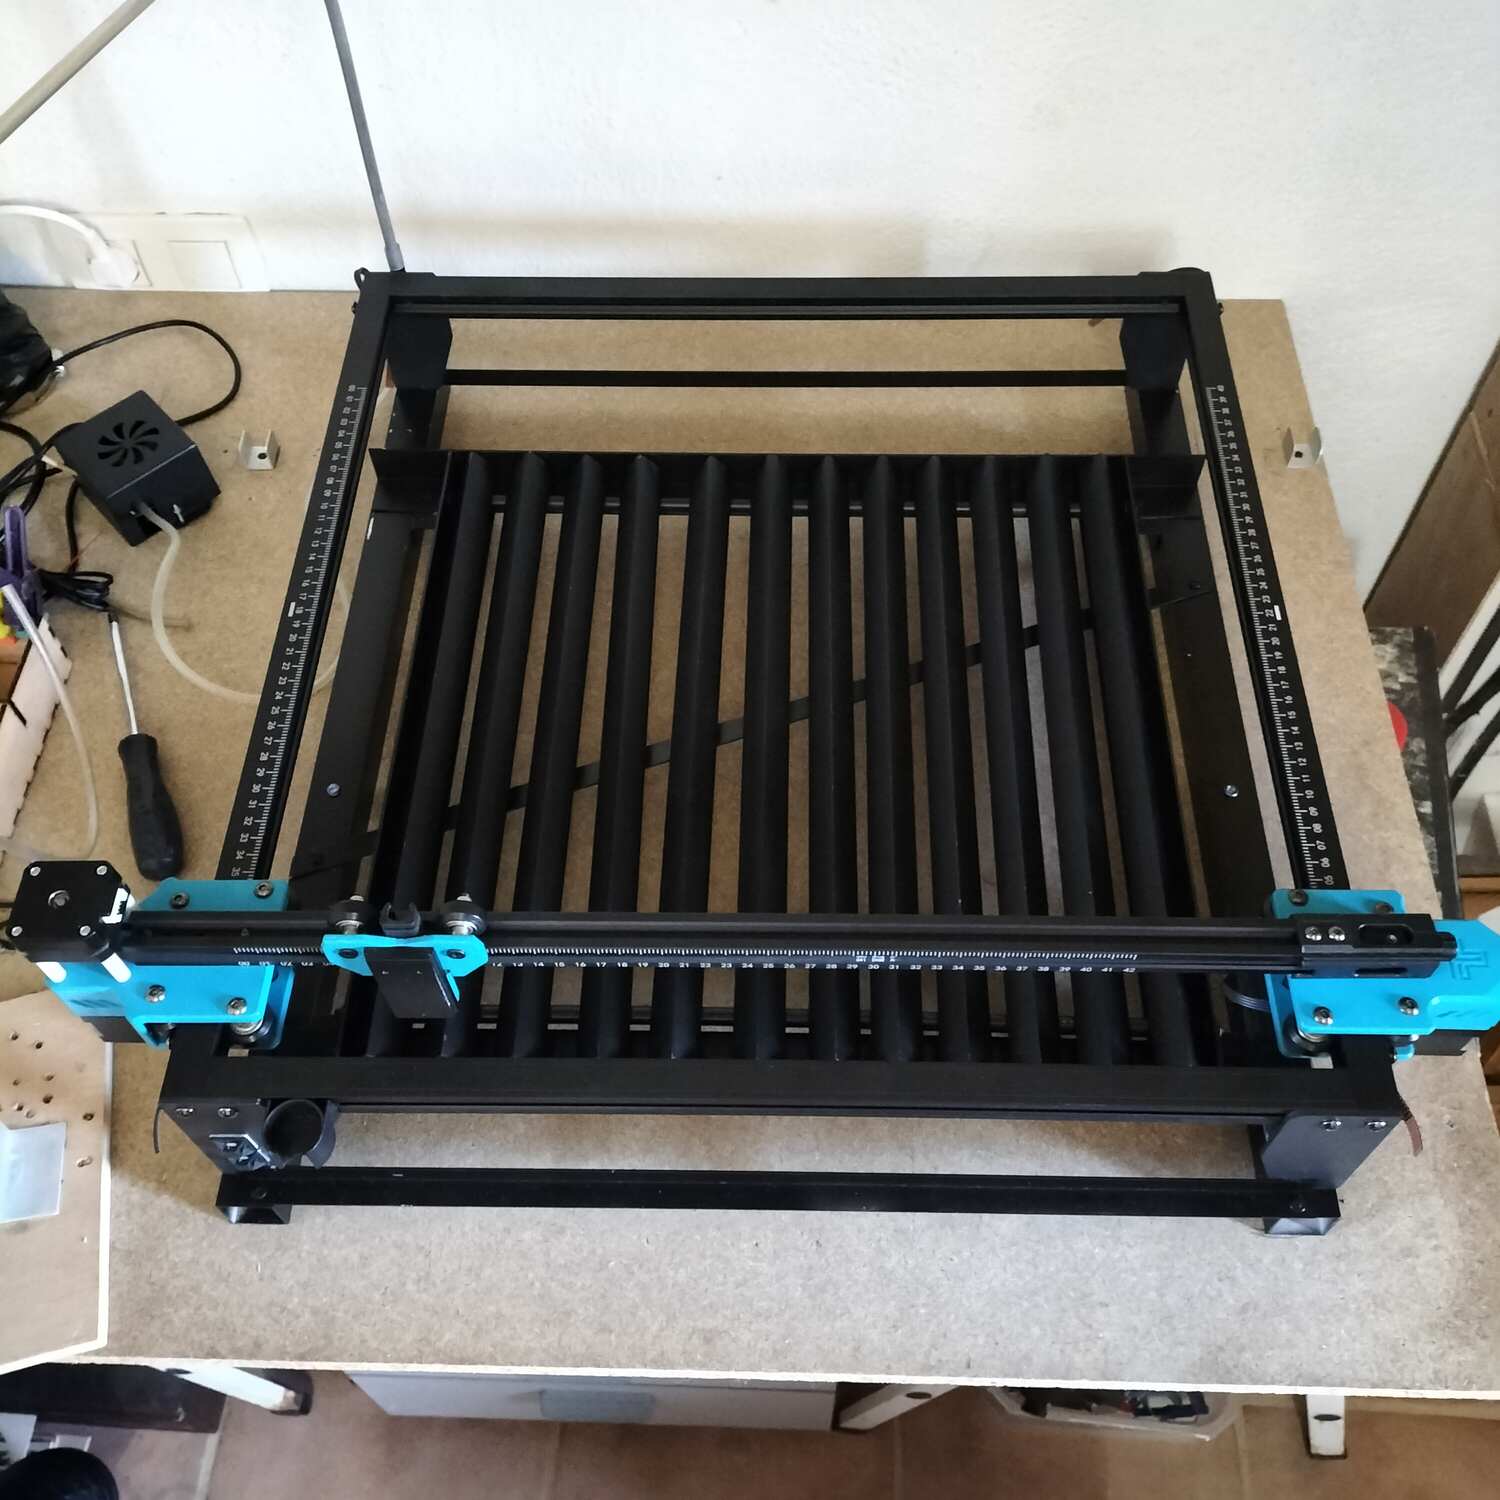
I’m leaving two photos of today’s results, which aren’t what I want because I had to do more than one pass to compensate for the warp, but they’re on the right track to being almost perfect.

Have a nice Sunday!!!
2 Likes
Hi
I realise the conversation may be more about achieving the cut from both sides of one piece of material, but
I was wondering if a 1.5mm or 3mm version of the K-line would work if cut twice and glued together to get a 3mm or 6mm finish thickness would be acceptable
Found at:-.
Ps, I was at a specialist interiors place a couple weeks ago (in a real hurry on other business, so only made a quick mental note…must call back there) and asked about bb/bb grade ply at 3mm or 5mm. They said they had 4,6 & 9mm of bb/c at 75euro up per aprox 8ftx4ft sheet.
Can I ask if that seems like a good price?
1 Like
Hi @Pete, of course.
I’ve thought about that too, but something that was supposed to be simple and affordable becomes complicated and more expensive.
Besides that, I’m left with the 6mm sheet for nothing and taking up space… ![]()
I didn’t know this store, even though it’s Portuguese. Thank you very much for the recommendation, it’s another store I can check out.
However, unless they offer a significant discount, or the quality is much higher than the K-Line I’m using, they sell the same product for about 10x more than I paid.
75€euro (plus shipment probably) is way to expensive to me. Only if it was for professional purposes and I could charge for it. I’am in the very beginning of “hobbie business”. And… to be honest, I’ve only offered things I’ve been able to do. I haven’t reached the “level” yet where I can charge for it. ![]()
Furthermore my 5W machine cut until 3mm plywood with a decent presentation. More than that leaves scorched cuts.
The next step will be to either build the bench or find a reliable way to fix the material to the honeycomb.
Thank you again for your help. ![]()
1 Like
Thanks Luis
I’m shocked at the price difference. I spotted that they had smaller thicknesses & Qty’s on offer and thought that might suit you.
I thought that 75euro ply was ok as it works out at 6.25euro per 600x400mm (my cutting deck) x 12. Its 20 miles from me and the only place I’ll get that quality and I’d have to cut it down to bring home. + fuel = 85euro, So the job would have to be good quality…probably personalised so it has real value to the buyer.
The bb/bb ply which is the best AFAIK is a little bit more expensive + postage, but is pre cut to size.
What sort of work is tha K-line best suited too?
I wish you all the best with your endeavour and I think we’re heading in a similar direction…But I also fear I’ve wondered onto the scenic route lol.
Also wracking the brain to think of how to quickly (accurately) flip the material for the reverse side cut…seems easy till your working in detail.
1 Like
If the honeycombe is not steel then some angle iron or finer (chapa) and magnets to hold the material in place. I’ve made a frame that will hold either the honeycombe or steel or I can rest the honeycombe on top of the steel. Photos if you want.
This is from where I bought. It looks like only with login you can see the price.
Different brand but same material.And after all the difference is nothing like what I mentioned. Doing mental math 1 hour after waking up leads to these errors. ![]()
And you may even be right. I may be used to low-quality products and find quality ones expensive.
I don’t even know. I found the product by chance and it’s interesting because it’s light and resistant.
I think it’s used to make models.
Theoretically, several solutions have already been presented here and, as long as it is guaranteed that the material does not move during cutting, they all have to match.
The “detail” here is a line (cut) with (I’m going to exaggerate to more) 0.1mm thickness.
If the part moves more than 0.1mm to either side relative to the reference point when being turned, the cuts will not match.
Hi @Mito
The honeycomb grid is metallic. And magnets work relatively well. Relatively because in the case of 6mm thick material the magnets have to be neodymium (if I’m not mistaken). The ones I have of this type have a thickness of around 3mm and this thickness is too high in relation to the distance between the UV protection of the laser module and the piece which is only 1mm (in this case), max 2mm for engraving.
This difficulty leads me again to the option of having to “waste” material to ensure fixation in the honeycomb.
Furthermore, due to the rigidity of this material, I am not sure that the magnet has the strength to overcome the bending that the material presents. (Well, I could always use more than one at each corner where the bending manifests itself)
But magnets are still a good option for fixing. Thank you for the reminder of the imams.
Yes please and if it is not inconvenient.
I’m looking for ideas for the bench I’m going to make, and I know that taking into account the experience of those who have been doing this longer than me is always positive.
Thank you very much for your availability.
I’ve got some not very good photos here.

The honeycombe can sit on top or take the angle out and it sits on two cross pieces.
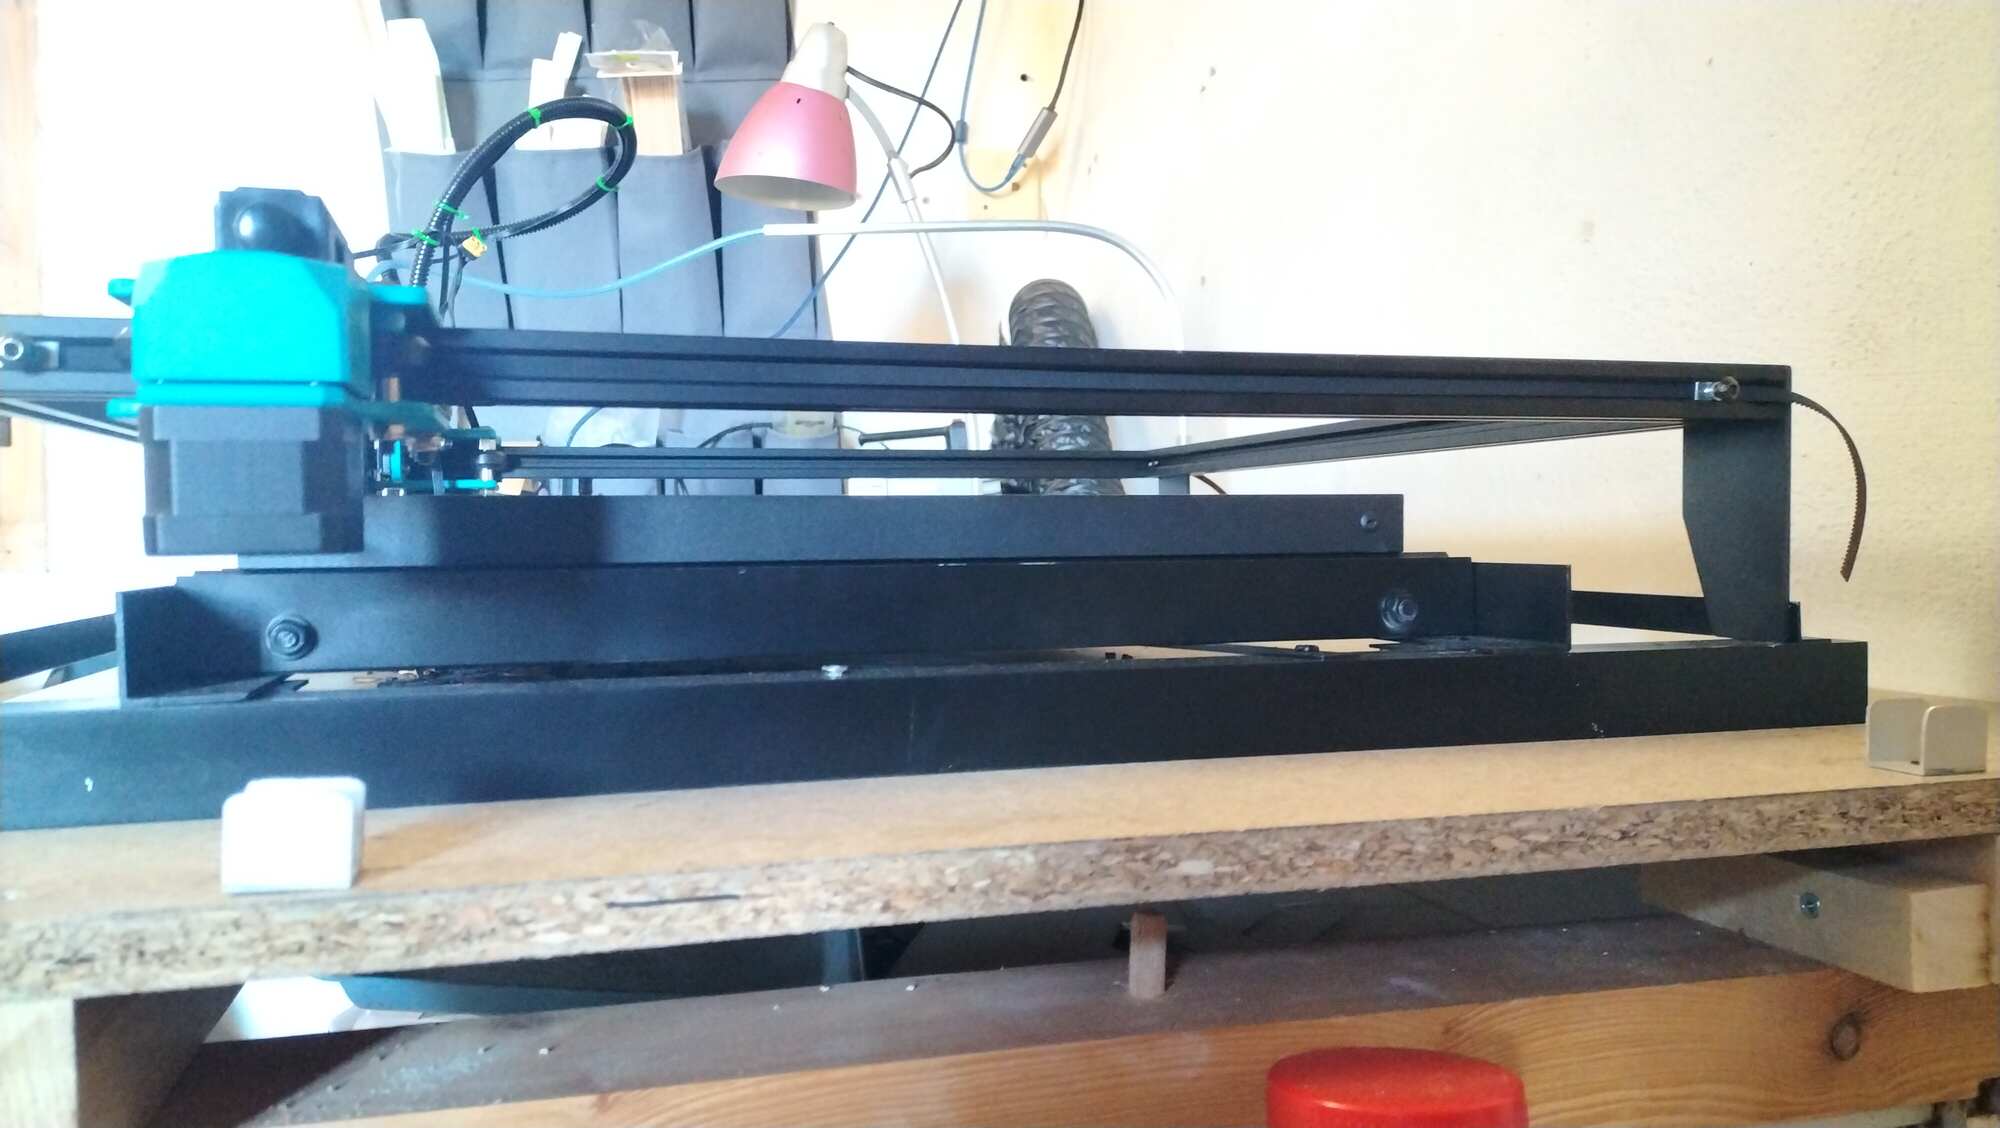
I think that shows the idea. The aluminium tube carries the air line and swings round as the axis move. The base was made from aluminium section that I had and is screwed to the chipboard, the laser frame is held in place byangle and is a very tight fit. LA Hobby Guy has a video on how he places magnets so they don’t interfere with the laser head. If you want more detailed photos, let me know.
Thank you for the additional photos. ![]()
I get the idea and it makes some sense the way you have the machine set up.
My idea is a little different because I intend to extract the fumes when I cut underneath the comb, and I also want to clean the residue/tiny leftovers from the middle of the comb by sliding a type of drawer where the comb comes with it. (But it’s still just being thought about)
I’ll look for that video you mentioned to see how it resolves the issue of magnets and UV protection. In CO2 machines it is very easy, but in those with a laser diode module with integrated UV protection it becomes more complicated if we want to maintain the safety factor. Removing the protection would solve my problem right away. But not interested right now.
Add light, a side webcam to the setup and fully close the box.
1 Like
Plan B then. Make a frame that supports the honeycombe above the surface of the bench and enclose it allowing air to enter. I don’t know what air extraction system you have, I use a duct fan of 100cm dia. Make a 3D adapter to extract the air from underneath that will match your extraction system. I don’t know if I’ve explained well. A drawing would be better.
1 Like
I have a small design, with some details.
in time I show them. Meanwhile i wondering if it’s not better open a new topic for the construction. ![]()
Yes, please. ![]()
1 Like
Just a quick update on the quote for (bb/bb) grade Birch ply 2440mm x 1220mm, exterior, long grain, FSC100%.
4mm 27.02 euro ex vat.
6mm 41.52
9mm 52.68
12mm 68.54
18mm 92.17
24mm 127.89
18mm bb/bb (INTERNAL USE) 81.10
The 4mm is much cheaper than previously thought, but what texture does really good ply have, as this felt a bit rougher than I thought it would be, but I can only compare to online photos and how they made it look.
Thank you very much for all your availability Pete!!!
The 4mm is the maximum I can cut (decently) with my laser currently. More than that, only after mastering the issue of this topic.
It’s not so much the aesthetic issue that is at stake in ply. In my opinion, it’s more the construction itself. Much of ply is constructed with misshapen sheets of wood and the empty spaces inside are filled only with glue. The result is extremely imperfect cuts (due to the reaction of the glue in direct contact with the laser) and inconsistent engravings due to the heat that the laser applies to the first sheet of wood.
I know that this subject has already been discussed here on the forum (with photos included) that demonstrate precisely the most common defects in ply and that are, at first glance, imperceptible to the eye.
I see myself as focusing more on engraving “at this ime” and the Vat included price for the 4mm (I calculated 23% but it may be 21%) gives me a 600x400mm at 2.77euro.
That seems like good value, and a lot cheaper than online but I still have doubts about the finish texture…but of course it ust be bought and tested to really find out.
I forgot to mention that the guy at the shop offered to have a lot of samples from the main depot sent free of charge which may reveal some other options and quality.
I also was in a big diy outlet and wondered what they do with all their ‘End of line’ materials like tile, flooring and wood pannels etc.