Following the topic Material thickness cut technics
I leave an outline of what I plan to do.
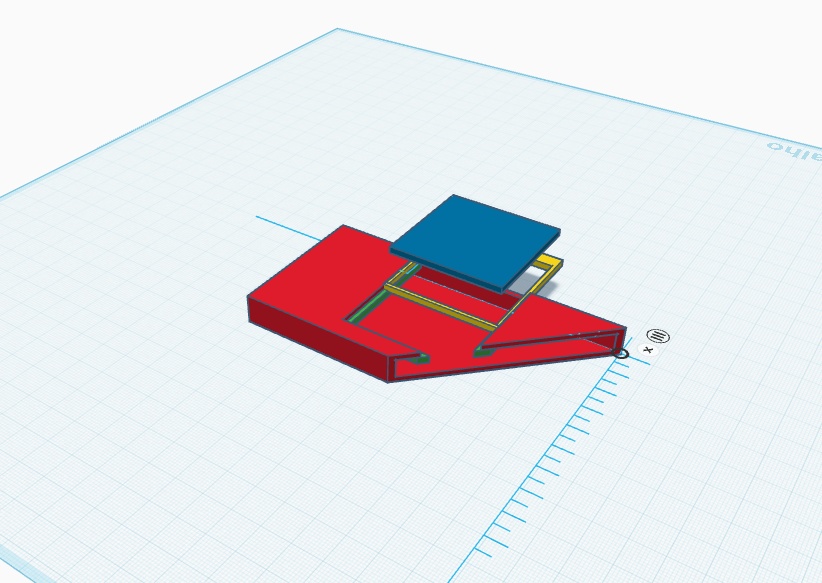
A table made of some type of wood or chipboard with a hollow interior and a drawer where a frame slides into which the honeycomb is placed. It is not shown but there will be a fine mesh underneath the honeycomb to prevent small pieces from falling onto the table. This is because I intend to place a fan/suction at the base of the table that will (or will not) aspirate fumes but mainly “vacuum fixation” of light material to the honeycomb (at least this is the idea).
The fan will be one used in air conditioning ventilation. From my experience, I think it complies with the vacuum fixing part, but I’m not so sure about the smoke extraction.
This table will sit on top of a bathroom cabinet that I still had when I had a flood at home. (Yes, floods also happen in Portugal. Especially when a pipe bursts in the middle of the morning and I only get home at night. ) I’ll post a photo later, but when it’s cleaner.
The table:
Thanks for the point of view with some experience Pete. That’s exactly what I need.
For larger “particles” and small pieces, this mesh will prevent them from being sucked in by the fan.
For fumes and dust, the fan support will have an easy fitting that will allow it to be removed for disassembly and cleaning when necessary. (I’m comfortable with this cleaning because I do it regularly at work)
Otherwise I would have to use a specific fan for exhaustion and a proper filter, this type of fan is usually noisier and takes up more space. (I don’t mean to say that in the end I won’t have to opt for one of these solutions)
Obviously I don’t intend to reinvent the wheel, this topic serves precisely that purpose - the journey, the discoveries, the rectifications and the conclusion. All this starting with the topic mentioned at the beginning.
As the machine has an air assist system in which the air comes out through the same hole where the laser beam passes, my intention is to try to allow as much air as possible to flow in only one direction when I make cuts. It doesn’t work the same way for engravings, but I usually use a reduced airflow just to prevent smoke from settling on the lens’ protective glass (which isn’t easy to find).
All this taking into account that the main intention of this table is to fix light materials to the honeycomb, the exhaustion part is something that I intend to take advantage of.
It will probably take some time because I only deal with this in my free time. But the developments will be posted here.
To know, my brother will be the one who will build the table, who has more skills and more appropriate tools for working with wood than I do.
In other words, the merit will not be all mine. If something goes wrong it will be his fault.
The ‘air in one direction’ is what I have in mind with my enclosure, I have a aluminium cutting deck with the channels running left (fan side) to right (exhaust side). I wanted the air to pass over and under the material.
As the air will cause flapping & vibration I will employ clips (initially) to secure the material and vary the wind for best outcome.
The vacuum idea came to me a while back as it is used in some situations and has been mentioned here on the forum during discussion of clean work etc, but its a little complicated for a hobby level setup.
I then recalled the hand pump and suction cup alternative which makes the securing of the material independent of the enclosure environment and is non electric.
The negatives are: space needed for suction cups (not directly under cutting area) & achieving suction on non smooth surface.
I think that the use of a thick adhesive (peel off) tape patch on the material but smooth enough to achieve vac suction would work. And an allowable area around the edge of work…or jig for suction cups which could be attached to honeycomb or deck.
I havent found suction cups quite small enough yet but Im thinking that about eight 1"sq cups under (around the edge) a…for example 400mmx600mm ply, would hold pretty tight.
There you have it, I’m trying something that I’m not sure I can achieve which is to avoid material waste, material fixation, and exhaustion all at the same time.
I realized a long time ago that the best way to understand the reason for things is to experience and understand the reasons for the consequences.
All of this is included in my learning of the capabilities of the laser machine. What can I achieve and how far can I go.
Here’s some suggestions, experience over the years with my China Blue 50W.
If you want to see how well something works, look at current industrial use. I’d suggest you forget vacuum, you don’t really see it in the industry, who are most likely to afford it, need and use a quick attachment/release of the material.
Most materials, such as ply, leak air, they even leak liquids. This is true of most natural materials.
The material vacuum system must be vented outside as any cuts will produce debris that will be sucked into the vacuum system holding the material. This is exacerbated if there are any leaks in the vacuum/material area. This means every job must use the same size material or you have to make ways to cover the uncovered honeycomb.
If you are planning to use vacuum then you need a very large vacuum to overcome all the leakage along with any part of the honeycomb that is not covered. Usually when you get enough air flow to do this, you can’t stand the noise, but I don’t have to listen to it.
If you have something laying on a honeycomb bed, you usually see the reflections from each part of the honeycomb as the lasers passes over it. Even with a high pressure air assist, there is very little air going through the lasers kerf, so there are pockets of cut debris that will condense on the first thing cool enough, a majority of this seems to be the inside of the honeycomb.
I have a couple issues with honeycomb, mainly I don’t see any advantage to using it, it gets dirty inside each cell and is more difficult to clean than my sheet of steel. I used to see them made out of steel, but all I seem to see now are aluminum so you can’t use magnets.
I tossed my honeycomb and replaced it with a piece of rolled sheet steel. This allowed me to put in indexing holes for jigs. I can use 5mm magnets to raise it off the plate for cutting and a majority of the debris sticks to the cold metal sheet. You can use any of these cleaning solutions on a rag and wipe it up.
This is my opinion as there are many in love with their honeycomb beds and their performance.
I suggest you get this to work first then figure out where you can put a vacuum table. The ventilation is a must have, the vacuum might be a good addition, if you can make it work.
I suggest your fan sucks and doesn’t blow. If you pressurize your cabinet, any leak will produce debris from the engraving/cut operations to be ejected from any leaking point.
The air should flow in as straight a line as possible. Mine has a vent fan in the back, so when I engrave or cut, I leave the top open about an inch and it flows over the work area. With engravings, I engrave from the bottom to the top, so the debris flows over areas that are yet to be lased. In my case the air flows bottom to top where it’s vented. I engrave bottom up so the debris field is always the other way.
I can honestly say, hand on heart & without reservation, that I totally agree Jk.
The industrial aproach “for me” would have been much quicker and less of a concern.
Thanks for the Vid, I understand the point about the fan/exhaust…as also advised by Tim, but I just had to try it out…determined Newbie style, but I hedged my bet by being able to swap the fan from blow to draw & replace at the outlet side.
The arch lid may work but is quite unnecessary…a basic angular design would probably be just as functional and an easier build and the idea of pushing more air through the channels in the cutting deck only creates the problem of securely fixing the material to prevent it flapping around in the 410cfm wind tunnel.
Much learned! and more fun yet to be had.
Many Many thanks to you and all the enthusiastic contributers here on LB.
As comments come in I will clarify. Putting my whole idea at once in the first post at this point I was still writing.
Resuming @jkwilborn, I agree with you on almost everything but I still have my reservations.
But first, let me thank you so much for your contribution.
First of all, I should probably have mentioned “ultra-light material” because I am referring to the K-line mentioned in the other topic, cardboard, felt, acetate, etc. Materials that, if not fixed in any way, fly away only under the effect of air assist.
Plywood and other materials that do not do the same are not so much my concern at the moment.
Basically, the only thing I don’t fully agree with is that in industrial use they can afford to waste a certain amount of material around them for two reasons. One is because producing several identical pieces at the same time prevents wasting the material needed to fix the material to the table one at a time. The other is because when they make an individual object, the customer will pay for all the material (both used and wasted).
For me, this is just a hobby. I can’t compare it to industrial use. Because as for the rest, obviously, what you mentioned makes perfect sense. But for now I’m going to take it slow, because money is scarce.
I don’t want you to think that your opinion about industrial use was unnecessary, far from it. Later on, I’ll be a big producer in the laser industry and I’ll need to review this topic again.
I didn’t know about this, especially the liquid part and it will be something I will take into account.
Yes, of course. As I often say, “For there to be a constant flow, if the air comes in it has to have a way to go out.”
So yes, the idea is to have the air sucked in from the fan exit to a nearby window.
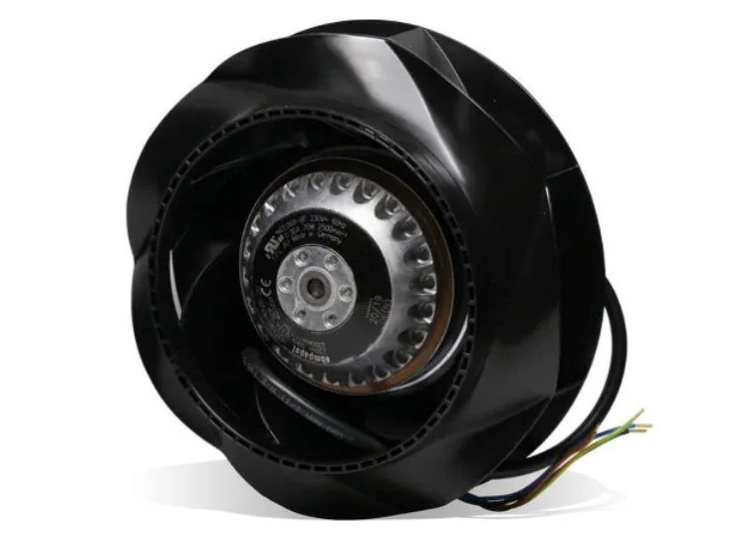
The fan I have placed in the image produces an interesting volume of air. With the exact reference I can say how many m3/h it can discharge. But to give you an idea, it can hold a cover made of 0.8mm sheet metal measuring about 500x900mm (19.7x35.4 inch) facing the floor. (I hope the example is clear because I have some difficulty in exemplifying in words)
As for the uncovered area of the honeycomb, I intend to use scraps of thin material (cardboard for example) to fill these spaces.
I have to agree with you. Any gas in vapor state that suddenly cools condenses if the temperature (and other variables that are not relevant to the case) allows it.
This only happens because you use the laser machine a lot. If you only used it like me on the weekends and for a few hours and not every weekend, you wouldn’t have this problem.
Mine happens to be made of steel.
My concern, despite the existing internal reinforcements, is whether the center of the honeycomb will not be uneven with the vacuum environment below. After all, it will be the most delicate area that will have to withstand the force of the vacuum without warping. This is my biggest concern. (For now at least…)
After more than one hour doing translations I have my reply finished.
I hope to be understood because I don’t have time to check the entire translation.
If I do 10 sheets a day and you do 10 sheets a month, the buildup is the same, so it doesn’t alleviate the issue. Just means you can go a month and I can go a day. I actually clean mine before it’s put to bed at night.
It’s just very difficult to get debris off from inside each honeycomb cell. You have to soak it in something and then apply some kind work to get the debris out of each cell.
Nice but will it hold it with a bunch of cuts and/or holes lased through the material, creating new points of vacuum leakage?
The entire size of your work could be as large as 697.38 sq inches - 19.7"×35.4" = 697.38 sq inches.
If you apply 1 lb/sq inch of vacuum to that area, it would have to have a supporting structure that will hold 697.38 pounds of overall force.
This kind of issue with basic physics is a real issue when dealing with pressures distributed across a large area, positive or negative (vacuum) pressure.
I don’t think honeycomb is really designed to support much. You’d have to look for honeycomb that will support the weight of the vacuum created against the machine.
You are absolutely right. If I had the hassle of having to clean every day I would probably think like you. But that’s not the case.
Now, joking aside, for now it is easy for me to clean the comb since when I remove it, all the small pieces of material fall out and for now the debris that sticks to the comb walls are not significant.
I think we are looking at the problem in different ways. What I’m imagining is a piece of material on top of the honeycomb that, once finished, only leaves the thickness of the cut, allowing air to pass through and reducing the effectiveness of the vacuum. I can’t imagine removing the pieces from the honeycomb as they are cut, leaving the space they occupied open.
I don’t know if that’s your point of view…
Precisely, or create some form of reinforcement that prevents the honeycomb from giving way.
If that happens, which is very likely, I’ll have to deal with it right away, but at least it won’t be something that catches me by surprise.
Are we still talking about cutting & engraving K-line 5mm or materials in general.
I recall a conversation about engraving…and perhaps cutting of thin materials using a sheet of glass as a way to keep it flat and stationary.
If this would work, then the vacuum may only serve as extractor to remove dust and smoke and adjusting air in for balanced flow could be controlled by needle valve.
As this is a bespoke build the glass could be inserted into a grooved frame (tall enough for various thickness materials) and spacers used to raise the honeycom/material up to meet the underside of the glass.
Is the reason that triggered the decision to build this table. The K-line being a very light material moves easily and as I have not yet managed to make all the cuts coincide on one side and the other I fear that the material will move. As I have other difficulties in keeping other very light materials stuck to the table, I already had in mind building something like this.
It will probably work on a CO2 machine, I also thought of this but the distance between the UV protection of the laser module and the material is only 2mm (0.078 inch). A sheet of glass that thin would have to be handled with extreme care to avoid breaking it, right? (I don’t know much about glass… )
For cutting thicker material, reduce the distance in order to keep the laser focus centered on the cut.
Precisely.
If I understand correctly, and I apologize if I got lost in translation, in a CO2 machine it would make perfect sense. But that’s not the case.
I’ve never seen this happen and my honeycomb has a thin metal plate underneath (optional) that I use to avoid burning the table it’s currently resting on.
Is the machine you are referring to also a diode laser or CO2?
Ok…yes, the thickness of glass would make focus distance difficult…thats a pitty.
So it looks like a large cfm vacuum …Small vacuum cups at specific locations on the cutting base, or a grooved frame that the material would slip into, so tight/secure at all edges and kept flat by cutting base (accepted quantity of material loss at frame edge or around Vacuum cups).
For my honeycomb bed, I soak the parts that have residue with bug and tar remover, let it sit for a short time, then spray with a strong jet of water to flush the residue out. This obviously doesn’t solve the hold-down, but I use magnet hold-downs I made that have magnets to hold to the bed and a notch on the side to hold the material. It even works on thin material (think 3mm basswood) that is slightly warped.
Hi Michael
Does wetting the wood cause a warp and would you have to press it flat to keep it in shape.
Do you know if its possible to re-flatten sheets if they are warped. I was at a supplier and the 4mm bb/bb grade had been improperly stacked on sticks that create a gap for forklift to lift & move.
They were costly enough without having to repair the warp & not sure if they would ever go back really flat again.
I haven’t had any, yet, that were so badly warped I couldn’t use them, so haven’t tried flattening any. I’m cutting out small parts and the slight warp I’ve experienced in a couple of the boards were not a problem.