What brand of PVA glue do you use? Does this method give a better result then just using a white paint?
Thanks, Duane
What brand of PVA glue do you use? Does this method give a better result then just using a white paint?
Thanks, Duane
There is a picture of the PVA glue I use in this thread. I should think any PVA wood glue would work just as well. Regards the results being better only you can make that decision. I believe it to be better, certainly easier and cheaper. Read this thread from start to finish and try it yourself.
Thagts my plan Ron. I got the
Just a thought: while mixing PVA +TiO2 powder, both are pretty light, try to add some darker pigment, to improve absorption.May yield easier or faster way to engrave. Does not have to be black, can be Rouge (rust) or such, whatever absorbs blue. May color shift results.
Magnetite powder may worth trying.
I don’t think we have as yet reached the finnising line in the development of this process. I’m of an age that slows me down, but I’m sure there are many younger minds that could take this a lot further. I have no scintific knowledge of chemistry so will have to stand back and let the more imformed experiment with this. I can only work by trial and error and hope to get lucky in making improvments.
I checked on internet as a lot of people use it in the kitchen. It may sound nuts: Plastic bottle with some nuts and HOT water. Add TdO and shake it baby… check out youtu.be if you can face it… ![]()
Ron, very cool!
I’ve been experimenting with your TiO2 recipe and noticed in your earlier post you mix 100ml PVA with 300ml water (i.e. 3:1) plus 3 heaped tea spoons TiO2. A later post shows 100ml PVA and only 2 TBSP water (~30 ml) with 1 TBSP TiO2.
Big change in the water from 3:1 to 0.3:1. I’ve been trying some test burns and they seem a bit “light” .
Can you confirm your latest recipe?
Thanks so much, some great work you have produced!
I did try using a mix with less water for brushing on. It worked well but was hard to get a smooth coat. I’m now using three spoonfulls of water and brushing it on. Seems to work fine for me. There is no hard and fast recipe, so try modifying it to your own likeing.
See this post.
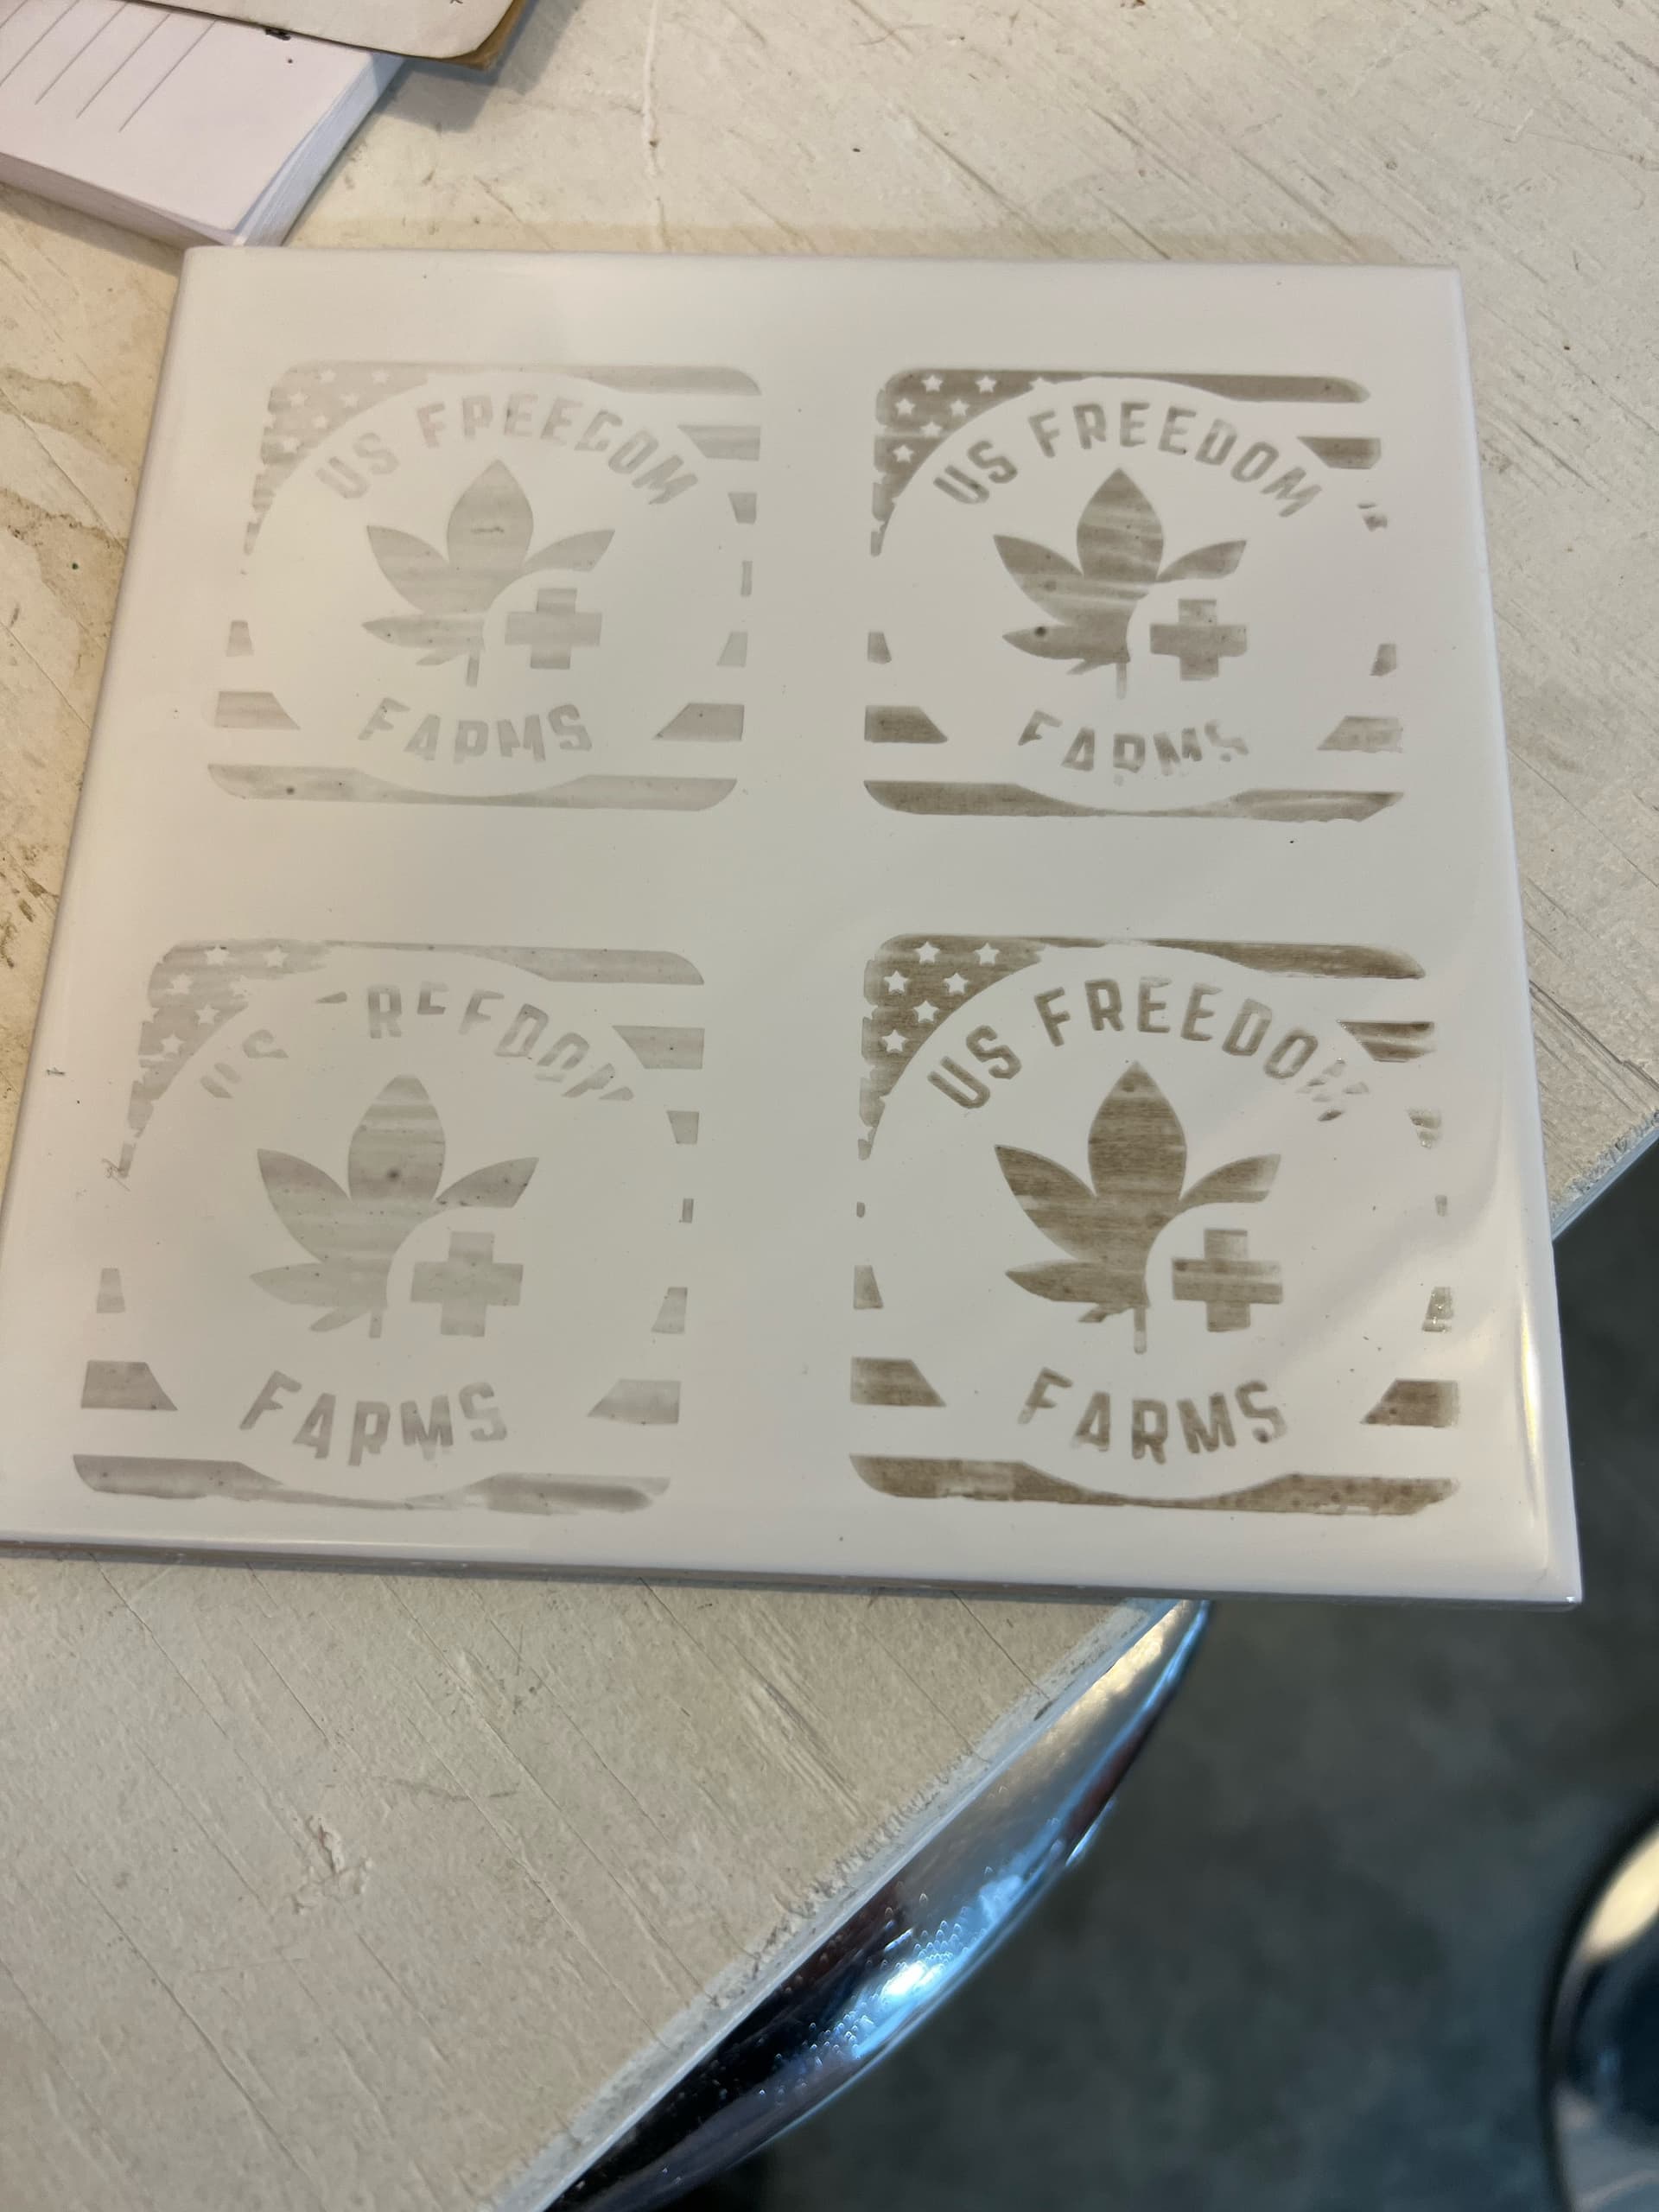
I’m now using the latest modified formula. For best results with a brush on method measure out 100 ml of PVA glue and I now add 3 tablespoons of water plus two drops of liquid hand soap. Mix thoroughly. Now add one full tablespoon of titanium dioxide to a flour sift. Slowly mix sifted powered to your PVA as you stir. Make sure you mix well. I now strain this mixture through the flour sift into another vessel. Paint on clean tile as you would paint anything with gloss paint. I dry with hairdryer and laser at 1000 mm/m 80% power. 40 watt diode laser.
Hope that helps.
Substitute hand soap if necessary for washing up liquid.
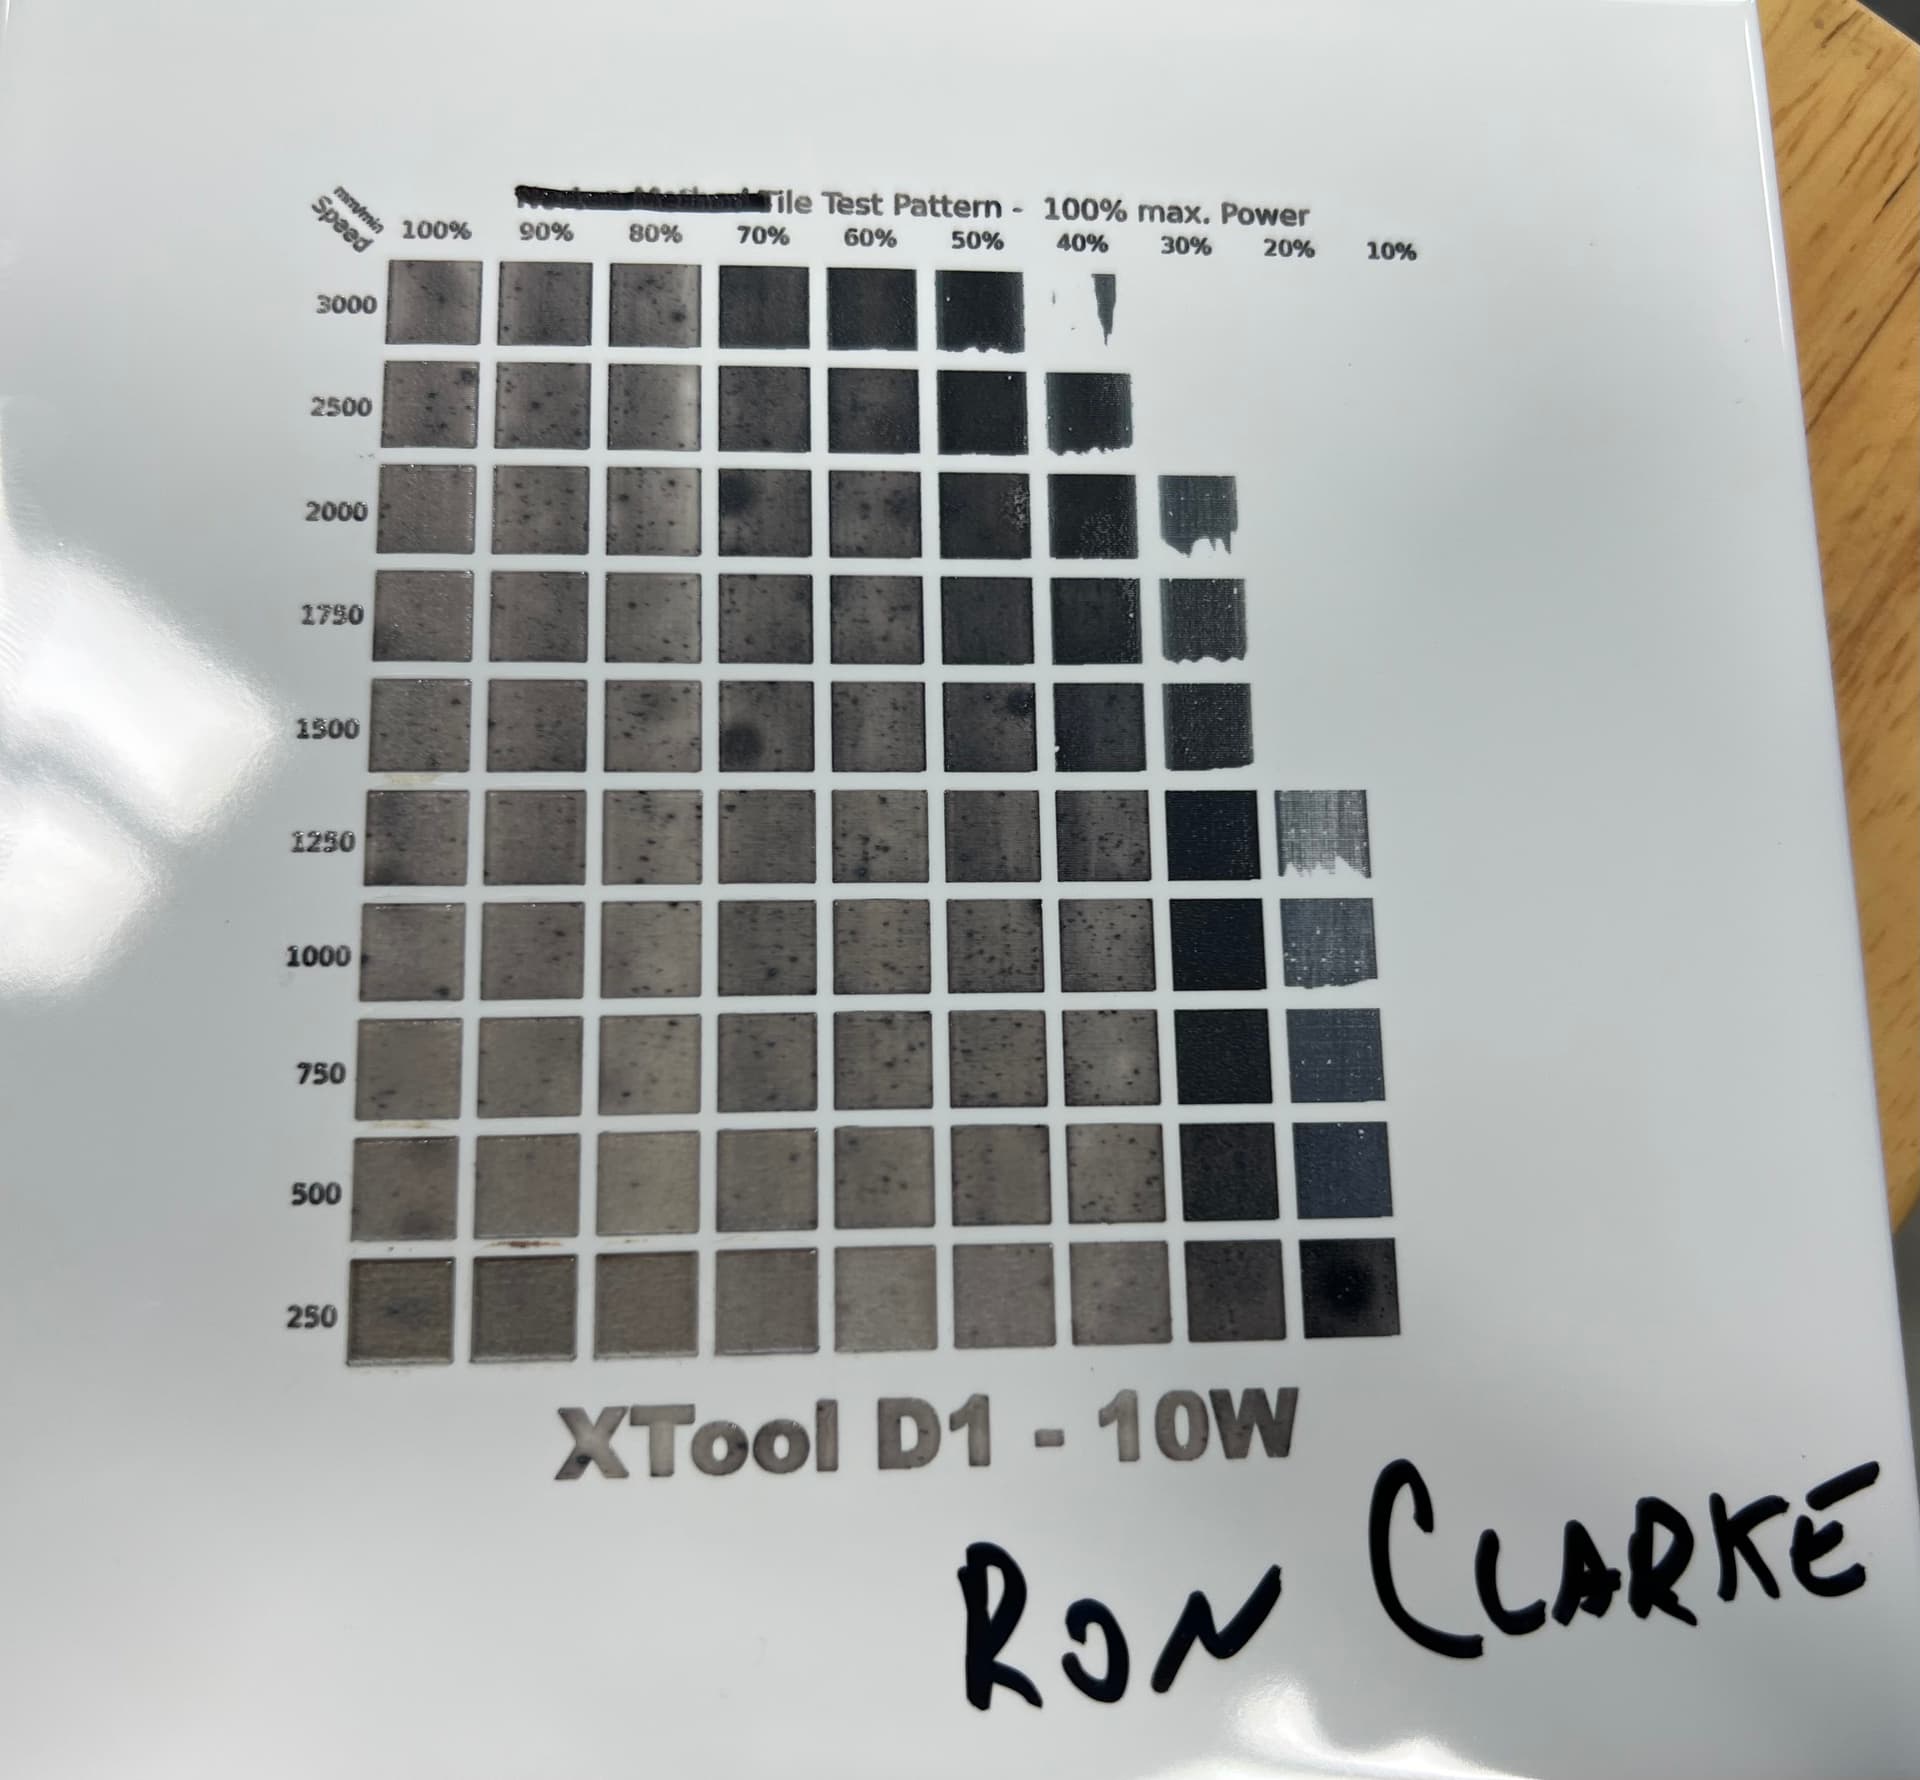
Trying out the PVA Ron Clarke method. I did a test grid and then tried 4 different speed/power combos. I believe my mixing is the issue. For the test grid, it was hand mixed with a stir stick. For the trial, I purchased a small power whisk, but the mixture ended up like a merengue pie. Very frothy. I think I need to make a new batch and find a hand mixer. Should the PVA mix basically be like a regular latex paint consistency when correct?
Thanks!
I’m trying the same thing using some “titebond original” PVA.
The 3:1 mix (PVA:water) was a bit thick so I went to 2:1 and found out I needed about double+ the amount of TiO2 for my tile and laser to get the black. Works great!
Still experimenting but aside from getting enough TiO2, the mix seems really forgiving and can be mixed to a viscosity that brushes well. I used a foam brush and the viscosity was a bit thinner than latex paint. Brushed on left to right, then back-brushed right to left, Repeated with the tile turned 90 degrees.
Yes the mix is the important bit. I use a small hand whisk and add the powder slowly. Straining through the sift after mixing helps to smooth the soultion down to a gloss paint viscosity and goes on well with a well loaded brush. Keep trying you will get it to your own liking and then you will get the excellent results with good blacks and shading.
Thanks Ron! I also had a lightbulb go off on the mixing. Instead of using the one-speed mixer, I’m going to put the tiny wisk on my cordless variable speed drill so I can mix it very slowly and not introduce all of the bubbles and froth. Cleaning off my previously painted tiles and mixing up a new batch this morning. ![]()
Getting closer. Slow mixed it, ran the Titanium through a paint sifter that I had on hand so it was really fine, no lumps, but after I slow mixed it and painted it on, I can still see some very small clumps in the resulting finish. Went shopping for a flour sifter, but couldn’t find one
I’m curious what kind of a bowl or jar you are all mixing in? I started with a mason jar but it was hard to try and slow sift the Titanium into the jar. Maybe more of a soup bowl and wisk.
I do like the idea of a foam brush because my 1" brush was dropping some bristles on the tiles.
Progress, but I’m going to do another power/speed grid to see how this batch works. Glad the tiles are cheap…LOL
I’ve tried a few things and didn’t get the results I wanted, but have not given up. I did purchase a hand mixer for this and have not put it to the test.
Seems odd you’d get lumps after it was filtered…
I mixed it, shook it vibrated it and anything I could think of and still had areas that didn’t appear to have the same amount of TiO2 on them.
I usually mix them up in a small mason jar. One of the lids I have has a hole in it. Put that lid on it and connect it to my hand vacuum pump and draw a vacuum. That effectively removes the air bubbles, at least, this was the quickest… just letting it set in a sealed container will let most of them escape but it takes time.
I also put a little food coloring in it so I can see if it’s spread out properly.
![]()
I put two coats on and it was definitely too much. Pretty much no good black squares on the test grid. Good idea. My neighbor has an air tool paint can shaker. Wondering if that would work. Just let it shake for a long time and then settle to let the bubbles out overnight, then slow stir.
I’m really surprised that you all seem to be having problems with this method I’m using. I’m going to try to arrange for someone to video my process from start to finnish. Maybe seeing the method would help sort most of the problems. My flour sift is about as fine as a pair of nylon stockings. Filtering it through the sift seems to get rid of all the air bubbles and putting on a good full coat with the brush lets the PVA mix self level. Should look like a matt finnish coat of smooth white paint.
I just made the mix but I added the titanium to the water first and just hand mixed with a tea spoon handle and mixed very easy no lumps
then added soap and mixed again then added mimxture to the pva glue all mixed very easy no lumps no electric mixers and no straining
That sounds very interesting. I am pleased to hear improvements are still being made. I have not had the oppertunity to film this process due to health problems I’m not doing any hobby work at the moment. Do let us know how well your method coats the tile and show us the edched results.
This turned out great. So for this result all you do is paint a single coat of that specific primer, dry, and etch the design? Do you have to mask the painted tile or anything to keep from getting any sort of residue/soot?
It sounds funny, but I saw a video of someone using a thin layer of mustard (the condiment) on metal to get an etched marking and I tried it out on a thrift store stainless steel butter knife and it did mark it. Pretty cheap stuff to give it a try on aluminum. Good luck!