The air brush has it’s uses, but I’ve severely plugged them up trying to run various mixtures of TiO2 through them… They worked the best with Ethanol, but it gets thick quick as the Ethanol evaporates and the mixture become thicker in the air brush bowl.
If you have the stuff to fiddle with it, yes… I wouldn’t recommend you spend the funds if it’s not available to you… Especially with this mixture…
He’s also right in that … it easily washes right out of the brush, comparably…
Hi
Spray an even coat of the primer. Le it dry.
Run your Laser engrave job
Place paper towel over the entire engraving
Spray with acetone til damp
Let sit. If possible cover with contractor cleanup bag to slow evaporation
After a minute or so the primer will congeal and just wipe off leaving the engraving.
Wash with water at this point or just let if off gas and do a final clean up.
Regarding Ceramic Tiles and Metal
An alternative to the very expensive sprays and the Mustard (which does not work well if at all ) is the use of Cold Galvanizing Compound.
Mich like the TiO2 in paint and primer and PVA mixtures. This is Zinc Oxide, MaybeDioxide?? not sure.
Same effect but works on metal to some degree but This is water cleanup people.
No acetone should be needed to clean up.
I am not an expert on the off gassing of this. but will not use it unless i wear a respirator.
I’
m on a CO2 60Watt so i have I have a 6inch inline fan to evacuate my laser chamber – >Go through charcoal filtration – then exit my garage near the roofline.
It may not present a problem, but you should look it up in the documentation to see what you are going to lase… You can find the safety/specifications of the paints at the manufacturers site… Might have to find out about specific materials in the paint…
This is post is about applying TiO2 without paint… suspending it in a type of glue…
Will do. Thanks for the warning.
I thought this post was in general about comparing Tile engraving methods and not specifically about PVA glue and TiO2.
In addition there were comments about Metal and Mustard and Wood.
Are you Moderating.?
I was replying to other comments about Mustard and metal.
Seemed appropriate. And a good follow up to the Comments i made about TiO2 in ZinserBullseye Primer. Zinc Oxide in an Aerosol application to Tiles and other media destined for a Laser seemed on point to me when discussing TiO2 and PVA glue . Especially when responding to other comments.
Just trying to continue the discussion.
I saw no other remiders from you when others made comments not specifically related to TiO2 and PVA glue.
Not a flame or gaslight attempt. Just discourse and seeking clarification. Just curious why I needed this reminder and others did not.
I always call people on why I am treated differently and inconsistently(from my point of view) from others when doing similar things to others.
Thanks.
That is what i thought as well. His use of PVA water suspension of TiO2 for Tile engraveing.
This discussion ,can benefit from additional context and content. Such as other applications of TiO2 and other methods for Tile engraving and other Materials used to mark with a laser.
Thus the branching of the discussion to metal, mustard, primer , etc from the main trunk .
Cool
Thanks again for the warning to us all about Zinc Oxide Vapors.
My reading of some relevant info shows some danger from zinc oxide fumes,
My reading also suggests this is (easily?) mitigated with proper exhaust setup and filtration and use of respirators.
Laser Engraving Zinc Oxide is quite different from Welding Galvanized Metal, in the precise and localized application of heat.
Anyway ZincOxide /Titamium Dioxide use in this manner is very similar and Zinc does work on metal in my few tests.
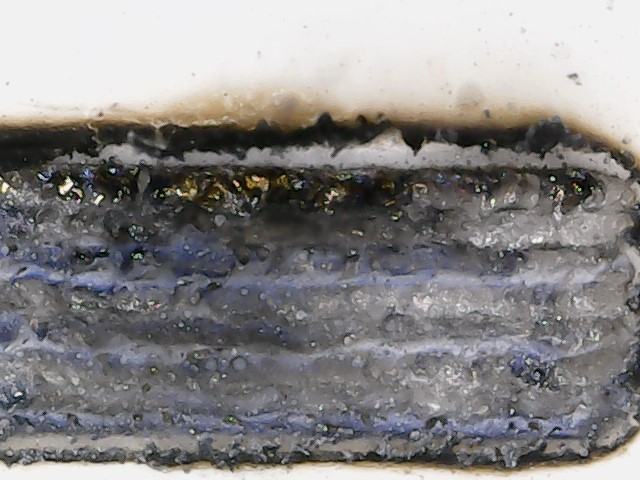
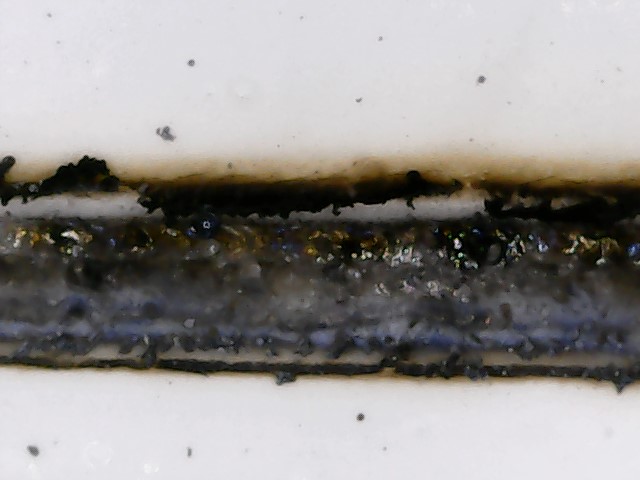
However, I’m not getting great results here. For the same speed and power, it’s not as black, and microscope shows many “puddles” aren’t filled with the black glassified stuff.
Looks like not enough TiO2, so I gave it another TBSP for a total of 2. Still spreads ok, burns more black but not as much as I got with the spray primer.
Also weird, my line width with the spray primer actually showed a significantly smaller spot size, like 0.1mm line interval. At 0.1mm, the PVA glue version was much wider.
Am I right saying you use a CO2 laser? If so I can not help much as I do not have any experience of CO2 lasers. All my settings refer to a 40 w diode machine. Have you done a burn test with my method. Getting the speed and power right is important. I would also test with a weaker mix as two much TiO2 could block the lasers path.
Have you watched the video in Jacks post by Sadler, he deals with CO2 lasers and his info may help.
I do thorough test burns. I just do a stepped gradient and put it in grayscale mode at 10-30mm/s 100% max/0% min power so you can see what it does as power increases to 100%.
I went ahead and added a third TBSP of TiO2 and shook hard (I’m keeping it in the Elmer’s glue bottle) and it seems to mix thoroughly. Brushed on. Doesn’t seem much better. Looks like it’s inconsistent thickness too because it’s too thick to self-level, I should try to add water.
Hmm, intriguing that it could be too much. But I look at the gradient- part isn’t through the coating, then it’s definitely through but all white melt. Then a bit grey. Then inconsistent spatterings of black.
What’s more, I see droplets of black melt sporadically balling up in the coating beside the last line. That suggest the coating is melting but first collecting itself into these balls on one pass, then the next pass may hit a ball and form the black puddle but only at that one spot. This explains the spattered appearance of black puddles in grey melt rather than a solid black. This seems like not enough TiO2 to form a consistent layer.
I’m usng the same laser and getting excellent results. Here is my method For best results with a brush on method measure out 100 ml of PVA glue and I now add 3 tablespoons of water plus two drops of liquid hand soap. Mix thoroughly. Now add one full tablespoon of titanium dioxide to a flour sift. Slowly mix sifted powered to your PVA as you stir. Make sure you mix well. I now strain this mixture through the flour sift into another vessel. Paint on clean tile as you would paint anything with gloss paint. I dry with hairdryer and laser at 1000 mm/m 80% power. 40 watt diode laser. Hope that helps. Substitute hand soap if necessary for washing up liquid.
I don’t think mixing is the problem. My TiO2 was a fine powder, no clumping. I’m not seeing lumps in the layer. When I get the glue on my fingers, even if it’s thin, it dries to a solid white.
Shaking seems very effective for mixing, as long as you have some headroom in the bottle, which I do. Again, no clumps coming out. I do get air bubbles though, but they’re gone by the time it dries. Now if I saw inconsistencies where the black layer has regional voids, I’d say that would be because it was underneath a dried air bubble, but I’m not seeing that problem.
I did take a tile and dumped some more TiO2 powder on it then brushed the mix over it to increase the TiO2 content for that one tile. I think I tracked which one I did that with, I don’t recall it getting notably blacker.
Additionally, I do see where single dashes from dithering light areas commonly do not have black melt puddles in them, just a white shallow hole in the ceramic. It looks like it needs to be adjacent to more burn either from a multi-pixel dash, or from an adjacent line
Have just noticed you are quoting mm/s not mm/m1 which is the recommended setting in Lightbrun for diode laser machines. I don’t know if this could be where your settings are different to mine and what difference it makes. I use mm/m and laser at 1000mm/m 80% power on an Atomstack 40 watt laser machine.
The speed is the same … 100mm/s is 6000mm/m there is no difference in how fast the machine is going as they are the same.
If I run my co2 at 1500mm/s that’s 90000mm/m … same speed
As a warning, the Device manager always appears to display the units in mm/m for a diode type … Even though it’s set to mm/s in the Settings, the device manager is displays in mm/m…
I have all of mine set to mm/s as I’m used to how fast I expect the machine will go…
Maybe that’s the default for grbl… don’t know… just watch it if you interchange them.