I posted on FB New to Laser Engraving but didn’t get an answer.
My engraving goes outside of my boundary lines and someone suggested running the Scanning Offset Adjustment, which I did and it helped. But as you can see from the photo, even though my lines are now even, the laser seems to be firing too early and ending too late to have the engrave stay within the limits of the object boundary. I asked on FB if there was a setting that could tell the laser to delay starting the engrave and to end early and someone mentioned the Overscanning feature. Unfortunately, my Ruida controller doesn’t allow for that so it doesn’t show up in my menu. Is there another way to adjust that setting?
Also, I get the same overscanning when I angle engrave (tried 1, 45, and 90 degrees).
Overscan on the Ruida is entirely a function of the full speed and the engraving acceleration setting in the Machine Settings.
You might be able to increase the acceleration to reduce the overshoot, but going too high can cause motor skips, so if you can share what it’s set to now, and what you have for hardware, we can make suggestions based on that.
Chinese blue 50W upgraded to 60W tube and power supply. The photo shows running at 300 but I’ve done tests at 80, 100, 200, and 400 with all doing the same thing.
There is no universe in which you should be required to run an engraving at 20mm/sec on a CO2 laser to get decent output.
On my Chinese Red/Black Kehui machine from EBay I could run 400 mm/sec with no issues, and I do 300mm/sec with a cheap K40. All of the diode machines I have will go faster than 20mm/sec, so I mean it sincerely that you likely have something else happening here.
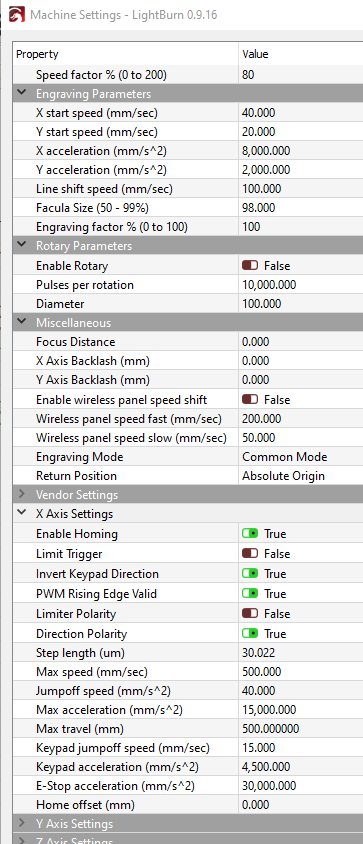
Can you post a screen shot of your machine settings? The top are will have Engraving settings and those are what I’m interested in.
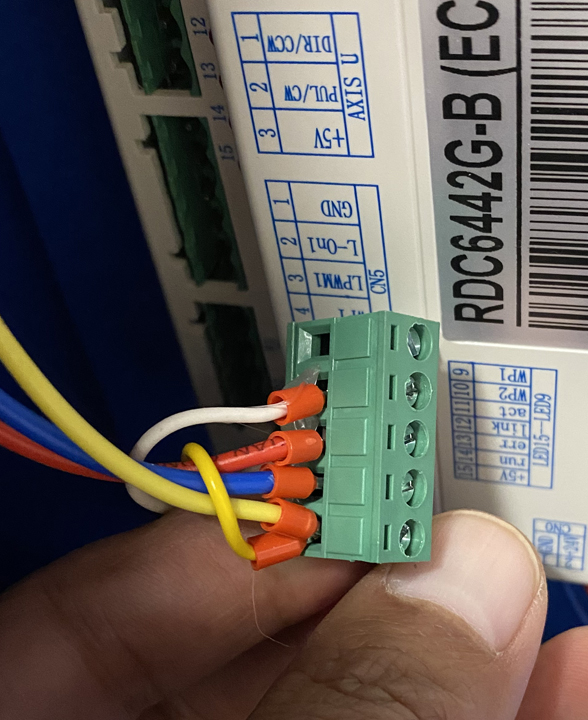
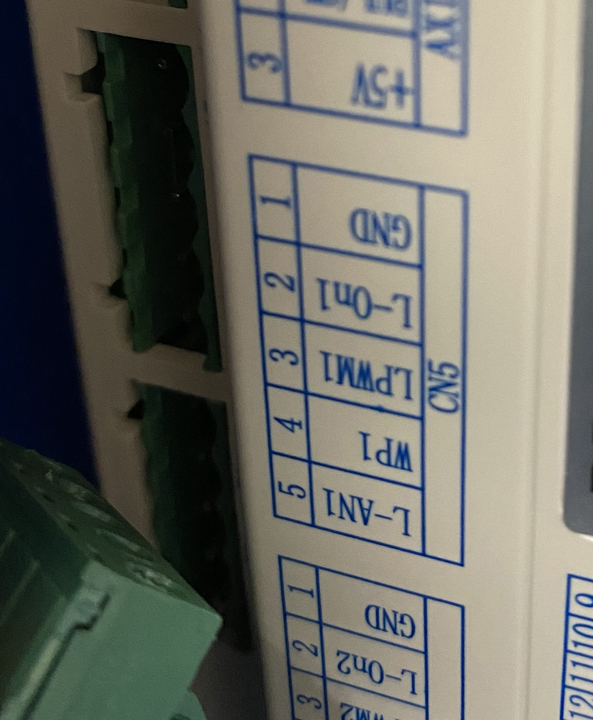
Your acceleration is already quite high, so that’s not going to improve things any. Are you getting lines between cuts at all? My best guess is that the power supply is either wired incorrectly, or is failing. Ruida generally uses an ‘active low’ signal to turn on the beam, where others want ‘active high’. The ‘L’ input on the power supply would be connected to the L-ON output on the Ruida, and then the L-PWM would go to ‘IN’ on the power supply.
Can you double check that those connections are right?
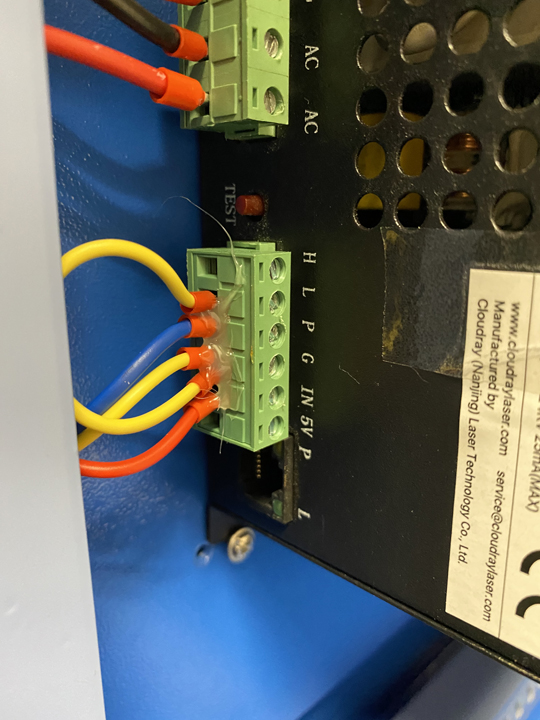
So I took photos and indeed, the wiring looks a little screwy to me. If you look at the second photo (I had to flip it in order to look at it so it is upside-down), this looks like how it is wired (from Ruida to Power):
2 yellow wires coming out of ground going into G. One of the yellow wires is going to the transformer?
Blue wire coming out of L-On1 going into P.
Red wire coming out of LPWM1 going into IN.
White wire coming out of WP1 going to transformer?
No wire coming out of L-AN1
The yellow wire connected to G on the power supply has a jumper wire going to L.
So if I understand you correctly, I should rewire the blue to go into L. Where should the yellow jumper wire go? To P?
I can’t believe the laser still works with the wires swapped like that.!
Double check that blue wire - ‘P’ is usually ‘Protect’, as in water protect. You also have a white wire there that I can’t see connected to the PSU. Did you flip the plug upside down before taking the picture on the controller side? It’s very difficult from that image to see which wires were coming from which outputs on the controller.
Yeah, sorry about the photos. Yes, I did have to flip it upside-down in order to show where the wires were going in. I went back to the video I used to swap my power supply (https://youtu.be/s9m3sEhGrX4) and I noticed his wires were different so either my original power supply had a different configuration or it was wired incorrectly. Either way, I went ahead and swapped the L and P connections in the power supply and it seems to have worked!
Man, Oz, thank you so much for your help and expertise. I’ve only had my laser for 2 weeks and there’s no way I ever would have figured out it was the wiring–I was prepared to just engrave at 20 mm/s not knowing any better! And the engrave is much lighter so I’m not scorching the thing anymore.