I want to mark, not engrave, thin wood (model plane kit) but the minimum setting of my 50W Co2 laser still cuts too deep. I need to label the parts with small single line fonts, not raster engraving. I can’t speed things up too much because the letters are very small.
Is there some kind of filter lens, maybe water cooled, that will reduce the output so it just marks the thin wood without engraving it?
Don’t know of a way to optically lower power but I would recommend trying specialized engraving lens. Cloudray makes one.
Thanks but I don’t know if that is what I need. But I will try de-focusing it for writing. Still interested to know if filter lenses exist for reducing power further.
I have a China Blue machine, 50 watts and I mark and cut paper all the time. I make and cut these targets… watercolor paper.

I find it difficult to believe you can’t engrave…
You’ll just get a ‘fat’ line… ![]()
How low of a percentage can you get it to lase?
![]()
1 Like
I haven’t checked the ma yet but on lightburn it cuts out at about 8 to 10% power. I am wondering why it still cuts about 0.5mm deep at the lowest setting. It is writing fairly fast. I will have a look again tomorrow.
My machine puts out 44 watts at 21 mA, that’s it max current. It’s advertised as 50 watts…
I tested it at 50% power and it drew 14mA much more than it should. I had to turn down the lps to get it right.
My minimum is around 9.5 or so but it’s drawing a few mA. I can’t imagine how you are producing that much power that you can’t engrave slightly.
Sounds like all is working from what you are saying… I really don’t have an answer…
My worry is that you are unknowingly over driving your tube.
![]()
Yes, I was worried too but it was cutting 5mm ply and I turned it down to only cut 0.5mm deep minimum. I will check things next week, away over the weekend. Many thanks for your input.
Do you have a mA meter on the machine? If so you can set it for 50% and with a continuous pulse read the 50% current draw.
Does that have a standard 50 watt lps?
Mine is a 60 watt.
Don’t know if I added much…
Good luck
![]()
I have the meter but it’s not installed yet. I haven’t checked the lps yet. Will do as you suggest ASAP.
When I first received my machine, I punched a hole in the cardboard meter box and run a pair of wires to it. For a month, it lived in the electronics cabinet. Until I got around to cutting a hole for it. Of course I had to lean over and read it. Improvement over the ‘digital’ one on the lps, even in the case.
I think what you are trying to do, should be easily accomplished with the equipment you have without any extra anything. We’re assuming what we think you have is what you have… ![]()
Since I have a ‘similar’ machine, I would expect yours to be similar. I can lightly etch paper as you saw.
The symptoms give me ‘bad vibes’, if you follow my meaning.
Do you posses a voltmeter?
Trying to think of ‘cheap’ test equipment… Kind of grasping at straws at this point…
I have no idea what you skill level is with this stuff, mechanical or electrical. I started with hardware before high school, so am comfortable working with all the phases of the use of my type of machine.
The lps will maintain a ‘charge’ since there is no ‘path to ground’ to bleed off voltage.
However, you should only be dealing with the ‘cathode’ or the negative side of the tube. There is only current flow when the tube lases. The tube will isolate you from any charge potential of the lps. The meter is inserted between the cathode and ground or hv return.
Post if you have a question…
Good luck
![]()
The W6 I measured would go down to about 15% power @ 20% PWM. Less made it unstable, it would spontaneously drop to near zero but could restart too. In short, no way to get less than about 13W off it.
If you want less burn, you first want to increase speed, but when engraving small fonts, there’s so many tight curves there’s only so fast the machine can go most of the time.
But the other thing is Ruida proprotionally scales back the power at start/stop of a vector and when cornering, any time it’s not at the commanded speed. e.g. if you ask for 100mm/s @ 90% power and goes on a tight curve and is only at 50mm/s, then it will be giving 45% power at that moment, although Min Power is part of what that scale is made of.
But I’m not sure about GRBLs and your Neje, I know at least some cannot scale back power based on current speed, and will consequently overburn on starts, stops, corners and tight curves when it slows below the commanded speed.
I understood it differently…
It starts increasing power as soon as the speed exceeds the jump off speed. Then it increases to the max power at max speed.
So if the jump off was 50mm/s that would be minimum power, at 75mm/s it would be 50% power.
The slope of the power increase is based (start) on the controllers jump off speed and the maximum speed… ?
![]()
Yes on Ruida Min Power and Start Speed (but not Jump Off) are part of the scale. And Machine Settings Min/Max Power and used in conjunction with Layer Min/Max power. Just trying to keep it simple by saying the you get a portion of the scale based on the portion of the slowdown you’re at for any given instant
If you set Min Power=Max Power in the Layer, there is no dynamic power reduction. The laser will be at that power all the time.
Are these the in the laser tube area of the Machine settings…?
So what is the difference between engrave and cut … ?
![]()
Remember this may be a dumb solution.
You may have said “cut” when you meant engrave. I noticed that and decided I would give my .02 cents. You don’t use “line” for engraving. And you don’t cut when you engrave.
They’re in Machine Settings.
My guess is that “Engraving” in Ruida applies to raster mode ops, but I’m not certain. I should test again.
If start speed is for power control why is it present like this?
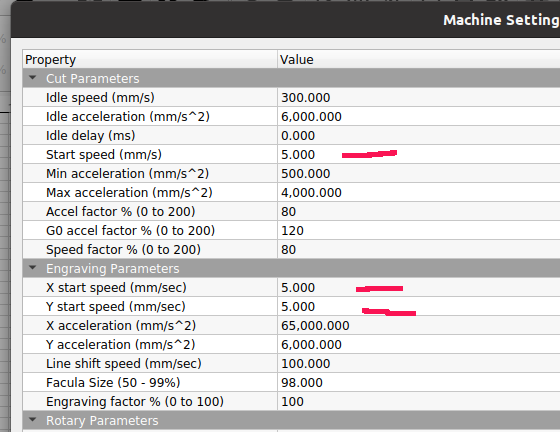
Why would these be here and what is the purpose of the jump off speed…?
Ruida manual 6445 says about start speed, jump off is not in the manual… ![]()
(2) Scanning Parameters (Only affect scanning mode)
X- axis Starting Speed
Y- axis Starting Speed
X- axis Acceleration
Y- axis Acceleration
The above four parameters are used to set the starting speed and acceleration of two axles when scanning.
The higher the two speeds are, the quicker the scanning is.
This doesn’t sound like it’s related to the power scaling… However it claims similar for the jump off speed… 644x manual…
Jump-off speed: Movement speed of shaft directly start from stationary state, if the value is too big, can
lead to motor lose step, jitter, and even produce the noise and set is too small, can reduce the running
speed of the graphics.
Did a couple simple programs to see if I could make it do something that was tangible, but the setting of both didn’t give me anything that made sense… Probably because of my operational ignorance…
![]()
Below the Start Speed, the PWM gives min power, rather than turning off the laser entirely by giving a sub-threshold current that won’t lase. It’s a BAD design choice IMHO, but it is what it is. Why is it bad? Well if you want to cut something comically thick at 3mm/s and your SS is 5mm/s, it just delivers min power even though it’s “at speed”. And this doesn’t scale right. It should have been that “any time the PWM value should have dropped into the dead zone of no-output, just keep the min power and overburn instead of not burning at all”. Well, that’s what Min Power does. SS appears to be nothing but trouble so I recommend setting to the min value of 1. But Ruida can do inexplicably unrelated things if you minimize fields like this sometimes.
Jump-Off Speed (as best I understand it) is that the machine will break its acceleration rules when coming from a dead stop and just start stepping at that speed from a stop. Stepper torque is much higher at low speeds and can handle some small instantaneous changes in speed with no accel in between. Closed-loop steppers will also correct a small number of lagging “missed” steps and catch up, because they use optical shaft encoders.
I presume if your JOS is higher than the speed the Layer asks for, it won’t jump to the higher speed. But that would be logical, and I’ve learned not to always just expect that.
Start Speed and Jumpoff Speed are two different things.
Neither should have an effect on rastering, as long as the raster is above the SS, because rastering is CV. Jump Speed, if it applied, would only have a minute effect on turnaround time.
As you say, it shouldn’t matter, that doesn’t explain why there is a start speed in both cutting and engraving in the machine configuration.
I’ve tried to do as you have stated and it isn’t working as I am interpreting the operation.
I drew two lines. One at 49mm/s@25%/5% and one at 51mm/s@25%/5%
Tried start speed and jump off speed of 50mm/s, no difference…
49mm/s should give me minimum, 51 should be maximum…
Does that make sense?
I would think his would think would be easily evaluated… Kind of has me befuddled.
It being Chinese translations don’t seem to dependable. Just the name start would indicate the motor is starting… the English translation may be the issue…
So explain whey the Ruida has ‘start speed’ (no axes specified) in the cut parameters but has ‘X start speed’ and ‘Y start speed’ in the engrave section…
The only place the jump off is defined is in the vendor settings of each axes…
![]()