I called my machine shop guy to cut me a piece of 304 SST 24 x 36 to try…
I think raising the material will work ok…I like the idea of no honeycomb crap to clean up, well for the most part, wiping down a flat plate…I can do that !
I had to reprint my RED Dot holder, when I did the first test, acrylic flat on the plate
it got my red dot laser holder to hot and melted it a bit
I’m setting up my machine with a Sheet of Sheet metal.
Its a NEJE Max 4 extended (750x1030mm).
I have it Bolted to a 4’x4’ 3/4" piece of Plywood.
My plan involves drilling holes and inserting neodymium magnets.
I will mark the “magnet array” holes with the laser prior to drilling.
The Sheet metal will then be glued down.
The Max4 has a Z Axis, and I have a Diamond Drag Bit.
So I will be etching a grid on the Sheet Metal with graduations.
(I will then use some Black Car Polish and buff it up to bring out the etch.)
This is for a few reasons, mostly to help place spacers in key locations.
Spacers will just be standard Hex Nuts which should in theory be held by the magnets, the whole of the sheet should have some magnetism to it.
Until I get motivated I’m just going to keep using what I have been, a Sheet of
Aluminum composite sign board, I just cover it in Aluminum foil and toss that instead of cleaning anything.
When I started to lighten up the head assembly the diode pointer was the first thing to go. Change a lens and you had to re-adjust the laser pointer… best I could get is ballpark (< 0.5mm), so I just use jigs and don’t have an issue.
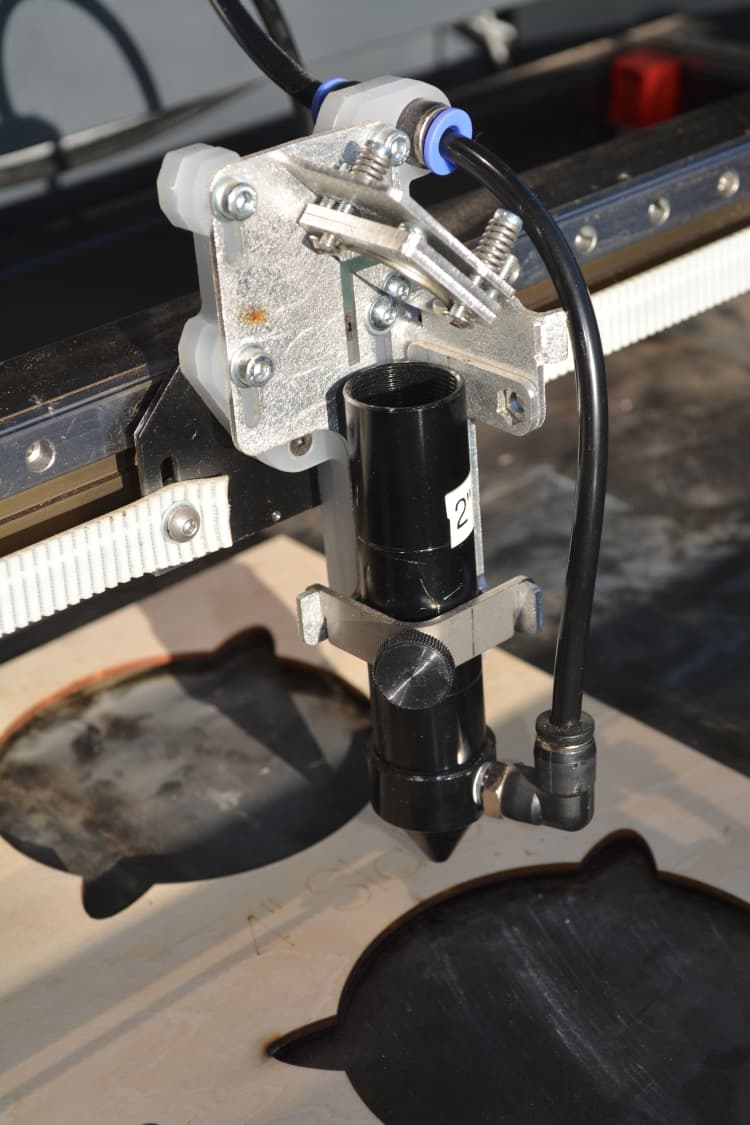
This is my head, the only thing connected to it is an air hose, no drag chain or pointer.
yes it is a pain changing lens…
but I keep with the 2.5" mostly at least that is the plan…
I have 3" meniscus coming want to try it and see if it give a little better cut
thru the thicker stuff…
I like the nice and clean look…
first thing to go on my new Monport 130W was the dang Autofocus Pen…
cripes talk about in the way…
and It is easier to just adjust the bed height then fool with the Up and Down stuff…
Just an update:
Installed 3" lens
added Air Assist, about 9psi at the gauge
cutting 10mm and 20mm cast acrylic
Results…
the 10mm cuts had very little drag markings, they got better when I dropped the air down to about 4-5psi, at the nozzle it was less of course…
cutting at 10mm/s at 45%pwr and raised 10mm off the bed.
set up a 30mm wide piece of 10mm acrylic in a cantilever set up so when cut it would fall away.
the edges were flame polished with just slight bottom drag only could see it with and the naked eye for the most part…
I turned the air down to 4-5psi as the part was not falling away with the higher air flow around 9psi…
after turning it down, when the cut went thru the part would fall away neatly.
the 20mm thick had the same results, with lower air pressure but
speed was 4mm/s 65%power…
All in all the 3 inch lens seems to work much better than the 2.5" …and the cut angle was very small also…
Also was cutting with the depth set to 2mm into the top surface.
anyway…just a tidbit as I continue to experiment with stuff…
Hey Chuck
Glad to hear your progressing. May I ask how you read & control the psi…guage n valve? and how do you messure your cut angle…you didnt mention a figure so do you just eyeball it using a square?
I have a 6gal compressor and set the out regulator to 30psi,
then it feeds into another 15psi air dryer/regulator that I can adjust down as needed.
The Monport comes with a built in small compressor,about 4psi…
I feed the external air into the machine and use a 24v control valve so Lightburn
can control it.
What I did differently was to keep the small original compressor that runs all the time,
and wye into the head feed line the external air.
I also put a shut off valve on the output of the internal compressor and set it to a very low flow, basically just enough to keep,pressure in the nozzle head when engraving so as not to allow particles into the lens area.
So basically I have very low pressure all the time when the machine is on.
and when I need air assist from Lightburn, the solenoid valve opens and applies the 4-5psi or whatever setting is best… then it turns back off… when the cut is done…
I have acrude drawing, I can post tomorrow when I get to work…
Does anyone else use tabs to hold cut pieces and stop them falling through ? I do ~50% power for a partial cut on my tabs
My setup is probably different to everyone. I have a box under the Y cut path with vacuum pulling the piece down to the support/puller rollers and removing smoke. Laser exposure is almost fully guarded. The laser beam is defused/reflected twice back up to the underside of the piece with matt aluminium 90 angle equal bar which absorbs most of the energy. The return beam is offset ~ 1cm from the cut and makes no mark on the underside of the piece. Without the reflecting aluminium angle bar it cuts the bottom of the box 100mm below the laser focus, cut piece. Twice reflected at 45 degrees absorbs stray energy really well.
The takeaway from this is - the laser beam reflection reduces the power of the reflected beam significantly, but also absorbs the energy (and gets hot).
One guy know uses steel sheet (famous engineer that has a whole series on lasers) he first has all material slightly raised off the metal (like 6mm) using magnets, second his setup has lots of air flowing over the metal sheet and exhaust out the back so the fumes of acrylic are drawn off so fast the can’t ignite.
It’s always hard to judge something without seeing it. Therefore here (again) an example from my current production. (When I change the material to 0.8mm plywood, I also like to show the pictures…)
The material (3mm acrylic) is placed directly on steel honeycomb, only relatively little compressed air is used (haven’t measured it). Marks from laser reflection are clearly visible. However, after the protective film is removed, the result is very clean and ready for assembly.
This is the method I use “normally”, because I can very quickly place the plates directly at 90 degrees in the upper corner of the machine bed and have a 100% repeatable positioning.
PS I have not had my honeycomb out for cleaning since I bought the machine, nor have I once used my blades under the honeycomb, not once.
It will be interesting to see other people’s results, especially when the material is placed directly on a steel or stone plate. If there are even more productive and better ways of doing things it will be great to see and learn.
Bernd…
you leave the bottom and top covering on the acrylic…and it is on the honeycomb when you cut ! Q: do you get and flashback marks… ? I did not see any …
as Promised here is my very crude air assist install dwg.
Keeps constant positive pressure in the nozzle when air assist is off…
Allowing etching/engraving with no air flow / smearing…
I turn the lo flow valve down to just a small pressure felt with your finger…not critical.
Then when the air assist is turned on you can adjust for cutting…
In the pictures, the “partially red” side is the underside and the discolorations are from laser reflections but, as I said, acceptable because there is nothing to see on the product itself.
Ah very good…I looked close did not see anything so great !
I just this morning worked with some 1/8 basswood sheets 12x12 of course…
did a little engraving and was able to dial it in for the most part…
but the cutting seems a bit touchy.
The line between burning and Cutting had me going a bit…again a newbie on the wood…
Did a whole Sheet with some logo’s and the outside balloon that LB has on the side panel… kinda nice.
about 80% of the parts would cut and drop away… the other nope…
I thought maybe it was because I had the sheet of wood to the center front and maybe had a weak
spot with the laser travel…
SO… I moved it to the center of the bed… bed size 35 x 55 well this seemed to help but still of the
25 pieces about 4 of them were not cut and could not be pushed out, where as the others
just dropped out…
I’m gonna guess it is the wood density that is the culprit here…
But I do defer to you folks with all the history with cutting wood and such…
I get that a little more power or slow down the travel will help, but the trade of of
too much heat and scorching is in the back of my mind…
This was done on the honeycomb
What say you ?
The setup I used some shelf liners to help direct the air flow being pulled from the bottom…
Those white latches look like the ones on my machine, so try opening the front feedthrough hatch for good airflow from front to back across the platform. If you ever have little ones in the shop, though, that hatch is at their eye level.
Plywood can be very strange once in a while, glue pockets and knobs are the most hated by the laser people. But, find a bad piece and try with different power settings and different speeds. If the result is not good enough, I will discard the entire sheet and use it for boxes where a black edge is not so critical.
Have you checked whether your bed is in level/focus in all 4 corners?
There may be a height difference and there may be a laser align problem, you can quickly test it.
Only 1 pass, but maybe now thinking, 2 passes with lower power may be a solution…
The fan is 750 cfm
The sheet was from Amazon, not sure the grade… wood hahahaha but I see your point…
Also, way in the back hard… to see, is the valve for the stock air flow…
OH Studio 512 is my work office for our band members… Just FYI
I have a full studio set up to play, we get together 2-3 times a week.
Yup I’m the guy on the drums.
Indeed, it was the great quality of the lettering as compared to the outer cut line…just that bit of smokey edge and your mentioning of the fjne line between ok and fire.
Your air/exhaust is obviously good so the extra pass will save you the residue cleanup time…and maybe give a slight improvement in edge quality.
750cfm is a good size, but I guess you do have a nice few Cu,ft to clear and a run to the fan.
I have a 410cfm, 6", variable speed for 10.5 Cu,ft in the enclosure. I have one of those channelled cutting decks, which Im putting under a subfloor with its own air intake at the opposite end to the exhaust…its experimental so if there isn’t enough draw I’ll add a pc fan under the enclosure base and channel the positive airflow up through the base to the inlet.
The cutting deck channels will have various jigs covering, to keep as much air as possible flowing through to the exhaust end.
I ask about your fan as I see its positioned vertically and I’m thinking, do they work better or just as well as Horizontal.