I have read the posts on Pause and Resume. I stopped a long job to let the laser cool. I clicked Pause and then later Resume, but it just sits there. I saw the tip to use Preview, which of course I did not know, having now ruined an important piece on SS. What is the point of having Resume on the laser window if it does not work!!! How many pieces have been ruined because of this. Is this the Preview tip in the manual. I looked in the online manual and it says that you should click Pause and then Pause again to resume. So, what is the point of having the Resume button, which is the logical thing to click. After clicking Resume it did not matter what I clicked it just sat there. This is very poor interface design/help info. Overall I am very pleased with Lightburn but basic things like this should have been taken care of long ago!
Not all controllers properly support pause/resume function. I’d suggest experimenting with this during non-critical operation to see how your machine actually behaves to confirm support on your controller.
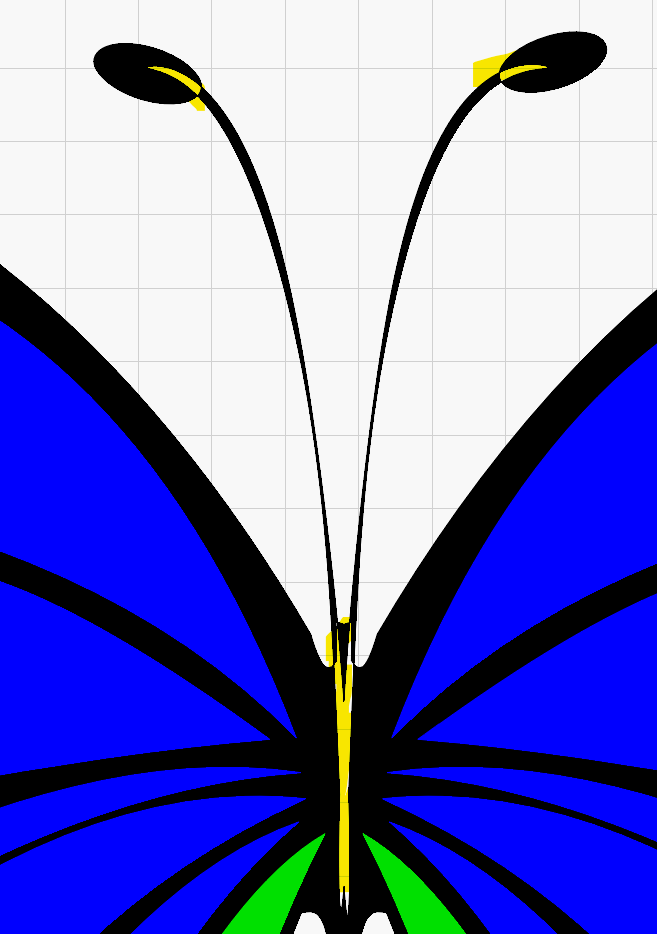
I did what you suggest and got basically nowhere. I could not understand the use of Preview to re-start. In any case, it would not re-start. I took a different approach with the burn. I decided to select the object on the first layer, and burn that, and then do it layer by layer. Then I discovered another Lightburn quirk! I created the vectors in Inkscape, where I took a base object and subtracted other shapes which became different colors/layers in Lightburn. When I move one of the subtracted shapes in Lightburn I see the hole than should be there. However, when I go to burn that shape with the holes it burns without any holes! What the heck. That does not make any sense. Surely, it should burn the shape as it is shown. More time and material wasted. As of now I am left with no choice but to burn the whole thing, which will take about 3 hours. I only stopped out of concern for using the laser for an extended period.
What were your findings? Did you confirm that pause/resume was not supported?
Preview is not used to restart. However, it can be used to start at a specific point in the preview. You’ll need to manually position the laser before doing this.
Inkscape is a drawing program with a focus on visual display. LightBurn is a laser burning program. Not all designs from Inkscape will burn as they appear in Inkscape. They need to be properly designed to work for lasering.
Upload the .lbrn file with a description of the problem you’re having, what you think should happen, and what’s happening instead.
The thing that confused me was the fact that when I started to burn the whole thing, the holes are there, but when I burn just the object that has holes it burns without the holes. The holes are where other colors/layers appear. Would it behave differently if had created the vectors in Lightburn? Since I know Inkscape well, I did not want to have to learn to do the same things in Lightburn.
butt1.lbrn2 (114.7 KB)
No… a vector is a vector once it’s inside LightBurn.
I think what’s missing is some understanding on how LightBurn works and how the relationship of shapes affects the final burn.
Using inkscape is fine. However, you’ll have to adapt your understanding of vector graphics from a purely visual representation to one that’s instructing the laser to burn.
It’s unclear to me exactly what you’re going for in the design so I’ll speak in generalities about some things I’m seeing:
- LightBurn follows the rule that areas of overlapping shapes will become negative space. So in order to make a hole, you put one shape on top of another. And importantly, this rule is only applied to shapes on the same layer. For example, shapes on red layer won’t negate shapes on black layer.
The areas in yellow highlighted are negative space because of this. Is this what you want? If not, you’ll need to weld these shapes together such that they are one consistent shape. - To further elaborate, all layers in LightBurn are treated independently in terms of how the graphics interact with each other.
So for example, in this screenshot the entire black layer is evaluated independently of the red and black layers. This means the red shape does not result in negating the black shape. Instead, the red shape will burn independently with its own settings - Running a job with a single shape in LightBurn is not necessarily the same thing as running all shapes at once because of the way negative shapes are handled
- All lines in LightBurn will get burned in spite of how things are stacked. Because something is obscured from view doesn’t prevent it from being evaluated for burning.
- Using Preview will show you how your job is being evaluated. Scrub through the Preview to understand how the job has been evaluated and what exactly the laser is being instructed to do.

I suspect based on your description you probably don’t want the colored areas at all. Remove those shapes in that case.
Well things are clearer, and yet they are not completely clear. I do need the colored areas because they are to be burned with those colors. If what you say is true how come I see a hole in the black layer when I move a red shape out of the way, and when burning the whole thing the black layer is burned with the holes where they are supposed to be? I did not get beyond this and thus don’t know what would happen. If I burn the whole thing as is, will I get a result which looks like the graphic, assuming that the colors come out as expected. If not, how should I approach it. I am used to using CNC, where you have cutpaths.
Because the black layer has shapes to create the holes.
Here’s a view of the shapes where I’ve turned off the colored layers and shifted the background shape. The shapes representing the negative space are more apparent.

This is actually the same as one of the modes in Inkscape.
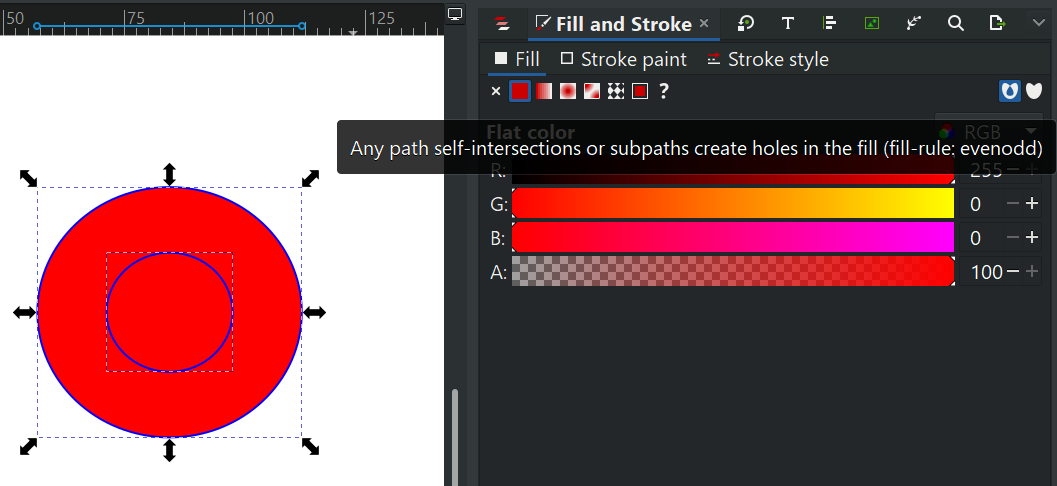
Note the wording in the tooltip. When combined these shapes will become a donut. However, that’s not true for the other mode where only counter-directional shapes will result in negative space. The only difference with LightBurn is that this is applied to all overlapping shapes, not only those that are combined.
It’s hard to know what you’re expecting without a thorough description but if you just want each color to represent a different level of shading then yes, you’ll mostly get what I assume you want. The exception being the negative space on the antenna and body. Are those deliberate?
One thing I’m noticing with your design is that you’re using flood fill for the black layer. I don’t see any value in doing that. Suggest you turn it off unless there’s something very specific you’re going for.
If I turn of Fill for the black layer won’t I just get an outline? I want it to be solid black like all of the colors.

Did not realize that it was on. I did not set it. What difference does it make? I noticed it was on for some, not all, of the other layers. I have turned it off there as well. Was that the correct thing to do?
It won’t make much of a change for the other layers given the design but would make a significant difference on the black layer.
Try watching Preview with it on vs off on the black layer. The difference should be pretty obvious.
I did watch in Preview and I see what you mean. All part of the leeeaarnniing curve since I am fairly new to laser work and Lightburn. Thanks so much for the help.