Rotary giving me hell

A few months back I went from a 20w diode to an omtech 100w CO2. I’ve been doing material tests and otherwise messing around with different things since then (when I have time). I ordered the 4-wheel rotary from them, and got it last night. This morning I’ve been trying to set it up.

First I needed to address the issue of potential slipping and moving. I’d rather not spend another $50 to buy the stopper/spring set some dude makes on Etsy if I don’t need to. So I made a wall that fits around the wheel bushings, and slots behind the screw on the gear side of the rotary, out of 5mm acrylic. Then a little piece to act as a wall on the adjustment side. This makes kind of a very minor pinching, and it loses traction. So I made a small weight out of a 16mm bolt, and a handful of nuts. I wrapped it in electrical tape and rubber, and put it in the tumbler. That seemed to keep traction.

Next I set up the rotary settings in Lightburn. Off the top of my head: 67mm diameter wheels, and after a dozen 35mm squares cut into tape, about 3250 for the steps.

Then onto the material test. This went all stupid. Issue 1: everything is upside down and backwards (mirror image is NOT checked in rotary settings). Issue 2: from the first test square, it went completely off kilter; angle and spacing. It seemed to correct itself after a few lines of squares. So I assumed it had to do with the starting point.

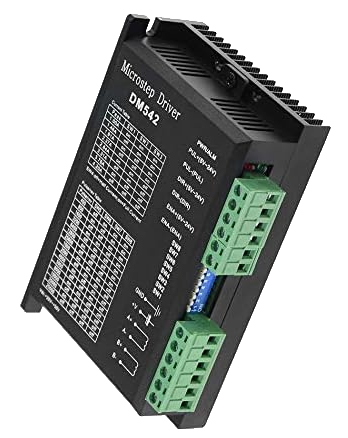
I did some digging around here. I flipped my rotary 180° to start. Then I made a backup of my machine settings, and lowered the Y jump off and acceleration by a good bit. Off the top of my head: jump off was 20, I set it to 5, and acceleration was 3000, and I set it to 800. This visibly slowed down the start, I could see from hitting the frame button.

Now that I’m hitting the frame button, the laser seems to stop at a different point each time. I line it up on a center line to start, origin is “current location”, and job position is right-center. Something seems off, here are a few videos, taken back to back, all I did was line it back up on the line after, and hit frame.

1: Watch unnamed | Streamable

2: Watch unnamed | Streamable

1 Like

Let’s start at the beginning… How did you setup the rotary? You should be able to read the steps/rotation and multiply it with the ration, leaving the steps/rotation.

Use the test button in the gui to check that the driving wheel (or roller) rotates one complete turn and back.

:smile_cat:

For the steps I started at 3000 per the recommendation from omtech. I marked a sharpie line on the tumbler, and one on the opposite end. I was hitting the test button in the rotary screen, but it seemed to be moving too fast. Though I haven’t gone back to it since changing the jump off and acceleration. I couldn’t quite get it to work no matter what number I punched in.

So I tried a different way I saw on a few videos. I made a small box, 6mm, then used the diameter of the tumbler where the laser is(it’s got a slight taper unfortunately ). That gave me the circumstance as the other measurement for the box. As long as the steps are right, both 6mm lines of the box should be in the same spot. I got that. Then I tried the material test from there.

I’m about to check out the link you supplied.

Edit: I will have to find this piece on my machine. Going to assume it’s in one of my side panels. But that makes more sense then the “common knowledge” of trial and error. Not a clue what my rotary ratio is, but I’ll see if I can find it out.

This is a common motor driver, might not be the same as yours but it will look something like this.

dm542

The two motor drivers are about center in the photo in green rectangle. Yours can be mounted anywhere.

:smile_cat:

Just an update: I found the stepper numbers, it’s 2000 according to the switches. Omtech has been less than helpful. After several emails, they still haven’t given me the gear ratio, and they told me the wheels are 70mm, when I measure 67.5(with o-rings on). So I’m going to have to take it apart and count teeth I guess.

I tried the test button on the rotary screen with a bunch of numbers. It doesn’t make sense to me. Most of the time it goes several full rotations. Sometimes it goes a little more than 1 full rotation, but then goes back more than one.

Gove this a shot. It’s a formula I found at lasers123.com

a. In LightBurn, create a rectangle that is 80mm wide x 5mm high.
b. Rotate the design 90-degrees so that the 80mm dimension runs along the round part of the cup.
c. Engrave the design.
d. Measure the rectangle in mm. (For this example, lets say it measured 95mm.)
e. Divide the measurement by 80. (e.g., 95 / 80 = 1.1875)
f. Find your current steps per rotation. (For this example, lets say it is 5000.)
g. Divide your current steps per rotation by the value obtained in step e. (e.g., 5000 / 1.1875 = 4210.53)
h. Test the value calculated in step g as your steps per rotation.

I’ll give that a shot, but first I have to shorten the rotation it’s giving me. I was trying to do short test square around the measured circumstance (6mm x 260-something). But it went around multiple times. So I couldn’t really get a read on where the actual stop point was. Though maybe I can slow the rotation speed even more to help with that.

Do the engraving on tape at low settings. That way you don’t waste any materials.

Doesn’t sound normal, but I don’t know what driver you have and can’t see the switch settings…

Are you sure you have the on/off correct? Not inverting them? Many of these are on, when it’s towards the circuit board. They are generally marked as to their on direction.

These are digital… meaning there should be no fudge factor involved in getting them to work.

It takes a certain number of steps to move the motor a certain distance or a complete rotation, this doesn’t vary by motor, so it should work correctly with the correct settings and you shouldn’t have to second guess it.

The worst case is that you command the rotary to move in increments it cannot perform, this would cause issues… I’ve run these for a number of years and yours just isn’t setup correctly.


From your explanation, I’d say you have something off and I’d guess it’s the switches. It is easy for us to check it if you give us the information… So far it’s been just talk with very few photos to help us with your issue.

Tell us which motor driver you have and include a shot of the switch settings, like I posted. If we have 1/2 of this, we can’t help you, we need to know the motor driver type (or a photo of the placard defining the switch settings) and the switch settings. Just to double check what you’re telling us as it doesn’t make sense.

:smile_cat:

I’m using tape. Unfortunately anything lower than 10% power in Lightburn doesn’t seem to be marking. And 10% is enough to go through the tape and scratch the tumbler. I have 2 scrap tumblers and some glass cups though, so it’s really a non issue

Here’s a pic of the side of the stepper for the y axis:

When trying to read the chart on the front, I have to use a combination of a magnifying glass and flashlight, as the “steps” part of it is tucked behind a piece of frame. But using the last 4 switches as off on on off, gives me 2000, just like the one in the former post you shared.

I’m so confused. While typing this, I had made a few more videos and pictures, starting at 3000 steps per rotation, showing how it went 3.5 rotations forward, then 2 back. Then I clicked ok, and switched to 5000 for a comparison, but it only went 1.5 rotations forward, and returned to start. I just went back to 3000, and it fell short of 1 full rotation, and returned to start.

Could this have just not been writing to my controller or something?? I’ve been hitting ok, have restarted lightburn, turned on and off the laser, etc.

Can you see the front of the driver? It looks like the switches are OFF ON ON OFF. If it’s the same as my driver that would be 2000.

Run the test I said before and it will help you get the steps close for the roller rotary.

Also make sure the rotary is enabled in lightburn. I’ve forgot to turn it on and it spinns the tumbler like crazy.

Update again. The test function has been done since my last post. I start on my line, it makes 1 full rotation to the same line, turns, goes back, and stops on the starting line.

Now I just need to figure out the whole circumstance thing. Taking calipers to the cup tells me 74.5mm diameter. I plug it into the rotary window to give me the quick circumstance. I use that to make the length of a 5mm box. It’s off by a 20.9mm overlap, but does end on the start line. I’ve seen that people at this point adjust the steps until it matches. But if the test on the rotary window was perfect, will this mess things up if I do that?

Next update.

I modified the steps per rotation downward to be able to make the rectangle meet end to end. I tested some words and images on the tumbler, and they looked great. However, when I switched to glass, the same image is squished, as if it’s not rotating, maybe not gripping. I tried a few different things, but I may just have to buy the dang kit on Etsy that has the retention arm on it.

Unless you guys have any ideas that is?

I appreciate all of your help thus far

When I was using a roller rotary I adjusted steps for every tumbler. Only time I didn’t was when they were the same size. Lots of guys disagree with that but it worked for me.

I used a piece of tape and measured 2 lines 80mm apart. Used the move window to move 80mm. If it went line to line it was good. If it didn’t I adjusted 50-100 steps either direction until it lined up.

I just did this and it worked out great. I went from 3030 steps per rotation for my skinny tumbler, to 3300 for a pint glass. I don’t really understand why this is, and I’m hoping someone can chime in. Kind of sucks to have to keep some sort of compendium of rotary settings for items lol.

I had amazing issues too, getting our rotary going, but it’s great now - the 4-wheel one. I can laser a 100mm square box on a piece of paper taped over a yeti of four different diameters, and each comes out at 100 x 100mm.
I can laser whatever else, and get it undistorted too, now.
But there are cautions. The faster you have U speed, jump speed, and acceleration, the more likely you will get slip and mismatched 2nd paths if running the file again.
I could explain here, or maybe start a separate thread which might be best…

1 Like

After changing the steps per rotation for each item, I haven’t had any issues. It is annoying that there seems to be no set system, despite calculations people give or commonly use.
I have a scrap tumbler and pint glass, both with tape and lines 70mm apart. I have the steps per rotation written down for each and use the tape lines to verify.

I would never argue with success …

There is a set system. You read the setup … keep in mind how this works.

First these systems are digital, they work or they don’t … this is why there is a setup procedure for Rotaries. I have two rotaries, one is a chuck and the other is a PiBurn 4 wheel rotary…

Once it goes through a pulley/belt/screw system it’s now analog. This is generally where it gets messy.


I select the best rotary for the application, irregardless of the machine, co2 or fiber.

Think about where these digital systems could possibly fail to be accurate… the first to mind is computing the circumference, Lightburn can’t compute Pi to it’s actual value which goes on infinitely… Even if it could, your calipers would be the weak link in getting an accurate enough measurement. Then multiple the error of your values times Pi, the best you can…

Although others have mentioned, is the Ruida has a limited size data word it works with and that can end up being truncated or loosing a bit of accuracy. This is just speculation to me as I’ve never had any way to get into a Ruida.

A direct drive rotary will inherently be more accurate, since there is no belt/pulley system that has to have backlash if you want it to work… It must have clearance to operate, which creates backlash, or it can’t operate.

A roller or wheeled rotary can easily slip, due to excessive high acceleration, jumpoff speed or other mechanical anomalous variations, such as the pulley/belt backlash.

You can setup a motors step and the distance moved is in microsteps. An unwary operator or creator could and do, select intervals that can end up not stepping a complete step, this also can makes visibly detectable anomalies on the work …

In the end we think these are very small things, which they are … and think what’s the chances of this effecting me?… you’ll find the chances are better than you think when it happens to you…

If you haven’t experienced any of these, you will.

When it does what I want and not what I tell it, I’ll probably be much more happy.

I have set my steps/rotation once, on both the Fiber and the Co2, never have touched them again… most of the other fixes have to do with interval and with a galvo, split/size.

Good luck

:smile_cat:

1 Like

Fair points sir, fair points