Ständiger Versatz nach Kalibrierung [Constant offset after calibration]

Hallo zusammen,

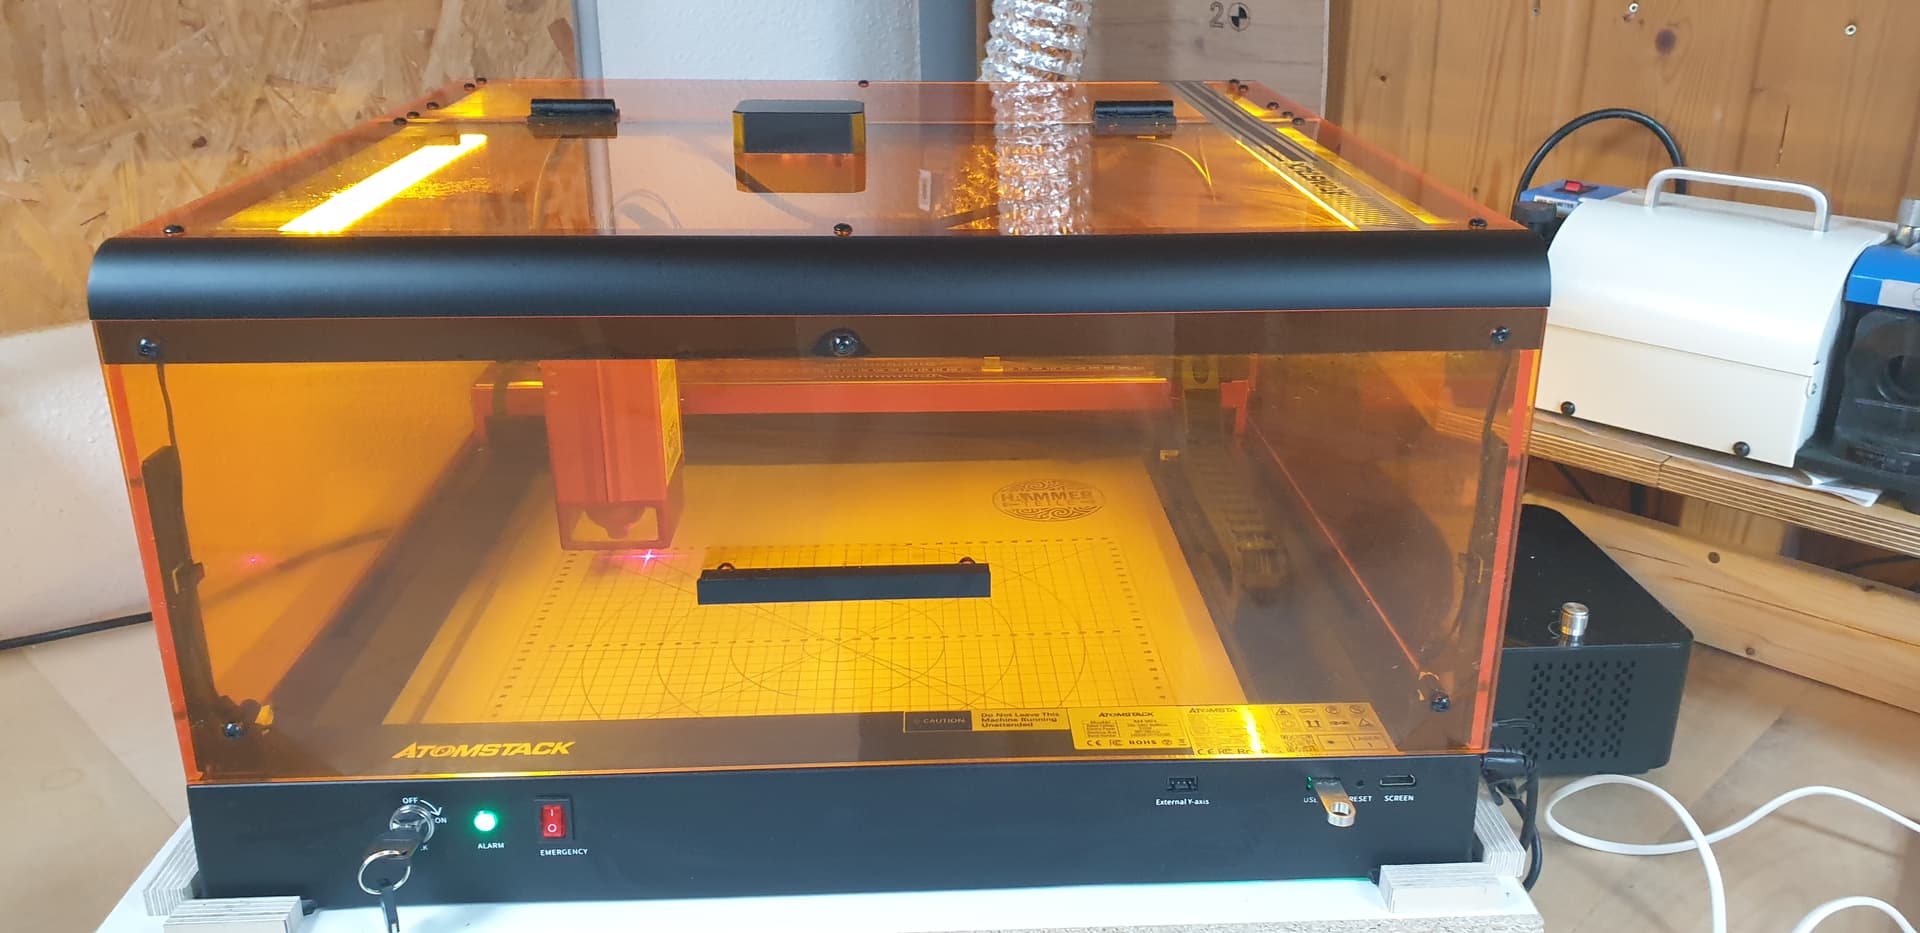
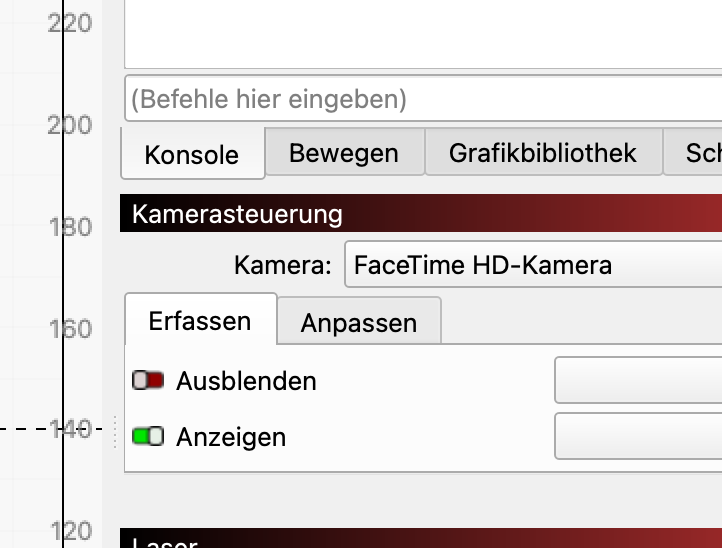
ich habe einen Atomstack A48 mit fest verbauter Kamera im Deckel. Dieser Deckel als auch die Kamera sind stabil montiert und wackeln nicht. Ich verwende die neueste Lightburn Version auf einem Mac.

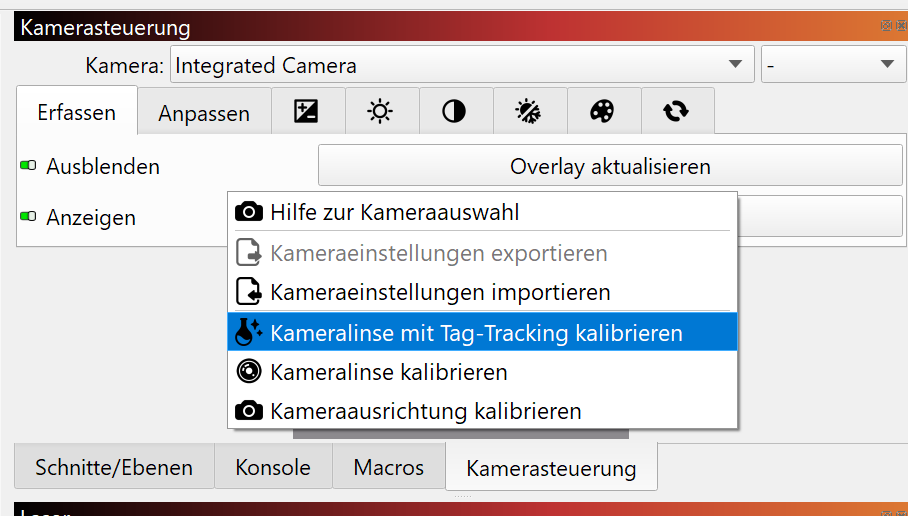
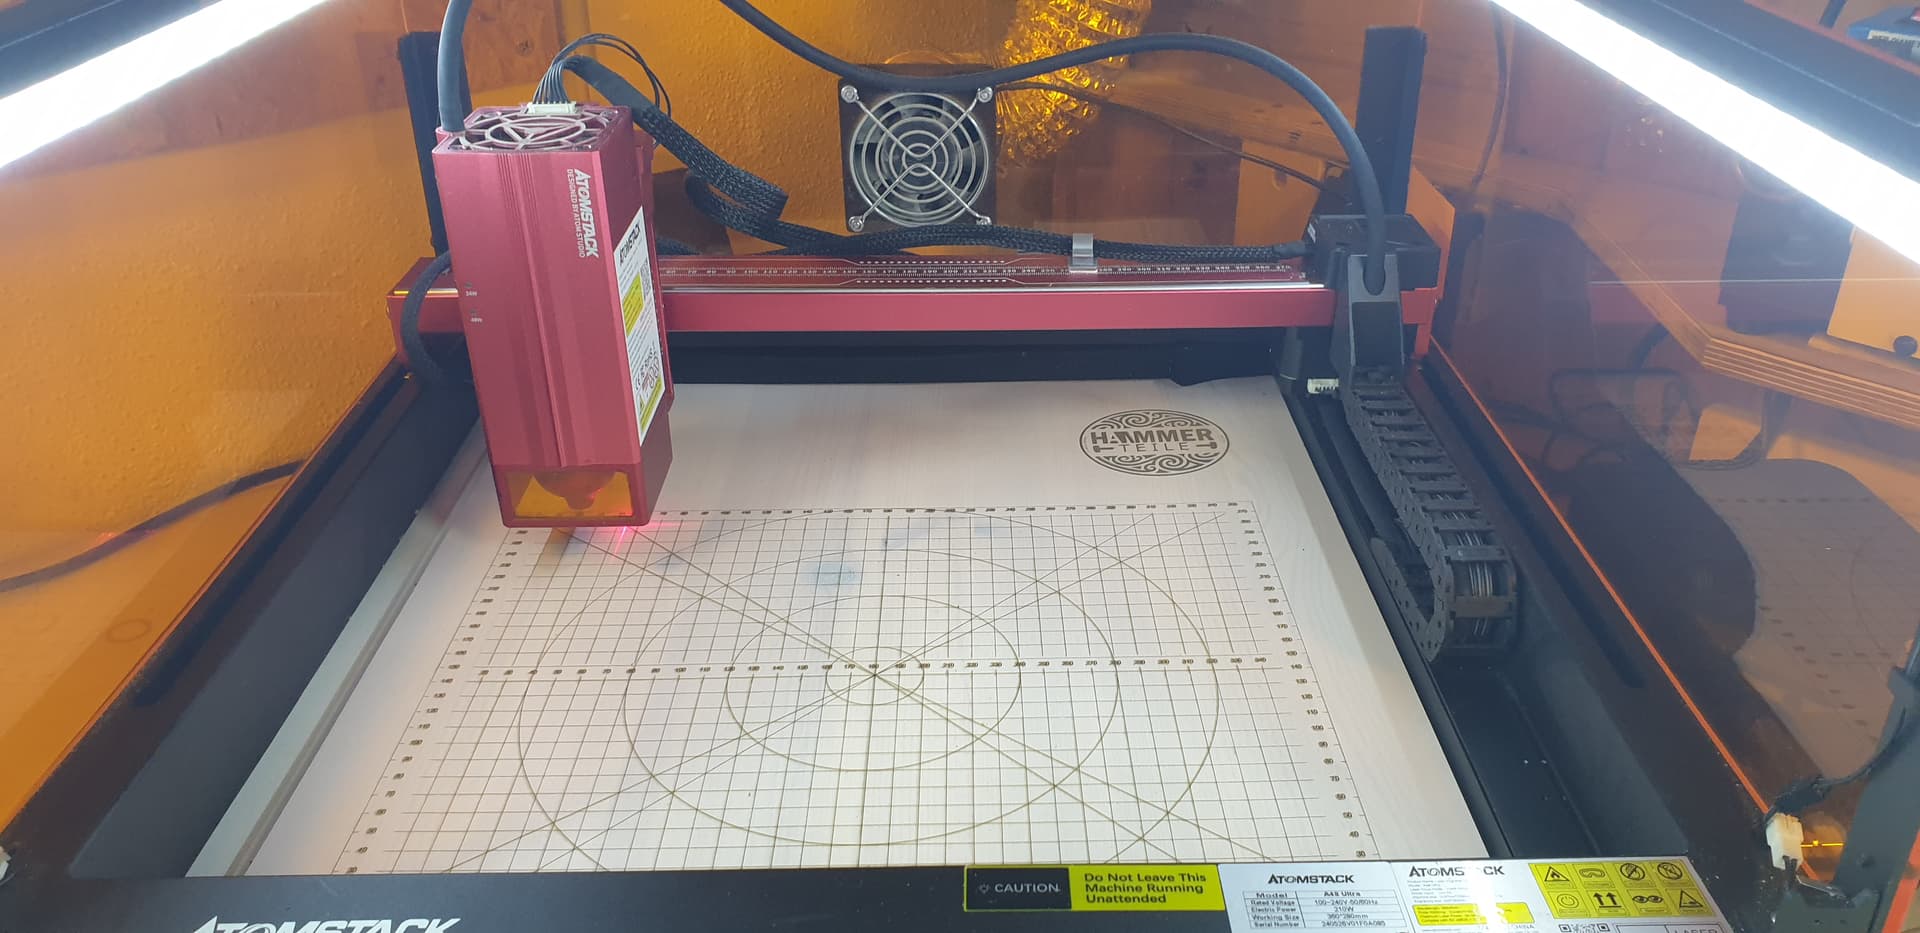
Für die Kalibrierung habe ich den max. Arbeitsbereich 360x280 auf ein Stück MDF gelasert. Bei der Kalibrierung der Linse habe ich den Ausdruck gem. den Anweisungen exakt an diese Ränder geschoben.Dannach die Kamera an den 4 gelaserten Kreisen kalibriert. Soweit so gut.

Der erste Versuch nach der Kalibrierung war perfekt. Ich musste nichts anpassen.

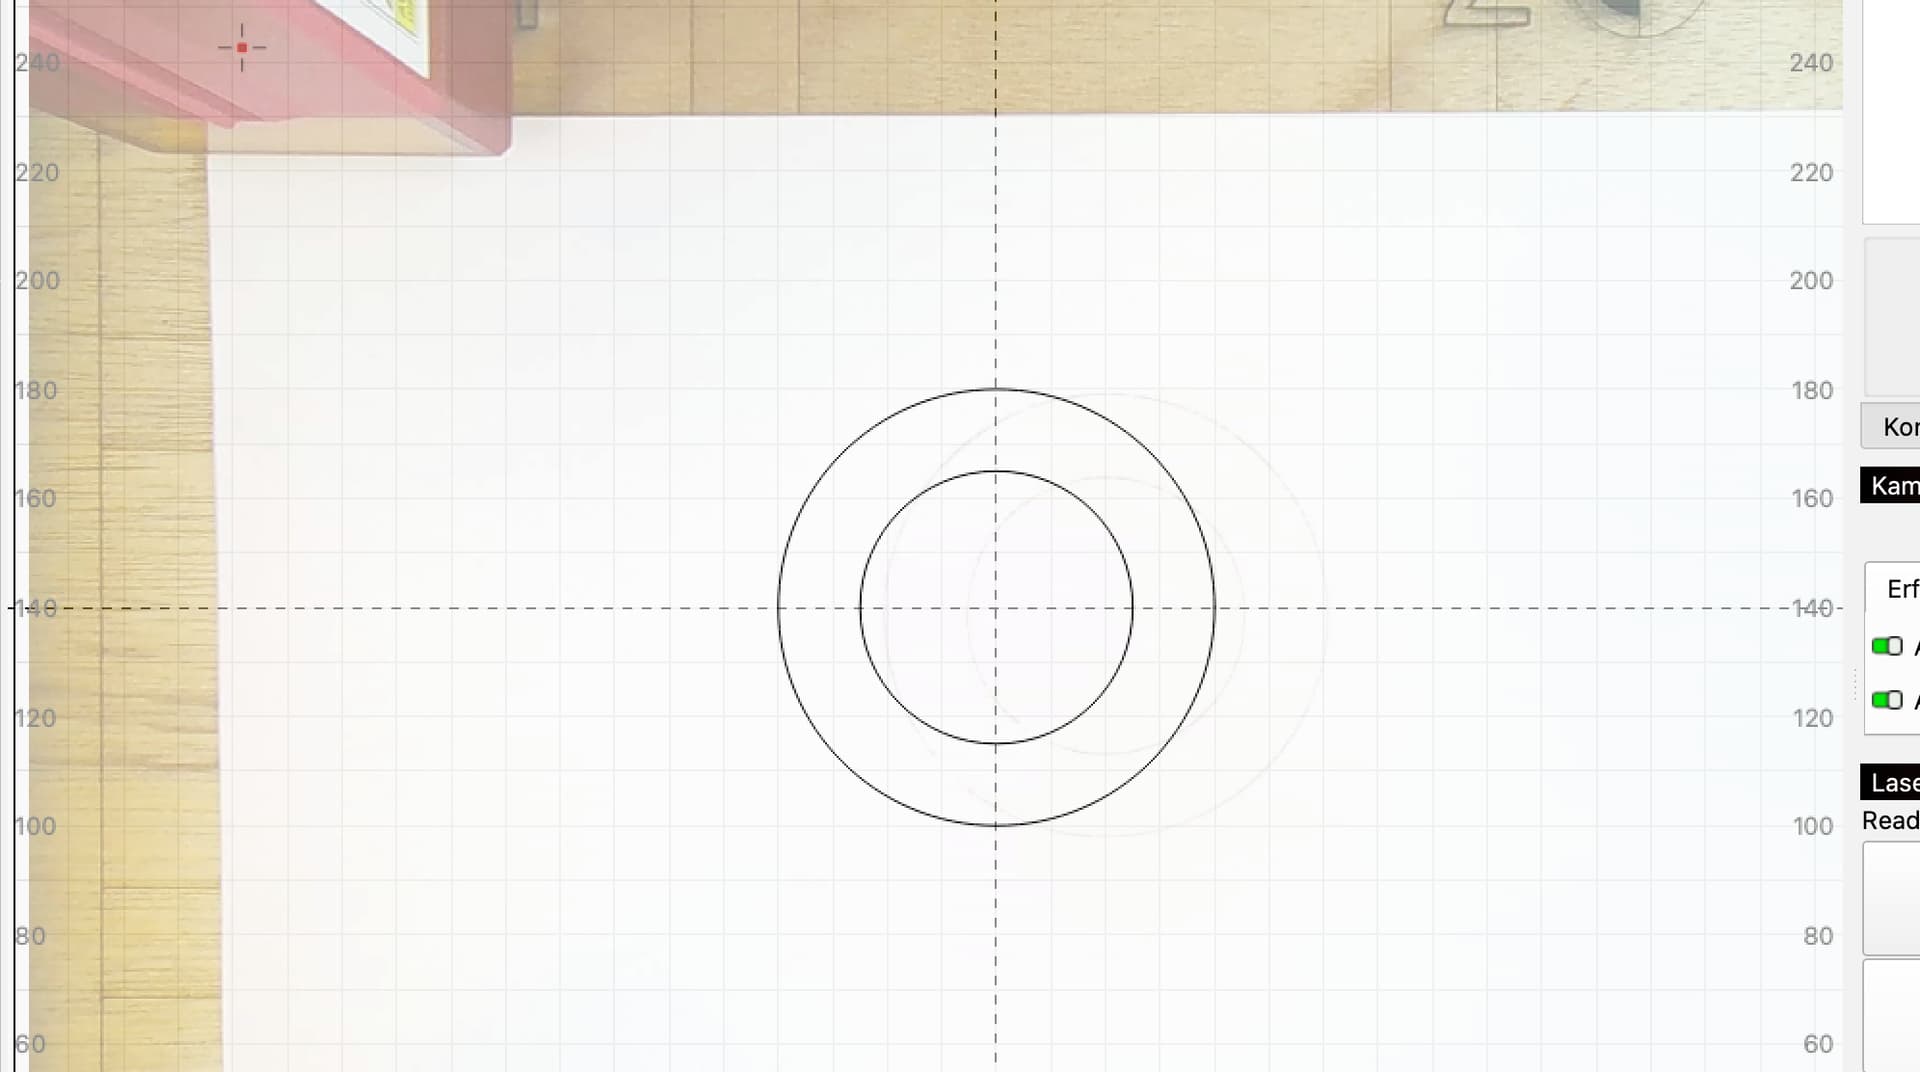
Aber wenn ich 2-3 Objekte gelasert habe ist die Kalibrierung dahin und ich habe einen Versatz. Dieser ist nicht reproduzierbar. An dem Aufbau hat sich absolut nichts verändert und auch die Dicke der Objekte war gleich.

  • Laser steht auf absolute Koordinaten
  • Ich home jedes Objekt und stelle den Autofocus ein
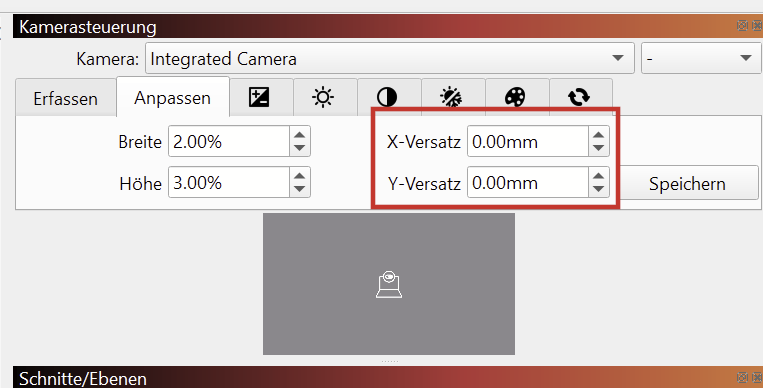
  • RedCross Versatz ist deaktiviert
  • Kamera ist fest
  • Deckel wackelt nicht
  • Objekte werden immer mittig platziert und sind gleich groß
  • Geschwindigkeit war auf 6000mm/min
  • Das gelaserte Bild war nicht verzerrt oder unscharf.
  • Achsen habe ich geprüft → Maße stimmen exakt in x und y

Ich hab das Ding jetzt bestimmt schon 10mal neu kalibriert und es passiert immer das Gleiche nach wenigen Laser versuchen.
Es gibt einen Versatz. In y-Richtung ist dieser oft etwas höher als in x-Richtung.

Hat jemand noch eine Idee?

Hello everyone,

I have an Atomstack A48 with a built-in camera in the lid. Both the lid and the camera are securely mounted and don’t wobble. I’m using the latest version of Lightburn on a Mac.

For calibration, I lasered the maximum working area of 360x280 onto a piece of MDF. When calibrating the lens, I moved the printout exactly to these edges according to the instructions. Then I calibrated the camera using the four lasered circles. So far, so good.

The first attempt after calibration was perfect. I didn’t have to adjust anything.

But after lasering 2-3 objects, the calibration is lost, and I have an offset. This is not reproducible. Absolutely nothing has changed in the setup, and the thickness of the objects was also the same.

The laser is set to absolute coordinates.
I home each object and set the autofocus.
RedCross offset is disabled.
Camera is fixed.
Cover doesn’t wobble.
Objects are always centered and the same size.
Speed was set to 6000 mm/min.
The lasered image wasn’t distorted or blurred.
I checked the axes → dimensions are exactly correct in x and y.
I’ve recalibrated the thing at least 10 times now, and the same thing always happens after a few laser attempts.
There is an offset. In the y direction, it’s often slightly higher than in the x direction.

Does anyone have any other ideas?

According to your detailed description of the problem, it seems that you are doing everything correctly with your camera. Therefore, I think you should contact your seller/manufacturer.

1 Like

Versuche mal direkt nach der Kalibrierung die Settings zu speichern (Rechtsklick->Kalibrierung speichern) und wenn du dann wieder eine Verschiebung hast, lade die Einstellungen neu rein und probiere noch mal. Daran könnte man erkennen, ob sich die Einstellungen verstellen oder etwas mit der Mechanik nicht passt.

Try saving the settings immediately after calibration (right-click → save calibration). If you notice a shift again, reload the settings and try again. This might reveal whether the settings have shifted or whether there’s something wrong with the mechanics.

1 Like

Hallo, also Rechtsklick->Kalibrierung speichern habe ich auf dem Mac Version 2.02 nicht gefunden. Ich bin stattdessen auf Datei->Präferenzen exportieren-> gegangen. Ich hoffe mal das dies dasselbe ist.

Hello, I couldn’t find the right-click->Save Calibration option on Mac version 2.02. Instead, I went to File->Export Preferences->. I hope this is the same thing.

Nicht ganz, vermutlich, aber eventuell ist es auch dabei. Ich gucke gleich noch mal nach dem Screenshot, ist gestern gepostet worden.

Edit: hier der Link:

English translation

Hi Niko,

The fact that the first attempt after calibration was successful makes me confident that you did everything right!

This leads me to believe that something is wrong with the positioning of the laser. It’s good that you are using “absolute coordinates.” Did you perform a homing sequence before execution?

Can you engrave two circles next to each other, click “Update Overlay,” and send us a screenshot of the entire LightBurn window?

This will allow us to see how severe the misalignment is.

The test Melvin suggests with exporting the settings may also provide helpful clues. You are welcome to upload the exported .lbcm file here so we can check it.


Are you using the new AprilTags for lens calibration? These are more accurate than the “dot map.”

For maximum precision in lens correction, I recommend this new procedure with AprilTags and tracking Calibrate Camera Lens (Labs) - LightBurn Documentation

The feature is still in development and can only be accessed by right-clicking in the camera window here:

Important: after this step, you must perform the Camera Alignment again.

I look forward to seeing your results.

Hallo Niko,

Dass der erste Versuch nach der Kalibrierung passt stimmt mich zuversichtlich, dass du alles richtig gemacht hast!

Das lässt mich vermuten, dass etwas mit der Positionierung des Lasers nicht stimmt. Es ist gut, dass du “Absolute Koordinaten” verwendest. Hast du vor der Ausführung eine Homingsequenz gemacht?

Kannst du einmal zwei kreise nebeneinander gravieren, “Overlay Aktualisieren” klicken und uns einen Screenshot des ganzen LightBurn Fensters senden?

Damit können wir sehen, wie stark der allfällige Versatz ist.

Der Test, den Melvin vorschlägt mit dem exportieren der Einstellungen kann auch hilfreiche Anhaltspunkte geben. Du kannst die exportierte .lbcm Datei auch gerne hier hochladen, damit wir sie prüfen können.


Verwendest du zur Linsenkalibrierung die neuen AprilTags? Diese sind genauer als die “Punkte karte”.
Für die maximale präzision der Linsenkorrektur empfehle ich diese neue Vorgehensweise mit AprilTags und Tracking Calibrate Camera Lens (Labs) - LightBurn Documentation
Die Funktion ist noch in Entwicklung und nur durch Rechtsklick im Kamerafenster hier zugänglich:

Wichtig: nach diesem Schritt musst du nochmals das Camera Alignment durchführen.

Ich bin gespannt auf deine Ergebnisse.

This makes me suspect something is wrong with the laser’s positioning. It’s good that you’re using “Absolute Coordinates.” Did you run a homing sequence before running the program?

Could you engrave two circles next to each other, click “Update Overlay,” and send us a screenshot of the entire LightBurn window?

This will allow us to see how much offset there is.

The test Melvin suggests, exporting the settings, can also provide helpful clues. Feel free to upload the exported .lbcm file here so we can check it.

Are you using the new AprilTags for lens calibration? They’re more accurate than the “point map.”
For maximum lens correction precision, I recommend this new approach using AprilTags and Tracking Calibrate Camera Lens (Labs) - LightBurn Documentation
This feature is still under development and can only be accessed by right-clicking in the camera window here:

image

Important: After this step, you must perform the camera alignment again.

I’m looking forward to your results.

1 Like

Vielen Dank erstmal für Eure Antworten.
Ich habe jetzt folgendes gemacht:

  • Drucker auf der Grundplatte (Spanplatte fixiert mit geklebten Leisten)
  • Atomtstack Matrix Unterlage verschraubt
  • Punkte für Kalibrierung auf ein dünnes Holz geklebt und zugesägt.
  • Arbeitsbereich mit 9 Rechtecken für die Punktekalibrierung auf grosse Unterlage gelasert.
  • Kalibrierung neu mit diesen Hilfsmitteln durchgeführt (alle Werte waren unter 0.2)
  • Nach der Kalibrierung kleines Kreuz gelasert und Versatz gemessen (x=-0.5mm, y=0mm)
  • Mehrere Testkreuze an unterschiedlichen Positionen gelasert.

Dannach habe ich alles ausgeschaltet und neue Kreuze gelasert. Der Versatz war wiederum nicht gleich, aber der Unterschied war deutlich geringer. Daraufhin habe ich die Präferenzen geladen und neu gelasert und das Ergebnis war wieder nahezu perfekt.

Ich werde jetzt erst mal weiter testen und berichten…

1 Like

Genau dieses Problem habe ich auch, zuerst passte alles super und jetzt passt nichts mehr.
Mit der neuen Schablone AprilTags und Tracking passte es sehr gut und auf einmal habe ich jedesmal einen anderen Versatz.Ich habe jede Kamera probiert, Materlialstärke war eingestellt.
Jetzt habe ich keine Idee mehr.

Materialstärke sollte man immer alles auf 0 lassen, da nichts einstellen. Das ist nur für Laser, die automatisch die z-Achse regulieren, das sind wenige. Eventuell noch mal so probieren.

1 Like

ah ok. Super, das probiere ich aus.

Das habe ich noch nicht gemacht, werde ich mal probieren.

English translation

How significant is this offset in each case?

This is well within the range of pixel resolution, and much greater accuracy cannot be achieved.

Explanation:

A typical 8-megapixel camera with an aspect ratio of 16:9 has, for example, 3840 × 2160 pixels.

If your working area is 500 mm wide, this corresponds to 3840 pixels / 500 mm → 0.13 mm per pixel.

In addition, lens calibration (distortion correction and perspective change) alters the image to such an extent that especially at the edges, where the lens is more distorted, two pixels can easily become one.

A precision of “only” +/- 0.2 mm is therefore well within the range.

For maximum precision, it is important to install the camera above the center of the work area so that as little distortion as possible is required.


It is worth mentioning that with autofocus cameras, the optics change constantly! For this reason, all LightBurn cameras are manual focus.

@TeacherMC and @Panda1202, which cameras do you use?

Would you mind trying this test?

  • Engrave two circles in the center of the work area.

  • Click on “Update overlay” - how significant is the offset?

  • Change the lighting conditions of the work area with a lamp.

  • Repeated clicks on “Update overlay” should not change the orientation.

It is important to recalibrate and realign each camera. (There are even differences between the same camera models.

I look forward to your feedback!

Wie stark ist dieser Versatz jeweils?

Das ist durchaus im Bereich der Pixelauflösung und viel mehr Genauigkeit ist nicht zu erreichen.

Zur Erklärung:
Eine typische 8 Megapixel Kamera mit einem Seitenverhältnis von 16:9 hat z. B. 3840 × 2160 Pixel.
Wenn dein Arbeitsbereich nun 500mm breit ist entspricht das 3840 Pixel / 500mm → 0.13mm pro Pixel.

Zusätzlich verändert die Linsenkalibrierung (Entzerrung und Perspektivenänderung) das Bild soweit, dass vor allem an den Rändern, wo die Linse stärker verzerrt ist, aus zwei Pixeln durchaus auch einer werden kann.

Eine Präzision von “nur” +/- 0.2 mm ist also durchaus im Rahmen.

Für die Maximale Präzision ist es wichtig, die Kamera in über der Mitte des Arbeitsbereichs zu installieren, sodass möglichst wenig entzerrt werden muss.


Erwähnenswert ist, dass mit Autofokus Kameras die Optik quasi ständig ändert! Aus diesem Grund sind alle LightBurn Kameras Manualfokus.

@TeacherMC und @Panda1202 , welche Kameras verwendet ihr?
Würdet Ihr einmal diesen Test machen?

  • Graviere zwei Kreise in der Mitte des Arbeitsbereichs.
  • Klicke auf “Overlay aktualisieren” - wie stark ist der Versatz?
  • Ändere die Lichtverhältnisse des Arbeitsbereichs mit einer Lampe.
  • Wiederholte klicks auf “Overlay aktualisieren” sollte die die Orientierung nicht verändern.

Es ist wichtig, für jede Kamera eine erneute Kalibrierung und Ausrichtung durchzuführen. (Es gibt sogar Unterschiede unter den gleichen Kameramodellen)

Ich bin gespannt auf eure Rückmeldungen!

Hallo Aaron,

ich habe jetzt Deine Tests gemacht.

  1. Kameralinse neu Kalibriert
  2. Kameraausrichtung durchgeführt
  3. 2 Kreise in der Mitte graviert
  4. Der Versatz war ca. 13mm X und 1mm für Y


5. Nun habe ich mit einer LED Lampe aus allen Richtungen in den Bauraum geleuchtet und das Overlay neu aktualisiert. Es hat sich nichts an dem Versatz geändert.

viele Grüße
Niko

Nach der Anleitung von Aaron, habe ich die Kreise gelasert und das Overlay aktualisiert. Den Versatz habe ich solange korrigiert, bis das Overlay genau passte.

Im Moment habe ich keinen Versatz mehr.

In Summe hat folgendes den Erfolg gebracht:

  1. Neu kalibrieren mit den April Tags und Tag Tracking wie von Aaron vorgeschlagen
  2. Dannach 2 Kreise und ein Plus in der Mitte gezeichnet
  3. Overlay aktualisiert (Zeigervesatz deaktiviert, Absolute Koordinaten)
  4. Versatz korrigiert bis es passt.
  5. Einstellungen exportiert.
  6. Laser Aus/An
  7. Neues Projekt, Präferenzen importiert.
  8. Kreise erneut gezeichnet an anderer Stelle
  9. KEIN VERSATZ MEHR HURRA!!!

Danke Euch allen für die tollen Tips!!!

Following Aaron’s instructions, I lasered the circles and updated the overlay. I adjusted the offset until the overlay was exactly right.

At the moment, I have no offset left.

In summary, the following worked:

Recalibrated with the April tags and tag tracking as Aaron suggested.
Then drew two circles and a plus sign in the center.
Updated the overlay (pointer offset disabled, absolute coordinates).
Adjusted the offset until it was correct.
Exported the settings.
Laser off/on.
New project, imported preferences.
Redrawn the circles in a different location.
NO MORE OFFSET, HOORAY!!!
Thanks all for the great tips!!!

3 Likes
English translation

Thanks for the great feedback.

You sound satisfied, but I’m still missing something, if you don’t mind looking into it. :slight_smile:

In your list of steps, you don’t mention that you performed a new Camera Alignment after the lens correction (with tracking). Did you do that?

I’m asking because an X- and Y-offset in the “Camera” window is usually only necessary if something is wrong with the alignment (or if the camera has been moved).

Or were you referring to the pointer offset in the device settings?

Danke für die tolle Rückmeldung.

Du klingst zufriedengestellt, aber ich vermisse noch etwas, wenn du magst dem nachzugehen. :slight_smile:

In deiner Aufzählung der Schritte erwähnst du nicht, dass du nach der Linsenkorrektur (mit Tracking) eine erneute Kamera Ausrichtung durchgeführt hast. (Der Wizard, wo die vier Kreuze gelasert, und ausgewählt werden) Hast du das gemacht?

Denn, ein X- und Y-Versatz im “Kamera” Fenster ist eigentlich nur notwendig, wenn etwas mit der Ausrichtung nicht ganz stimmt (oder, wenn die Kamera in der Position verschoben wurde)

Oder hast dich auf den Zeiger-Versatz in den Geräte Einstellungen bezogen?

It’s great that you’ve achieved this result. Congratulations
In the last of your pictures we see a clear, nice picture of your work area, may I ask, is exposure never a problem for you?

Hallo Aaron,

ja Du hast Recht. Ich habe die Kameraausrichtung gemacht und vergessen es mit aufzuschreiben.

viele Grüße
Niko

1 Like

my Laser is in a closed housing an a strong fan wich pulls the smoke directly out of my window.
In my Room i use an Air Filter which is not perfekt but better than nothing.

viele Grüße

Niko


Danke Niko, but I meant camera exposure, is it problem-free with your Mac OS LB system and your camera? I struggle with severe overexposure, that’s why I’m asking.
nb. Your machine and workshop look very nice with that extraction solution.

Hi Bernd, ok i understand. If i deactivate the switch “ausblenden” in Lightburn (german) it is ok for me.

Maybe you have activated this Button.

viele Grüße

Niko