I have an Omtech 80w B&G. I had my rotary 4 wheel working great yesterday. I have a line made with little flags at the end the form an arrow when lined up right as a test line. All was good yesterday. Today with same file/cup/machine/computer, my line appears to be shrinking every test line I burn. I had a 2985 step yesterday, today I have been having to add about 5 steps in the setup at the step per revolution field to keep my line meeting up. I am now at 3120 steps to get the same results. I have reset both laser and cpu, also switched USb cable. Still getting an ever shrinking line. I was able to get a full burn yesterday so this I can not figure out. Is this a sign of a bad stepper motor.or driver? Only used about 5 hrs total setting up “work fields” on our cups.
Once set you should not be changing anything on a wheeled rotary.
What rotary and how did you come by the steps?
What are ‘work fields’?
You need to know how your steppers are set and multiply that times the rotaries ‘gear ratio’.
The only other information the machine needs is the ‘driving wheel diameter’ With a wheeled rotary you should not have to change any of these settings.
![]()
CNC Wheel Router Rotary Axis Attachment for CO2 Laser Rotate Engraving Cutting Machine 2/3 Phase Stepper Motor (Wheel Rotation-2Phase) This is from Amazon as Omtech was out of stock. Supposedly it has the same specs as Omtech. I had the steps by watching many videos and running a line test using the suggested steps then increasing slowly to getting the ends to meat perfectly. Up until this morning it was meeting perfectly. The work area is a box drawn to the size of the circumstance and height of the working space of the cups we will be offering this summer at camp. I’d ran quite a few test runs using foil wrapped around the cups with blue tape on top of that, so not to damage cups during practice and alignment. A coworker came buy so I ran just the line. That’s when I noticed it getting shorter with each try. The lightburn program shows my box and line to be the same size was using. The Dia of cup and the wheel is still the same, my first thought was it changed in the settings, but it is still exact. So I started to try to change the steps and it fixed it. Then after running the test line again, the second time it was short again. I added 5 steps to the count and it was perfect again. this is now a repeated process with same results. I thought maybe cup was slipping but watched it close, it is not slipping. The cup is returning to the start position. From what I read , I didn’t think I should ever had to change anything other than cup Dia. That’s why I was thinking maybe a bad stepper motor. THought I would see if possible could be a software. I am running a win 10 with ltb release 1.0.06. I have a work laptop with win 11 but I have only loaded the program. It’s small screen isn’t as friendly for a image rich environment.
I let everything sit for about 3 hrs off. Now to get the lines to meet i’m up to 3172 steps to keep the line meeting. It is the only thing I’m changing. I haven’t even moved the line i’m trying to test. It just keeps getting shorter on every try.
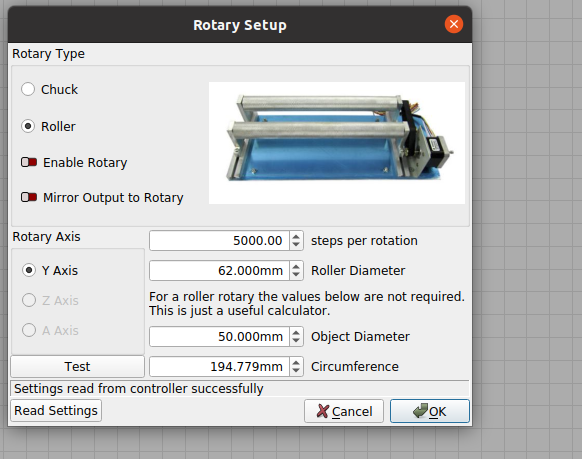
This is a pretty standard setup…
Check the stepper drivers switches for steps/rotation
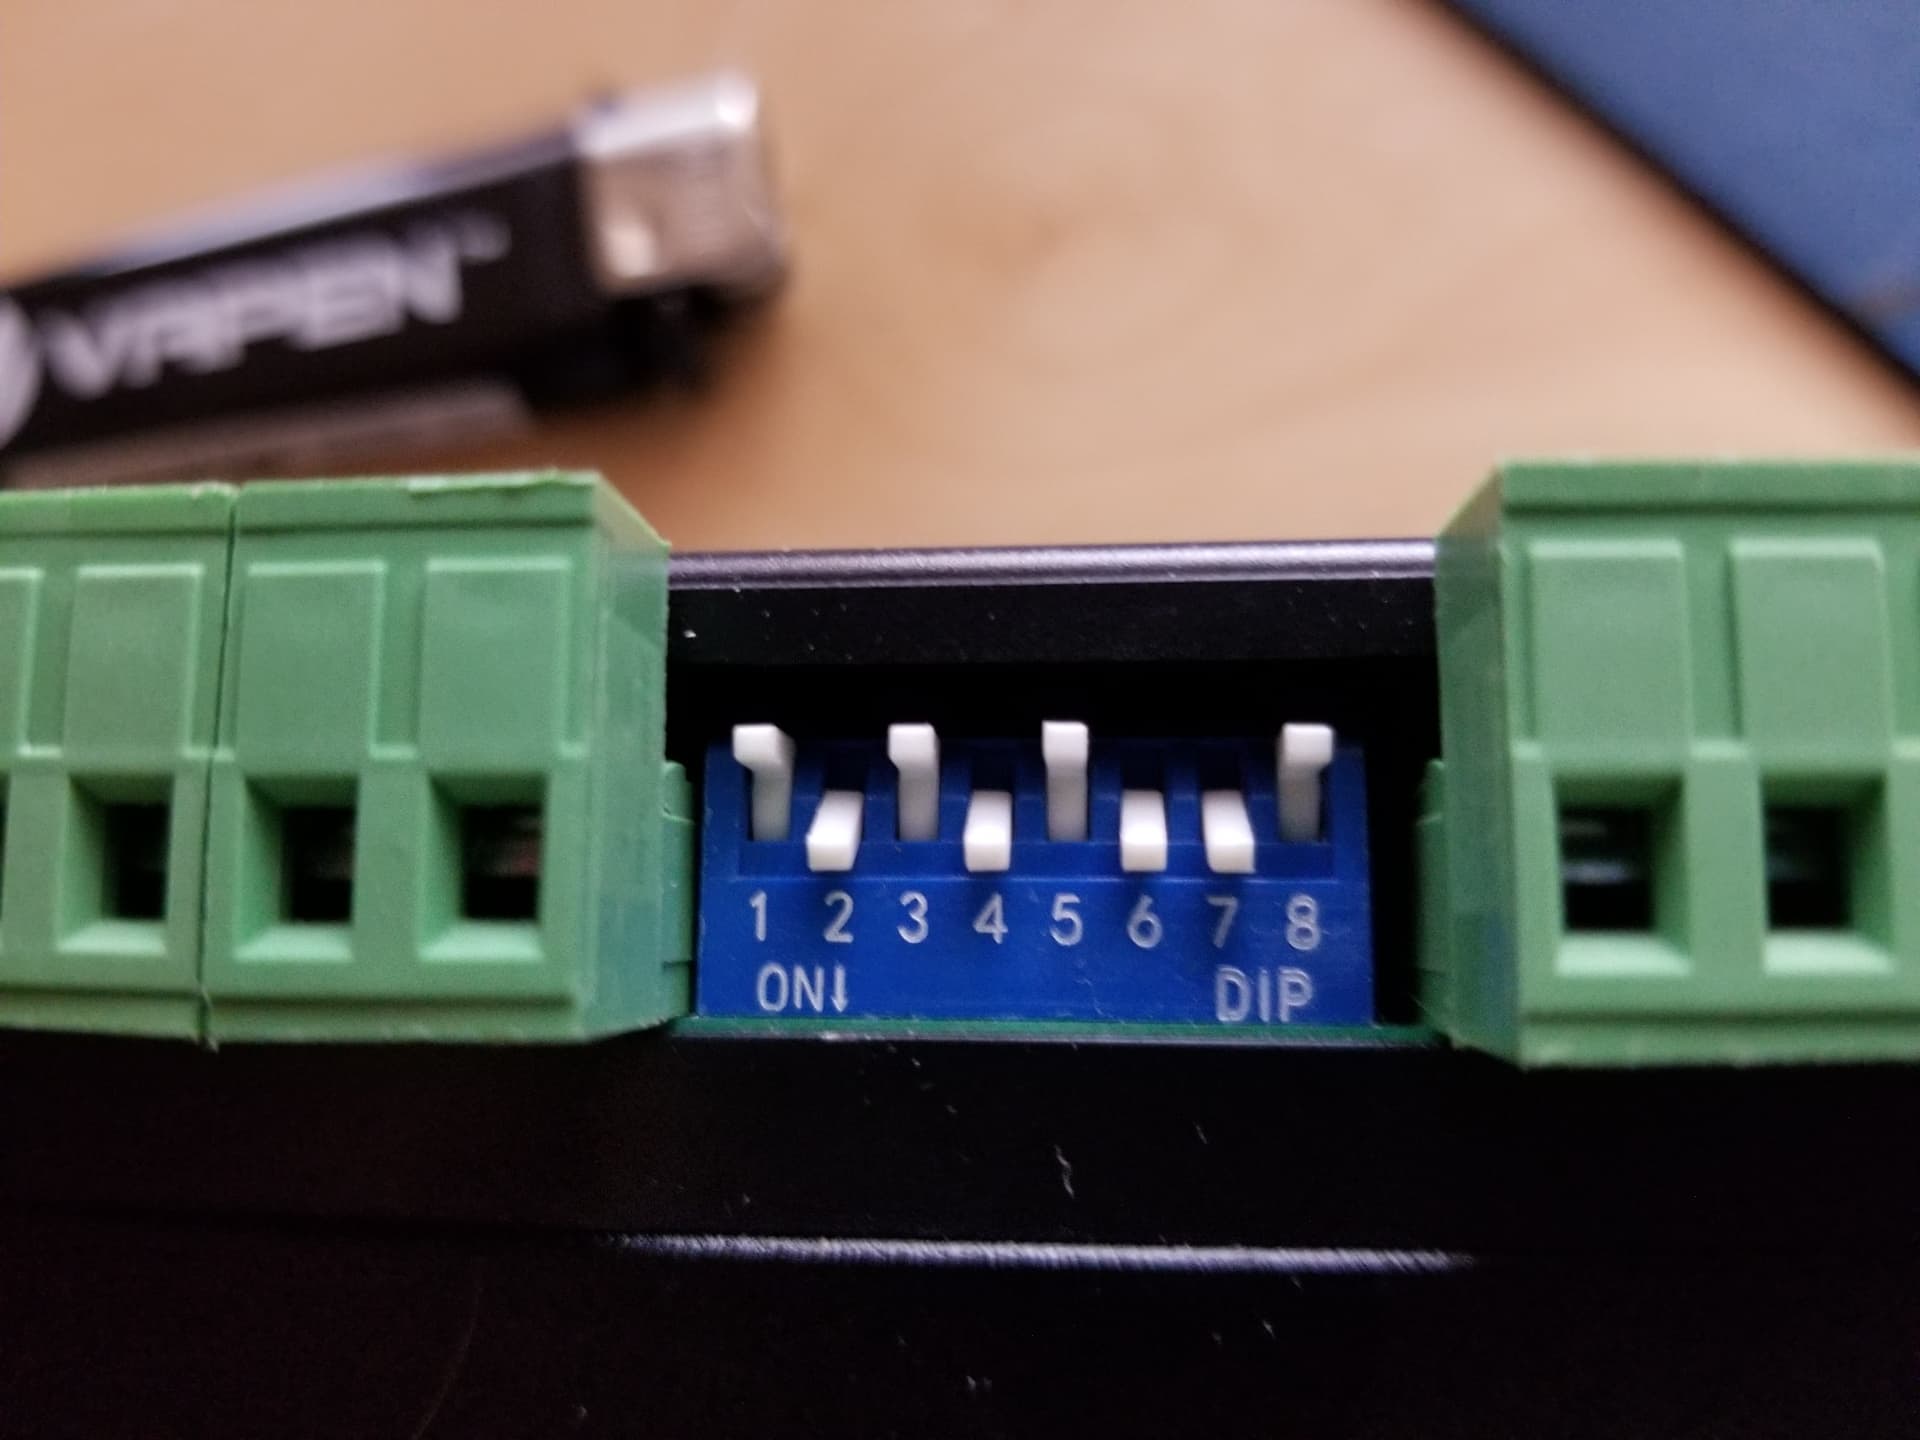
The placard indicates the steps/rotation
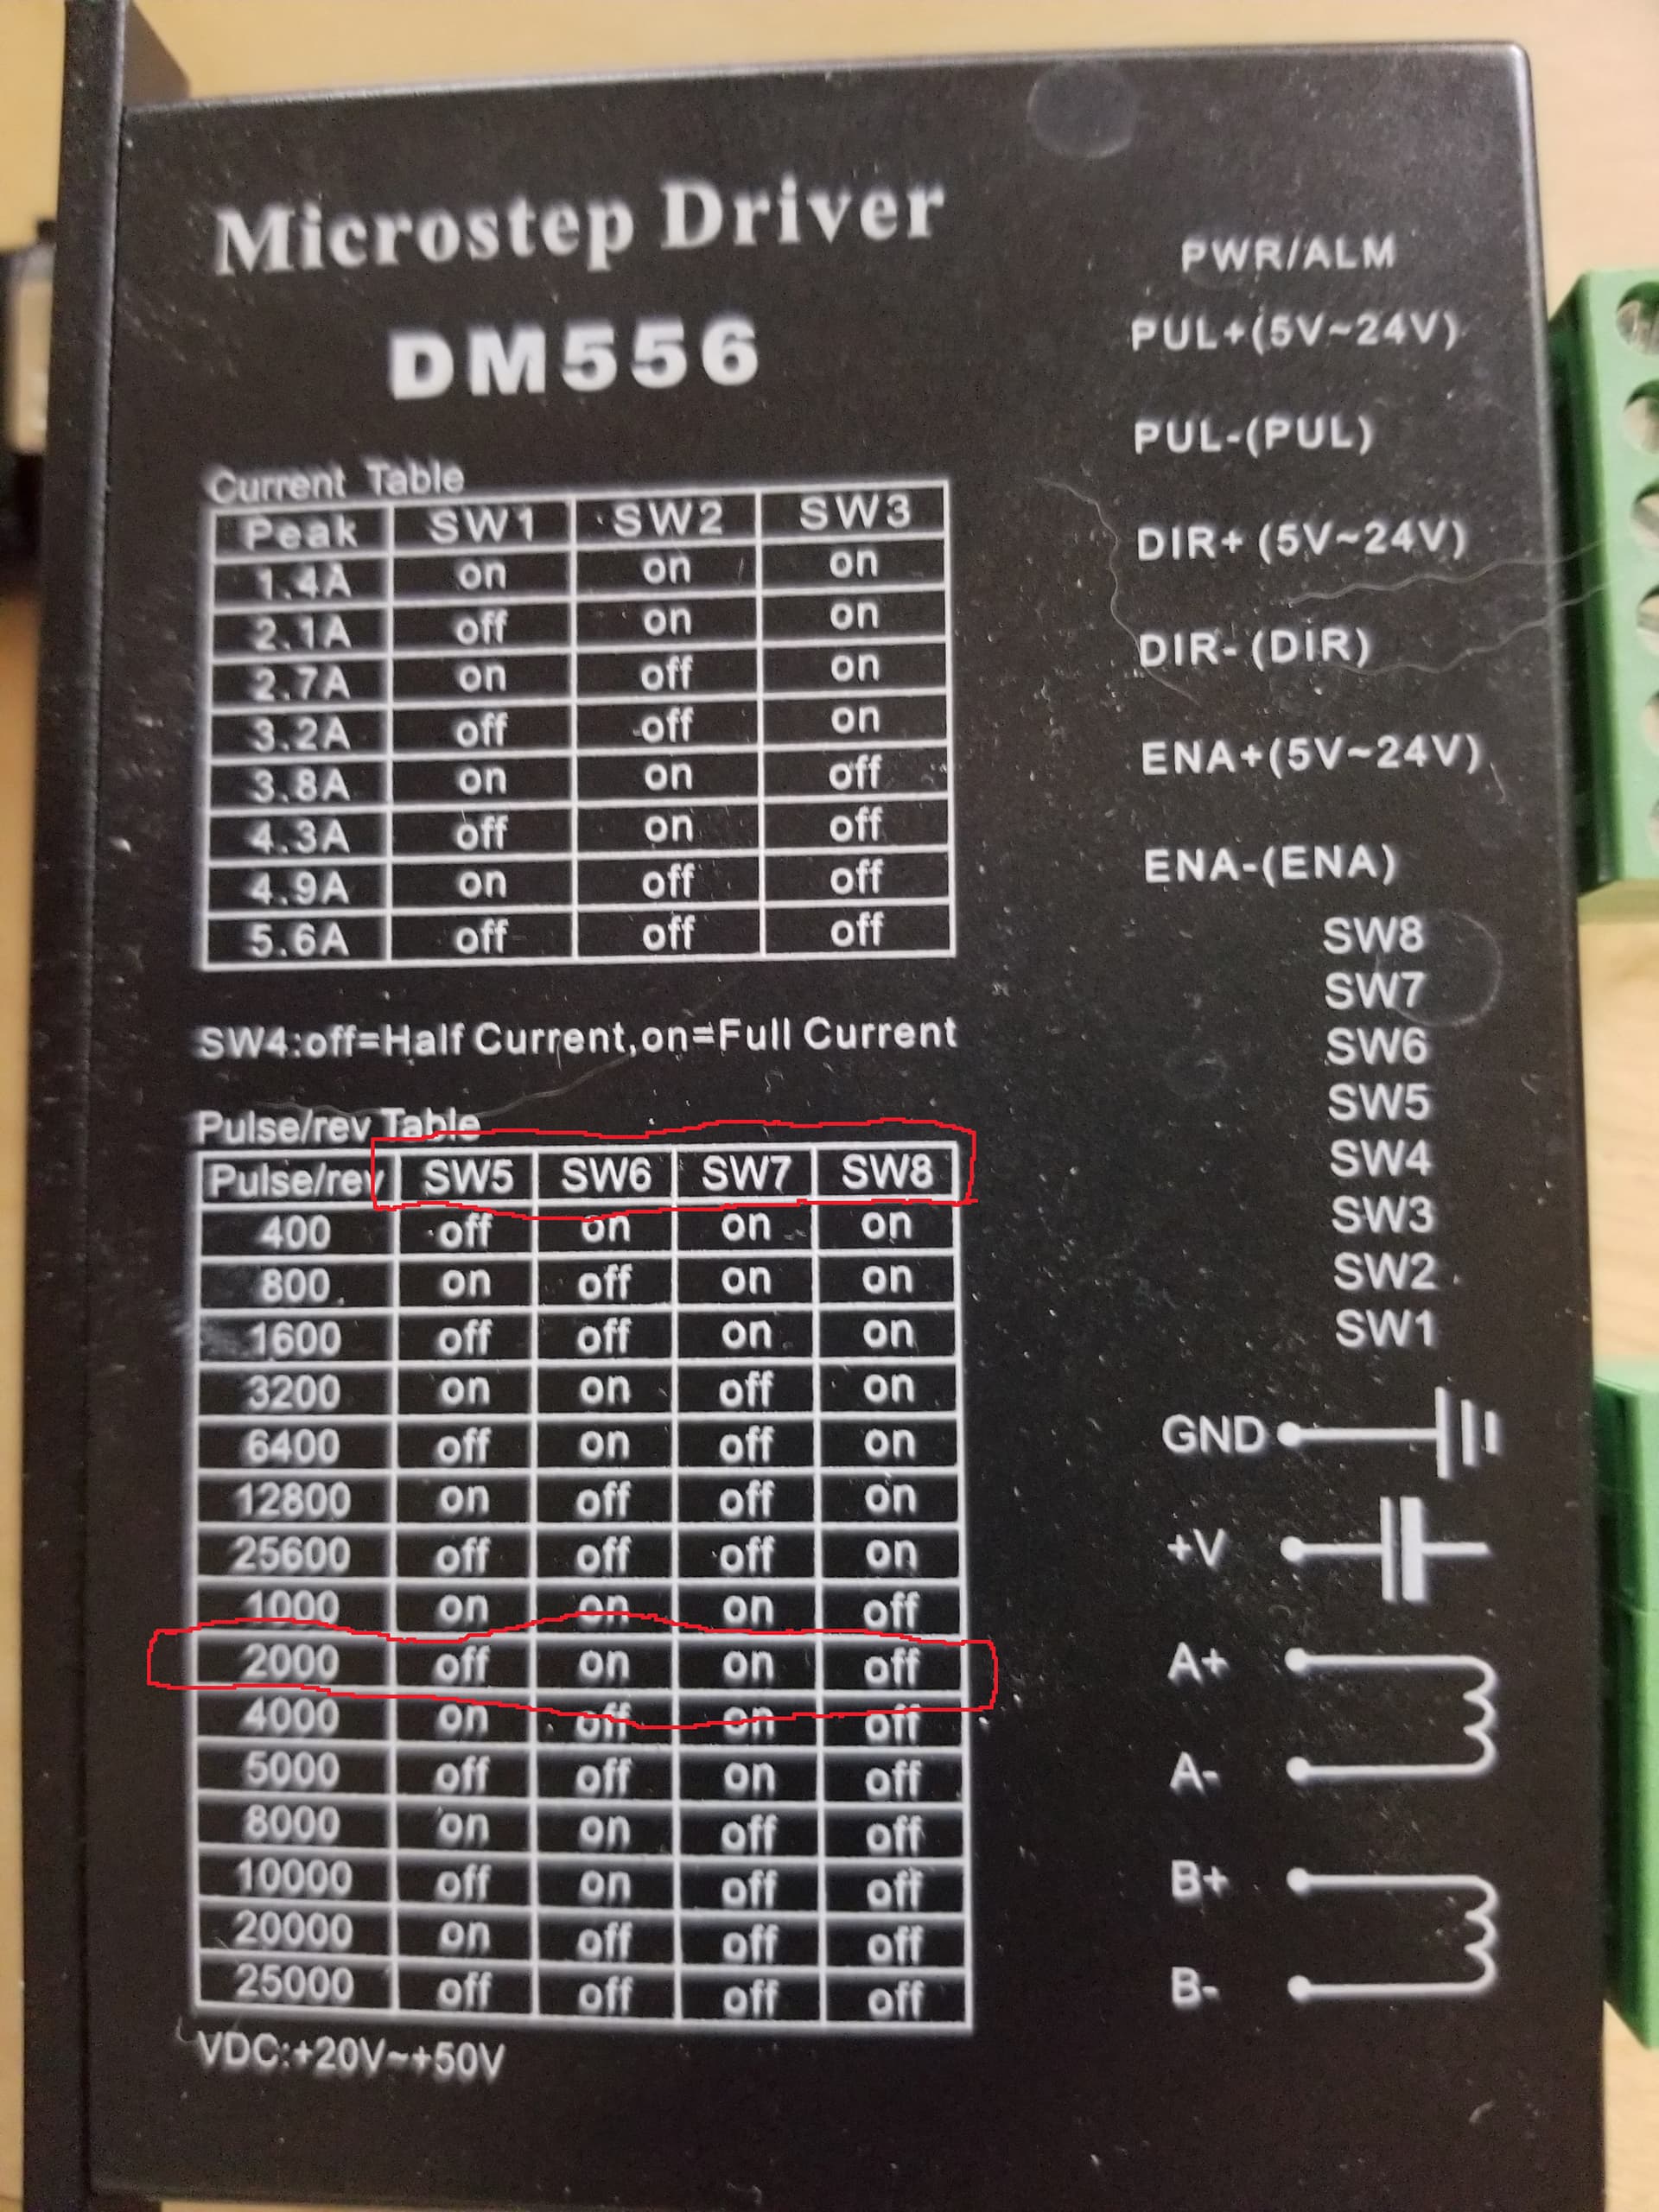
2000 steps/rotation… The PiBurn has a 2.5:1 gear ration, 2.5 * 2000 = 5000 steps/rotation.
The ‘drive’ wheel is 62mm…
Good luck
![]()
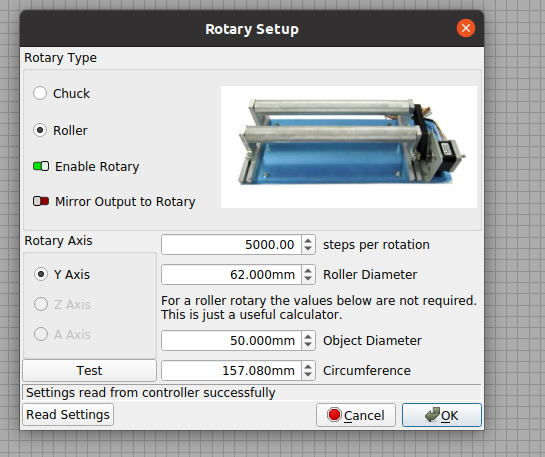
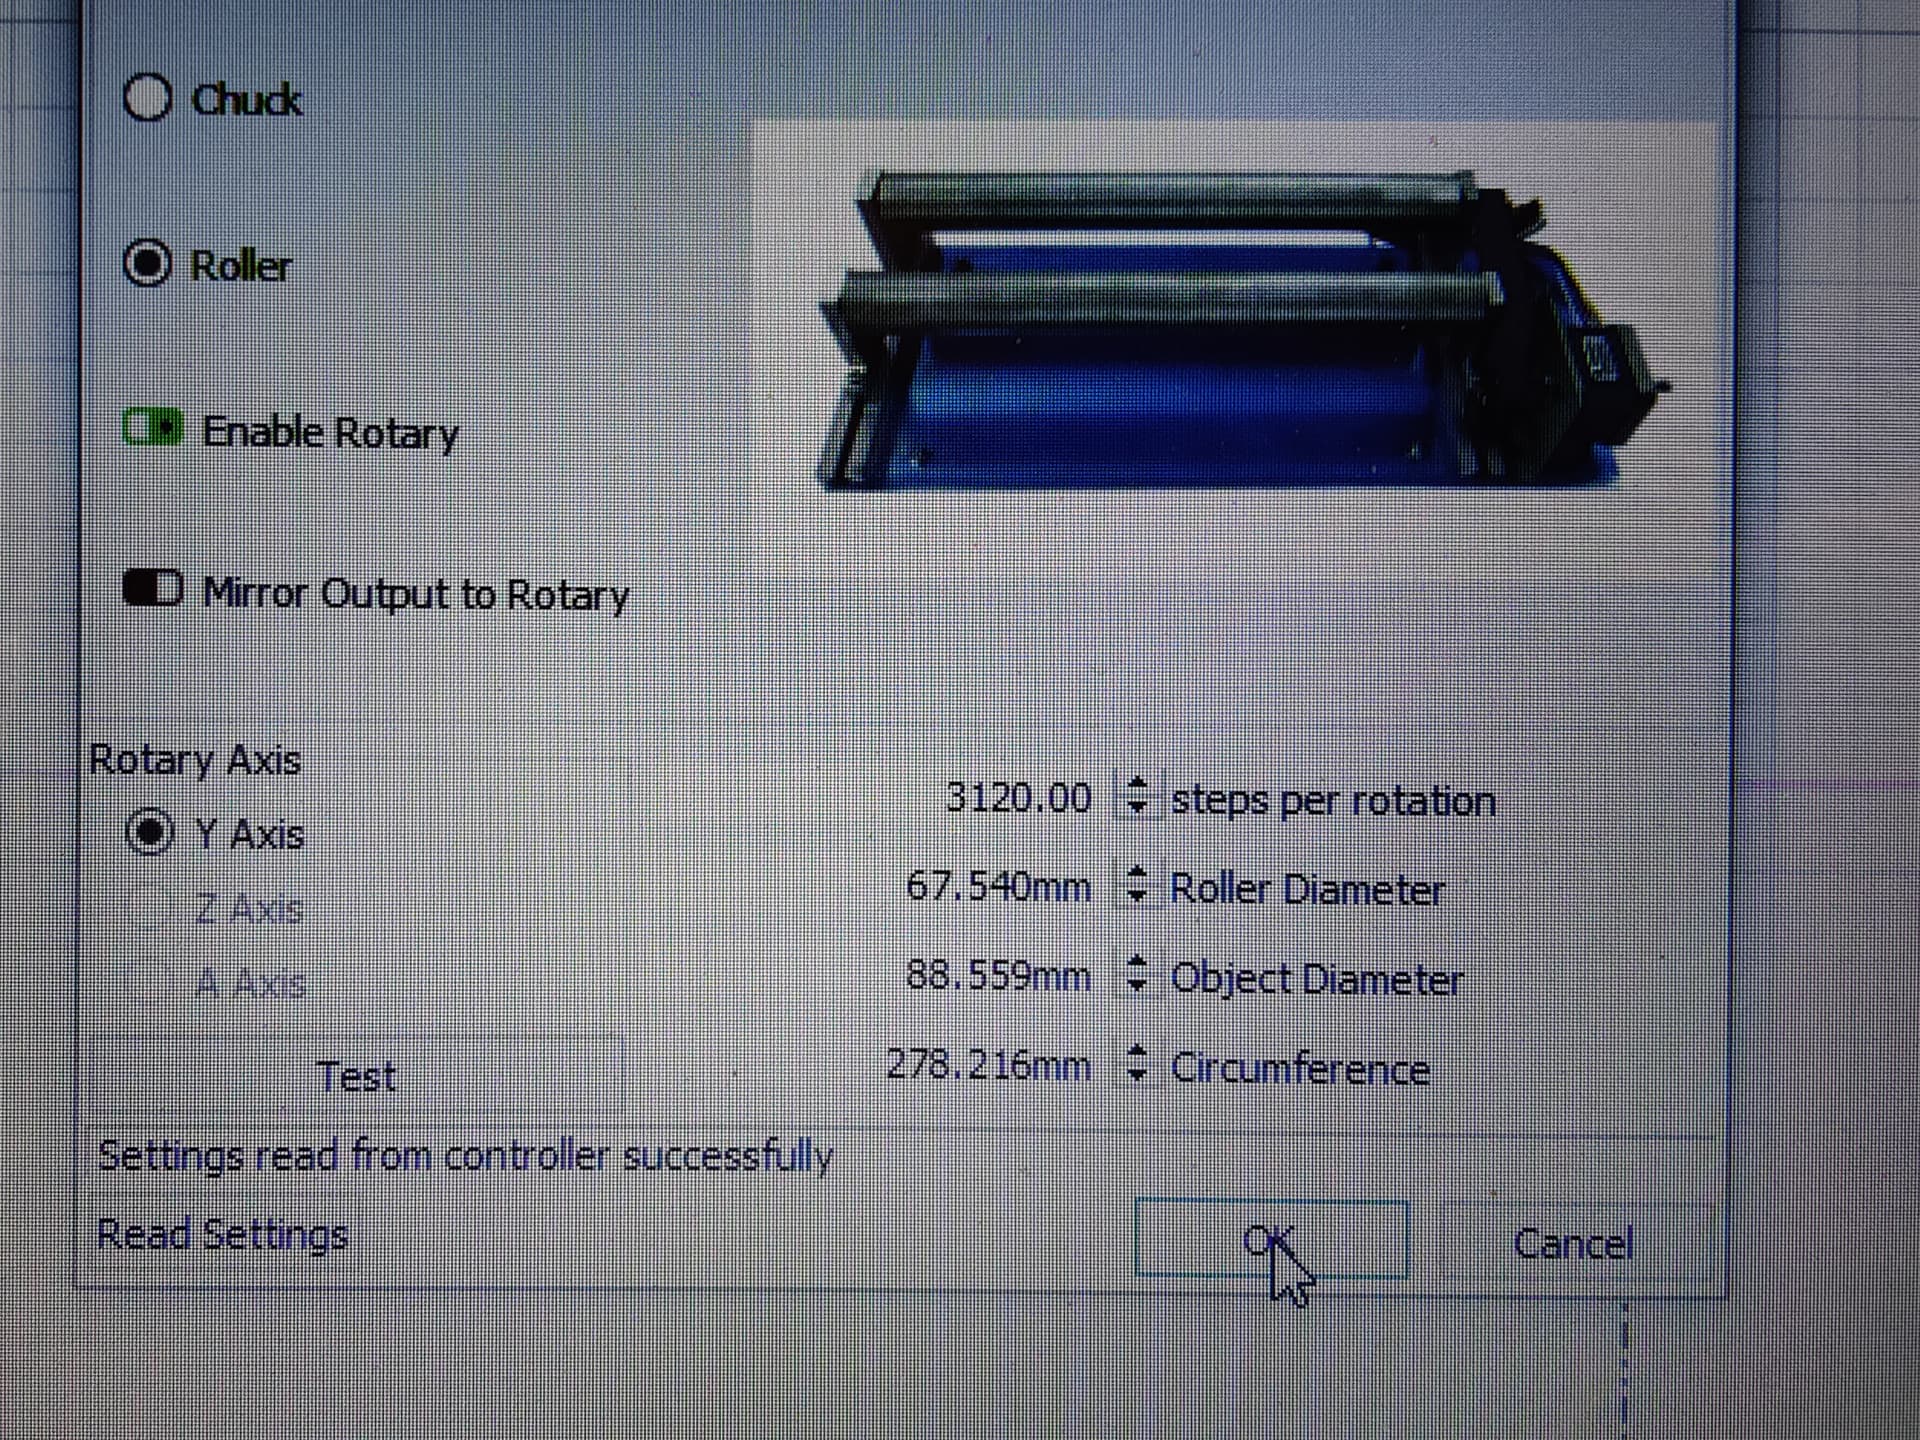
I looked and both X & Y are the same as yours. (Off ON on off) I unplugged the power (mainly incase i touched something I shouldn’t…After opening the program back up I switched everything to MM. I ended up w/ 3120 steps, 67.540 roller, 88.559 cup dia, and cir of 278.216. THis gets my lines to end at the same spot. 11 times so far.
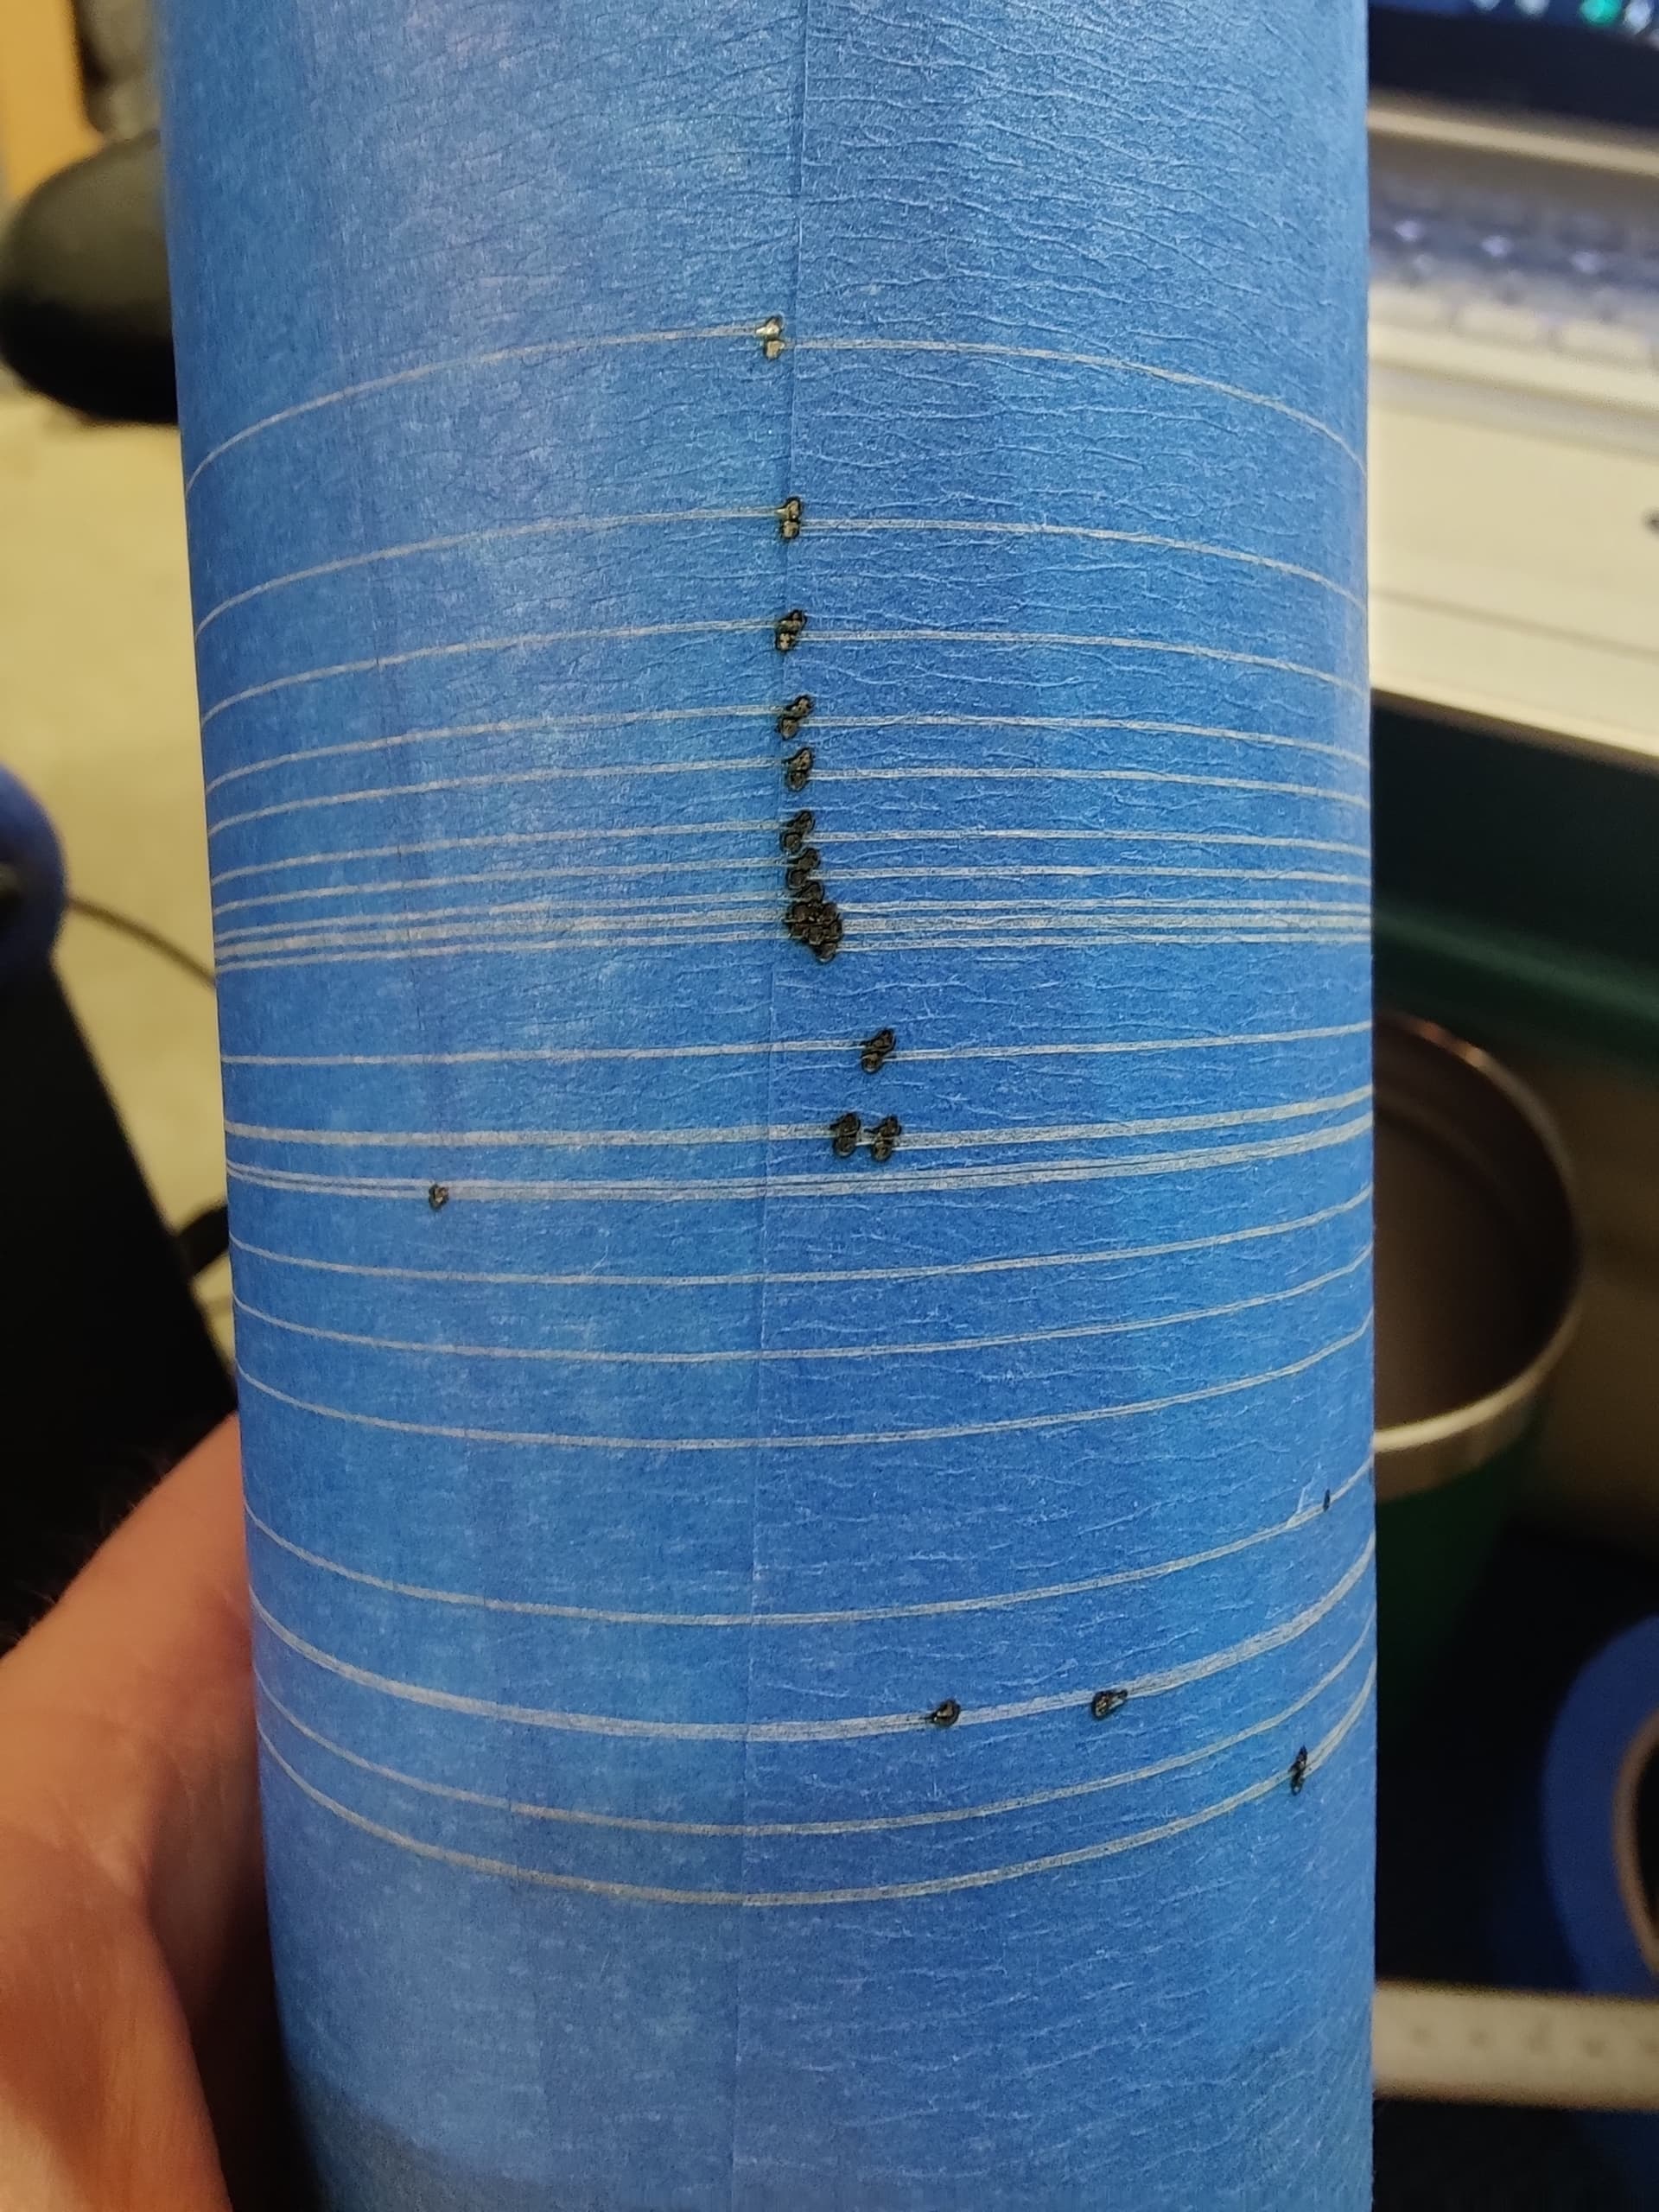
the top ones are at 3120. they are blackened on the end because of a little flag. it’s easier to see when they overlap. of course now I can focus on the slight skew of the line. not much, but may interfere with complete wraps. of course none els will notice, just myself. I hope this has made the difference but it is hard to understand, why it worked fine for over 5 hours, then just start to shorten itself.
What is the gear ratio of your rotary as to where the 3120 ended up being the number?
Why do you care about this.?
I think you are making this much more difficult than it is or you are not understanding what I’m trying to say and missing the concept.
Why do the lines have to meet and what is that blue thing anyway? Is it tapered?
![]()
If I read it right, it is a 2:1. All the specs are the same as a Cludray and Omtech, at least the same as all of the published info for them.
The blue thing is a tape wrapped 20Oz. tumbler. only a 4.5mm difference from top to bottom where we engrave.
The line meeting in the middle help so we can make sure it will go all the way around the cup, without going past the starting spot as they have some full wraps planned for the summer.
From my understanding does the Cup Dia. make a difference on where the design goes and to keep it from passing over itself on the end of a design.
If you have 2000 steps/rotation and a gear ratio of 2:1 I get 4000, not 3120.?
On a wheel rotary, the diameter doesn’t matter because the ‘drive’ wheel is moving the cup just like it was the Y axis. So the ‘surface’ speed of the object is known. This is not the case for a ‘chuck’ since the diameter can change and the surface speed will change. On a wheel rotary once set these numbers don’t change.
If you are trying to make them meet and you have a tapered cup, good luck…
How did you get 3120 steps with a gear ratio of 2:1 and steps/rotation at 2000?
Seems pretty clear there is a misunderstanding… this isn’t rocket science.
Good luck and good night…
Take care
![]()
okay, that explanation made me click, So only on a chuck it makes a difference. most of our cups will have designs on opposite sides. I have voiced my concern about wraps, We sell all our cups with a reservation/camp logo on it. We offer the chance for them to add their name and or a totem( spirt animal ) to it for an extended fee of course or a sizable donation to the chapter. We have a closed group of people we can supply our items to. About 6000,- 6800 scouts every summer. Thank you for your help. Still don’t under stand why it went bonkers today though. It’s working now. I’ll see if it works when I get back in in the morning.
As simple as this stuff is, it sometimes helps to just think about what is going on. It can sure be a mind bender. I think mostly because we ‘assume’ how it’s supposed to work, but may not be the case.
When you are ‘machining’ anything, additive (3d printer) or subtractive (milling out metal) the setup for perfect work is the proper ‘speeds and feeds’. This is usually applied to milling machines, but the science and operation are the same, 3d printer, cnc cake decorator… your laser.
The nirvana of cnc is the perfect combination of ‘speed and feed’, less wear, better/cleaner cuts and consistent lowest cost of operation.
Speed usually refers to how fast the 'tool is spinning, equate it to the power levels of your laser. Unfortunately we don’t really have much power control on the laser. Most control occurs by head speed. The head speed is how fast the material is passing the tool so this is the ‘feed’ rate, also referred to as ‘surface speed’.
To know the feed rate on your wheel rotary is simple as the ‘drive’ wheel moves x distance so does the objects surface speed. A chuck needs to needs to know one of the dimensions to compute the circumference, and come up with surface speed.
The bottom is only a calculator, if you read the text…
I should have added how I do a mug. Most of how to manipulate the alignment is with the ‘Start From’ and ‘Job Origin’ controls.
I do some things rather unconventional, so if something I do makes you uncomfortable change it…
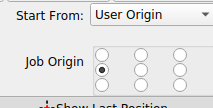
This setting will allow me to place the mugs manufacturer logo up, and align the head to the proper offset from the logo.
Press ‘Origin’… you should be able to frame it.
This will allow you to align the graphic, centering it above/below the logo.
If you wanted to start elsewhere depending on what you are doing, select that job origin…
Take care, good luck
![]()
This topic was automatically closed 30 days after the last reply. New replies are no longer allowed.