Hi everyone,
I recently upgraded my laser controller to a Ruida 6445S, switching from my old setup that used LaserCutEngrave. I’m now trying out LightBurn (trial version), and while I really like it so far, there are a few things I used to do with my old software that I can’t seem to figure out in LightBurn.
I’m hoping these features exist and I just haven’t found them yet. Here are my questions:
Laser head return position
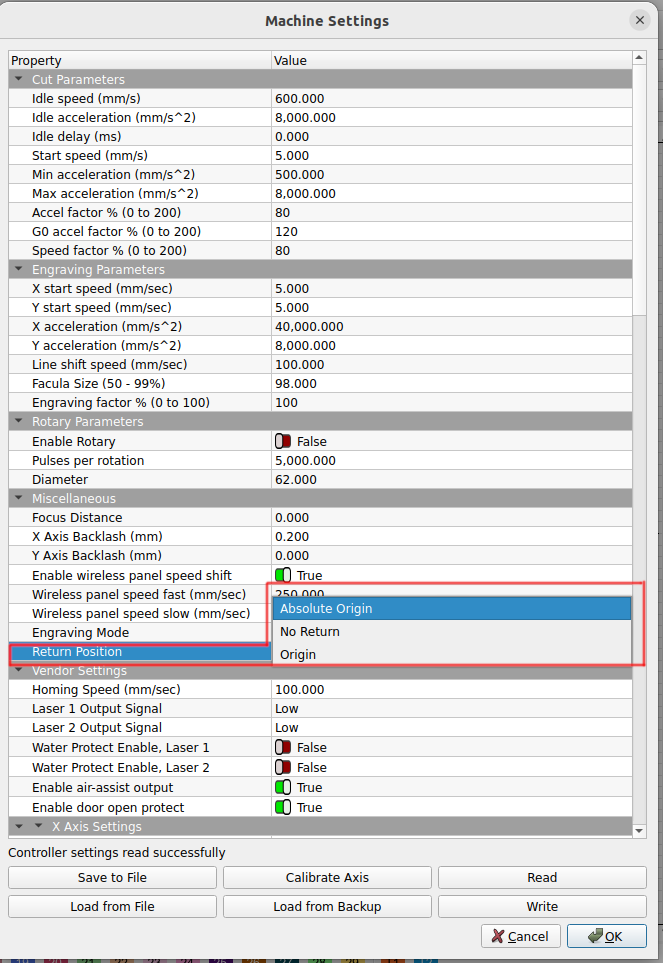
In my old setup, after I set the origin and ran a job, the laser head would return to the position it was in before the job started (I could set origin and move the head anywhere). In LightBurn, it always goes back to the origin after the job finishes. I did find an option to return it to the home position, but I’d prefer if it went back to wherever the head was before the job started. Is there a way to do that?
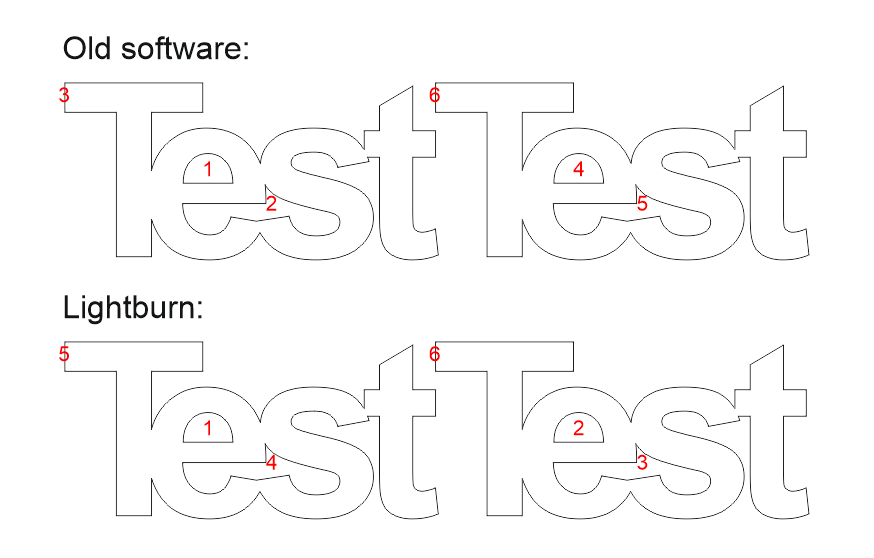
Cut order issue
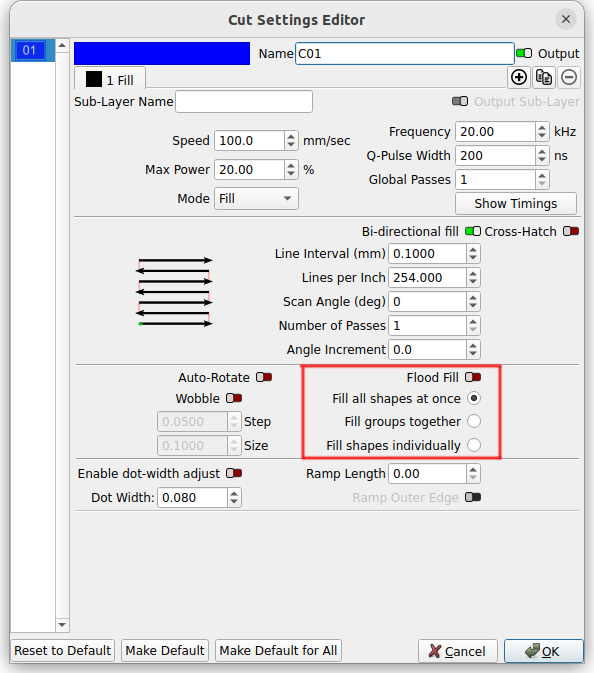
I’m having trouble setting the cut order. I have multiple shapes, and I want the laser to cut the inner parts of each shape before moving on to the next one. Everything is on the same layer. My old software did this automatically. I’ve tried changing cut order settings in LightBurn, but I can’t seem to get it right. I’m just exporing DXFs from CorelDRAW. I know making groups could solve this but i mostly export around 10 shapes and grouping things would take quite a lot time. Any tips?
Sending files without file name prompt
When I send a file to the Ruida controller, LightBurn always asks me to enter a file name. Is there a way to skip that step so I can just hit “Send” and then press “Start” on the machine without getting any popups?
Click to set job origin
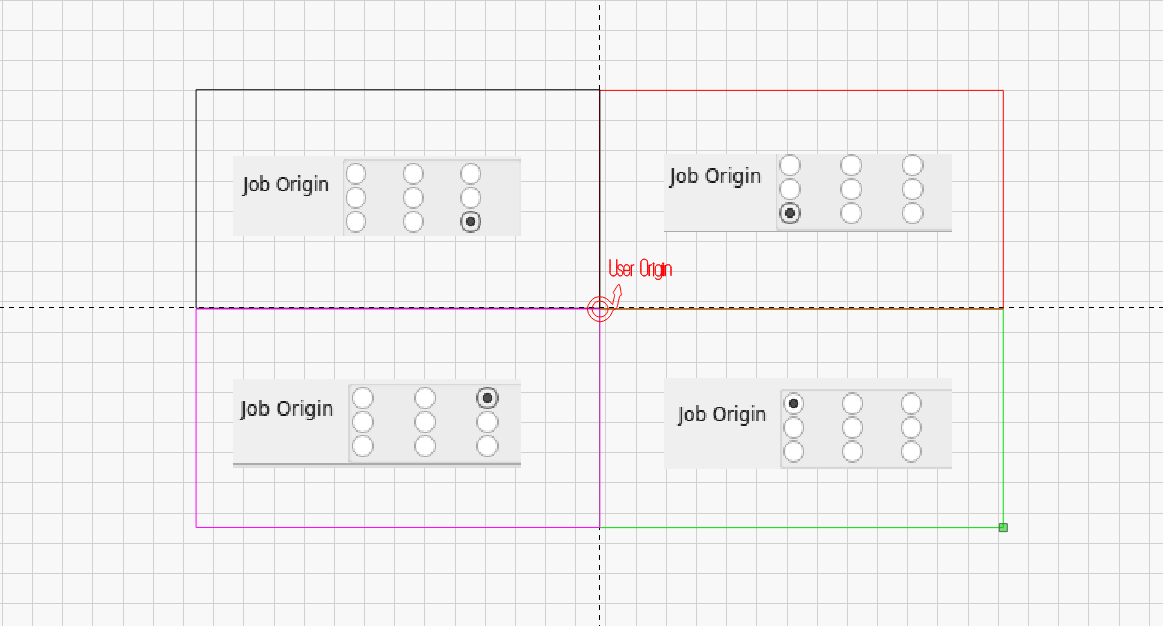
In LaserCutEngrave, I could click anywhere on the drawing to set the user origin. In LightBurn, I only see the 9-point system (top-left, center, etc.). Is there a way to freely set the origin by clicking, like I used to?
Thanks in advance for your help! I’m still new to laser cutting, and English isn’t my first language, so feel free to correct anything I said. I appreciate any advice or tips.
Welcome to the forum.
All the points you have mentioned can easily be achieved in LightBurn. But explaining it all in one post would exceed people’s time/possibility. You can find all the answers in LightBurn’s fantastic user manual and the tons of videos available. Click on “Docs” here on the page, on the top menu list.
Thank you for your response. I’ve looked through the LightBurn documentation, browsed the forums, and also checked the Ruida user manual I found online, but I couldn’t find the answers I was looking for, ill check the documentation again. Apologies if my question was too broad or asked for too much.
There are two origins, one for the machine and one for the job. You can move the head to some arbitrary location and press origin on the Ruida console. That’s the only way to set a user origin with a Ruida.
I don’t believe that particular setting is available for Ruida. This is a function of the Ruida, not Lightburn.
I’m not at my machine right now, but if you go to Edit Menu> Machine Settings you will find a setting called end position or something like that. I believe there are 3 options, machine origin, job origin & nothing. I may have the names wrong, but those are essentially your options.
I don’t think this is an option. You can choose to overwrite filename without additional prompt, (set in device settings) but not avoid the initial dialog.
I don’t believe this is an option the way you’re describing it. The 9 point grid sets the origin point for your graphic. You can define where on your workbed that point is using the set origin button on the controller or from within the Move window.
I don’t know your software, so what you say and what it does, doesn’t really make sense.
You can set a user origin, this is done by pressing origin on the console of a Ruida. There is no software way to set the user origin other than via the Ruida machine console. This seems to be inherent to the way most of the Ruida controllers work.
I’m not sure how you would use your way of doing this… There is a User Origin set within the controller and set via the keypad, there is also a job origin, as to where the job itself will be based. When you change any of the selections for job origin, the green square will show that on the screen in Lightburn, black square shows machine origin.
What does putting an origin in the middle of an object do for you?
Might want to go over the coordinate system and read how Lightburn implements it’s operations within the coordinate system.
This is the same document page, but covers using Job Origin.
You really need to know the difference between the *** machine origin*** and job origin. For example, the machines origin determines which quadrant the machine will operate within.
I looked into this, and it seems there isn’t an option for what I was trying to do. As Tim mentioned, it looks like this feature just isn’t supported by the controller.
I read about this and I do have “Cut Inner Shapes First” enabled. It does cut the inner shapes first as expected, but instead of finishing all the cuts for one part before moving on, it jumps to another part to cut the inners there, and then goes back to the first part.
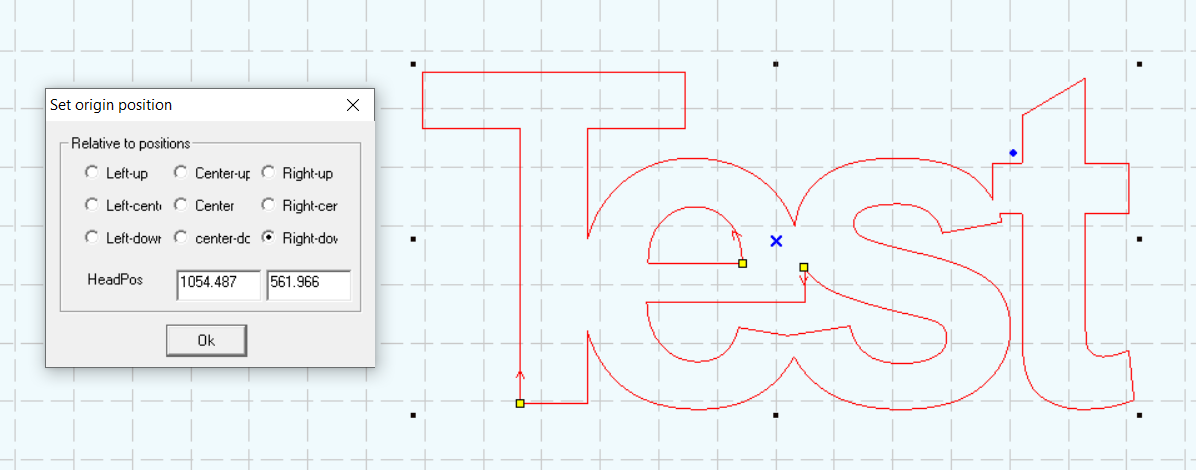
You could set the job origin anywhere on your drawing (just to clarify, I’m referring to the software origin, not the machine origin… sorry for any confusion). I used this feature to make nesting parts easier. I think LightBurn just doesn’t have an option like that. Here an screenshot of that option:
This looks like the job origin and appears to work similarly. I can’t image a job origin marked at bottom right showing up in the upper middle right of the design… Can’t really get my head around why help that would be.
As with any software package, when you change packages, you end up re-learning how the software works.
Sorry about the Ruida only having three options, but it seems to work OK for my applications. Not knowing how your software operates makes this more difficult.
If you want to complete each part before moving to the next part place each part on a separate layer with the same cut settings. That would emulate the Old software method of cut.
Not sure how this is helpful. I would be interested in knowing and understanding though.