This took me a while and there wasn’t too much information out there so I figured I’d put together a guide on my steps to wirelessly access my IP camera in LightBurn.
My goal is to keep this general and geared towards Macbooks/Apple, but I can only speak to the experience I’ve had with my hardware.
Items I used:
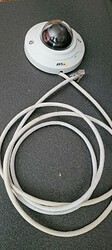
Axis M3004 IP security camera - purchased used on eBay for $30
TP-LINK 802.3af Gigabit PoE Injector - $21
Cat6 ethernet cables
Verizon Fios G3100 router
Step 0 - Acquire your hardware
The first mistake I made was buying an IP camera powered via POE (power over ethernet), I knew this was the case when I purchased it however I didn’t realize at the time not all ethernet connections are powered, my Verizon router does not supply power to connected devises. So you can either buy a camera with it’s own power cord, or buy a POE injector like I did and power the ethernet cable yourself.
Step 1 - Setup the camera, cords, and power, get access through IP address
When you’ve supplied power to the camera and attached to your router / switch, all the documentation on IP cameras tells you to download a Windows program and configure the camera. That’s not necessary and the only way I found to complete this on a Mac is to find the IP address of the camera by running the terminal command arp -a (if you’re not familiar with command line operations, google using Mac command line and download iTerm).
If your IP camera is connected and powered on you’ll see it listed after running the command:
That’s the IP address for your camera, you can access the camera and the configuration in your browser by entering http:// + the IP address shown in the terminal.
Mine asked for a username and password when accessing the URL, I was able to find the defaults through google.
We’re in, I was pretty excited at this point, it worked!
Step 2 - Turn that IP camera into a “USB” camera
LightBurn only works with USB attached cameras, or at least cameras that appear to be USB connected. In one of the support forms I found an answer that said to use the program IPcamDriver .com, I can’t recommend not using that program strongly enough. After a really frustrating time of it straight-up not working, I tried the program splitcam.com and that finally started working.
Configuring the settings in Splitcam was also frustrating, when you go to add IP camera, it wont accept an http url, so you have to find the rtsp:// version of your camera feed url. You also need to add the username password to the url string, my camera’s turned out like this:
rtsp://root:pass@192.168.1.**/axis-media/media.amp
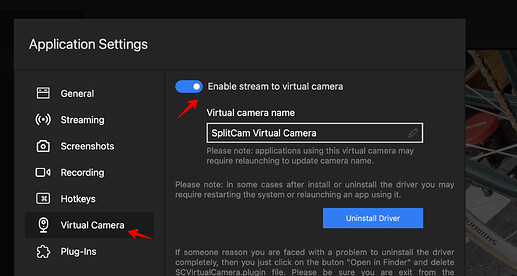
Once you’ve done all this the feed shows up in splitcam, and you can enable Virtual Camera (turning IP camera into a webcam)
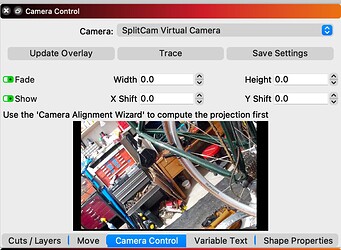
At this point I had to restart both LightBurn and splitcam, but finally, after hours, LightBurn could see my video feed!
I still have to mount the camera inside my cabinet and get longer ethernet cables, but the headaches should be done with.
I hope this is helpful to other people, and I really hope Google search picks this up as being relevant to these problems because there is no information out there once you get past the connection steps.
Happy engraving everyone!


